Whether you’re thinking about getting into film, or you’ve magically picked up an old SLR and are confused about how to use it, hopefully this little guide can steer you in the right direction.
The actual process of shooting film isn’t that much different from digital. Assuming you understand how exposure works, then the principle is exactly the same.
If you come from shooting RAW on a digital camera then really you only lose three features.
– Ability to change ISO
– Ability to change White Balance.
– *shocker* Ability to preview your shot
Editor’s Note: This post was originally published at Peter Stewart’s blog. It has been syndicated with permission.
Choosing the right camera
When it comes to shooting with a film camera, boy is there a lot of choice out there. Not only do we have the standard 35mm format, but there are also larger film sizes such as Medium and Large format, which utilise a larger negative for superior resolution that in some cases far surpasses the output of digital.
Also, as with digital cameras, there is a wide selection of types of camera bodies ranging from compacts to TLR’s to SLR’s and rangefinders. We’re going to stick with 35mm and medium format for this list.
B&H has a fantastic used section on their website with some great deals that can be worth checking out. There is no shortage of models available and prices are far better than can be had from auction sites.
35mm Cameras
35mm is a good format to start with. Second hand camera bodies and lenses can be had for as little as $100, and film plus processing is still readily available.
– Note: try to go for an old manual built camera from the 70’s or 80’s. They have less electronics to go bad, less automation and are usually built like tanks.
SLR (Single Lens Reflex)

35mm SLR’s work very much in the same way as modern DSLR’s, with a prism based viewfinder that allows you to see directly through the lens for focusing and retain a simple layout of controls that are not too unfamiliar from a digital system.
Almost all SLR’s from the late 70’s onwards contain a built in meter for spot or centre based metering, and newer cameras also feature aperture priority shooting or automatic modes.
The best thing about SLRS are the sheer quantity of affordable lenses available. Fast prime lenses such as 50mm f/1.2’s or 1.4’s can be had for only a few hundred dollars and are built far better than modern equivalents but still have amazing optics.
My Picks
– < $100 Pentax K1000, Nikon F80, Olympus OM-1
– < $300 Canon AE-1, Nikon F3, Nikon FE/FM
– >$300 Nikon F6
Rangefinder
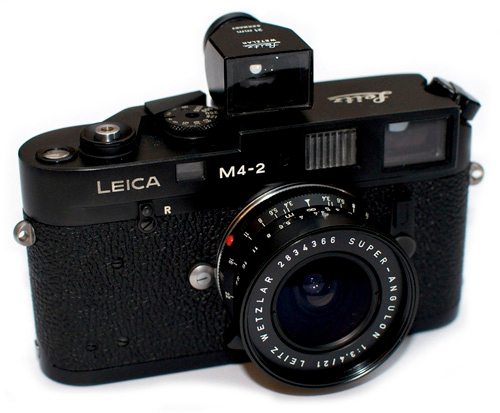
The rangefinder system is a smaller more compact alternative to the SLR that offers smaller, lighter lenses with the same quality of that of the SLR.
This system is mirror less, so focusing is obtained by aligning objects up through an overlay in the cameras window. One advantage of this is the ability to handhold at lower shutter speeds without getting shaky images due to lack of mirror slap. Rangefinders are available with automatic metering, but by far the most iconic is the Leica M series; which are all fully manual cameras, and in some cases offer no metering.
My Picks
– <$100 Canonet QL17, Olympus Trip 35, Yashica Electro 35
– <$500 Contax G2, Konica Hexar AF
– <$800 Leica M3, Voigtlander Bessa R3A
– >$1000 Leica M6
Point-And-Shoot
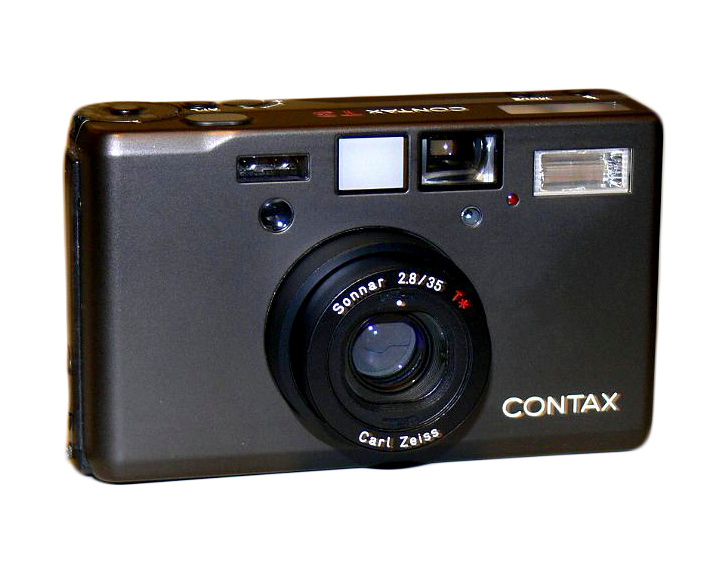
Now a quick word before I talk about 35mm point-and-shoots. 99% of these cameras are utter utter crap, much like their digital counterparts.
Back in the 90’s as electronics became more sophisticated and the popularity of photography grew, manufacturers started pumping out fully automatic pocketable 35mm cameras faster than Usain Bolt can sprint the 100m.
Point-and-shoot cameras are however, apart from being practical, an incredible amount of fun to use.
Nikon, Contax and Ricoh produced some fantastic P&S cameras featuring fully automatic and manual modes, with a lot of the features you would expect in modern cameras. The exception however is the glass. The optics of some of these small cameras is phenomenal and on par with Leica lenses in some cases.
My Picks
<$100 Olympus Stylus Epic (mju II) , Rollei 35
<$300 Ricoh GR1, Nikon 35Ti, Leica Minilux
>$500 Contax T3, Fujifilm Klasse W, Ricoh GR21
Medium Format Cameras
Medium format film uses a far larger negative than 35mm for superior image quality, however it is just as simple to shoot as 35mm and thankfully just as cheap. The film format is known as 120 which will provide 12 square images on a roll of film. Less common is the 220 format, which allows for twice as many shots
There are many types of medium format cameras available from rangefinders to SLR’s to the type of modular cameras from Hasselblad and Mamiya, which use detachable parts.
Processing is still available but will require a proper photo lab, as places like drugstores will not have the facilities to process it.
– Note : Many modular type systems like the Mamiya and Hasselblad cameras allow for the addition of a polaroid back, for shooting large instant film.
SLR & Modular type cameras
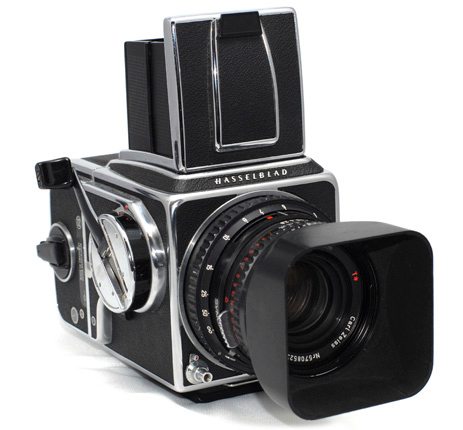
Medium format had it’s fair share of variations in camera design, from panoramic rangefinders to traditional style SLR design to modular systems with swappable parts.
Whilst 35mm stills and modern digital cameras use a universal 3:2 aspect ratio for recording images, medium format camera systems can vary.
Hasselblad cameras are famous for their 6×6 square images, whilst brands like Mamiya, Pentax, Yashica and Fujifilm manufactured cameras that use different negative ratios such as 6×4.5 or 6×7.
Most often the camera name is an indicator of the aspect ratio it shoots, such as the Pentax 67 or the Bronica RF645.
My Picks
<$500 Pentax 645, Pentax 67, Bronica SQ-A
<$1000 Hasselblad 500C/M, Mamiya 645 Pro
>$1000 Mamiya 7
TLRs
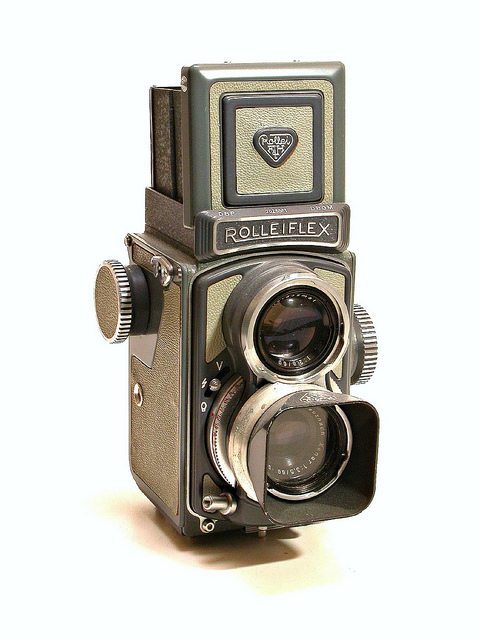
The ‘Twin-lens reflex camera’ as made popular by Rolleiflex, is an all mechanical camera that utilises two fixed focal length lenses. One is used for focusing through the top down viewing screen, and the other is for taking your exposure. A light meter will be required for gaining correct exposure however.
The TLR is unique due to it’s simplistic mechanical nature and fact that it requires use at waist level height. Almost 99% of these cameras shoot square 6×6 negatives for a total of 12 images on a roll of film.
My Picks
<$200 Rolleicord, Yashica D
>$500-$3000 Rolleiflex
Folding Cameras
Although less popular and massively overshadowed by the mass arrival of 35mm cameras in the 1940’s, the folding camera is a unique style of compact camera that features a lens attached to bellows to achieve focus. A small rangefinder is usually included to aid with focus and composition.
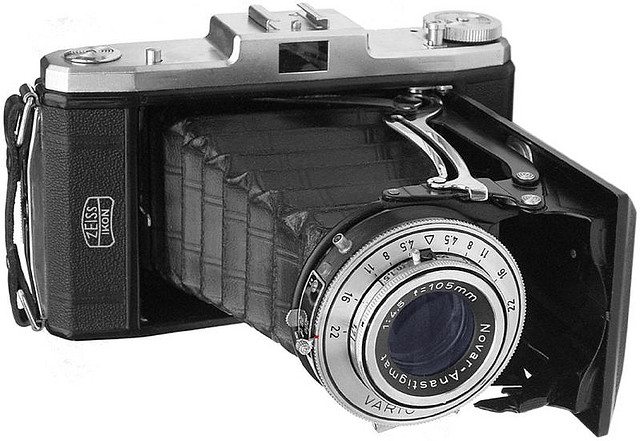
The most popular of this variety of camera is the Voigtländer Bessa which shoots 120 film.
My Picks
<$500 Voigtländer Bessa II >$1000 Fujifilm GF670 Folding Rangefinder (aka Voightlander Bessa III)
Choosing the right film
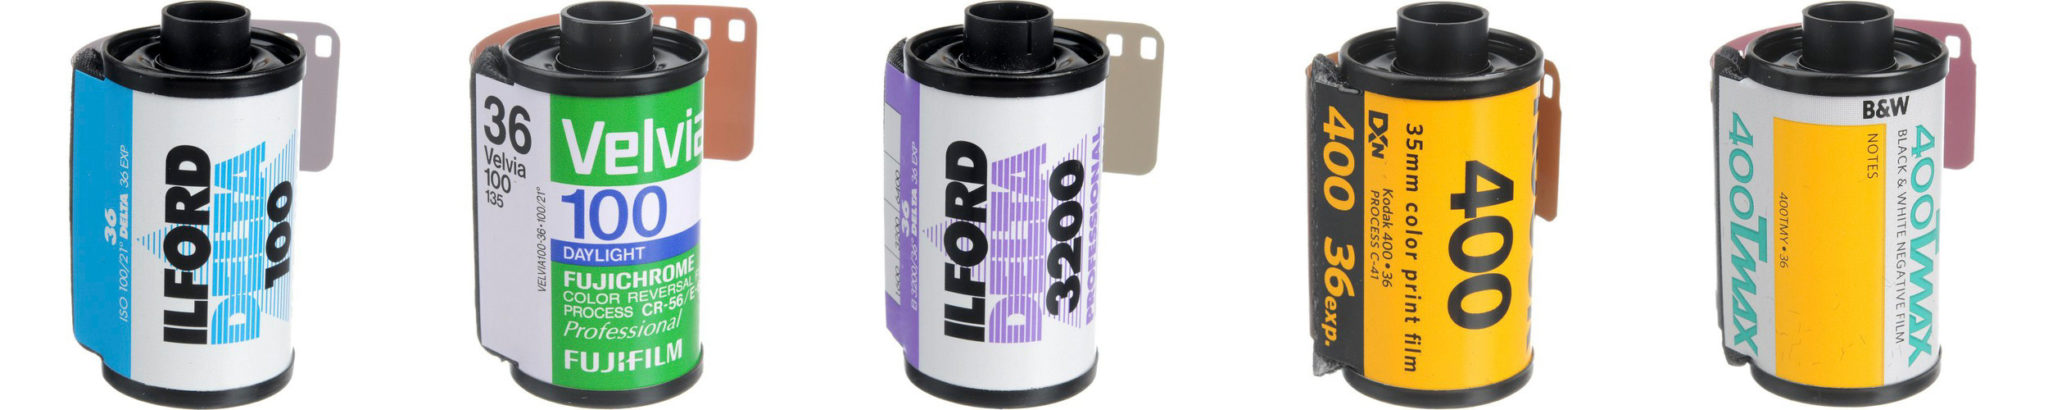
Today’s film lineup regrettably isn’t what it once was. The two big names FujiFilm and Kodak have both dropped some beloved stocks, leaving us now with a far smaller collection to choose from. That being said, there is no danger in it dissapearing completely. It’s simply becoming more expensive to source film.
35mm is available is rolls of either 24 or 36 exposures. The film is held inside a light tight cartridge so it can easily be loaded or unloaded in daylight.
120 (Medium Format Film) is loaded on a spool with a piece of backing paper that protects the film from accidental exposure to light when loading or unloading. Depending on the type of camera is it used in, you can get anything from 8 to 15 exposures per roll.
220 (Medium Format Film) is physically the same as 120 film, however the protective backing paper is removed restricting loading/unloading to be performed in darkness. It is twice as long in length as 120 film.
Lower (slow) film speeds of ISO 50, 100 & 200 will generally offer better sharpness and resolution and are the preferred choice for outdoor photography such as landscapes and still life. Fuji Velvia 50 is famous for an almost complete lack of grain.
Higher (faster) film speeds of 400, 800 & 1600 will be more sensitive to light so tend to offer up more grain and less detailed images. An ISO 400 film is an ideal compromise between speed and resolution.
Note: film actually has an expected shelf life, after expiration of a few years it can degrade and colours can shift or fade. To prolong it’s shelf life, always store film in the fridge.
Colour Negative
The most common of the three types, colour negative film is still in plentiful and fairly cheap supply. Print film as it is commonly called, is identifiable by an inscription of (C-41) on the box.
Generally speaking it is very forgiving to use. Unlike digital, it copes very well with overexposure and can capture a very wide dynamic range. It is ideal for general use, portraiture and street photography where exposure can be guessed rather than be perfectly metered.
As this is the most common type of film, it can still be easily processed almost anywhere for only a few dollars a roll.
Nikon F3 | Nikkor 50mm f/14 AIS | Kodak Portra 400 35mm
My Picks
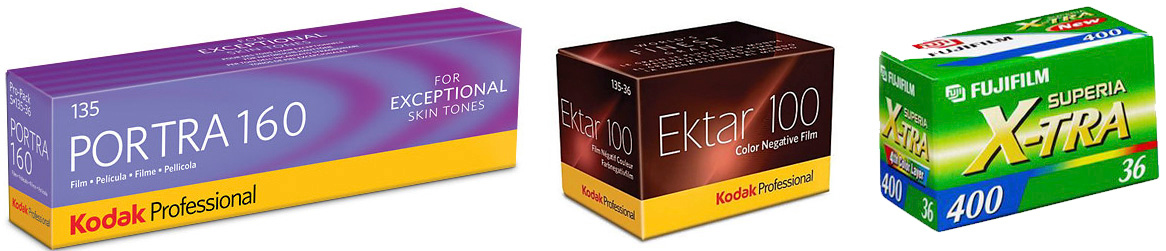
Kodak Portra 160 & 400 (35mm & 120) – Very natural colour reproduction with fine grain and massive exposure latitude.
Kodak Ektar 100 (35mm & 120) – Ultra saturated colours. Very sharp. Not very forgiving of under/overexposure.
Fujifilm Superia X-Tra 400 (35mm) – Good cheap film with saturated colours, good exposure latitude.
Slide (Colour Reversal)
Slide film, commonly known as Colour Reversal or (E-6) produces a transparent ‘positive’ image when processed, which is designed to be projected rather than printed. It was a favourite type of film for many National Geographic photographers, and has produced some of the most iconic images of the 20th century.
Slide film simply looks amazing! It has superior sharpness, resolution and colour rendition to negative film in almost every way. The down side to slide film is that it is very expensive now to purchase and develop, with upwards of $10 a roll and a specialist photo lab required to develop. Also, unlike colour negative film, exposure needs to be spot on to avoid blowing highlights for which slide films are extremely unforgiving. When shot correctly, slide film (especially when projected) offers images that just blow you away with their depth and dreamlike range of colours.
Leica M6 | Leica 35mm Summicron f/2 | Fujichrome Velvia 100 35mm
My Picks
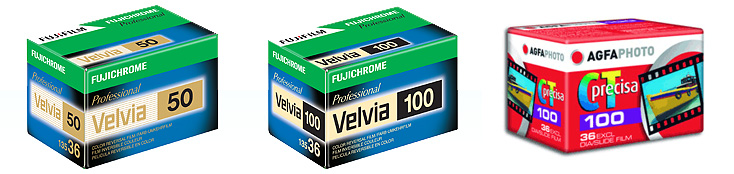
Fuji Velvia 50 (35mm & 120) – Very fine grain. Very saturated colours. Extremely sharp.
Fuji Velvia 100 (35mm & 120) – Faster and more contrasty than Velvia 50. Still sharp and saturated.
Agfa CTPrecisa 100 (35mm) – Cheap fine grained film. Moderately sharp with warm reddish colour reproduction.
Black & White
Above all others, one film type that will never disappear will be B&W. There is still a huge range of B&W films available, and with the developing solutions available for cheap, you might as well buy a kit and develop it yourself at home! You really can’t go wrong with any B&W film, it’s equally as forgiving of over exposure as colour negative, and it’s great for shooting in low light situations for gritty, moody images.
Note: when shooting B&W films during daylight try adding an orange filter over your lens to darken the blues in the sky.
Nikon F3 | Nikkor 50mm f/14 AIS | Kodak T-Max 400 35mm
My Picks
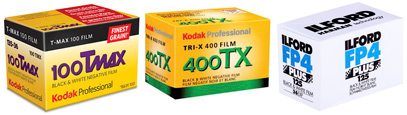
Kodak T-Max 100 or 400 (35mm & 120) – Fine grained low contrasty film.
Kodak Tri-X 400 (35mm & 400) – Contrasty coarse grain for a classic B&W look
Illford FP-4 (35mm&120) – ISO 125 wide latitude and finely grained. Contrasty.
Additionally, it is worth checking out the film stocks available from Lomography. Typically speaking, Lomography source expired films or rejected stock from other manufacturers and rebrand it as their own. They are good for experimenting.
How to Manually Focus
One of the best things about shooting with film cameras is having a larger viewfinder which makes focusing so much easier than modern digital SLR’s.
The majority of cameras work by using a system whereby you have a circular split image focusing screen. Aligning your subject within the circle will mean that it’s in focus and you’re good to go.
However, this process does involve a few valuable seconds to ensure you have correct focus. A few valuable seconds that could be the difference between nailing or missing the shot.
This is where hyper focal distancing comes in. This is the area by which we want acceptable sharpness to be present.
All manual focus lenses include a distance scale on the top on the lens. This scale is used to approximate where focus will lay dependent on your selected aperture and where you have set your focus ring.
In the example below I have set my focus ring to 3 metres. So I should expect an object 3 metres in front of me to be in focus regardless of the aperture I’ve chosen.
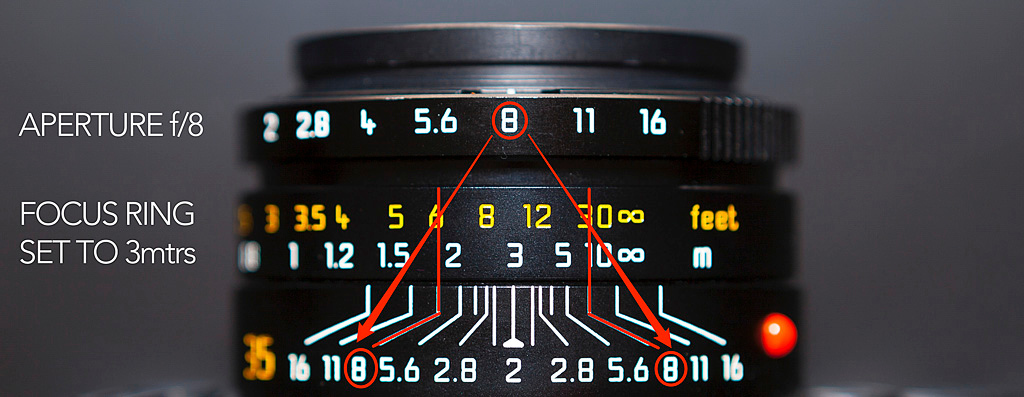
By stopping down my lens further I also increase the depth of field, thus increasing the chance of getting my object at 3 metres away in perfect focus.
By stopping down to f/8 and looking at the distance scale on the lens, It tells me that any object from just shy of 2 metres to 10 metres will now be in focus.
This type of focusing is really useful in fast moving situations such as street photography, where there is no time to stop and focus on your subject.
How to Meter
The long regarded rule with film photography has been to expose for the shadows when shooting B&W or Colour Negative film and to expose for the highlights when shooting slide. This is extremely valuable advice that should always be remembered when out shooting film.
If your camera has a built in light meter then it’s likely to be a spot or centre weighted meter. If it’s automatic then thats all good, but if you are having to shooting manual (as you should be!) then sometimes a bit of guess work is required.
Note: remember to set the ISO dial on your camera to match that of the film speed you are using.
Sunny 16
This method is designed for shooting B&W and colour negative film when outdoors and during daylight hours when the sun is high. It is a method that will allow you to get pretty accurate exposure without having to resort to using a meter.
The rule is to set your aperture to f/16, and then take the ISO valueof your film and set your shutter speed to the same or nearest available number.
For example: My camera is loaded with ISO 200 film, so I set my aperture to f/16 and my shutter speed to 1/200s.
For changes in lighting you can compensate by opening up your aperture.
f/16 – for direct sunlight
f/11 – for slightly overcast
f/8 – for overcast
f/5.6 – for heavy overcast
f/4 – for sunset
Poor Man’s Meter
If you’re fairly light skinned, then the perfect surface to get a fairly accurate light reading off is…the back of your hand!
Darker skinned? No problem, just add a stop of light to the reading.
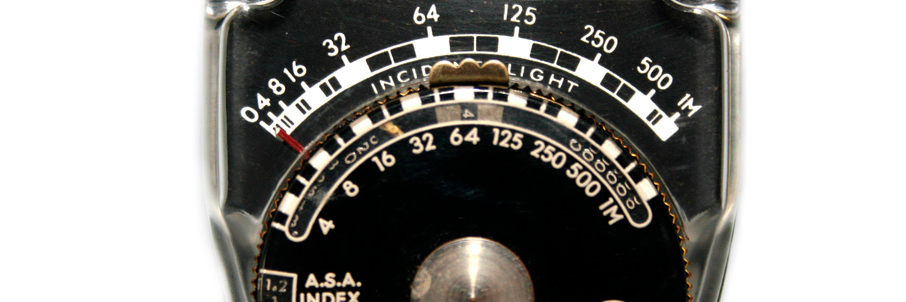
Smartphone Meter
iPhone and Android have a range of free incident light meters available from the app store. Although they fail in very low light situations, I have found them to be incredibly accurate in most situations. Test them against the metering on a digital camera first to see if they match.
I use Pocket Light Meter, which is available as a free download for iPhone from the app store
Note: colour negative film can benefit from overexposure, so increasing your exposure by +1 stop can result in punchier more vibrant images. Alternatively, set the ISO on the camera to +1 stop higher than the film inside. E.g if Using ISO 400 film, set it to 320 on the camera.
Processing and Scanning
In order to get your negatives developed you will need to take it to a photo lab, which can take anywhere from 1hour to 1 week to process your film.
In the US there are still many cheap processing labs at places such as costco or wallmart who can process Colour Negative (C-41) for a cheap price and quick turnaround. There are disadvantages to using cheap labs however, opposed to professional film labs.
The issue is one of quality. Whilst C-41 processing is pretty standard as it’s run through an automated machine, the cheaper supermarket labs have poorer quality control which may result in your negatives coming back with untrue colours or scratches due to poor handling. Additionally if you opt to get prints, you will find that they are inferior to prints from a professional lab.
A pro lab is definitely worth the extra few bucks if you value the output of your film, and if you are shooting slide or B&W film, a pro lab is usually the only option anyway.
When it comes to scans, at a lab the film is scanned digitally then output to a JPEG file. Unfortunately, most of the machines that do this are pretty old and can only output a fairly low resolution file. To further add to the scanning frustration, these machines use a piece of software to automatically perform colour corrections and brightness/contrast adjustments which can drasticly alter the true look of the image.
If you can opt to get your prints and scans done at a pro lab, always ask if they can provide scans at the highest resolution and output to a TIFF file. As a TIFF image is a kind of RAW file type, it will allow you to make any colour or luminance adjustments afterwards rather than allowing the labs computers to do it for you.
To see more of my film photography images, please do check out my Portraiture & Street Photography section on this website for a selection of my favourite images shot on film.
Editor’s Note: This post was originally published at Peter Stewart’s blog. It has been syndicated with permission.
Get rid of the ads!
Did you enjoy reading this article as much as we enjoyed writing it? There's a way to support us and our reporting, getting ad-free navigation and more as a bonus. Subscribe to us for less than a coffee per month —just $3.99— or take advantage of our yearly subscription with a hefty discount for only $25.- An ad-free experience
- A free mystery box for Lightroom or Capture One
- All the books in our store
- 20% discount on Capture One
- 30% discount on Imalume Photo Theft Protection
- 20% off Herbs and Kettle Tea Company.
- 20% off your order from MPIX printing services.
- 5% off Viltrox Products via their eCommerce store.
- 10% off all film developing, printing and scanning services from Blue Moon Camera and Machine
- 15% off 7Artisans products: The lens and accessory maker is offering a sweet discount for Phoblographer's readers.