
Last Updated on 07/08/2020 by Mark Beckenbach
Photographing during golden hour can produce stunning results, but Mother Nature isn’t always kind to us. Give this trick a go if she’s being temperamental.
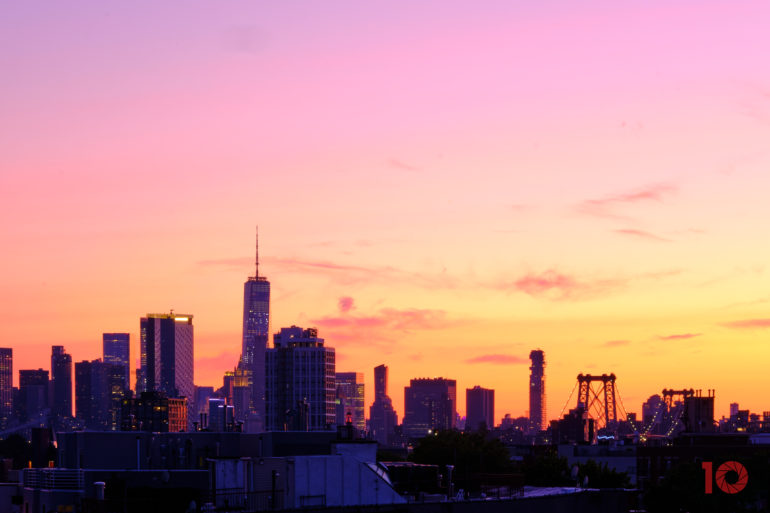
Many photographers love shooting during golden hour because the ambient light imparts a soft, gorgeous warmth onto our subject matter. Those fleeting moments during golden hour often produce some of the most stunning images regardless if you’re photographing landscapes or portraits. Aside from the short window of opportunity, we’re also very much at Mother Nature’s mercy when photographing during golden hour. Weather conditions, cloud coverage, time of year, and a slew of other factors determine whether the ambient light is actually golden during its eponymous hour. All hope is not lost, however, if Mother Nature happens to be a cruel mistress while you’re out photographing. By mastering your camera’s white balance settings, you will gain the ability to control how intense golden hour’s effects appear in your image. You can even simulate the appearance of golden hour if Mother Nature is giving you the cold shoulder. Let’s dive right in.
“Golden Hour describes the short period of time just after the sun had risen or immediately before it is about to set. During this momentary window, the sun appears very close to the horizon and produces a quality of light that tends to be beautifully diffused and typically embodies a warmer tone than usual.”
from Creating Stunning Portraits Using Beautiful Golden Hour Light
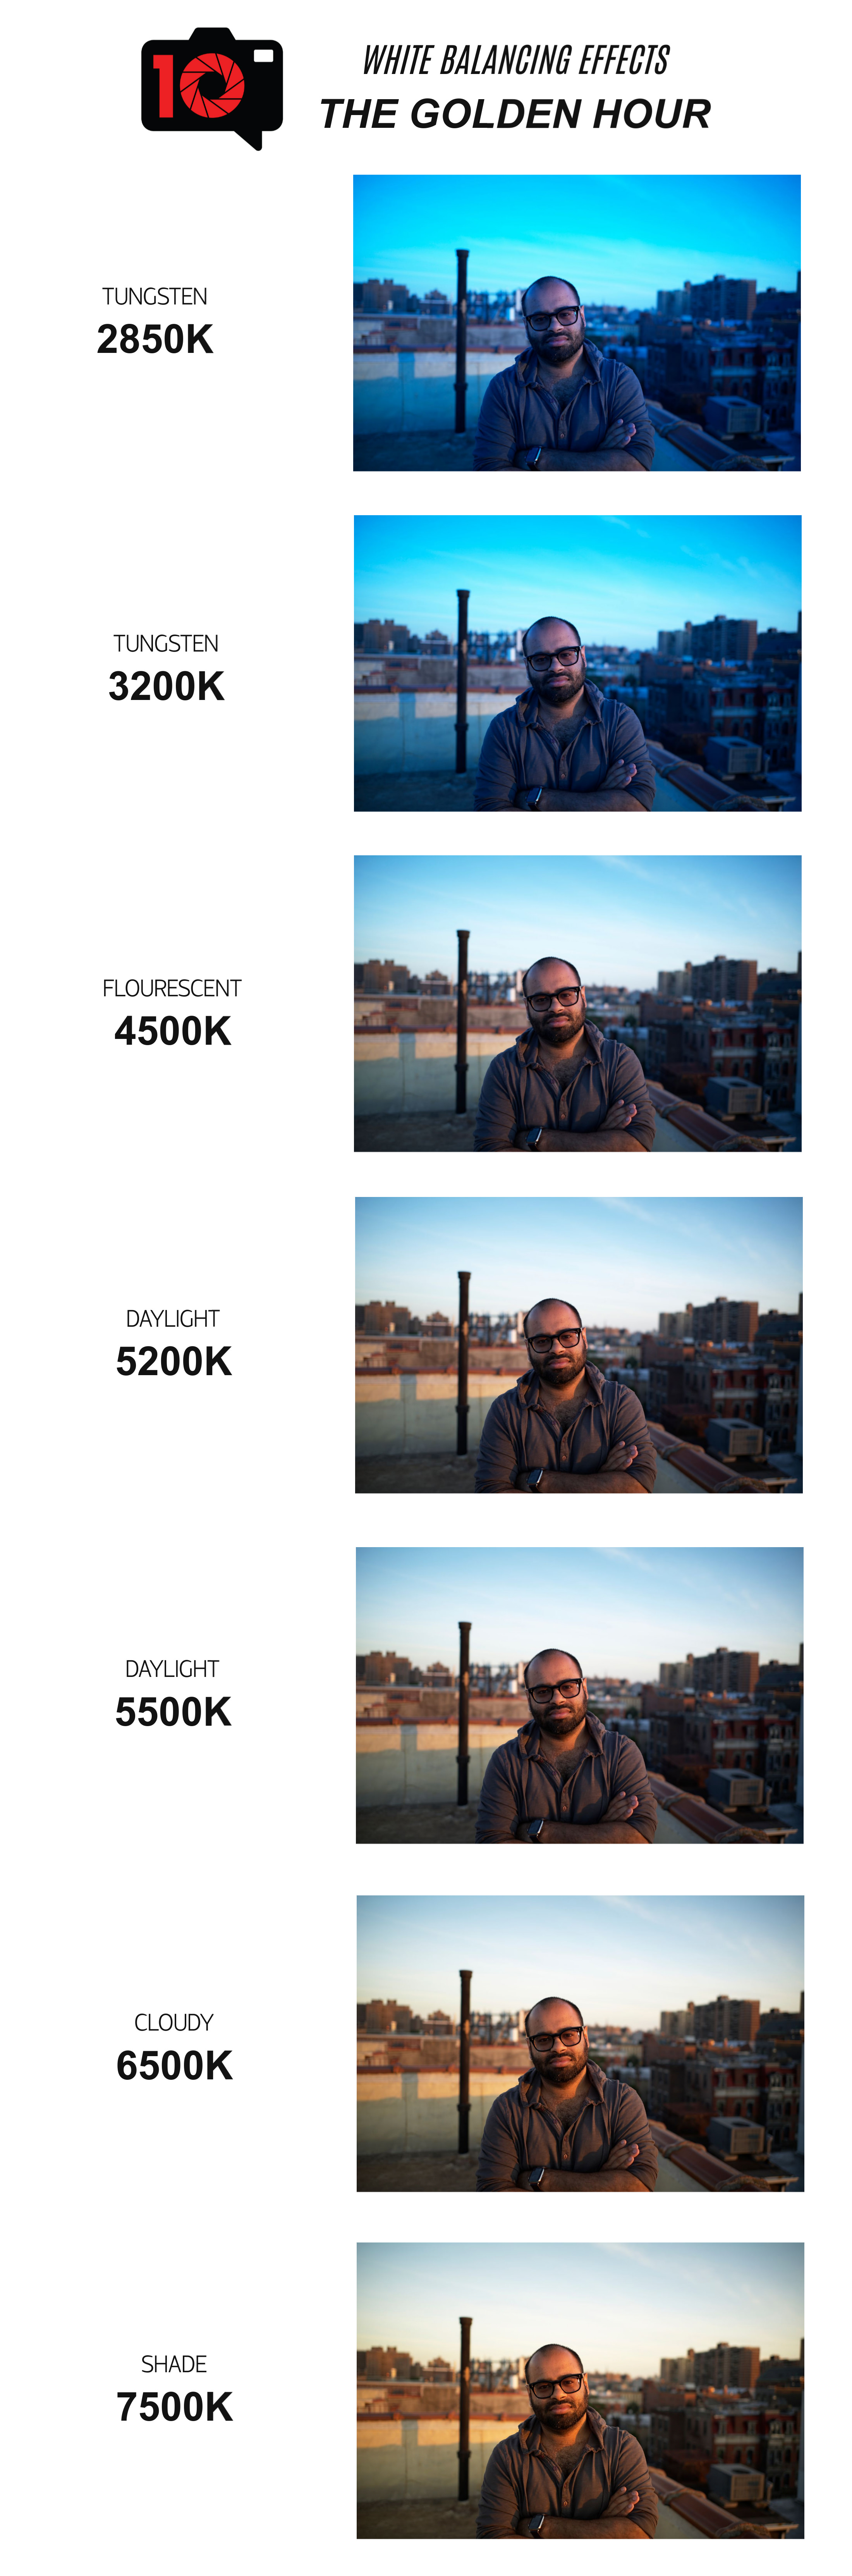
As you can see in this infographic, your white balance setting has a profound effect on how your final image looks. Sometimes when photographing during golden hour, that characteristic warm glow just isn’t there. It could have been a particularly cloudy day. Perhaps a rain/snow/precipitation-of-choice storm is about to descend on you. Or maybe you got your times mixed up, and you missed golden hour by accident. Once you understand how your white balance setting affects your images, it can be a super useful tool that will allow you to simulate golden hour light if you’re ever in a bind.
White balance is a measurement that modern digital cameras use to compensate for color casts within an image. By default, most cameras are set to Auto White Balance (AWB). As its name suggests, it will try to adjust your white balance dynamically so that objects that appear white in the real world also appear white in your image. This can be very helpful when you’re photographing in situations where the lighting conditions are constantly changing. Once you understand how white balance settings affect the look of your final image, you can use it to trick your camera into simulating golden hour light.
Unlike the analog days when film emulsion locked you into one white balance, just about every modern digital camera gives you the ability to adjust your white balance on the fly. We’ve included a list of the more common white balance settings found on modern digital cameras in this infographic along with their respective Kelvin temperatures. Depending on your particular camera, there may be additional (or possibly less) white balance presets available. You can also set your white balance manually by dialing in custom white balance settings. This can usually be done via the same white balance menu in your camera.
Tungsten white balance is most commonly associated with 3200K, but some cameras let you go even “colder,” down to the 2000s. For our purposes here, you’ll want to look towards the opposite end of the white balance spectrum. As we increase the Kelvin temperature, you’ll notice that the image begins to take on an increasingly warmer appearance. This is the key to simulating that golden hour light that photographers love. Typically when photographing in daylight, your white balance will be set to 5500K (5600K on some cameras). If Mother Nature is being a pain, simply increase your white balance to Cloudy or Shade. As you ramp up your Kelvin temperature, you will notice your image beginning to take on the same warm tones that we commonly see with pictures taken during golden hour. Cloudy or Shade white balance presets are good starting points, but don’t be afraid to use custom white balances to fine-tune your image until it’s to your liking. If you are shooting RAW, you can also make white balance adjustments during post-production using programs such as Capture One, Lightroom, or Photoshop.
Be sure to check out these other articles for more useful tips on white balance and photographing during golden hour:
- The Truth About How White Balance and Your Camera Actually Work
- Photography Cheat Sheet: White Balance Presets Guide
- Photography Cheat Sheet: The Color Temperature Scale Explained
- Beginner’s Tips: Getting the Most Out of Golden Hour Landscape Photography
- Creating Stunning Portraits Using Beautiful Golden Hour Light
- Photography Cheat Sheet: Camera Settings for Shooting in the Golden Hour
- Useful Photography Tip #196: The Golden Hour Look Any Time of the Day
Get rid of the ads!
Did you enjoy reading this article as much as we enjoyed writing it? There's a way to support us and our reporting, getting ad-free navigation and more as a bonus. Subscribe to us for less than a coffee per month —just $3.99— or take advantage of our yearly subscription with a hefty discount for only $25.- An ad-free experience
- A free mystery box for Lightroom or Capture One
- All the books in our store
- 20% discount on Capture One
- 30% discount on Imalume Photo Theft Protection
- 20% off Herbs and Kettle Tea Company.
- 20% off your order from MPIX printing services.
- 5% off Viltrox Products via their eCommerce store.
- 10% off all film developing, printing and scanning services from Blue Moon Camera and Machine
- 15% off 7Artisans products: The lens and accessory maker is offering a sweet discount for Phoblographer's readers.