
Last Updated on 06/24/2026 by Chris Gampat
The Leica S2 has been out for a very long time now, but I’ve only had intermittent and brief amounts of time with it each session. Recently though, Leica allowed me to borrow it for an entire weekend. For those of you that have read my other medium format camera posts, you’ll know that I’m a lover of the format for many reasons including the extremely shallow depth of field, level of detail, and versatility of the RAW files.
The question was though: what do I shoot with it? Portraits? Documentary? Landscapes? After looking through a brochure, Tumblr, and through work done by friends who shoot medium format, I developed a couple of ideas.
This post contains the first impressions and experiences of that weekend.
Update in 2026: The Kodak Sensor in the Leica S2 was Something Special, With a Big Problem

Yes, back then, medium format sensors weren’t great for high ISO output. That’s because they were a CCD sensor with a processor that just wasn’t developed for it. The time period was early digital still, and CMOS sensors were starting to become more of the norm over CCD. They used less power, could offer arguably better high ISO output, etc. But still, the older CCDs still had a charm of some sort.
What a lot of folks don’t know is that the Leica S2 was more or less the same sensor as the one in the Leica M9. To that end, they had very similar image quality.

Though there was one big problem that I’ve only really realized now as I’m older and have become a much more experienced editor and far more outspoken against issues in the camera world.
This sensor was pretty terrible for photographing people of color specifically with noticeable amounts of melanin in their skin. What do I mean by that? If you look at someone from Germany and someone from a country like Argentina who tend to be more fair-skin brown, you can tell the difference. And in my Leica S2 review, I mostly photographed women of color. When I went to edit the RAW files in Capture One, I found the color depth to be pretty lacking. Below are images that I’ve edited in Capture One; the program considered by serious working photographers to be far superior to Lightroom when it comes to editing.


Put bluntly, the sensor in both the Leica M9 and the Leica S2 wasn’t great for people of color when it came to editing the colors in the scene. You often need to really adjust the color channels for their lips.
And even then, there are some a fair amount of oddities that I haven’t encountered with newer cameras as much. The key word there is, “As much.” To that end, I’ve still found that editing my images for different skin tones to be annoying.
Overall, it reminds me of an old teaching from Steve McCurry about making sure that the colors in your portraits have three colors that really stand out from one another. Here’s a quote from an article I wrote in 2024 explaining his methods:
Steve McCurry is known for something called the three-color portrait method. This process more or less doesn’t include black or white in the method. Instead, it focuses on the ROYGBIV colors. It states that in order to not overwhelm the human eye, you have to make the colors pretty minimal.
Steve basically uses the following:
- The color of the person’s skin
- The color of the outfit
- The background color
And he makes them stand out from one another just enough. But he also uses light and depth of field to make the image even more effective at emphasizing the subject. By default, lots of his backgrounds are some shade of green. And the science behind that is pretty simple. Like black, white, and gray, the color green is found naturally to work with everything in nature. Here are examples:
- Red and Green: Roses, tulips, saffron
- Orange and green: Mandarin trees
- Yellow and green: Lemons and limes. Also flowers
- Blue and green: Seaweed. Landscapes alongside rivers.
- Indigo and Green: Spiderwort flowers.
- Violet and green: Violet flowers
With all this said, green is a color that you can easily try to make the background for every shoot that you do.
So why bring this up in 2026? Well, photographers have been getting into digi-cams and the older CCD sensors quite a bit. To that end, they’ve been requesting camera brands to make them again. If the brands are to do this, they need to also work on the processors and the color science quite a bit more to make the image files more inclusive. But they only need to do a bit of a tweak. Not a lot. The sensors are still, to this day, quite capable and deliver a look that’s really wonderful.


Ergonomics
ISO 1600")
First and foremost, it should be noted that the Leica S2 is a masterpiece in most situations. Not only is it very simple to use once you wrap your brain around it, but it is also extremely comfortable to hold and have slung around your chest for hours upon end. That’s a big plus for documentary photographers.
ISO 1600")
Something that should also be noted is the position of the camera’s lens release: which is on the right hand side. The only other company that I remember doing this is Sony. In real life use, it makes total sense because your camera never has to leave your right hand. All you’ll need to do is use a finger to depress the button, screw the lens off, hand it off to an assistant and then put another lens on.
For studio work, that makes the overall flow of the work so much smoother.
ISO 1600")
The top of the camera (yes, I put gaffers tape on it) is characterized by a couple of key but small features. First off, there is the shutter release around the grip. Behind that is the shutter dial and next to that is a small LCD screen displaying critical information like shutter speeds, aperture, ISO, etc. Next to this are the hot shoe and the diopter adjustment dial.
ISO 1600")
The back of the camera is the business end: there is that very large and bright viewfinder and on the right side of that is a programmable button. I’ve often seen it programmed to focus on a subject. Next to this is another dial that controls the aperture settings.
Then there is the large LCD screen that really should have been much more high-res and detailed. Then there are buttons around each that are multi-function buttons. Pressing anyone of them bring up a screen that bring you through other submenus. This is where you can set the various controls. While this seemed a little odd at first, I got used to it within an hour.
Above this is the on/off/drive switch.
ISO 1600")
The right side contains the memory card slot that holds both CF and SD cards.
ISO 1600")
The left side contains two other major ports: one if for flashes and HDMI out at full 1080 while the other one is for Firewire and a remote shutter release.
Autofocus
The autofocus is noisy, but it is also pretty darned accurate. The S2 uses one focusing point in the center and my version of the camera had a split prism. If you’re used to the old school film SLRs or you’ve changed your focusing screen in your DSLR to have this, it will come like second nature to you.
For the best results, you should find a point of contrast and aim the focusing point there. This is a lot like the Canon 5D Mk II’s focusing; which was essentially designed for studio use despite it being a whole different price range and type of camera.
Image Quality
Documentary
ISO 320")
I often used the 35mm and 30mm for this type of work. As a trained photojournalist, it’s quite interesting doing this type of work with a larger format than 35mm, which I’ve honestly never done before. Approaching subjects this way means that you can’t rely on the snappiness and freedom that the smaller formats allow you, but instead you need to sit there, study a subject, and then compose and focus carefully. When using larger formats, that’s the way that Joel Meyerowttz and various other larger format photographers (like those included in the PDN 30) do.
ISO 160")
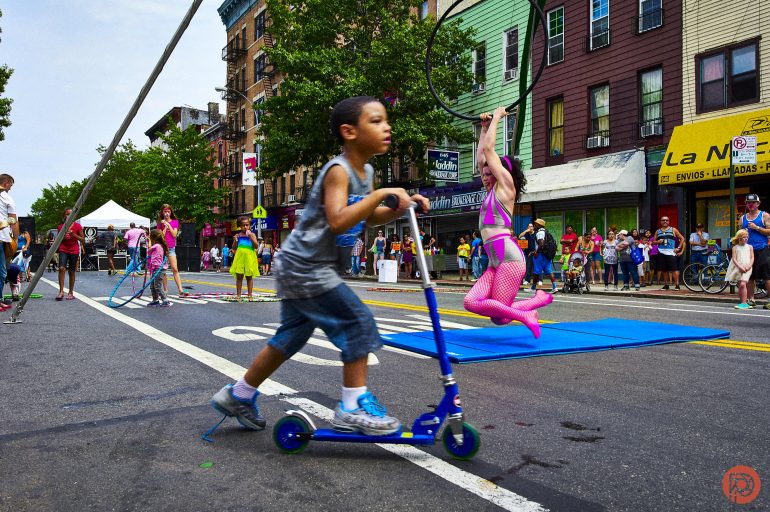
For a quick real-world test, I documented a recent block party in my neighborhood and worked with the Phoblographer’s Former Educational Director Sander Martijn on how to document not only the neighborhood but some of the more interesting characters around. When working with such a large format sensor, you need to keep a couple of things in mind and use different options:
– Aperture priority
– f5.6 to 11 when capturing entire scenes
– F2.5 to 4 for close up and intimate portraits
– ISO 160 due to the current overcast day.
ISO 160")
After previously only shooting the compressed raw images, I switched up to uncompressed which churned out around 75MB files with each image. The files here have been drastically resized for the web at around 2000 pixels across and 150 DPI. Amazingly, the larger system was able to maintain quite a bit of stealth; and part of this could be perhaps due to all the craziness that was going on. This allowed me to work closer up to my subjects on a more personal basis. And because the camera looks like any other normal DSLR when you put gaffers tape it, no one will really think that you’re any different than other people around. And with me living in Brooklyn, there were tons of DSLRs.
ISO 160")
The uncompressed files have tons and tons more color depth and versatility than the compressed files do. Additionally, I felt that the color accuracy improved. For the best results in unpredictable situations, I also often found that I needed to underexpose by around 1/3rd of a stop to get the results that I wanted. For the photographers that use this though, that won’t matter much. At this level, you’re also probably looking at a scene and metering it by your eyes because you don’t trust a camera meter not out of pretension but because you want a scene to look a certain way. This is how I’ve trained myself to work.
When photographing a scene, it is often best to stop the lens down and just capture the entire scene by itself instead of trying to work different through your compositions: which can then be done in the post-production phase due to how much resolution you have. Due to the focusing system only really having one focusing point, it is also imperative that when taking portraits of someone, you catch them when they’re still due to the fact that the depth of field is so thin with medium format cameras. Focusing and recomposing or them moving the ever so slightest bit will throw off the entire plane of focus. Here are some other images I shot:
ISO 160")
ISO 160")
ISO 160")
ISO 160")
ISO 160")
ISO 160")
ISO 160")
ISO 160")
ISO 320")
ISO 320")
Studio Styled Portraits
ISO 160")
This is where the 70mm f2.5 and 120mm f2.5 really began to shine. Because this is a medium format camera, the focal length multiplier works in a reverse way: so these lenses were around 50mm and 90mm each on 35mm. During the studio session, I often shot tethered to a cord or with a wireless system hooked up to a Nikon SB900. Unfortunately, the SB900 shut itself off after a while due to overheating; and it probably didn’t help that I plugged it into a battery pack and fired it off at full power for a lot of the time.
ISO 160")
My friend’s PocketWizard Mini and Flex didn’t work at all with the system: which I expected but he didn’t. So we switched to the Vello Freewave Fusions, and they worked with issues. When waking the camera, flash and triggers up, I would need to fire one shot to ensure that they were awakened. Then I needed to fire another shot to ensure that they were syncing probably. And then they were synced and working together flawlessly. It was a tad bit annoying and I’m not exactly sure where the problem was, but my best guess is with the triggers.
After a while, I switched to the Impact LiteTrek with a PC cable. The cable slot is located on the left of the camera and it holds onto the cable fairly well, but there were situations where it didn’t totally stay in and my hand would subtly knock it out of place. However, this setup worked much, much better in terms of consistency. We’ve rated the Impact LiteTrek very highly, and once again it didn’t fail me.
During a tethering session, I tethered the camera to a laptop and imported using Adobe Lightroom 4. My friend, who also shot with the camera and rents the loft I did this shoot in, also shot tethered. What he did was set Lightroom up so that with each photo shot, a preset would be applied. This slowed down the performance and at times even seemed to freeze the write-speed to the laptop. Additionally, when the camera would go to sleep, it would almost be impossible to get Lightroom to recognize the camera again to tether. In many instances, we needed to shut down Lightroom, turn off the camera, unplug the cable, and then reconnect the entire system again.
This problem is common though: and it often happens during my B&H Event Space sessions where myself of Joey Quintero are shooting tethered. Indeed, we’ll have to do that short troubleshooting problem. This makes me believe it is a Lightroom issue. I did not have the chance to try the software with Capture One.
Something else to be mentioned is that the camera can be a bit heavy, and so you should often try to shoot at a higher shutter speed to prevent the effects of camera shake. The Leica S2 only syncs with studio strobes at 1/125th of a second though, so this can be a bit killer.
ISO 80")
Many of the photos I shot were often done using studio strobes, but I did manage to shoot often with it using natural light. Once again, I started to see image noise at ISO 320 but 160 and Pull 80 were crisp and clear. To ensure that you have that clarity, you’ll also need to ensure that you don’t focus and recompose and instead move around a ton due to the center-only focusing point combined with the shallow plane of focus due to the larger sensor format.
ISO 160")
Here are some more images from the studio session (pre-retouching).
ISO 160")
ISO 160")
ISO 320")
ISO 80")
ISO 160")
ISO 320")
ISO 160")
ISO 80")
ISO 160")
For even more studio work, see my post on my time with the Hasselblad lenses with the S2.
Raw File Versatility
ISO 160")
When shooting compressed DNG files, you will get smaller files but with less raw file versatility. When shooting uncompressed, you’ll end up with 75MB files on average and with lots more versatility. For the best results, I recommend shooting tethered or with a very large card. But even with a 32GB 1000x speed Lexar CF card, it can sometimes take a bit of time to write the files to the card.
For the image on the left, I shot in aperture priority at ISO 160 and f2.5 However, there was already quite a bit of light on her and when I chimped the LCD screen I realized that I would need to fix it in Adobe Lightroom 4 afterward anyway.
To clarify, her facial paint (which is what I was really trying to go for) was all blown out along with various details in her face.
In order to get it back, I messed with the highlights, luminosity and saturation of certain colors in addition to boosting clarity, sharpness and contrast on top of the black levels.
Here’s the interesting thing: a compressed RAW file wouldn’t have been this versatile despite the fact that I know that 5D Mk II would have nailed it with no trouble and have had loads of room for editing versatility. When shooting uncompressed though, I was finally able to see the full extent and capabilities of the S2. In a previous meeting, the company told me that it contains the same sensor as the Hasselblad H4D but that Leica doesn’t use a high pass filter. This makes a ton of sense because I’m able to resolve more detail from these images but I’ve got noise issues as soon as I go up to ISO 320.
Either way, with the natural light available, I was surely able to get the photo, thank the young lady and move on: not being a burden to any of us.
Ease of Use
ISO 320")
After familiarizing yourself with the camera and customizing it to your needs, it should take anyone no longer than an hour and a half of use to get it to do what they need it to and to place everything you need right where you want it. For example, the depth of field preview button has been programmed to format the card for me.
For an extra example, if you hold the top left button down around the display, it will bring up the ISO menu and will allow for quicker access to the settings you need the most.
In real life use though, the camera’s native ISO is 160 and one starts to see image noise at ISO 320. Even that noise can sometimes be tough to edit as well.
Conclusions
Now here’s the multi-thousand dollar question: would I buy the camera system? In my current state: no. The reason why is because my work personally demands more from me that only DSLRs and mirrorless cameras can do. For example, high speed sync with wireless triggers is one. Sure, I could use ND filters with a medium format camera system, but it’s not something that I really want to do because of the simple convenience that using High Speed Sync with wireless triggers allows.
Also, most of my work doesn’t require this much resolution: but when it does I will surely rent the camera. The ergonomics are nothing short of what I think are a masterpiece. The camera is also extremely simple to use, but setting up custom functions can be a bit tough to do sometimes. Every time I picked the camera up off of the ground in between moving a light or something else in the studio, I often thought about how powerful, beefy and well-made the camera really feels.
The image quality with the Leica S system lenses is second to none and literally the best image quality I’ve seen at the Pull 80 and ISO 160 settings. With that said though, I wish that ISO 320 weren’t as noisy, but many medium format DSLRs suffer from this problem. On a personal note, I don’t feel that the color or noise control of digital medium format can compare with 120 film yet. This goes double for black and white as nothing can touch Kodak Tri-X in 120mm.
The image quality drastically improves from shooting compressed to uncompressed DNGs. And if you want the absolute best image quality from this camera, I recommend doing nothing else but shooting uncompressed. Otherwise, you’re wasting your funding.
I will be renting the Leica S2 again at a future date as I do have personal projects I want to do with medium format cameras.
Please Support The Phoblographer
We love to bring you guys the latest and greatest news and gear related stuff. However, we can’t keep doing that unless we have your continued support. If you would like to purchase any of the items mentioned, please do so by clicking our links first and then purchasing the items as we then get a small portion of the sale to help run the website.
Get rid of the ads!
Did you enjoy reading this article as much as we enjoyed writing it? There's a way to support us and our reporting, getting ad-free navigation and more as a bonus. Subscribe to us for less than a coffee per month —just $3.99— or take advantage of our yearly subscription with a hefty discount for only $25.- An ad-free experience
- A free mystery box for Lightroom or Capture One
- All the books in our store
- 20% discount on Capture One
- 30% discount on Imalume Photo Theft Protection
- 20% off Herbs and Kettle Tea Company.