
There are a lot of things to know when it comes to photography terminology. And there is also a difference between knowing what things mean, and being able to apply them. We’re going to talk about that a little bit in this article. When I started this site, I wrote about photography terminology. And today, I’m revamping that piece with a bit.
You can view this article and much more with minimal ads in our brand new app for iOS, iPadOS, and Android.
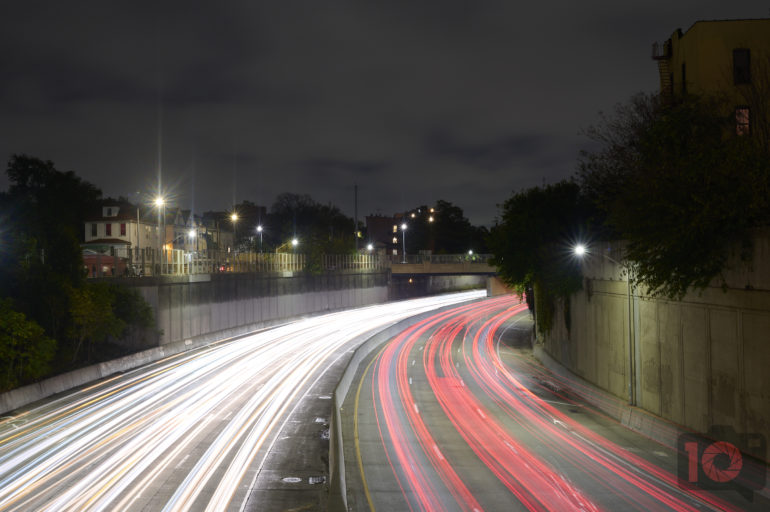
Shutter Speed – This is how long your camera’s shutter stays open and it can be read on either the back of your screen or within the viewfinder. It is typically a fraction or a whole number.
For example:
1/15 = a fifteenth of a second
1/1000= a thousandth of a second
1”= 1 second
15” = fifteen seconds
Here are the basic rules to follow:

The longer the shutter speed the more motion will be captured and the stiller you need to remain. This is great for capturing nighttime scenes.
The faster the shutter speed the less motion will be captured. This is great for capturing fast-moving objects like sports action.
The longer the shutter speed, the more the camera is going to pick up on your shaky hands. So you’ll get the effects of camera shake. Image stabilization can help with this, but the best thing to do is use a tripod or hold the camera in an efficient way.
On your camera, this can be seen with the S mode.
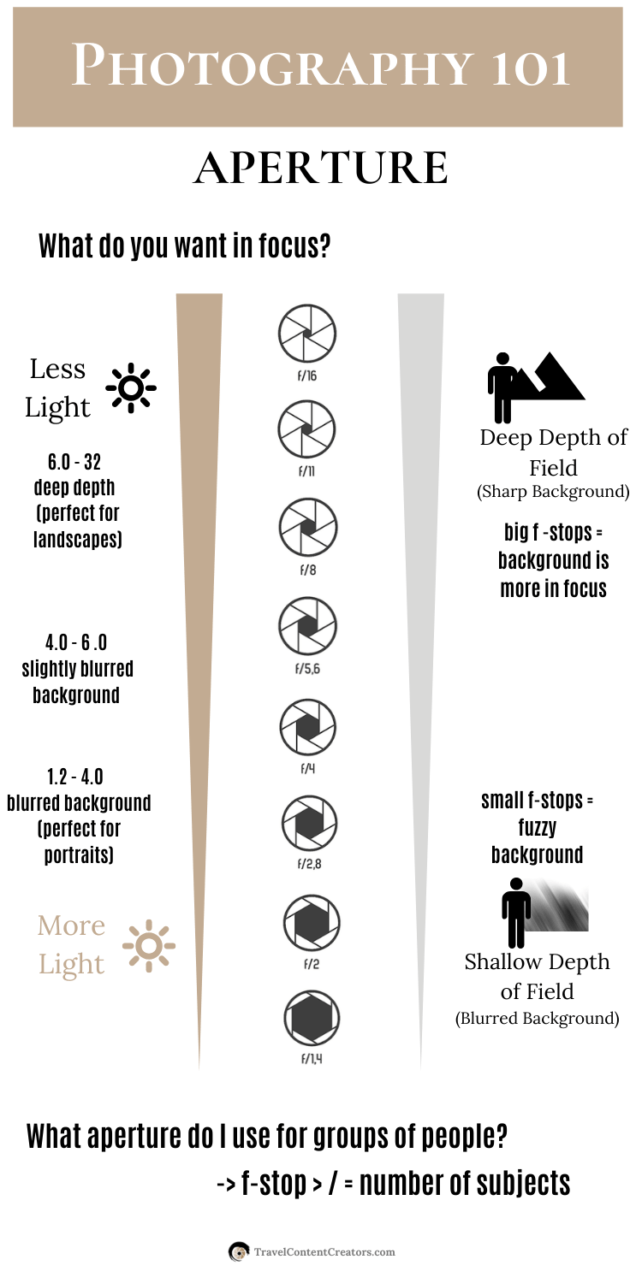
Aperture – This is also known as F stop. It controls how much of your image is in focus or not (what is clear and what is blurry). It also controls how much light comes into the lens of your camera and hits the sensor (the equivalent of film).
In general:
f1.4 = Enables high shutter speeds – not much is in focus
f2.8 = Enables almost as high shutter speeds – more is in focus (great for portraits)
f11 = Needs slower shutter speeds – much more is in focus
f22 = Needs the slowest of shutter speeds – everything you point your lens at should be in focus (best used with a flash unless there is tons of bright light available)
If you have a smartphone or a drone, it most likely won’t have a variable aperture; it will be locked at one setting because the sensor is so small. It’s a bit useless to have a working aperture. So the blur is created using software.
On your camera this is also known as AV mode.

Bokeh – Bokeh can mean a few things. Colloquially, it will refer to the quality of the out-of-focus area in a photo. But it’s been adapted into the vernacular to just mean the out of focus area. Various things affect the bokeh. The coatings on the lens elements can add more or less contrast. More contrast can sometimes mean that your subject pops out from the background. We’ve typically seen Leica Apochromatic lenses lend some of that special “pop.” And the number of aperture blades also affects bokeh. The fewer aperture blades there are, the less pleasing the bokeh balls in the background can be, but this also depends on the focal length.
Depth of Field – This is what is the range of distance within the subject that is acceptably in focus. It can be controlled using aperture.
ISO – Light sensitivity of your camera’s sensor. The higher the ISO, the more sensitive your camera will be to light and the grainier your images will be. The lower the ISO, the less sensitive the camera will be to light and the less grainier your images will be. Higher ISOs allow for faster shutter speeds.
ISO 100 = great for daylight use, no image grain
ISO 400 = great for twilight use, a bit more grain
ISO 1600 = much more suited towards low light or high action where you need to stop fast movement
ISO 6400 = even better suited towards low light and fast action, but delivers grainy images
In recent years, cameras have gotten so good that ISO 6400 can print images at 17×22 inches with little to no grain. ISO is something that’s more flexible with digital cameras than it is on film. With film emulsions, you typically have to shoot at the same ISO for the entire roll.
Manual – A shooting mode on your camera that enables control of every aspect of shooting. You can manipulate shutter speed, ISO, aperture, and loads more. On your camera, this is the “M” mode.
Exposure – This term is used very interchangeably in the photographic community. It can mean your shutter speed, a single photo, and other things. Your camera has something called, “Exposure Compensation” that, depending on the meter, will either make your image brighter or darker.
The way it typically can work on your camera is by adjusting the shutter speed, ISO, or aperture depending on what shooting mode (manual, aperture, shutter priority or program) you are in.
Usually, you just have to judge from the context.
Lens – The piece of glass attached to your camera. There are different types of lenses.
Prime: A fixed focal length with no zoom. They can be 50mm, 28mm 85mm, etc. They tend to have better results depending on manufacturer, and have a fixed aperture as well.
Zoom: a lens that zooms in and out. Lesser quality zooms will generally change aperture when zooming in and out depending on the range. Higher quality ones keep the same aperture throughout the zoom ranges. Once again, this depends on different factors such as zoom range.
Lenses with a larger aperture (f1.4) are known as fast lenses. Lenses with a smaller aperture (over f4) are known as slow lenses.
Focus – This is what the camera is mainly trying to take a picture of. On a point and shoot, it is what appears in the green boxes on your camera’s LCD. For a DSLR, it is what can be clearly seen in the depth of field. The larger your F stop (f1.8) the less will be in focus.
The out of focus area is affectionately called “bokeh” and can deliver beautiful results.
There are also different type of focusing modes:
Macro – anything really, really up close (seen as a flower symbol)
Infinity – for very, very far away objects (seen as a mountain symbol)
Normal – generally everything in between Macro and Infinity
Beyond this there is:
Auto-focusing – lets the camera focus for you
Manual-focusing – you do all the focusing
Single focus – auto-focus on one stationary subject.
Single/Manual – same as above but allows for manual touch-up
Continuous focus – continuously focus on one spot or subject as you are moving
Continuous/Manual – same as above but allows for manual touch-up
Tracking Focus – continuously focus on one subject as it moves
Flash – The burst of light that comes from the camera when a picture is taken. There are different types of flash. Here are just two examples.
Fill Flash – light that will just fill in any dark spots
Red Eye – flash that will prevent red-eye from showing up
On your camera, this is typically characterized by the lightning bolt symbol.
Shooting Speed/Mode – This determines how many pictures (or exposures) your camera will take when the shutter is pressed.
Single – When the shutter is pressed it will take one picture. To take another picture, you need to press the shutter again.
Continuous – When the shutter is pressed and held down it will keep taking pictures until the card fills up or the processor can’t write any more photos to the card.
On your camera, this is typically characterized by the three rectangles stacked on top of one another.
RAW – There are many different types of image files. The most common are JPEGs, which most cameras take and what you always see online. RAW is a much larger file that contains lots of information and allows for more flexible editing. Different camera companies make different RAW files. For example Canon is CR3, Olympus ORF, Adobe is DNG.
Think of it this way:
Film: Negative -> Print
Digital: RAW -> JPEG
Not all cameras have RAW shooting mode. All DSLRs do though.
Get rid of the ads!
Did you enjoy reading this article as much as we enjoyed writing it? There's a way to support us and our reporting, getting ad-free navigation and more as a bonus. Subscribe to us for less than a coffee per month —just $3.99— or take advantage of our yearly subscription with a hefty discount for only $25.- An ad-free experience
- A free mystery box for Lightroom or Capture One
- All the books in our store
- 20% discount on Capture One
- 30% discount on Imalume Photo Theft Protection
- 20% off Herbs and Kettle Tea Company.
- 20% off your order from MPIX printing services.
- 5% off Viltrox Products via their eCommerce store.
- 10% off all film developing, printing and scanning services from Blue Moon Camera and Machine
- 15% off 7Artisans products: The lens and accessory maker is offering a sweet discount for Phoblographer's readers.