
Want to dip your toes into film photography but don’t know where to begin? Here’s a quick checklist for you.
Film is not dead, and you’re living proof of it for wanting to try it out. Maybe you were curious after seeing some film photos in your Instagram feed. Or, you came across film photographers whose work you really liked. Perhaps you found your grandparents’ old film cameras and have been wondering if they’re still working. Whatever your reason, this simple checklist should help you get started.
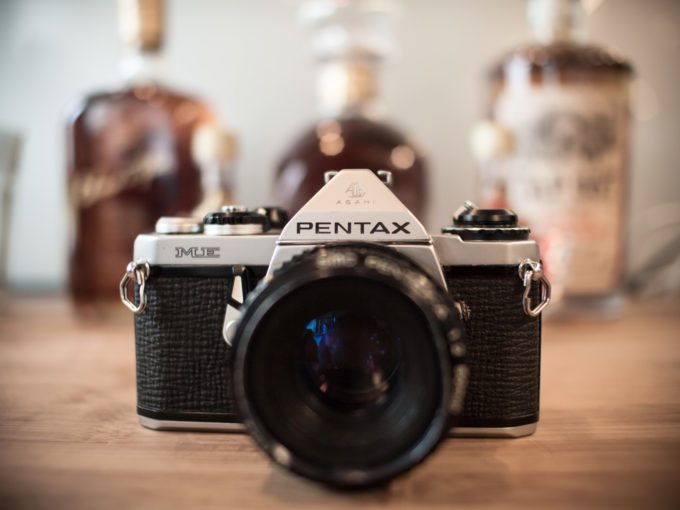
✔ A 35mm Film SLR Camera
There are several types of film cameras out there, but we recommend something simple for learning the ropes of film photography well. An inexpensive 35mm film SLR with manual controls is perfect, and is easy to find in yard sales, thrift shops, and on eBay. It offers a WYSIWYG view of what you’re shooting and focusing on, as opposed to a rangefinder (two overlapping images have to be aligned) or a TLR camera (right-to-left reversed image through the waist-level viewfinder). But if you’re willing to splurge on a more advanced model with a built-in light meter, choose one that has at least an aperture priority mode. This will help a lot if you’re not yet comfortable with manual photography.
What about point and shoot cameras and disposable cameras? Well, sure, you can use one of those too. But if you really want to learn how to shoot in manual mode, they won’t do anything for you. If anything, keep one for fun, casual shoots or spur-of-the-moment photo walks. One last thing — don’t forget to check what batteries your camera uses if it has a built-in light meter. These models won’t let you shoot in any of the semi-automatic modes without batteries.
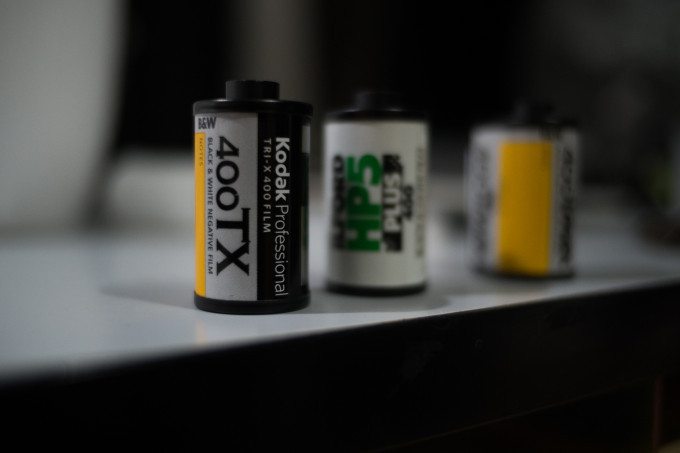
✔ Films
Of course, you can’t shoot with a film camera without film. There are plenty of options, so feel free to grab a variety of films with different ISOs. Since we suggested using a 35mm SLR camera, get 35mm films. Color negative films are readily available, and all film labs can easily process and scan them. Make sure you stock more of those inexpensive 100 ISO and 400 ISO films because they are what you will practice with. Use 100 ISO films if you’re shooting in bright daylight, and 400 ISO films closer to the Golden Hour or in bright indoor locations.
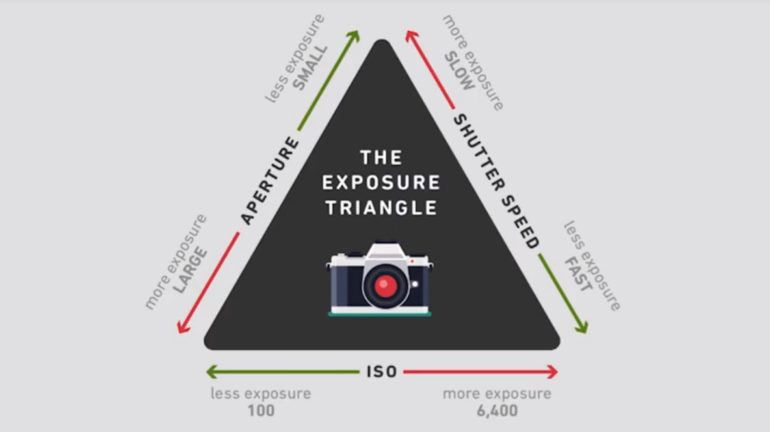
✔ Understand How the Exposure Triangle Works
Once you have a working camera and some film, you’re ready to shoot. Since you’ll be shooting with some manual settings, you have to rely on your understanding of how the Exposure Triangle works. Basically, it’s a balance of three fundamental exposure elements: aperture, shutter speed, and ISO. For this part, we suggest checking out our many resources for getting the hang of the Exposure Triangle.
When you’re shooting in manual mode with a simple film SLR camera, you’re in charge of setting these values yourself. On the one hand, it can be intimidating to know you may end up with a crappy shot if one (or all) of your exposure settings is off. On the other hand, it can be empowering to realize you are in charge of how your photos will look. You can open yourself up to more creative approaches by shooting manual.

✔ Composition
As with digital photography, composition is key when shooting with film. It’s an even more pressing matter since you can’t afford to waste frames, being limited to 24 or 36 exposures per roll. To increase your chances of getting better photos, you have to work on your composition, regardless of what you’re photographing. Refer to this photography cheat sheet with 19 composition tips to help your film photography practice.
✔ An Open Mind
The film photographers whose works you now see and admire on social media once struggled when they were still starting out. Expect some wasted rolls, developing mishaps, film loading boo-boos, happy accidents, overexposures, underexposures, light leaks, and grainy photos. Some photographers will tell you that it’s all part of the learning process and the charm of the medium. You may or may not agree as you progress in your film photography journey, but it’s important to keep an open mind and shoot with an understanding that the results will be significantly different compared to shooting with your smartphone or digital camera.

✔ Accessories/Nice to Have
As with digital photography, shooting with film can be easier with the help of some accessories and “nice to have” stuff. You may or may not want to go for any of these while you’re starting out, but they’re worth considering once you’re a little further along.
Light meter: If your film camera doesn’t have a built-in light meter, you might want to invest in a handheld light meter. It will ensure accurate exposures for all kinds of shooting conditions. It’s especially helpful for shooting portraits and using slide films. If it’s out of your budget at the moment, you may opt for a simple “paper light meter” for your practice.
Tripod: A tripod is handy for a variety of shooting conditions and genres, especially in low light conditions, long exposures, and landscape photography. You may consider investing in one if you find yourself doing more of these.
Film photography groups and communities: Online groups and communities are great for times when you need some tips and technical advice, or film photography inspiration. Just beware of toxic community members!
Film photography portfolio: Once you’ve amassed a body of work you like and feel comfortable with, we’re sure you’ll want to share your results and track your progress. Consider showcasing your photos in a film photography portfolio once you get to this point.
Get rid of the ads!
Did you enjoy reading this article as much as we enjoyed writing it? There's a way to support us and our reporting, getting ad-free navigation and more as a bonus. Subscribe to us for less than a coffee per month —just $3.99— or take advantage of our yearly subscription with a hefty discount for only $25.- An ad-free experience
- A free mystery box for Lightroom or Capture One
- All the books in our store
- 20% discount on Capture One
- 30% discount on Imalume Photo Theft Protection
- 20% off Herbs and Kettle Tea Company.