
Last Updated on 10/15/2019 by Mark Beckenbach
Learn how to avoid overexposing the sky in your landscape snaps with today’s nifty photography cheat sheet.
Overexposing the sky is one of the tricky parts of landscape photography. Because the sky is often brighter than the rest of the scene, it’s easy to blow out the details and end up with an unflattering sky when shooting in Auto mode. With today’s photography cheat sheet, you’ll learn how to avoid that by exposing for the sky.
The photography cheat sheet below by Digital Camera World comes in their usual flowchart format to help you evaluate the scene and make adjustments or use the right tools to achieve the best exposure. It is a continuation of the exposing for landscapes cheat sheet, so if you haven’t seen that yet, you can pull it up from here. Both cheat sheets work in tandem to ensure both the landscape and the sky are properly exposed with as much detail as possible.
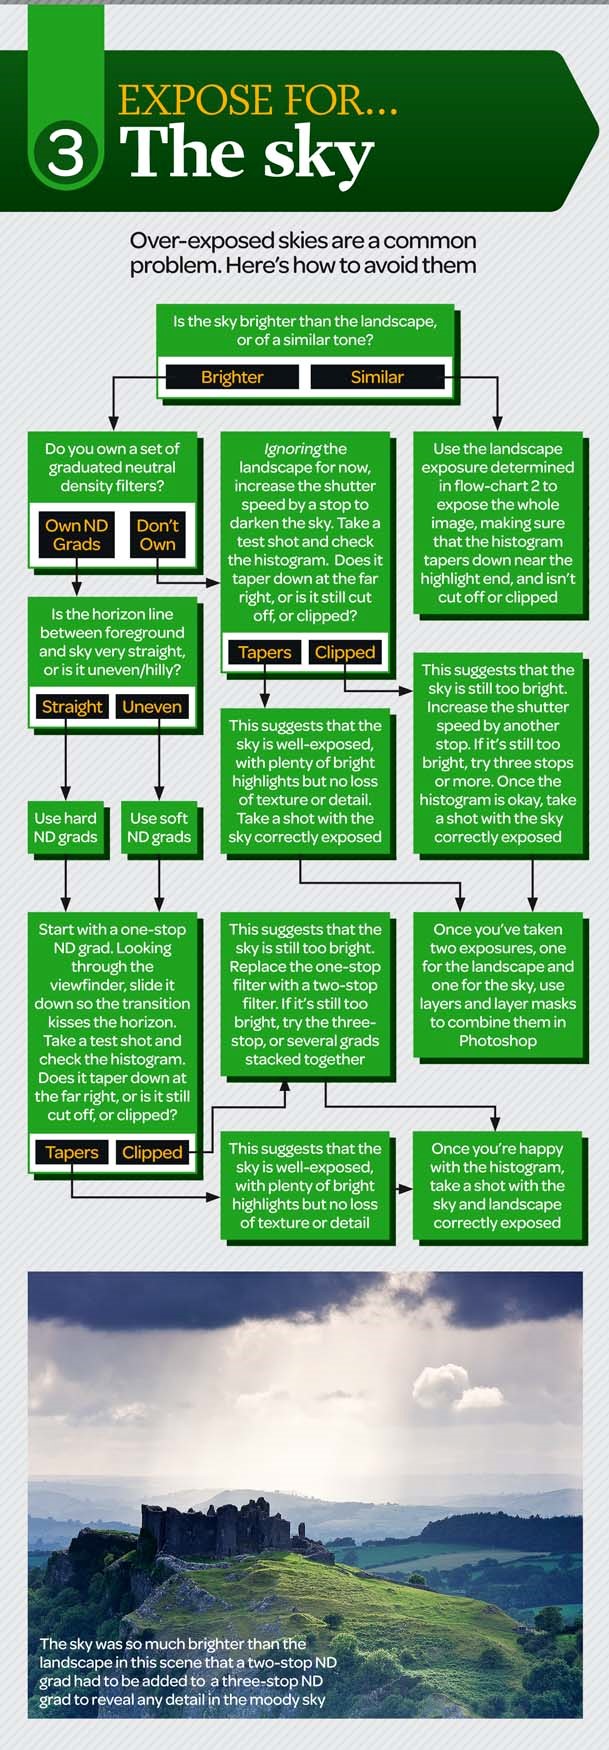
The flowchart begins with an evaluation of the sky. If it’s brighter than the landscape, it’s best to use graduated neutral density filters to control the brightness. Use hard ND grads if the horizon between the foreground and the sky is straight, or soft ND grads if it looks uneven. Begin with a one-stop ND grad, looking through the viewfinder to align the transition with the horizon as you slide it down over the lens. Take a test shot then check the histogram. If it tapers down to the far right, your sky is already well-exposed. If it’s clipped or cut off, use a two-stop filter or stack several filters together. Check the histogram again and add a filter until it suggests a good exposure for the sky. Take a final shot with the sky and landscape correctly exposed.
You can still work with the scene if you don’t have ND grad filters. You’ll need to make two exposures — one for the sky and another for the landscape. After taking a well-exposed shot of the landscape, increase the shutter speed by one stop and take a shot of the sky next. Add more stops if necessary, based on how your histogram looks, until you get a properly exposed shot. Combine the two shots together in Photoshop using layers and layer masks.
If the landscape and the sky are of similar tones refer to the landscape exposure flow chart to expose the entire scene. As always, take note of the histogram and make sure the highlight end isn’t cut off or clipped.
Need more photography tips and tricks like this? Check out our collection of photography cheat sheets so far!
Get rid of the ads!
Did you enjoy reading this article as much as we enjoyed writing it? There's a way to support us and our reporting, getting ad-free navigation and more as a bonus. Subscribe to us for less than a coffee per month —just $3.99— or take advantage of our yearly subscription with a hefty discount for only $25.- An ad-free experience
- A free mystery box for Lightroom or Capture One
- All the books in our store
- 20% discount on Capture One
- 30% discount on Imalume Photo Theft Protection
- 20% off Herbs and Kettle Tea Company.