
Last Updated on 07/11/2019 by Mark Beckenbach
While a handheld light meter is ideal, this paper “light meter” could still be handy in a pinch.
One of the major challenges of shooting with film then, and now, is shooting in manual mode. This is especially the case if you’re shooting with a fully manual camera that lacks a built-in light meter. You either have to get yourself a reliable handheld light meter, or train yourself to “read” light so you can adjust your camera settings for the right exposure. Thankfully, there’s a neat printable guide — let’s call it a cheat sheet while we’re at it — that you can use as a paper “light meter” during your shoots.
Called Exposure-Mat, this “No Battery Exposure Meter” was designed by Dave Harris, a collector of classic rangefinder cameras. I’m sure it has been saving the photo walk snaps of many film photographers since it came out back in 2003. According to the Exposure-Mat website, Harris was looking for tips on exposure and exposure meters back then, which led him to a simple cut-out light meter (interestingly called “Really Clever Pocket Exposure Calculator”) by Rick Oleson. He used it as a basis to create several paper card prototypes and came up with both the Exposure-Mat and Exposure Mat Mini for miniature cameras.
The Exposure-mat is based on the Sunny 16 rule, which says that if you’re shooting on a bright sunny day, your aperture should be at f16 while shooting with ISO 100 film. Under these conditions, you’ll be able to get correctly exposed photos when you set your shutter speed at the reciprocal of your film speed (so 1/100th of a second, with 1/125th often the closest value in most modern cameras today). More about the Sunny 16 rule here.
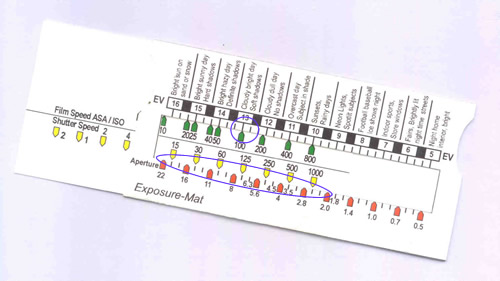
So, if the idea interests you, download the Exposure-Mat PDF file, print it on 140 gsm card stock, and follow the assembly instructions. You’ll need a craft knife, ruler, and glue, and when you’re done you should have two pieces: the holder with exposure value (EV) and aperture indicators, and the Film Speed and Shutter Speed card to slide into it.
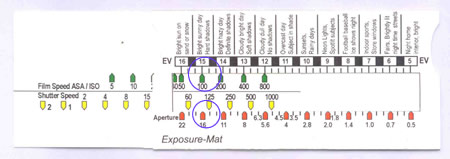
To use, align the ISO or film speed that you want to use with your estimated Exposure Value at the top of the window. Then, read the possible aperture and shutter speed combinations at the bottom of the window. So, in the first example provided above, a bright and sunny day with hard shadows would have an EV of 15. If you’re shooting at ISO 100, that will give you an aperture of f16 and shutter speed of 1/125, just as the Sunny 16 rule indicates.
Now, in the second example, shooting at ISO 100 on a bright but cloudy day with soft shade (EV 13), the shutter speed and aperture combinations show a range of 1/15s at f22, to 1/1000s at f2.8.
You can always use your film boxes as a guide. But in case you’re curious anyway, go ahead and try it out today, and please share your results with us!
Get rid of the ads!
Did you enjoy reading this article as much as we enjoyed writing it? There's a way to support us and our reporting, getting ad-free navigation and more as a bonus. Subscribe to us for less than a coffee per month —just $3.99— or take advantage of our yearly subscription with a hefty discount for only $25.- An ad-free experience
- A free mystery box for Lightroom or Capture One
- All the books in our store
- 20% discount on Capture One
- 30% discount on Imalume Photo Theft Protection
- 20% off Herbs and Kettle Tea Company.
- 20% off your order from MPIX printing services.
- 5% off Viltrox Products via their eCommerce store.
- 10% off all film developing, printing and scanning services from Blue Moon Camera and Machine
- 15% off 7Artisans products: The lens and accessory maker is offering a sweet discount for Phoblographer's readers.