Creating the Photograph is an original series where photographers teach you about how they concepted an image, shot it, and edited it. The series has a heavy emphasis on teaching readers how to light. Want to be featured? Email chrisgampat[at]thephoblographer[dot]com.
In the early 90’s, photographer Travis Singleton got his hands on a Minolta XD-5 35mm film camera. then he took a break from photographer and went digital. Born on a small farm in rural Nova Scotia, he grew up on the east coast of Canada. Even during his younger days, he had an interest in photography. “As I didn’t have the money, I would buy the rolls of film to take pictures but often didn’t get them developed.” he tells us in an email. “Or I would put the roll aside to get developed later, only to forget.”
Fast forward way ahead to 2015, and his company, 20two19 Photography, started to get noticed through social media by local businesses, and has now worked with a number of businesses and professionals in town including the Shawn & Ed Brewing Company, Dundas Museum, Dundas, WIllow Salon, The Red Door Cucina, the Dundas Farmers’ Market, Jax Sweet Shoppe and others.
Besides all of Travis’ commercial work though, he still manages to get creativity; and sometimes he finds the inspiration in his adorable daughter. When the family went to go see Star Wars Rogue One recently, he was inspired by the film to create this pretty awesome photo.
Here’s his story. Be sure to follow Travis on Facebook, Instagram, Twitter, and Website.
The Concept
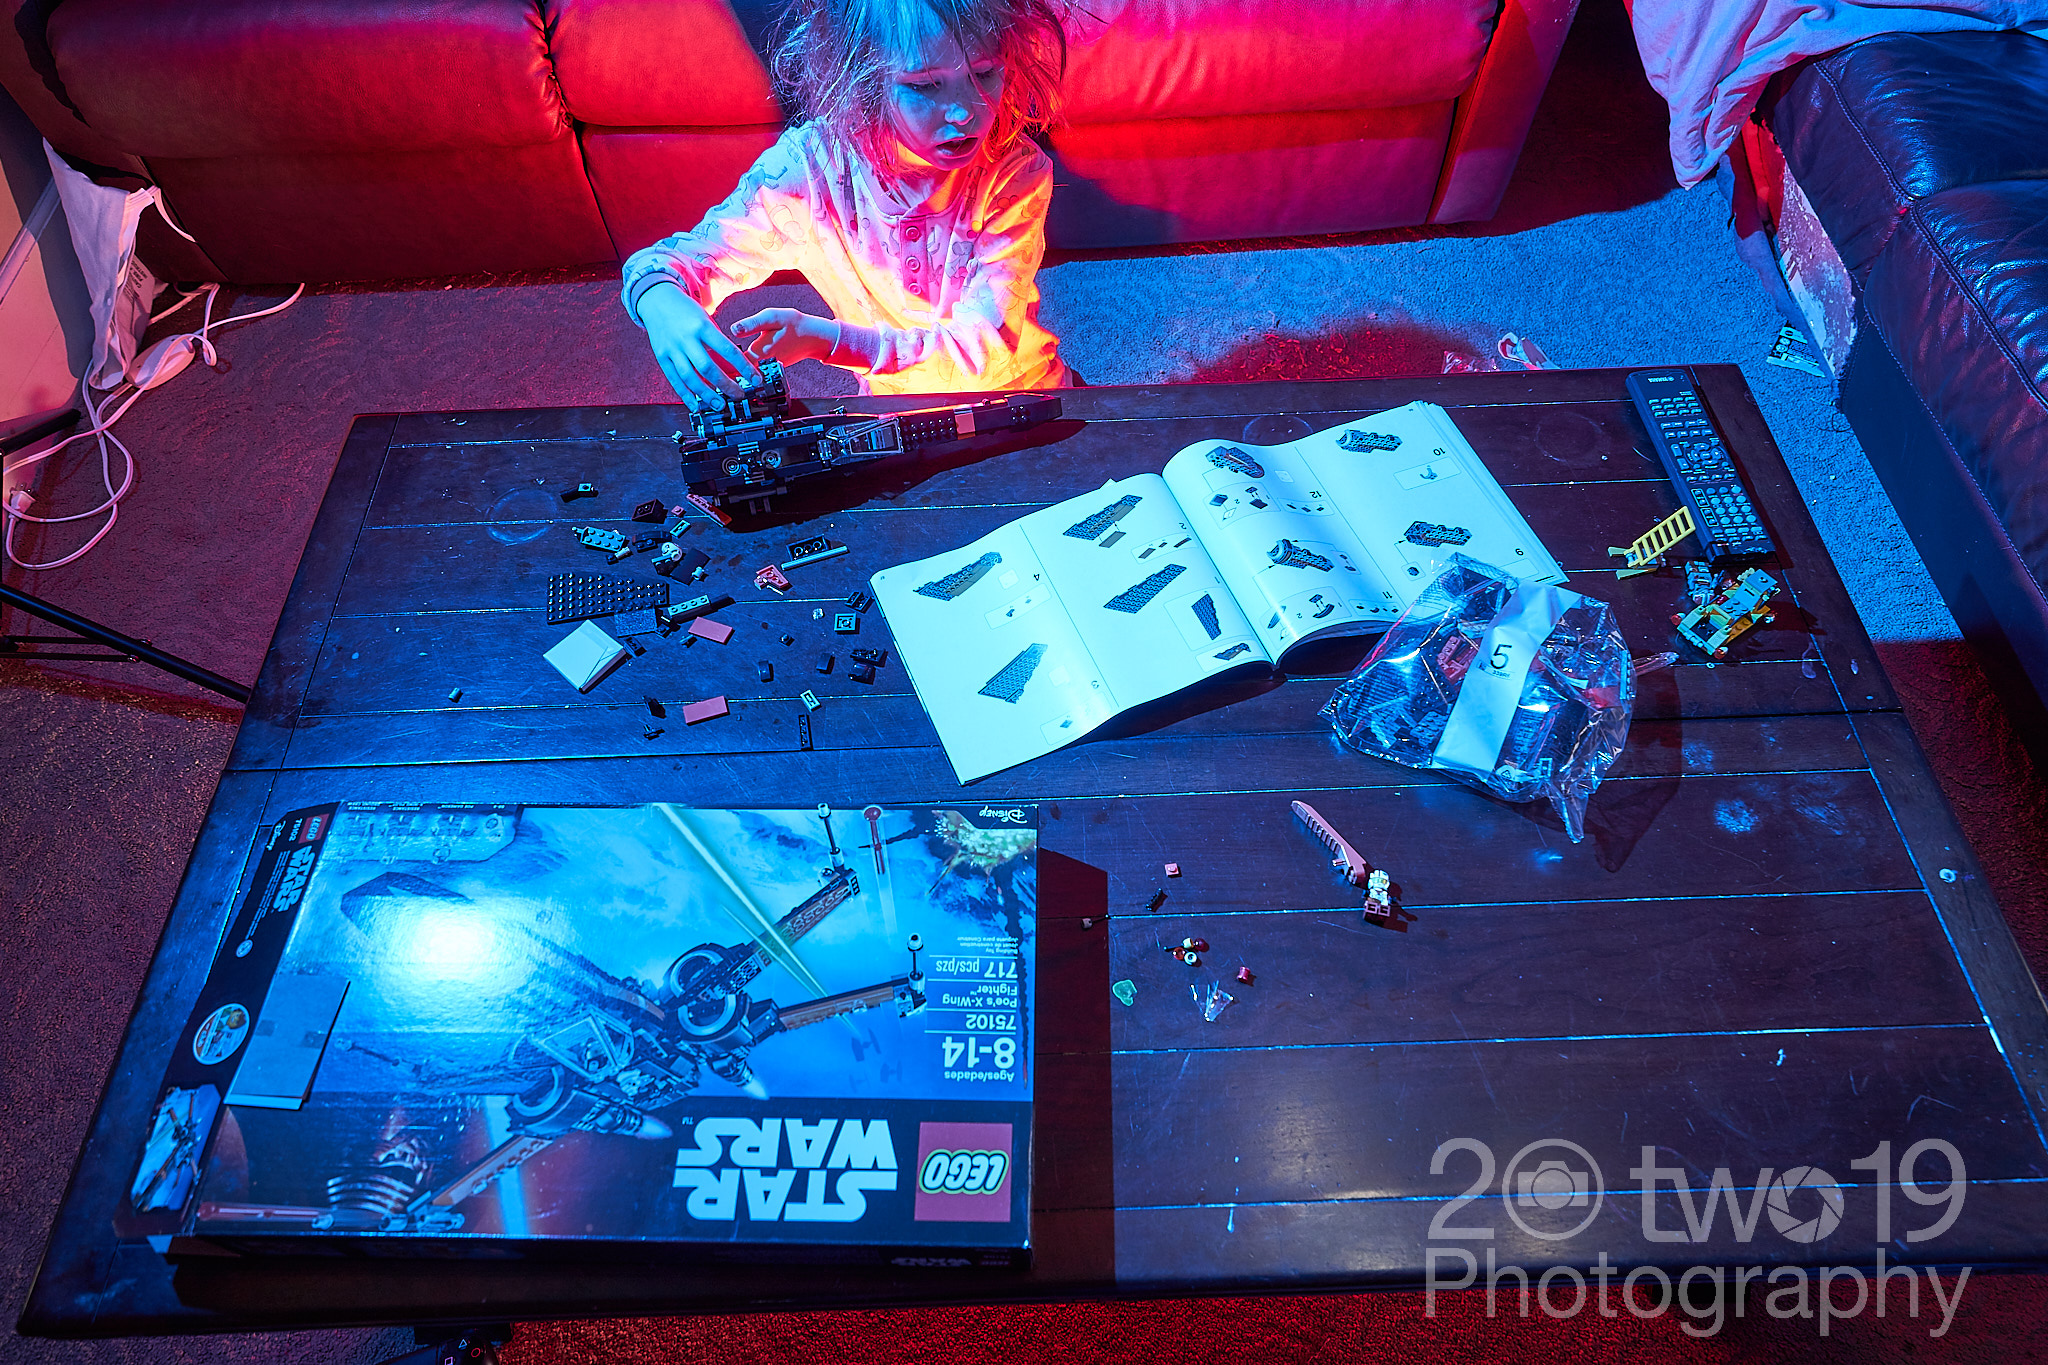
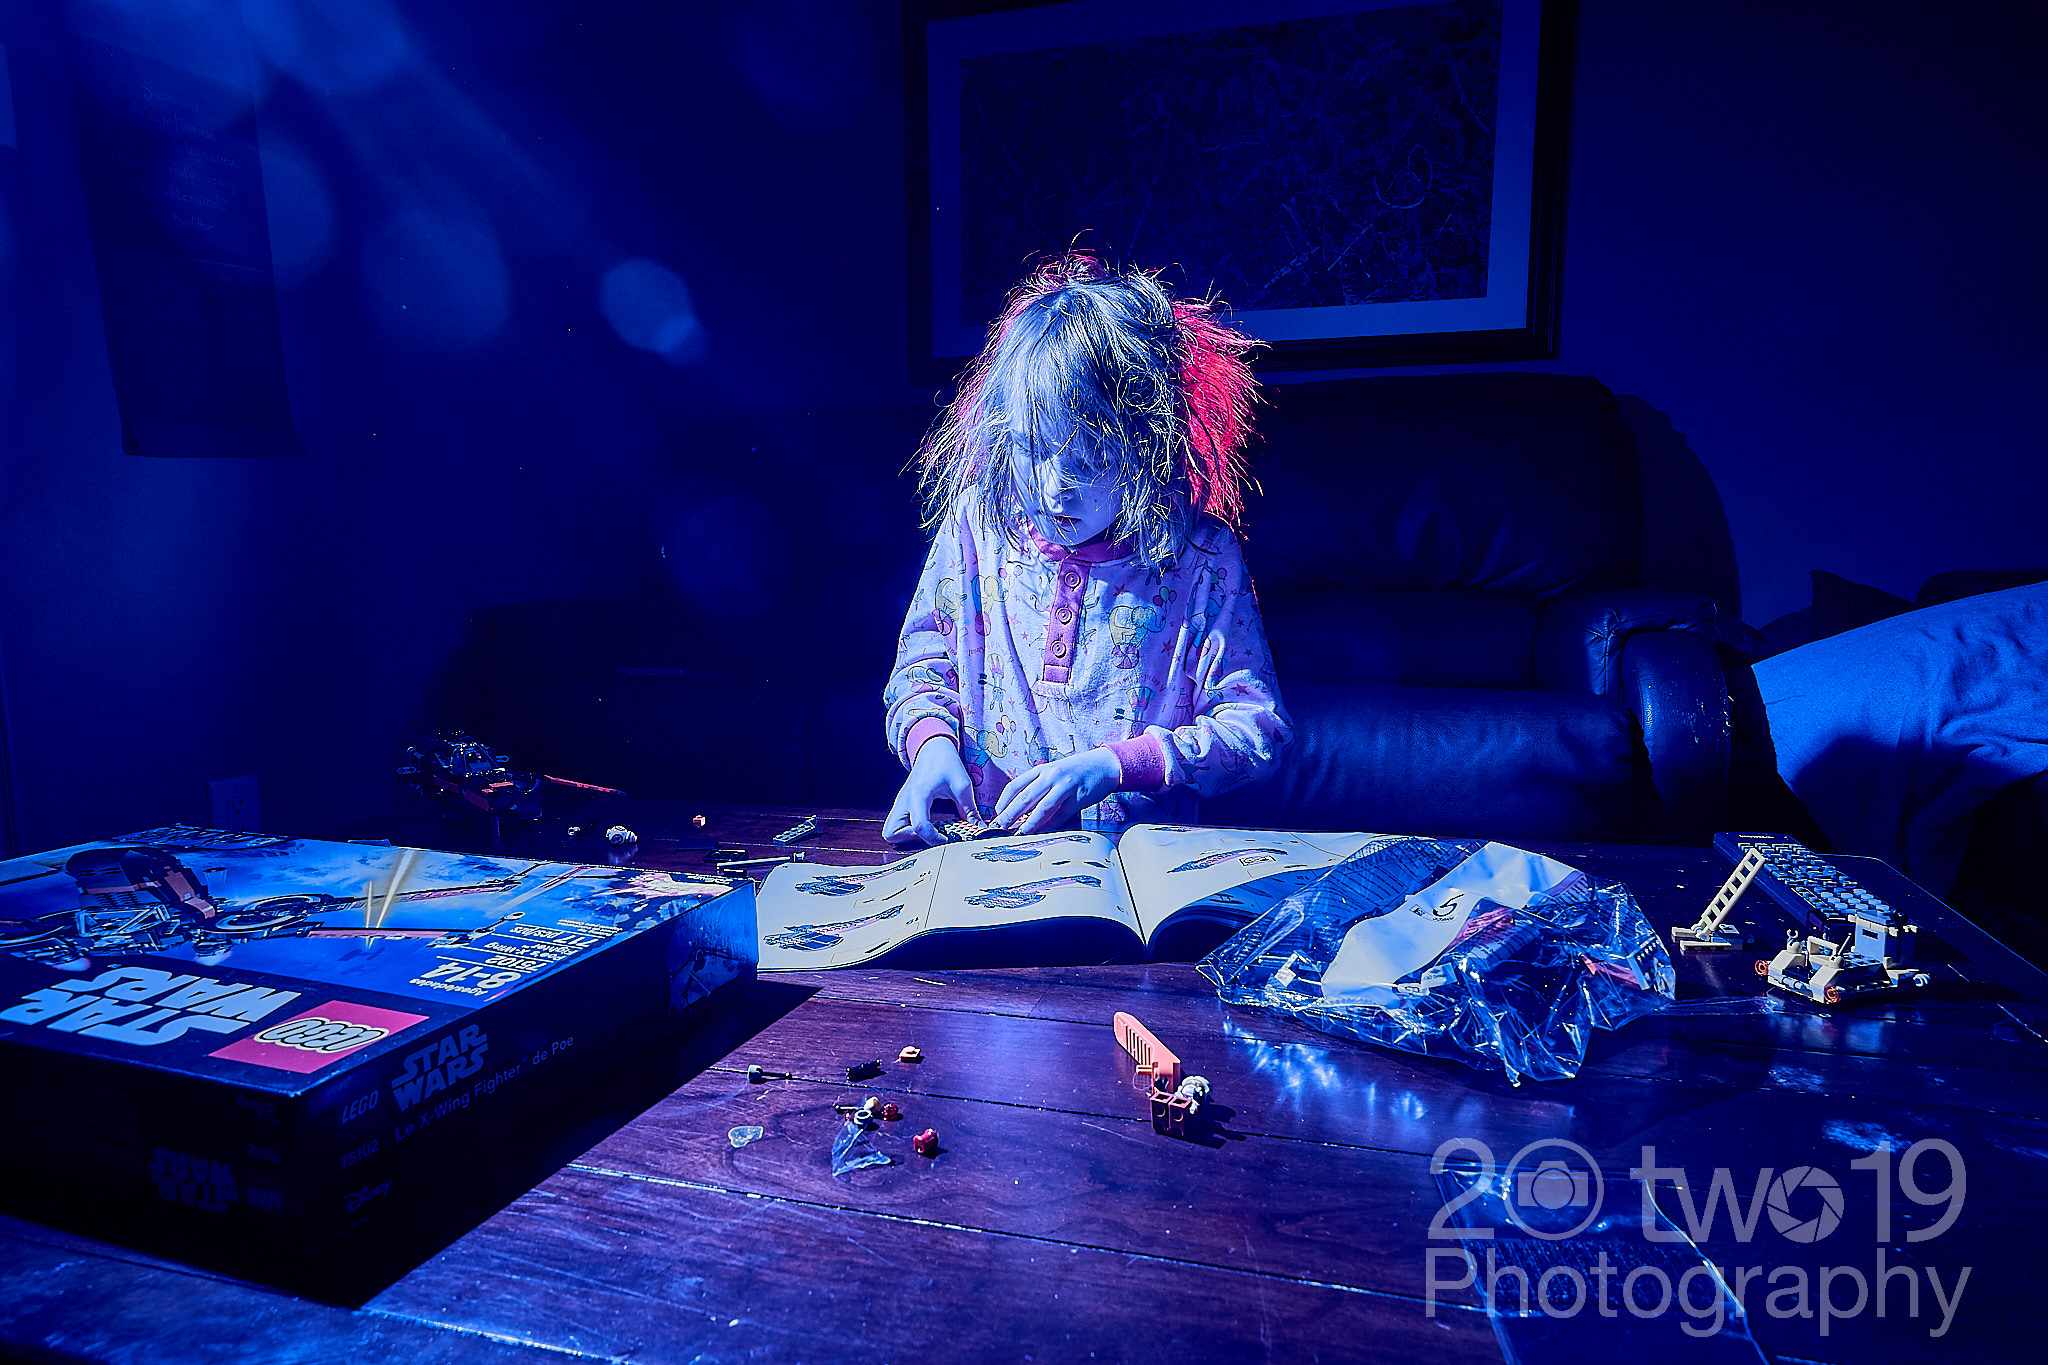
Our family had gone to see Star Wars- Rouge One before Christmas of last year (2016) and my daughter was super excited that she had received Poe’s X-Wing Fighter Lego set as a gift. She loves building lego sets and this one was no different.
The Gear
- Sony a7 (mark i)
- Sony Zeiss 16-35mm f4 ZA OSS len
- 2x Godox TT685S flashes with X1Ts trigger
- Westcott Tripod that came with my Apollo Orb
- Flash Gels
The Shoot
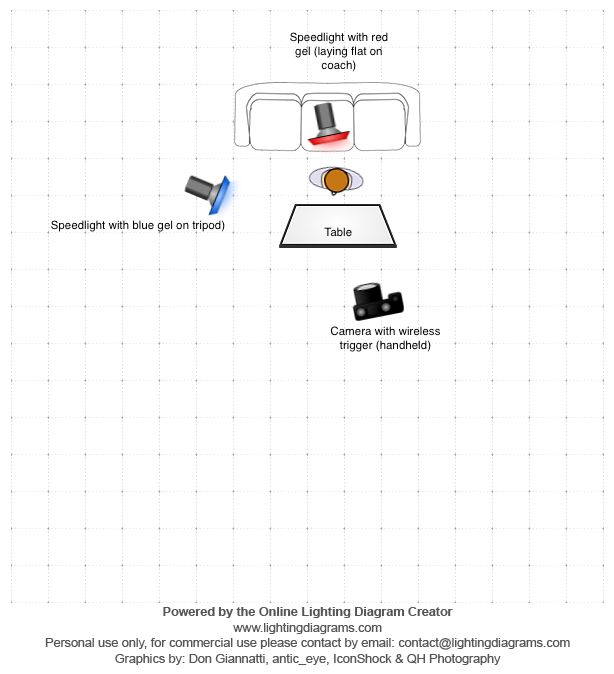
Setup:
- Godox flash with blue gel on tripod to camera left, high pointing down.
- Godox flash with red gel directly behind subject head.
- Camera hand held
Camera Setting on final shot:
ISO 200, 1/200 sec f/11 at 21mm. Flash power not recorded.
I wanted to capture this moment in a more creative way with off camera flash. So I grabbed my Sony camera and one flash on a tripod. To set the mood I place a blue gel on the flash and tried to keep the power lower for better color effect. I also set the white balance to Tungsten for more blue in the look. I took about three shots this way and decided it just wasn’t enough.
At first it was just a few basic shoots with blue light but then I decided to add a second flash with a red gel and place it under the table she was working at in our living room. I kind liked the effect and shot a number of photos (12) from above trying to get all the table where she was working. See concept 1 & 2 photos.
While there were pretty cool, I just wasn’t loving the photo.
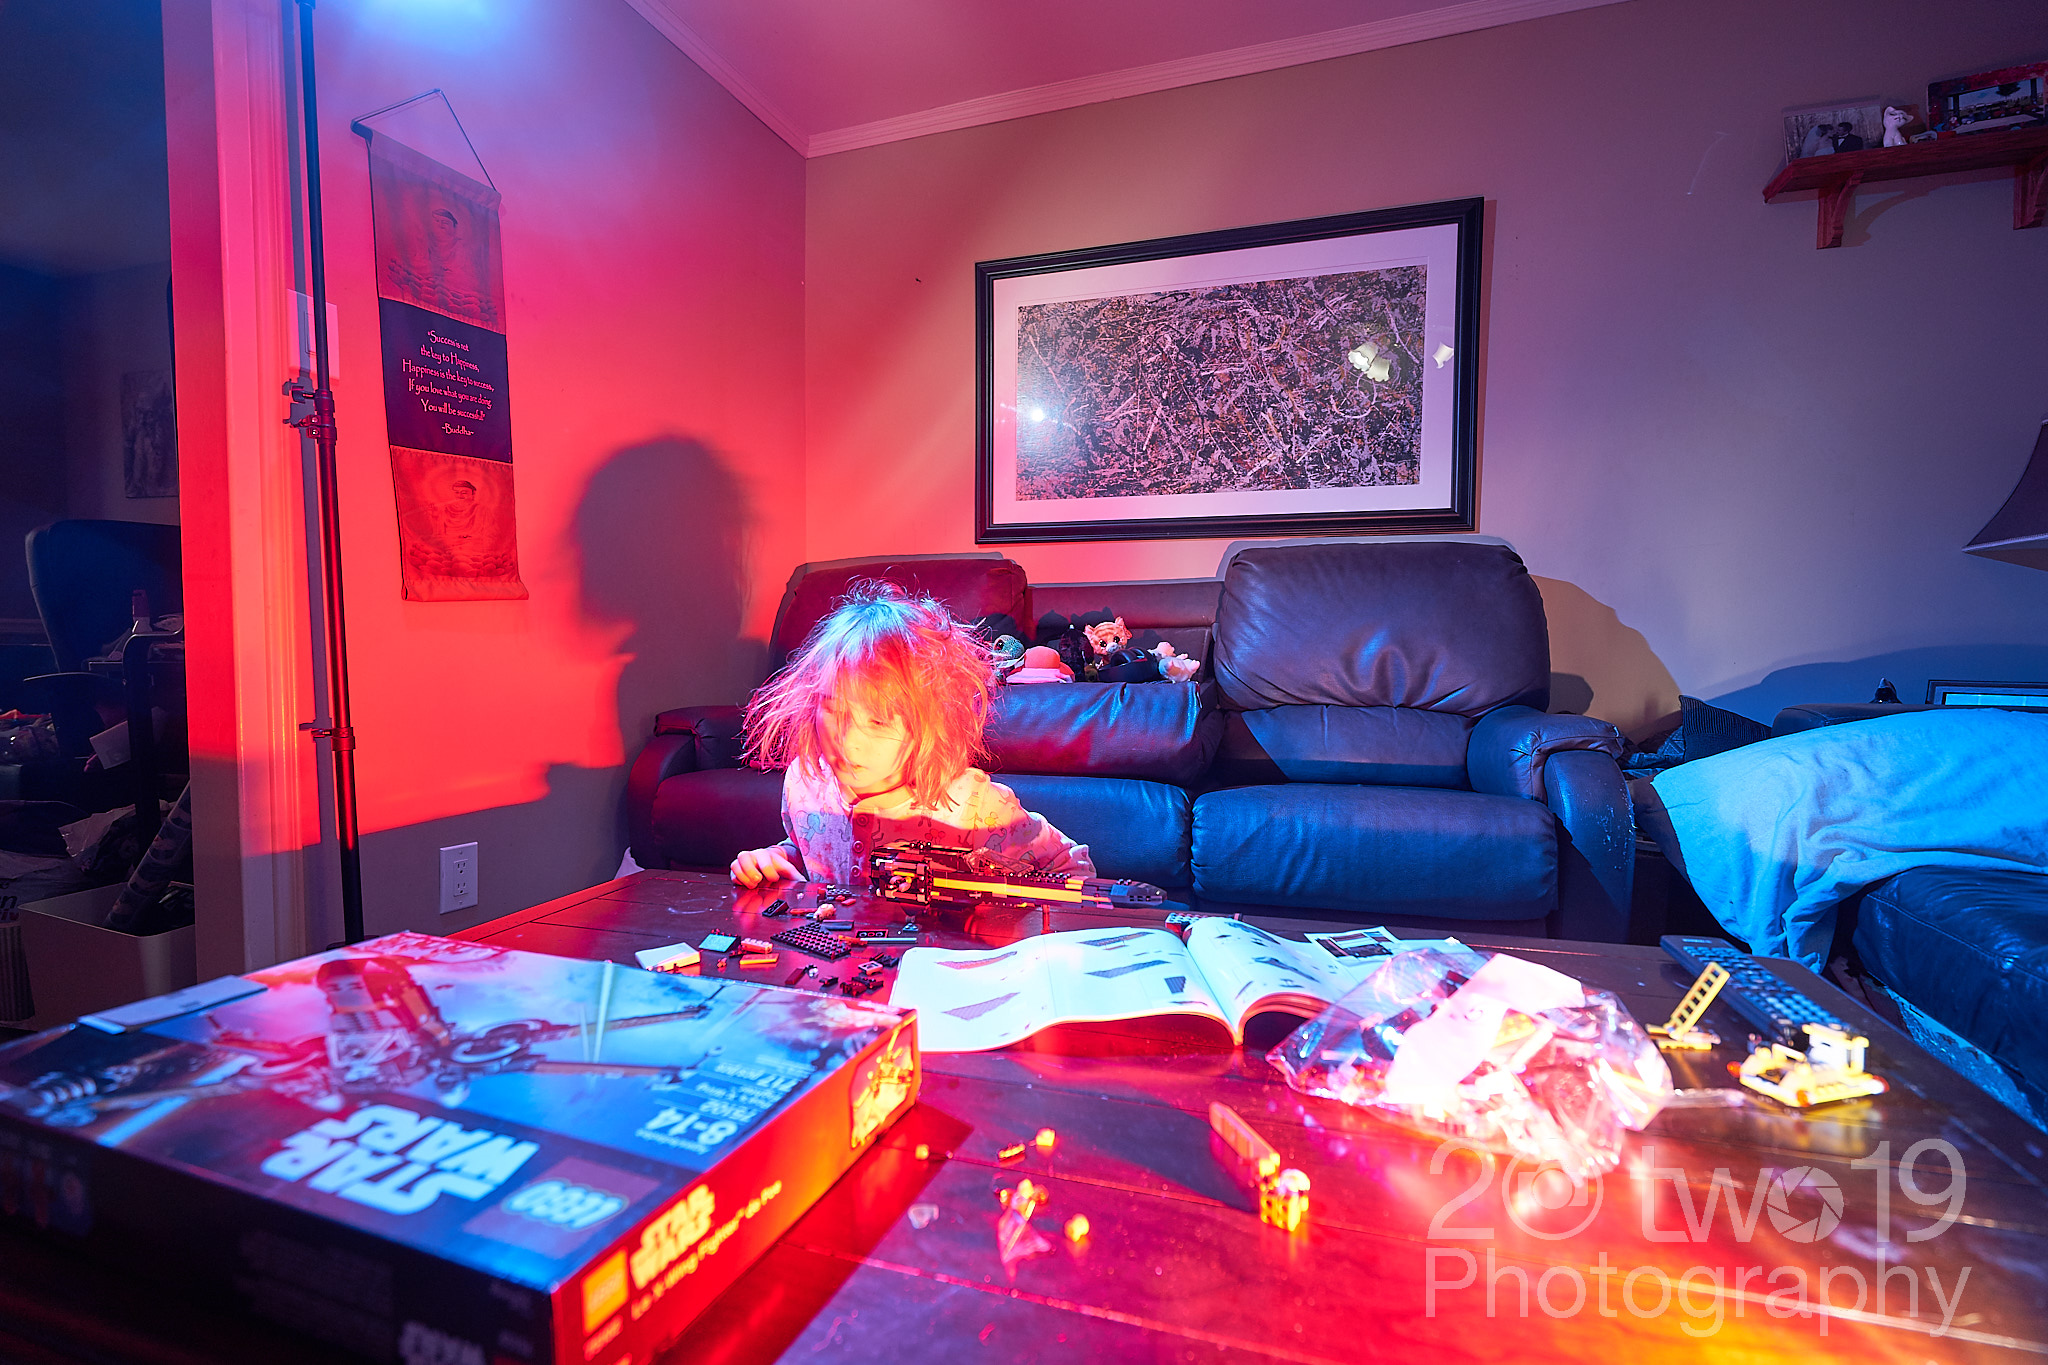
Next, I switched to sitting on the floor shooting at her level and moved the red gel flash to behind me from the right to oppose the blue gel flash still on the tripod. Better. I was liking the angle better and the effect the blue light was having on the lens, almost causing a flare.
Still not there, the whole photo was too bright, so I changed the aperture from f4 to f11 and this presented a better mode for what I wanted.
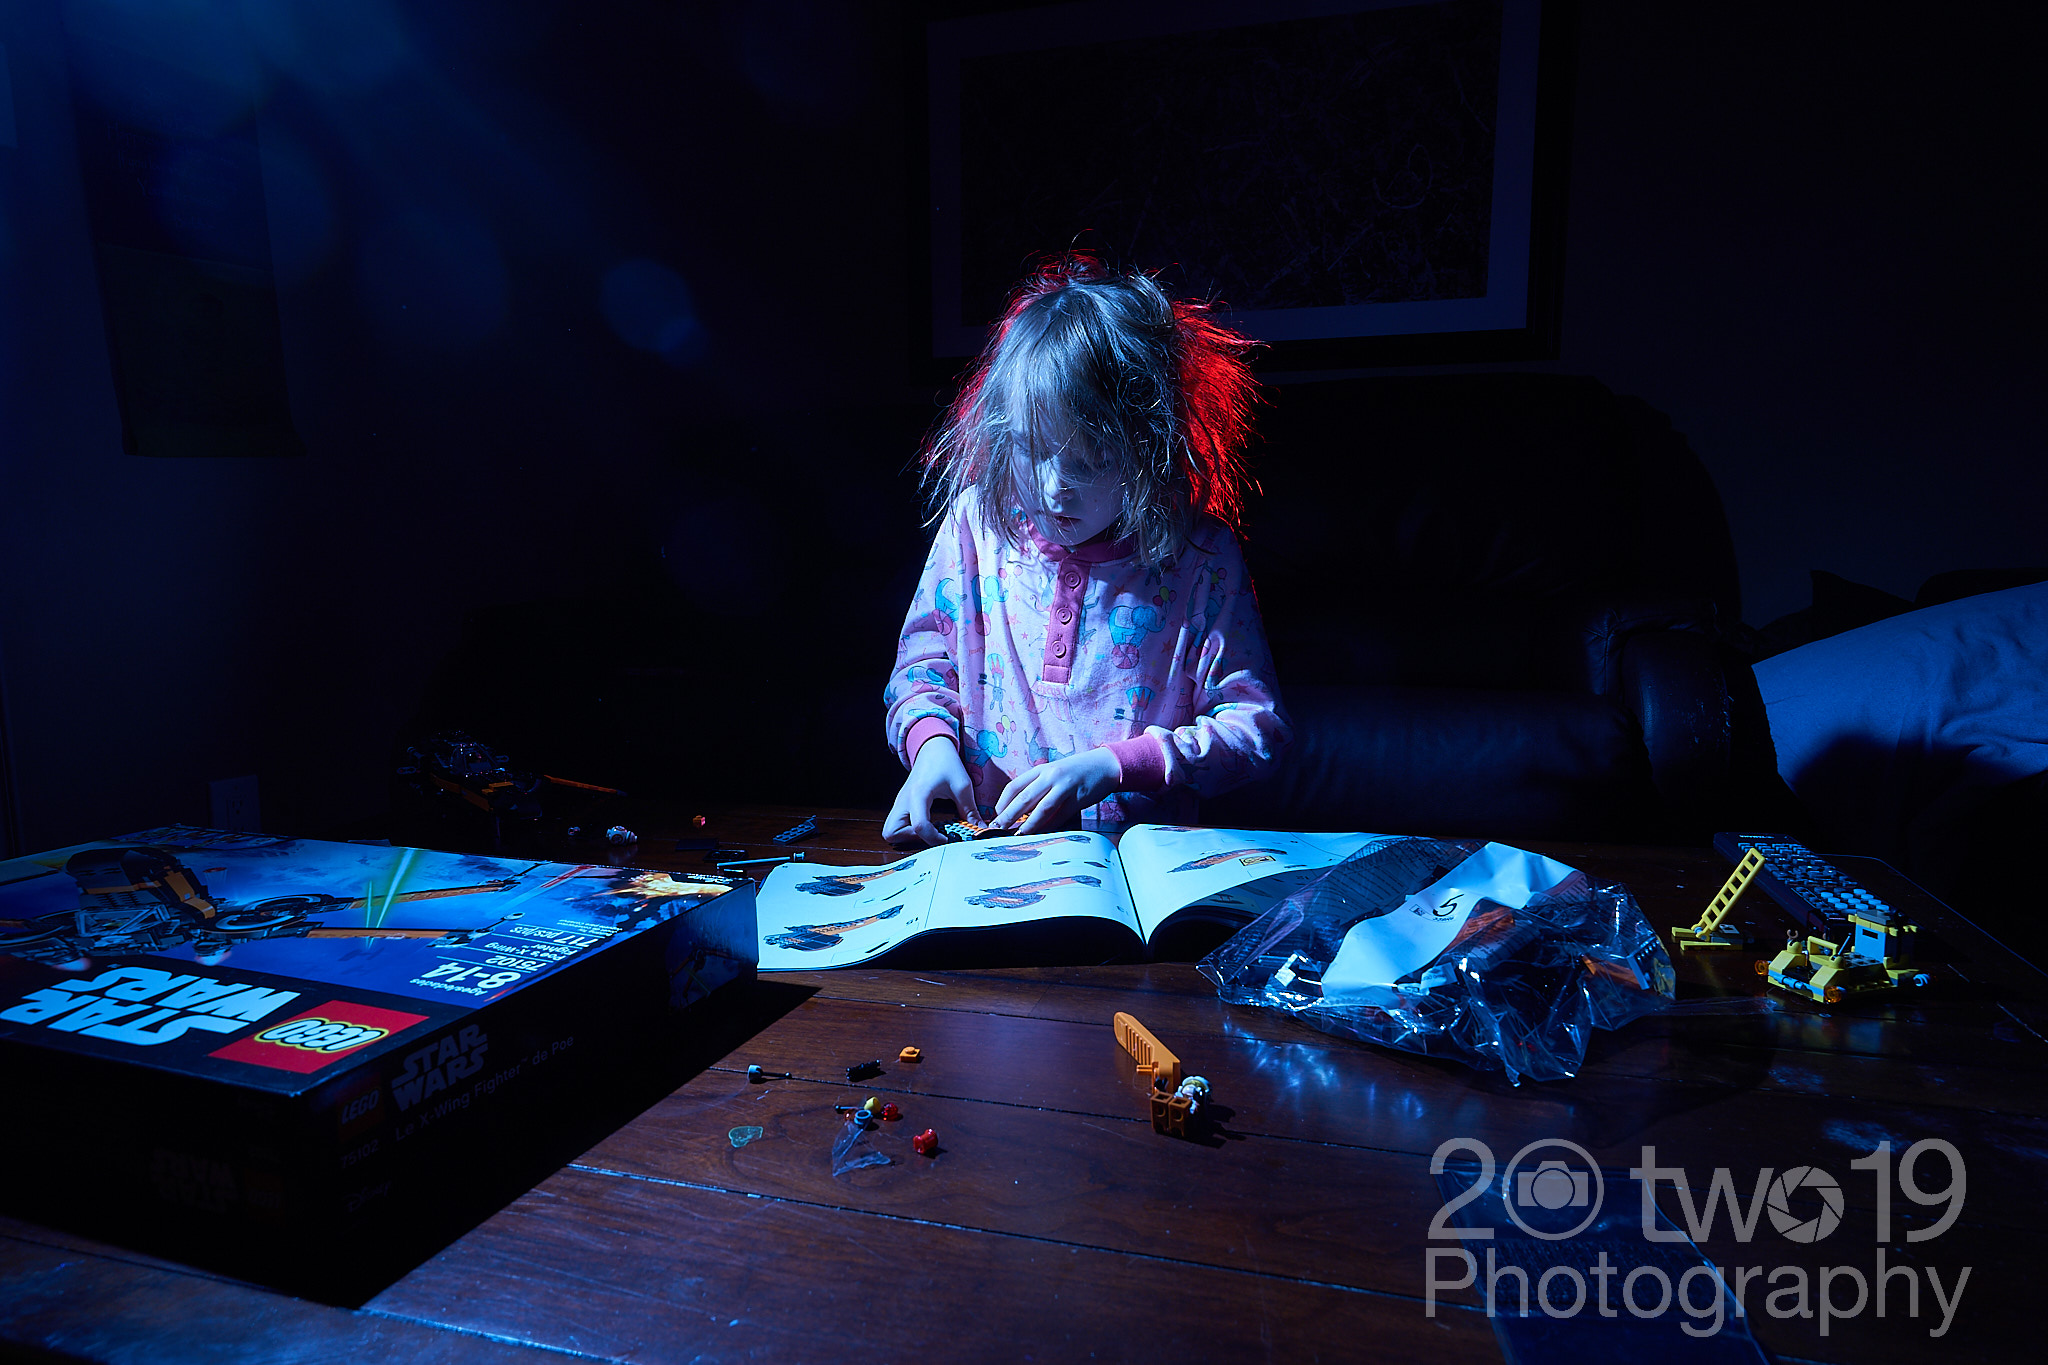
It wasn’t until I moved the red flash directly behind my daughter’s head that the photo popped for me. Her messy morning hair backlit with red light, and blue light on the rest of the scene. In total it took 36 images to get the final shot.
Post Production

I use Capture One Pro Sony Edition. I usually start from the top and work my way down in CO1 Pro and adjusted the white balance to a little more cooler, from 2700 down to 2100. I brought the exposure up almost 1 stop and did very minor tweaks to contrast and brightness, no saturation. I always play with the highlight and shadow sliders and pushed down the highlights to 78 and the shadows came up to 50.
A minor adjustment to the Luma Curve brought the shadows down and highlights up just a touch. A couple of adjustment were also made to the red & blue levels sliders. The red bottom highlight slider was lowered to 242 from 255. The blue slider has a few more adjustment on it. Top shadow slider up to 4, mid lower slider to 0.10 and bottom highlight lowered to 248.

Clarity was also punched to 25 and 50 for Clarity and Structure.
Sharpening was punched to 700 but countered with Halo Suppression to 100. Luminance Noise
Reduction was increased slightly from 50 to 56.

One of my favourite tools of Capture One Pro is the Colour balance wheels and I always tend to add blues in the shadows, I increased the blues midway on the wheel and lowed the luminance almost all the way. Mid-tones were giving just a hint of blue. I also like the Colour Editor tab, I punched the magenta (top slider) just a bit (+7) in saturation and gave Blue (+25) and Red (+20) but dropped the cyan colour almost all the way (-70). Dropping the cyan allowed the pages on the lego direction to remain white as they had a colour cast to them. And the final touch was -1 stop with an Elliptic Vignette. A lot of times, I make use of the Local Adjustment brush, but I did not in this case.
Before/After
Get rid of the ads!
Did you enjoy reading this article as much as we enjoyed writing it? There's a way to support us and our reporting, getting ad-free navigation and more as a bonus. Subscribe to us for less than a coffee per month —just $3.99— or take advantage of our yearly subscription with a hefty discount for only $25.- An ad-free experience
- A free mystery box for Lightroom or Capture One
- All the books in our store
- 20% discount on Capture One
- 30% discount on Imalume Photo Theft Protection
- 20% off Herbs and Kettle Tea Company.
- 20% off your order from MPIX printing services.
- 5% off Viltrox Products via their eCommerce store.
- 10% off all film developing, printing and scanning services from Blue Moon Camera and Machine
- 15% off 7Artisans products: The lens and accessory maker is offering a sweet discount for Phoblographer's readers.