Last Updated on 12/10/2015 by Chris Gampat
When it comes to HDR imagery, it’s tough to beat Trey Ratcliff–and that’s why Macphun collaborated with him to create Aurora HDR. The software works as both a standalone program or as a plugin for a myriad of software; and is designed to give users better HDR images with relative ease. Aurora HDR is by Macphun, the same folks who created Noiseless Pro–with many of them being former Nik Software employees. To refresh, Noiseless Pro won an Editor’s Choice award.
I was given a demo of Aurora HDR before it was announced; and I had a bit of familiarity with the software. Since its launch, there have been updates that allow Lightroom users to export images with the current edits that they’ve done to their photos. That’s incredibly important if you didn’t get it right in camera to begin with.
On average, it has some major advantages over what Adobe Lightroom offers with their Photo Merge HDR process. But on the other hand, it also has its quirks.
Pros and Cons
Pros
- A full embrace of the HDR mindset mixed in with fun
- An editing panel that can be both advanced and pretty simple.
- Faster to process HDR images than Adobe’s own Photo Merge process from start to finish; though the actual merging process can take longer. Adobe slows down when you apply effects to the merge.
- Works absolutely fantastic with Fujifilm RAW files
- Offers a plugin for Aperture, Photoshop Elements, Photoshop CC and Adobe Lightroom.
Cons
- The color panel offers no orange adjustments and therefore goes against conventional thinking when approaching color theory.
- While TIFF files are cool, I’d really be in love with this program if it offered exports as DNG files.
Features
Specs taken from the press bracket
● Revolutionary HDR algorithms make possible the entire spectrum of HDR looks, from natural to highly stylized.
● Total HDR editing experience with the most complete set of tools available.
● Powerful oneclick presets, including Signature Pro presets by Trey Ratcliff, yield fantastic results instantly.
● Layers, masking and brushes provide the ultimate in selective editing.
● Unique Radiance controls and custom texture blending for creative versatility.
● Detail enhancement to increase drama in images.
● Extensive color and toning controls for vibrant color combinations.
● Approachable user interface makes for a comfortable, understandable experience.
● Builtin sharing supports popular photo communities and social networks.
● RAW, JPG, TIFF and other popular files support for the greatest flexibility.
● Workflow tailored to any style with support for using as a standalone app or as a plugin to popular host applications.
Ease of Use
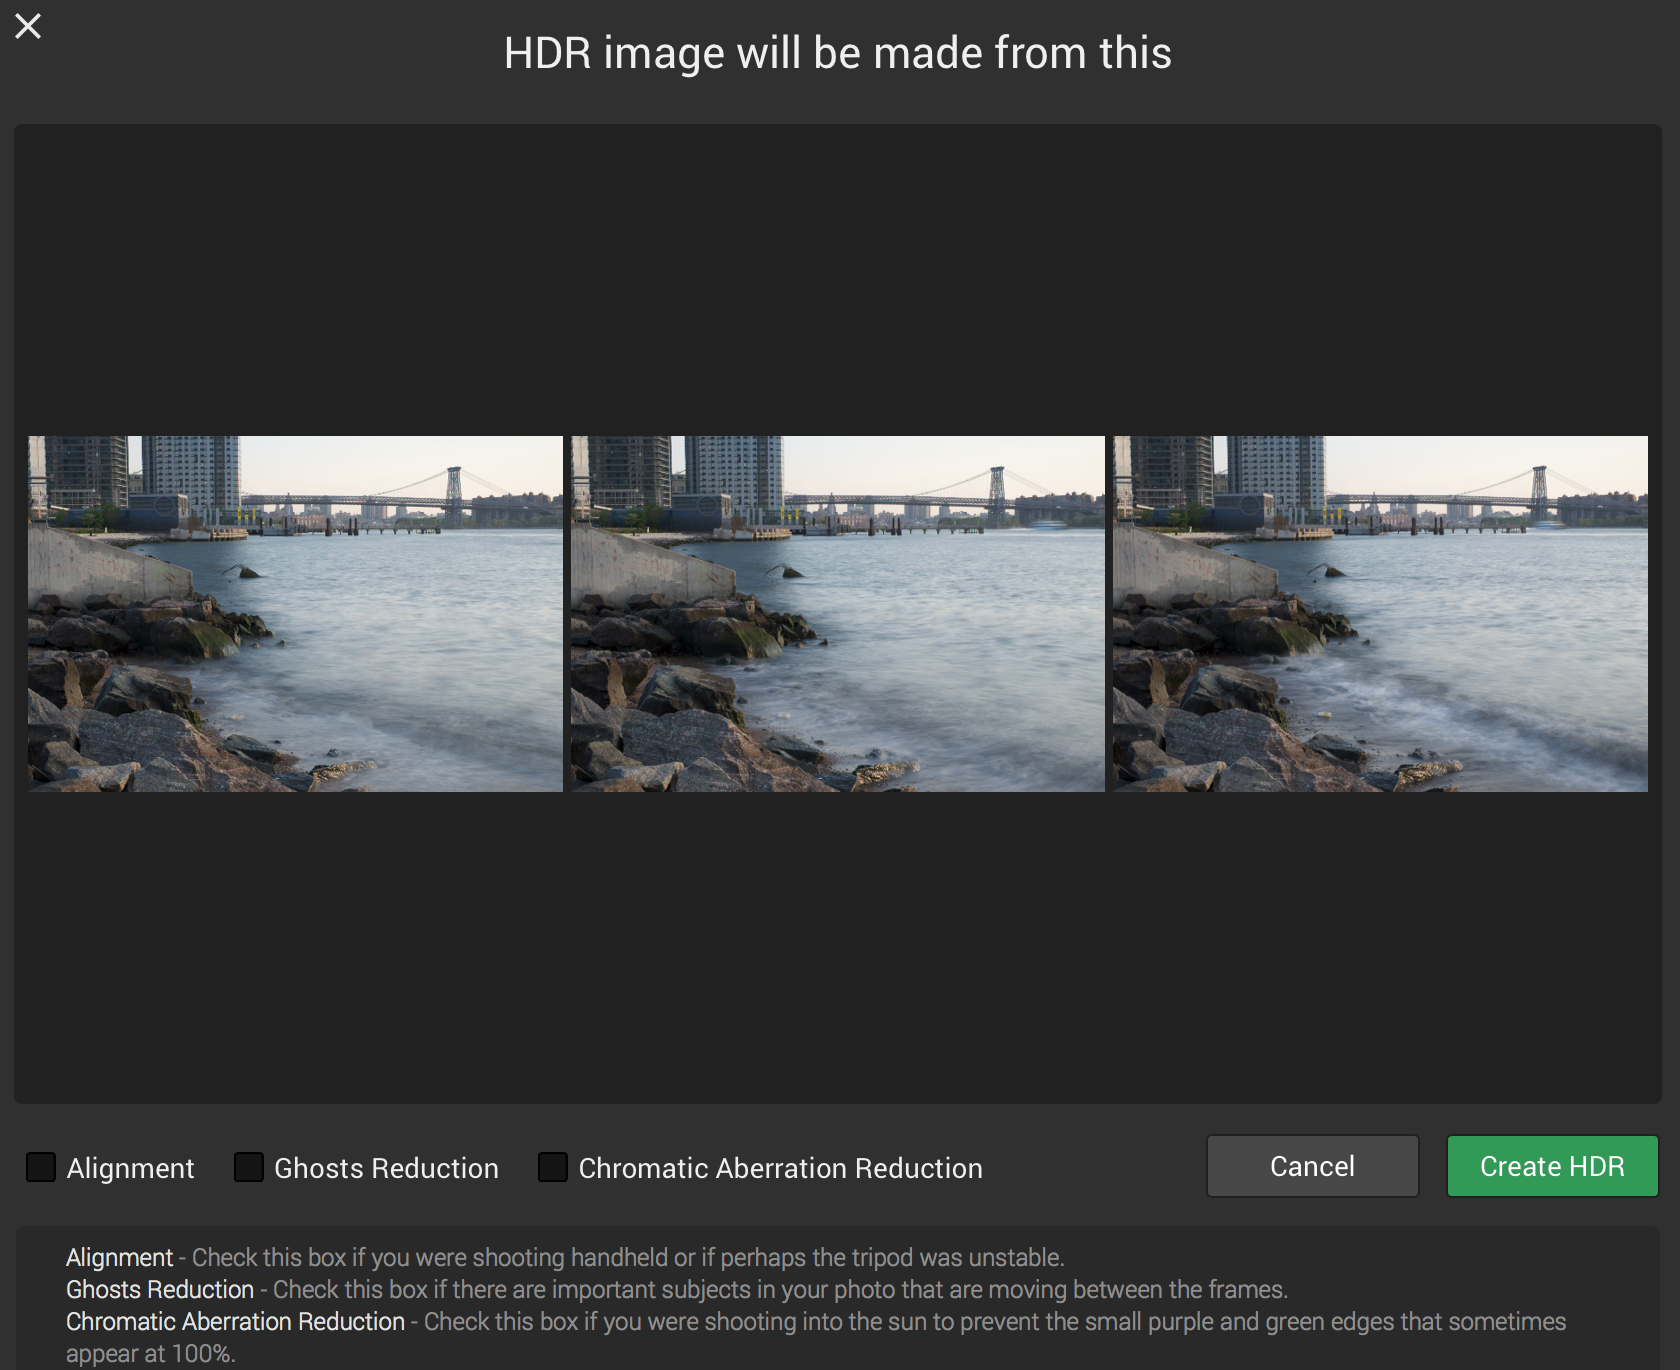
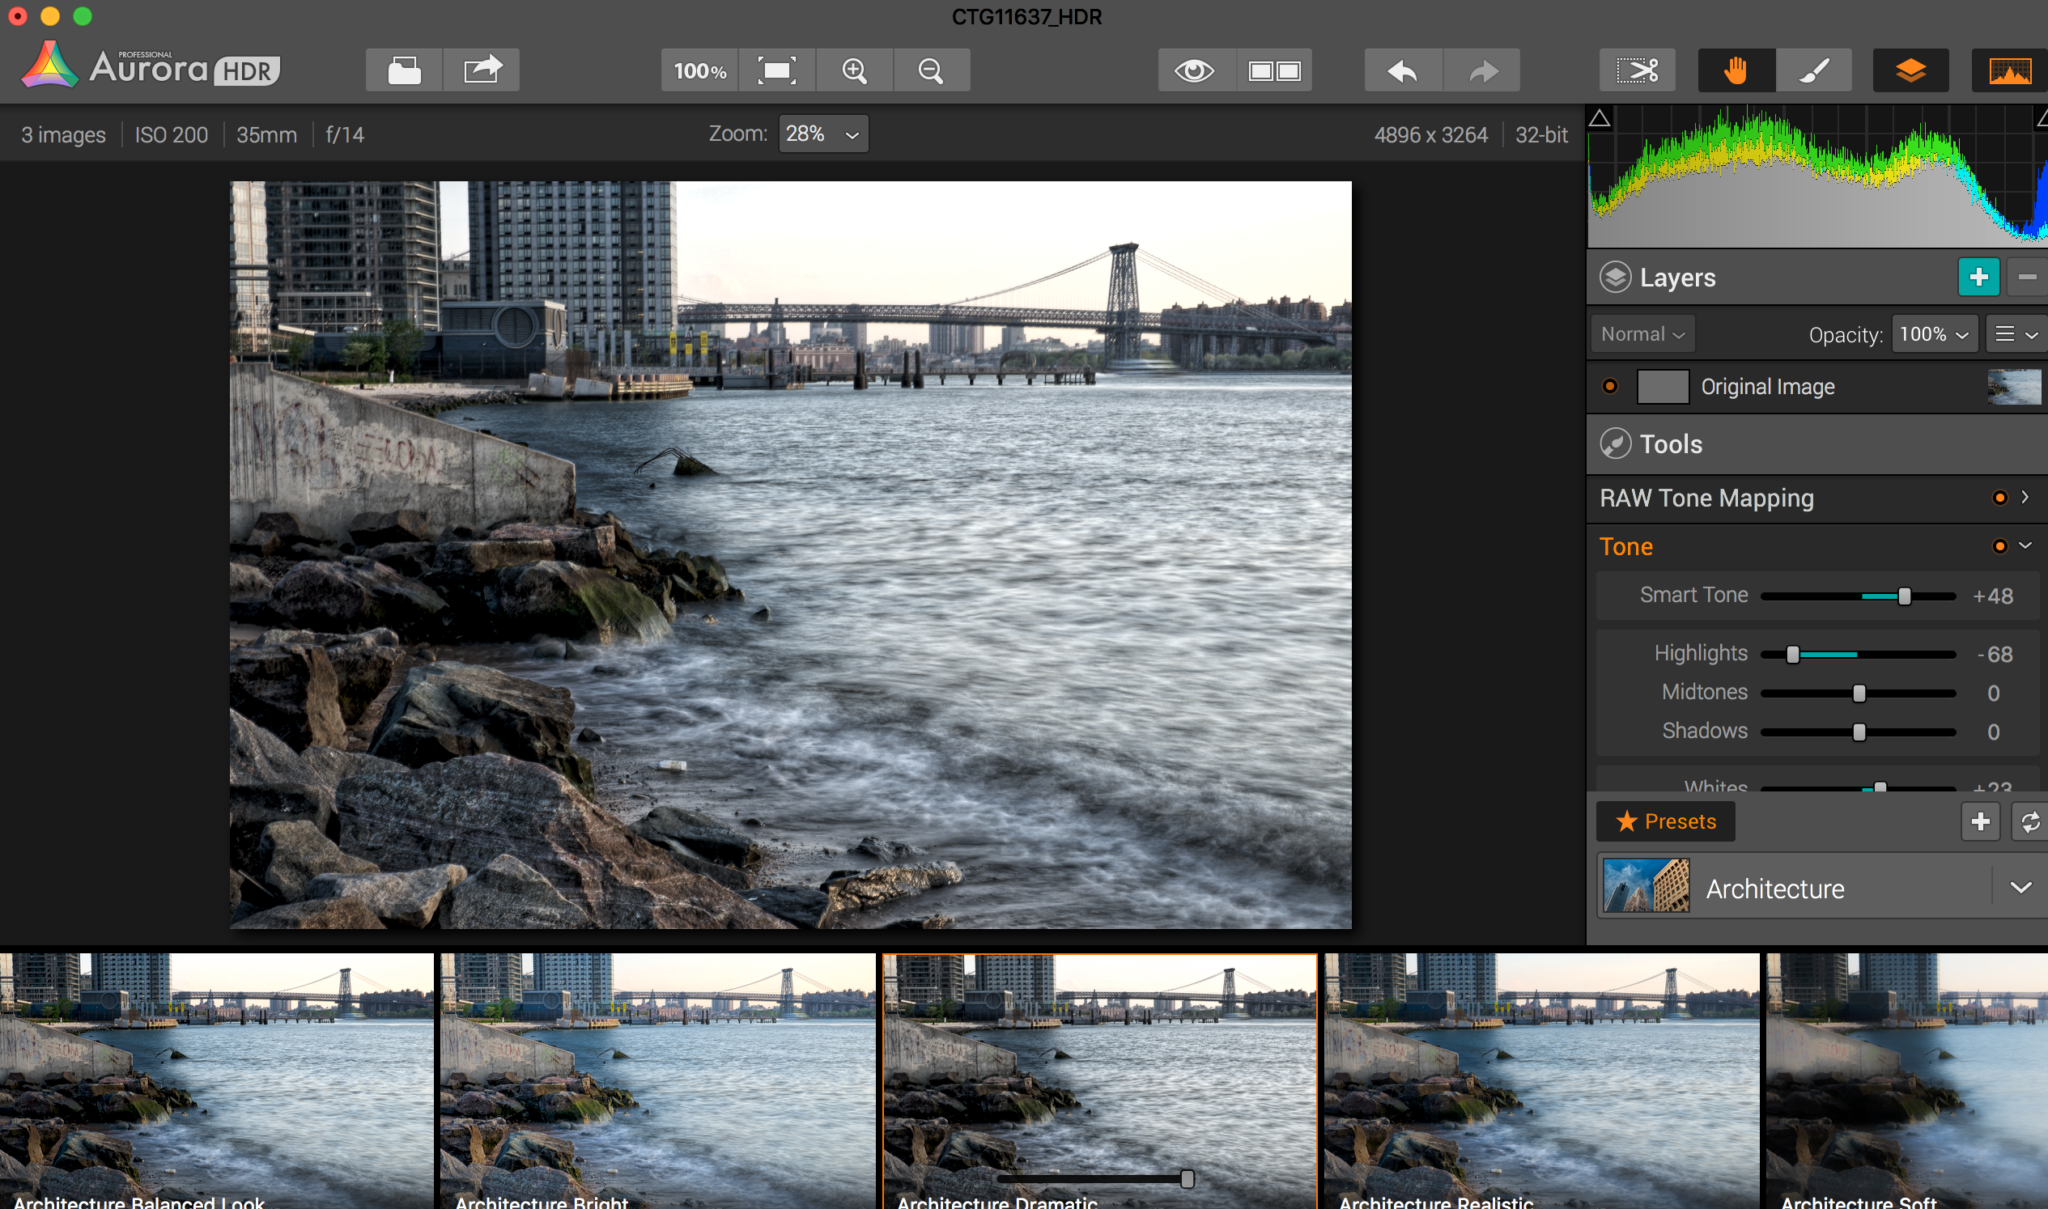
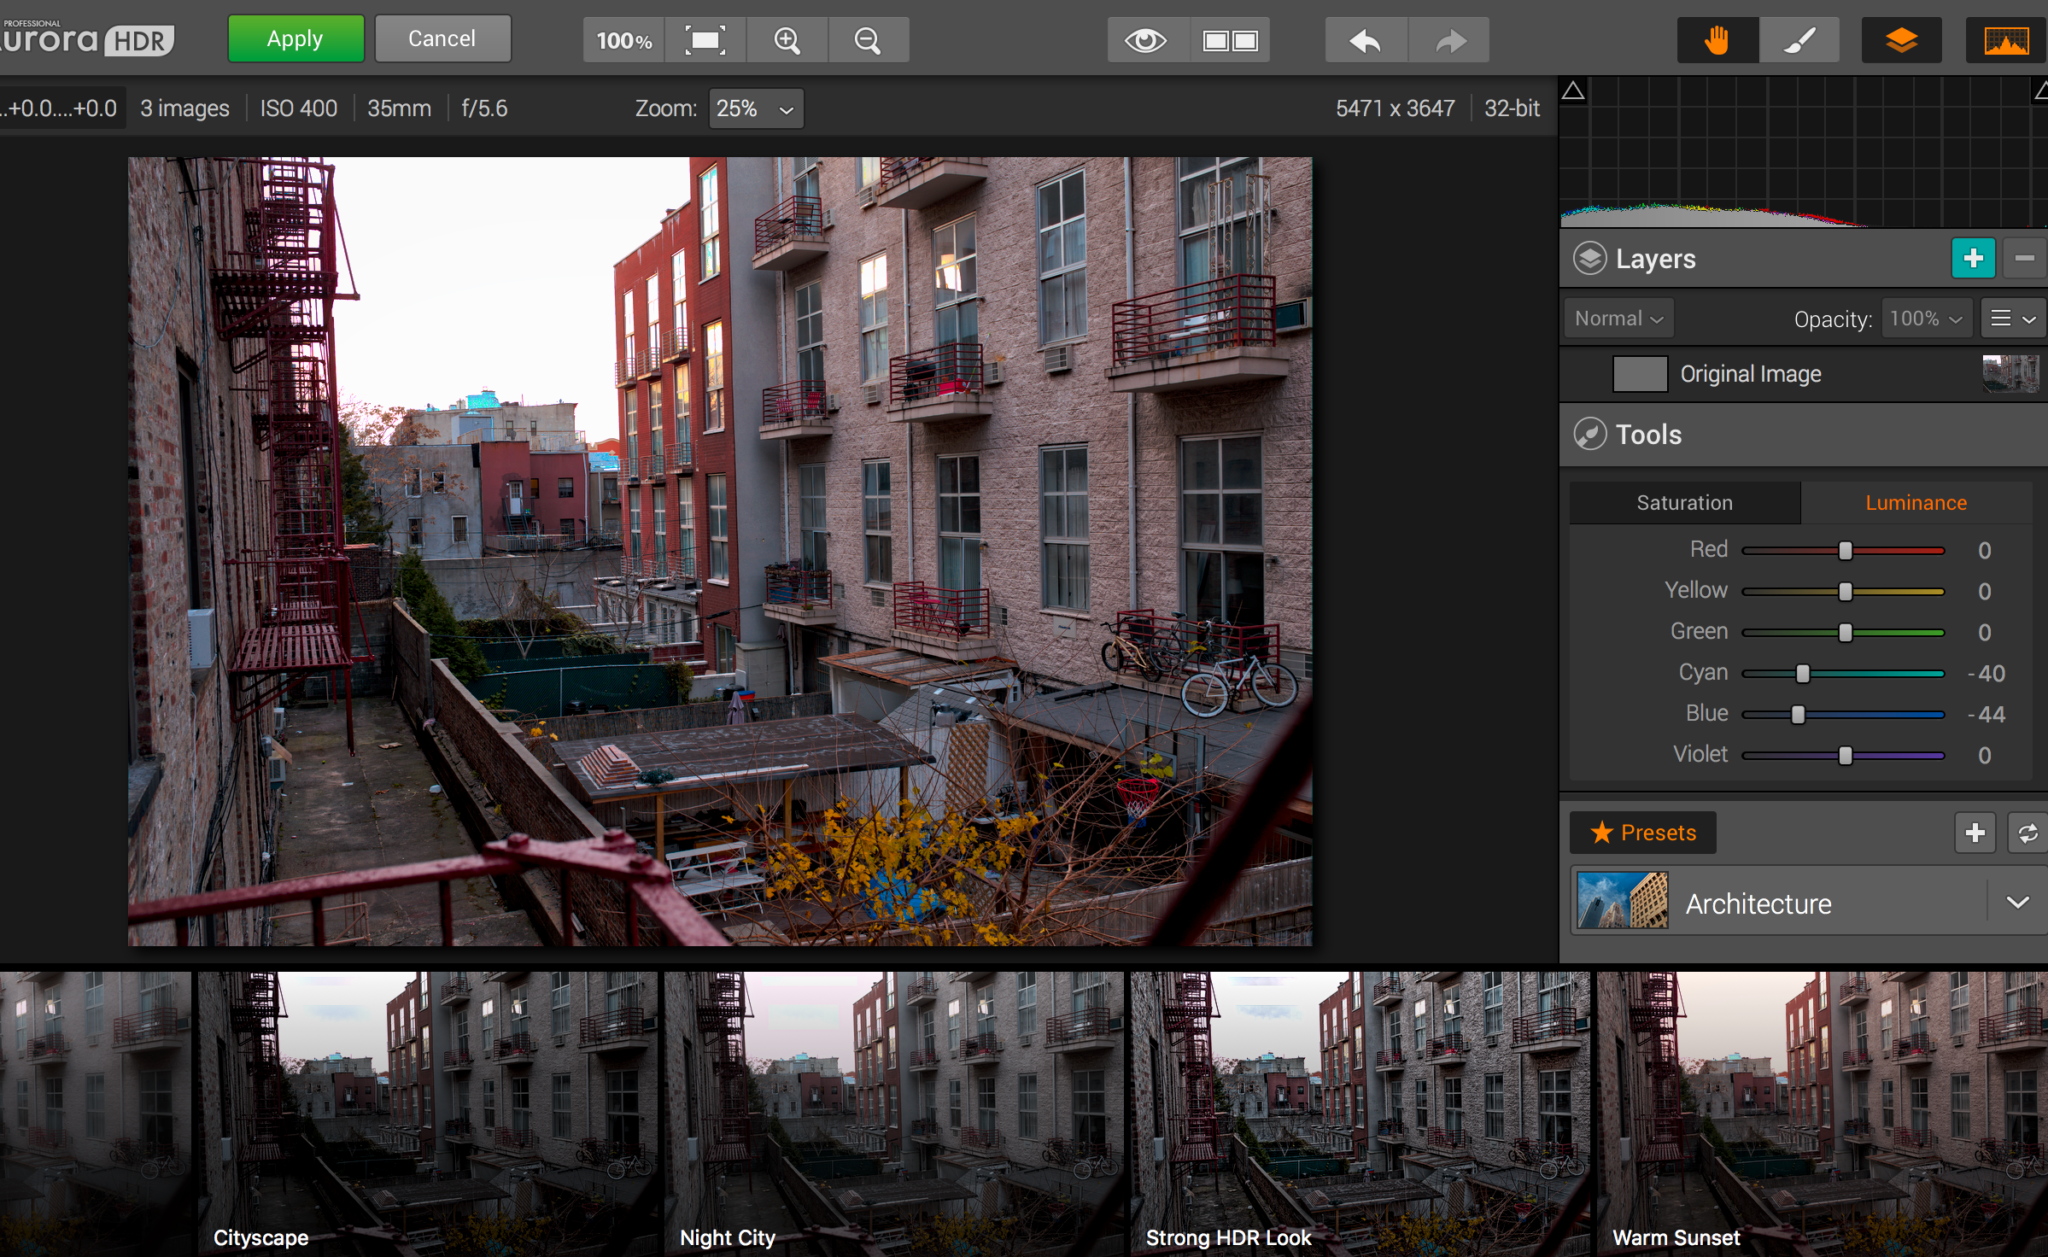
Aurora HDR is a program that works as a standalone piece of software or built in as a plugin to one of the top pieces of editing kit. It looks and functions the same either way–for the most part. This is the import panel, and as you see the images that I chose were from a moment where I pretty much just shot the same scene three times at the same exposure. Aurora will import the originals when this is done and ask for a reference image. In this particular case it has to do with RAW files from the Fujifilm X Pro 1.
When I imported these photos from Adobe Lightroom into Aurora HDR, I edited them by applying the Fujifilm Velvia camera profile to each, raising the exposure of one image a full stop, lowering the exposure of one image by a stop, and then doing the import. When you go about it this way (because your Lightroom edits are important to you) then Aurora HDR will import the images as TIFFs. While they don’t have the bragging rights of being able to say that you can edit your RAW files and then import them natively with just this program (it’s available with the Macphun Creative Kit though) it works well enough for Fujifilm files because of the way that the X Trans sensor handles both highlights and shadows.
To clarify that statement, Fujifilm X Trans sensors tend to pull more information from the highlights than standard CMOS sensors do at a given exposure level. Here’s what I’m talking about.
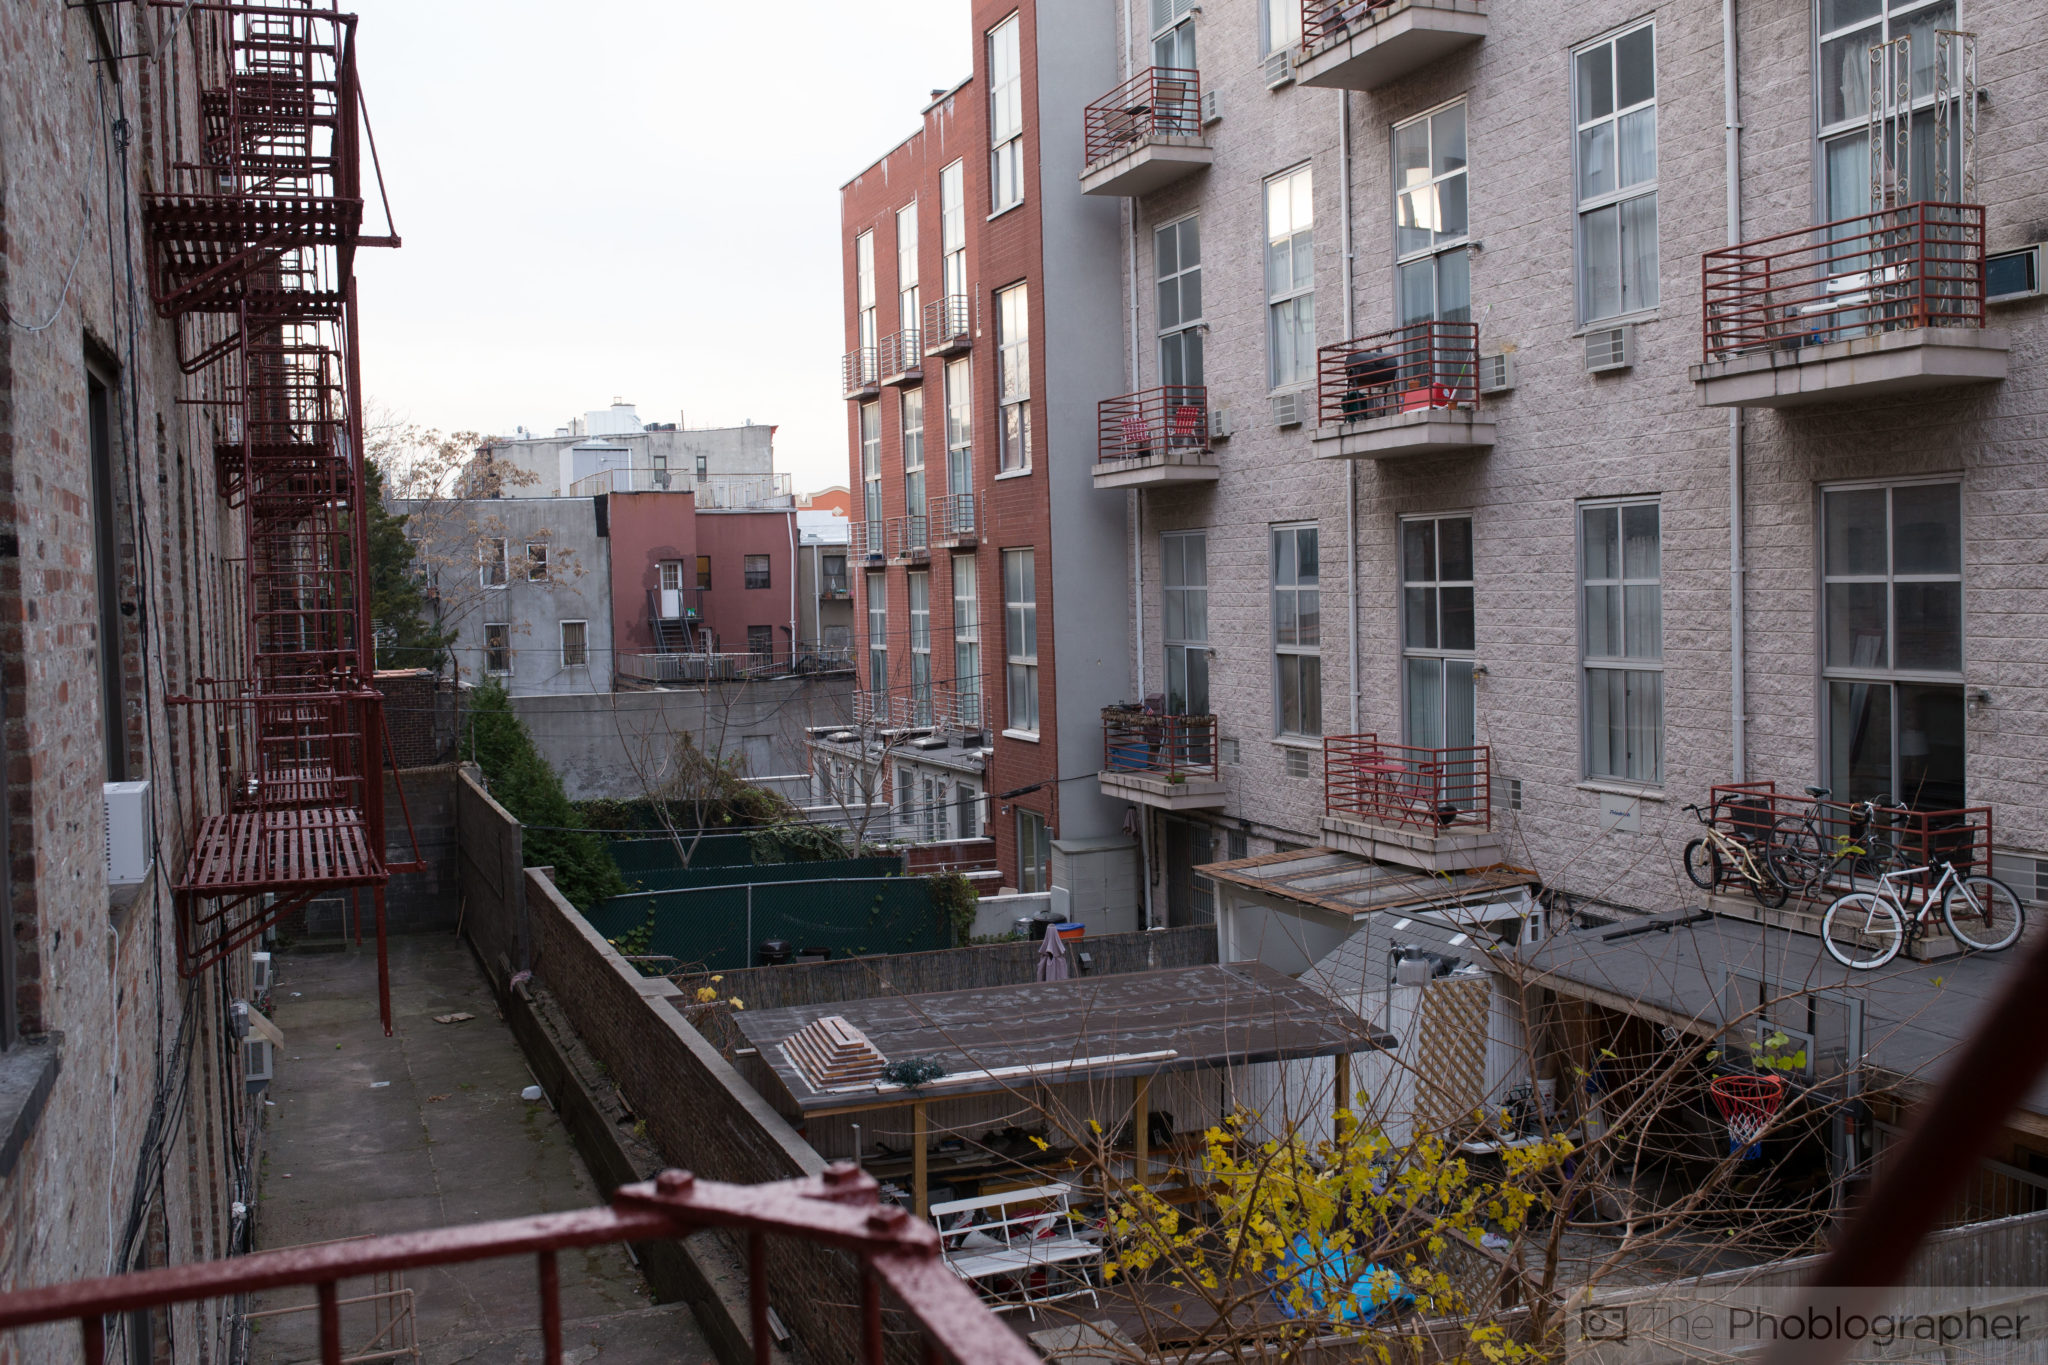
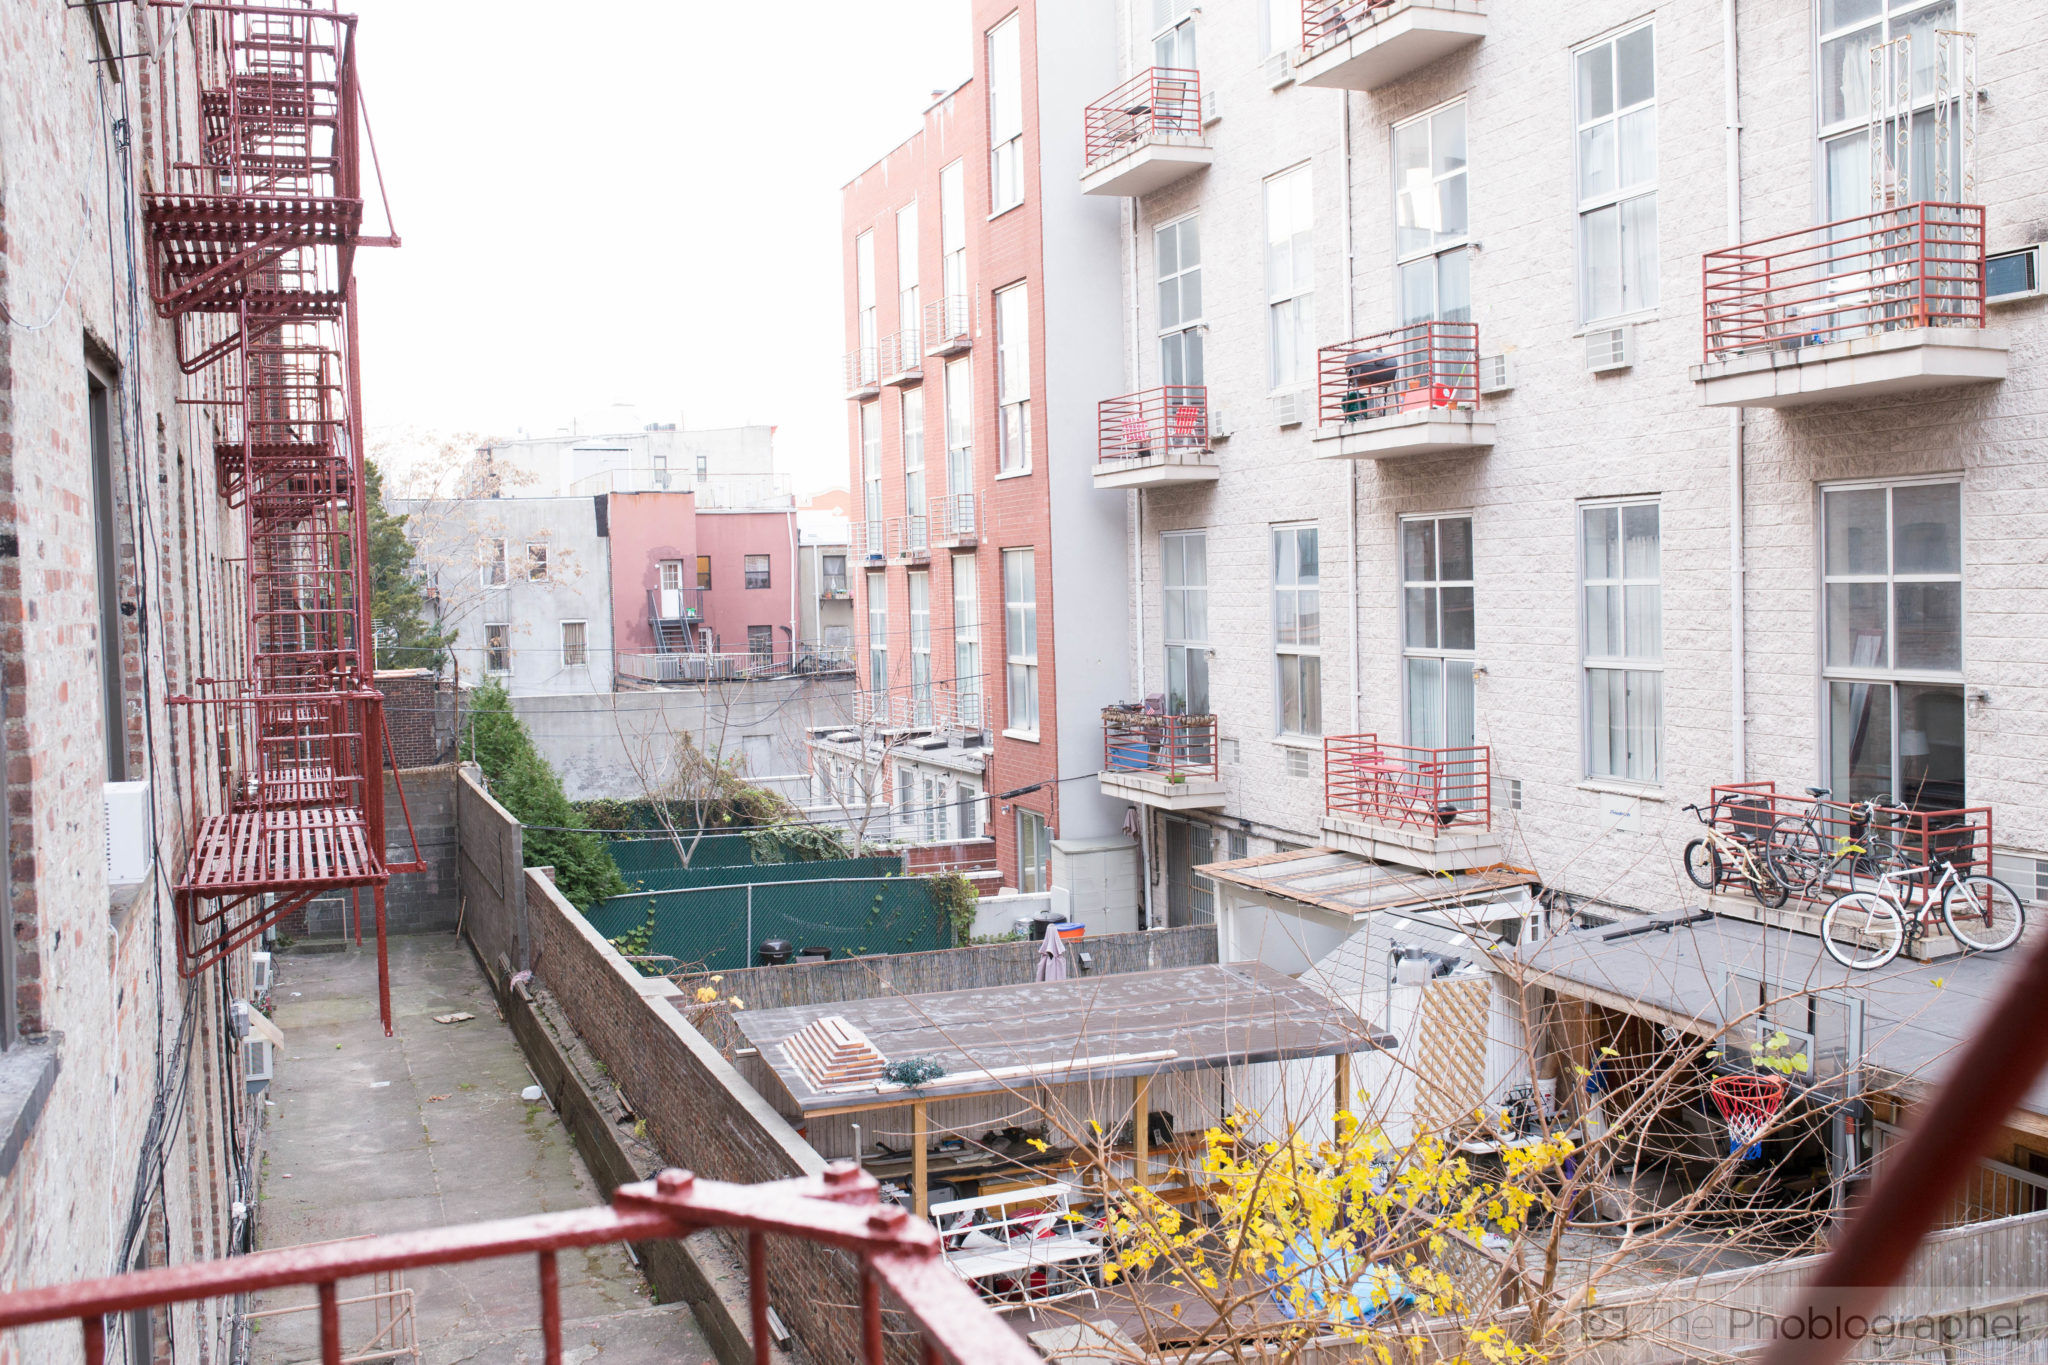
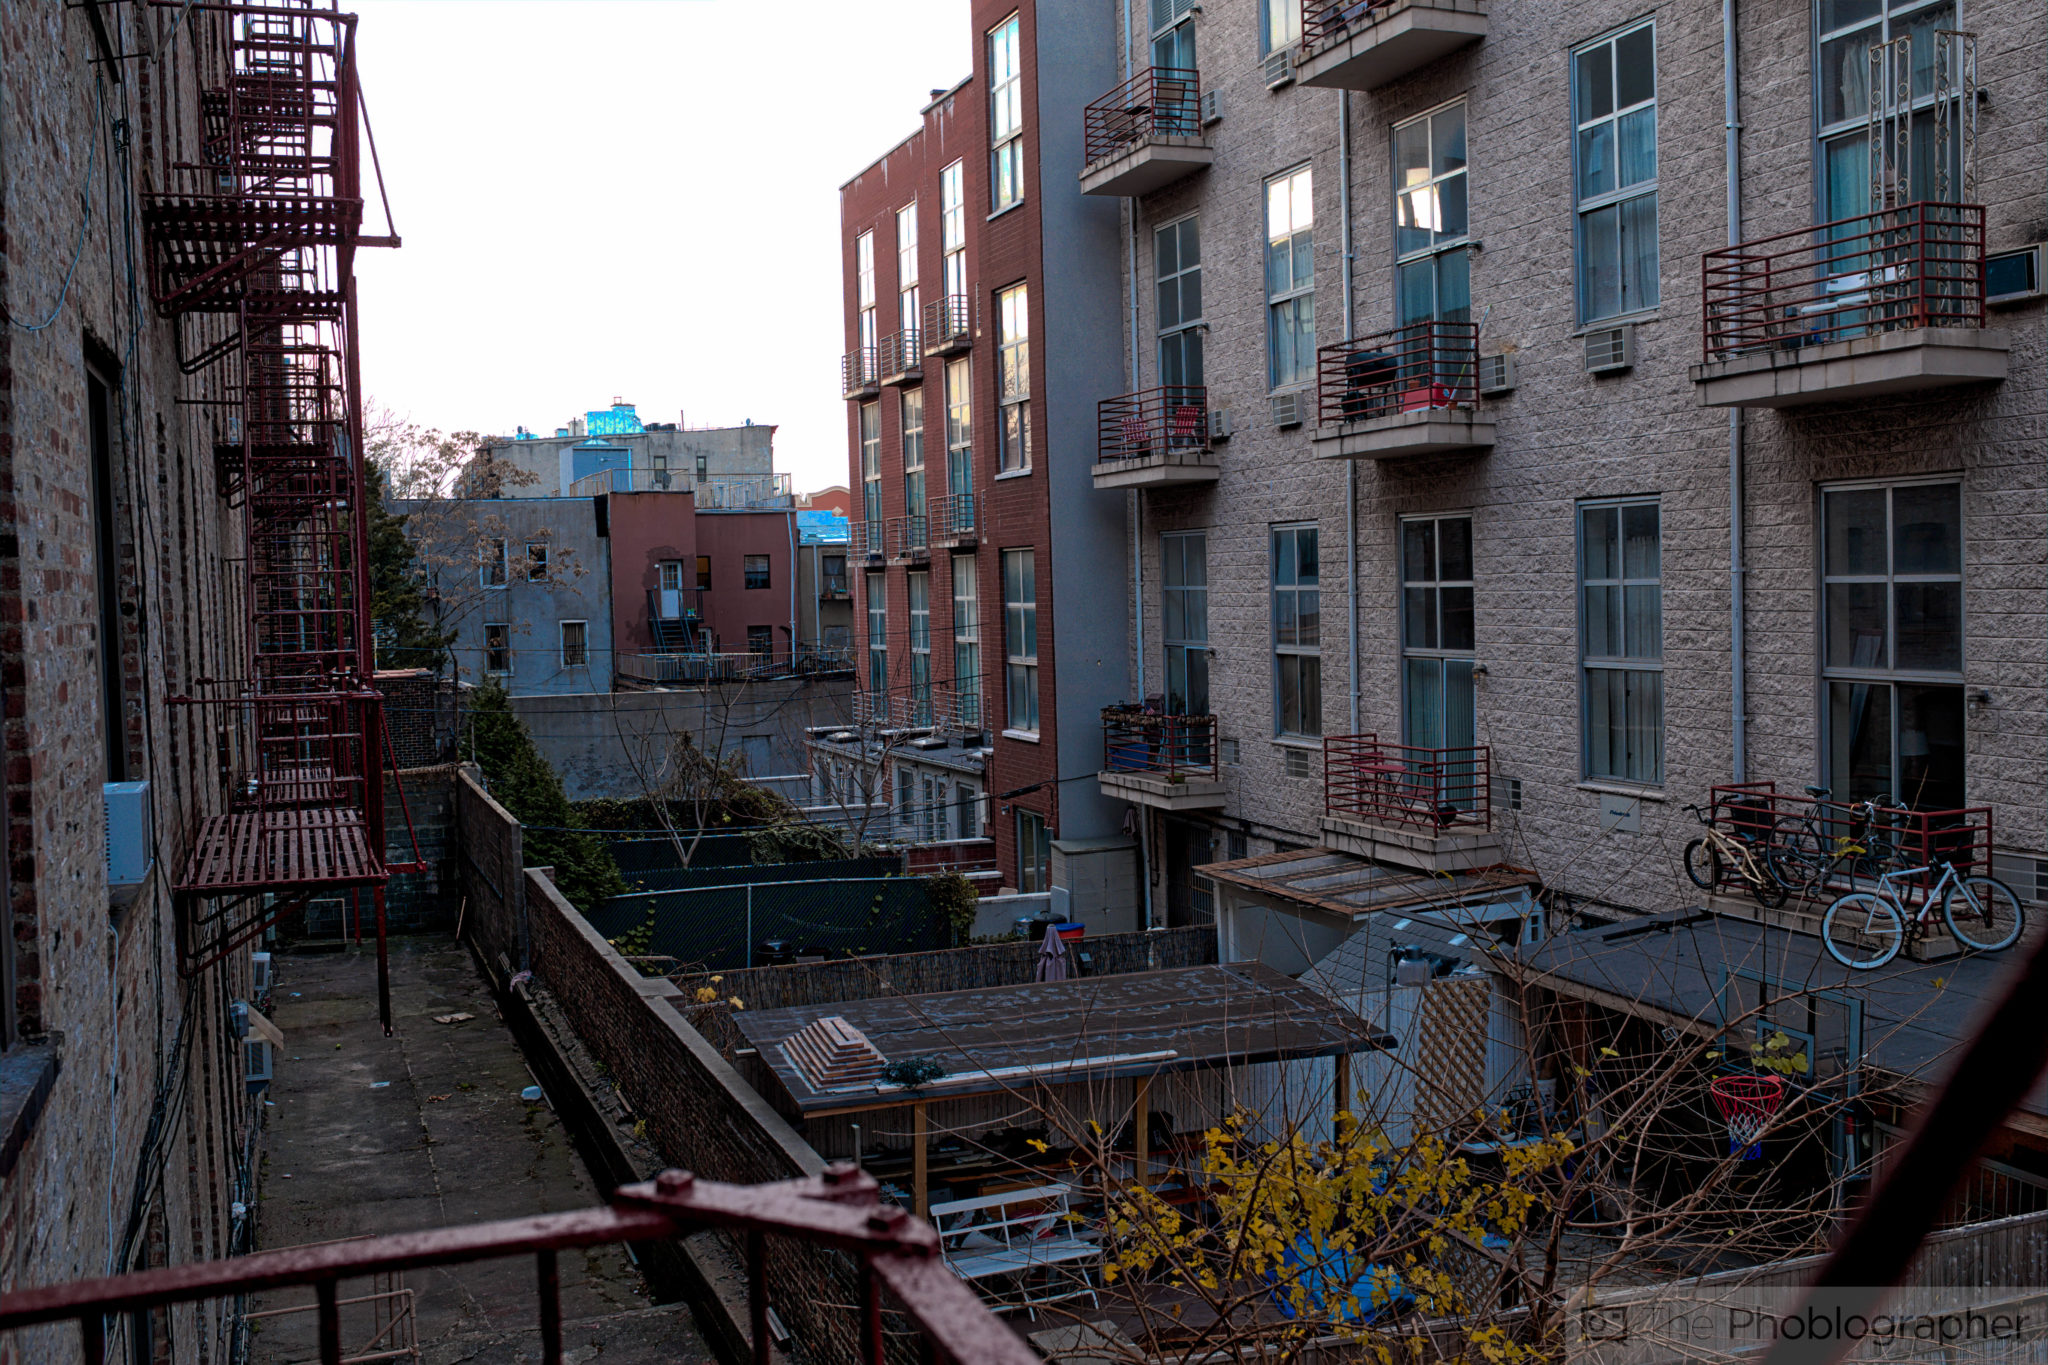
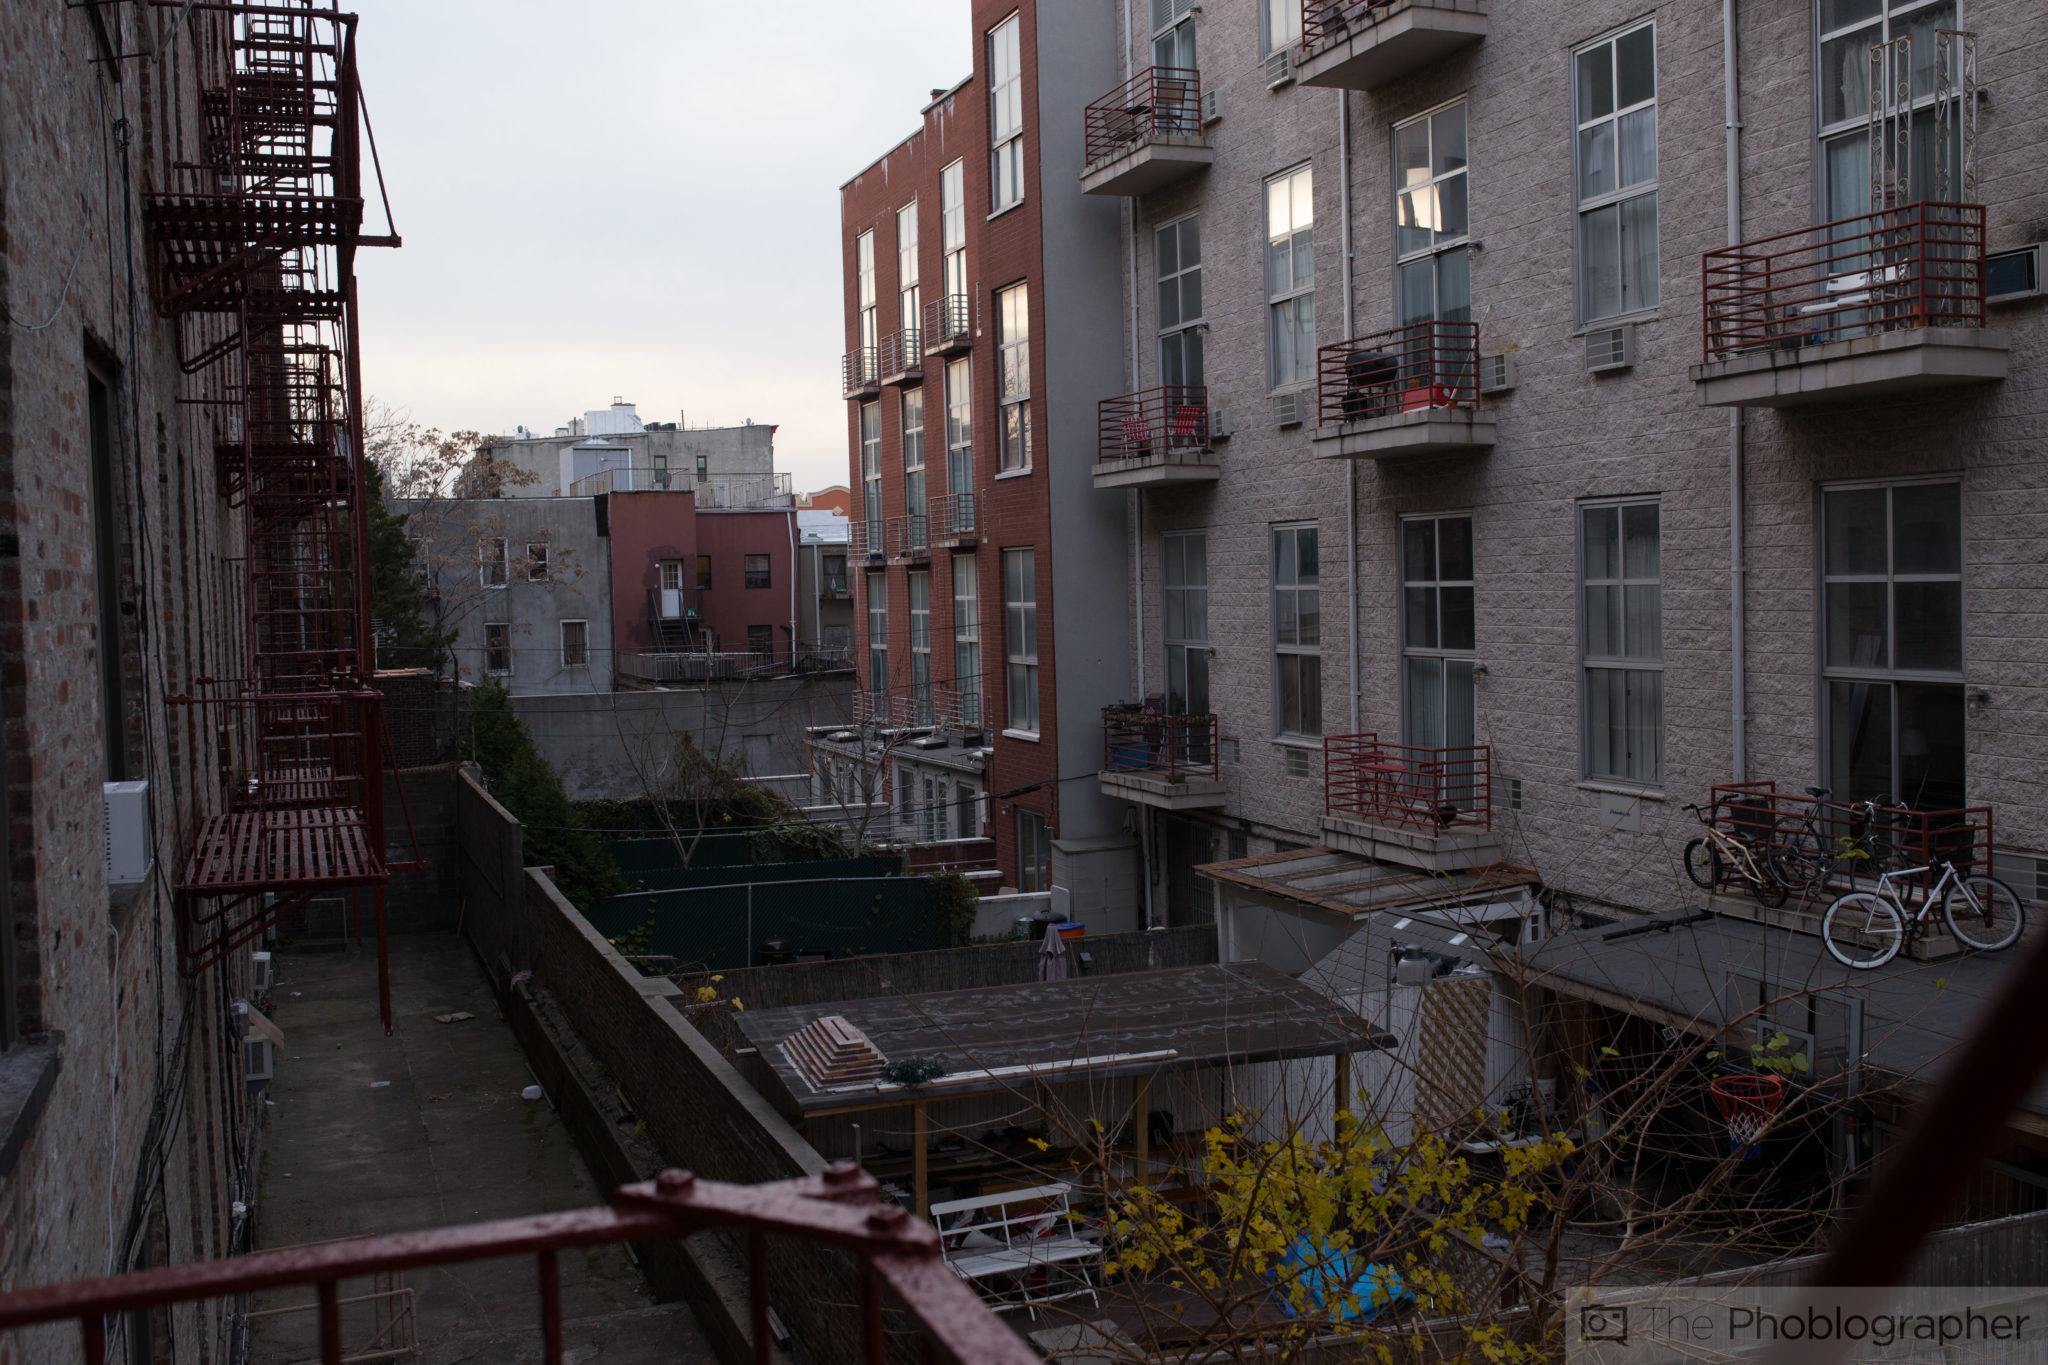
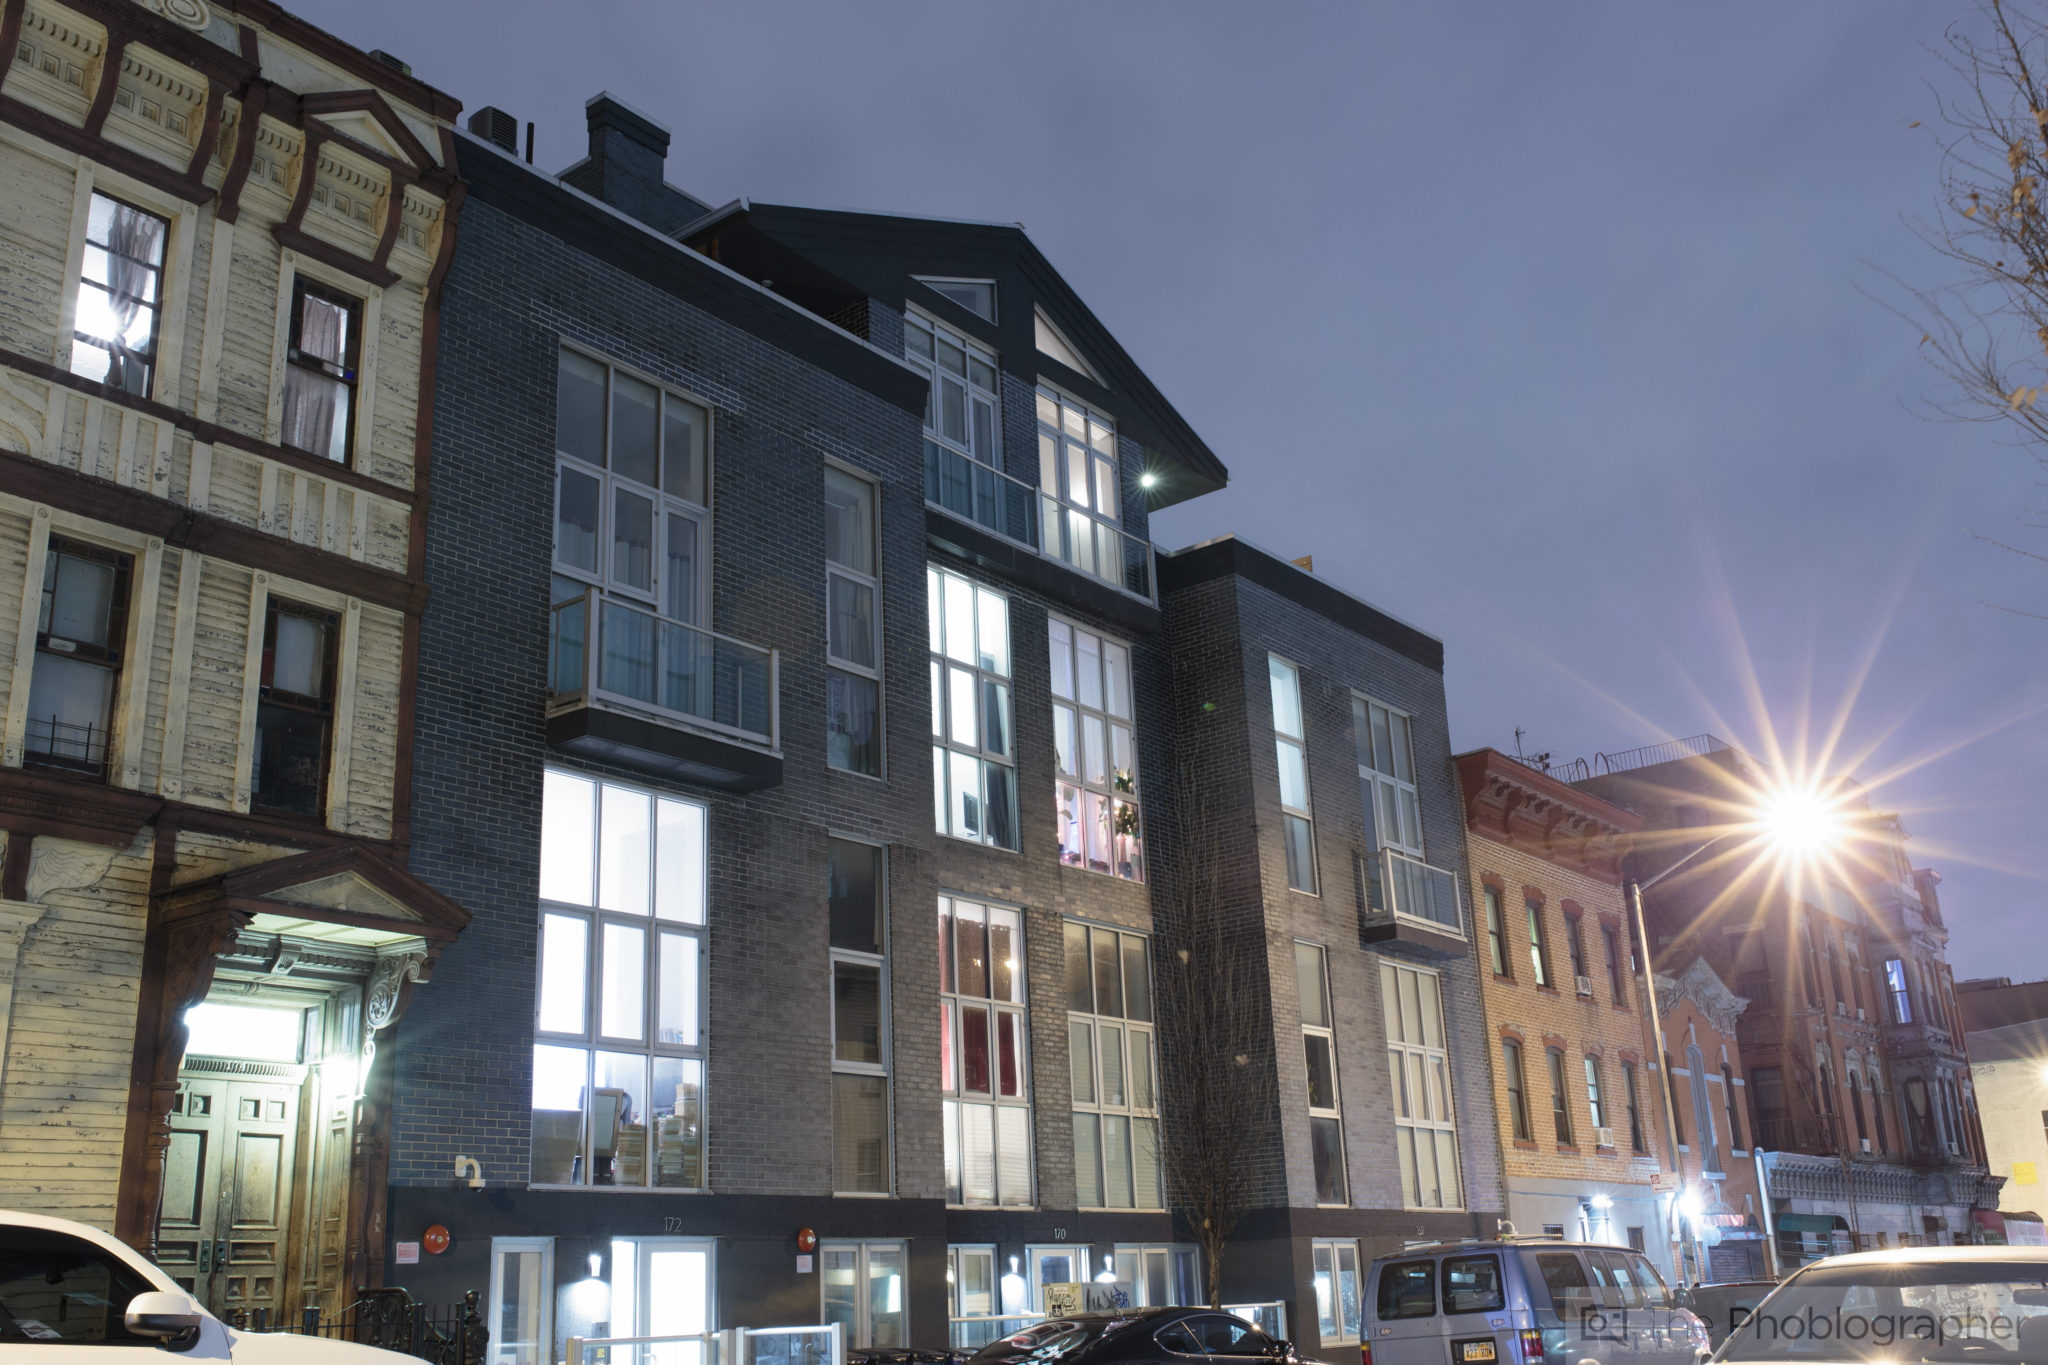
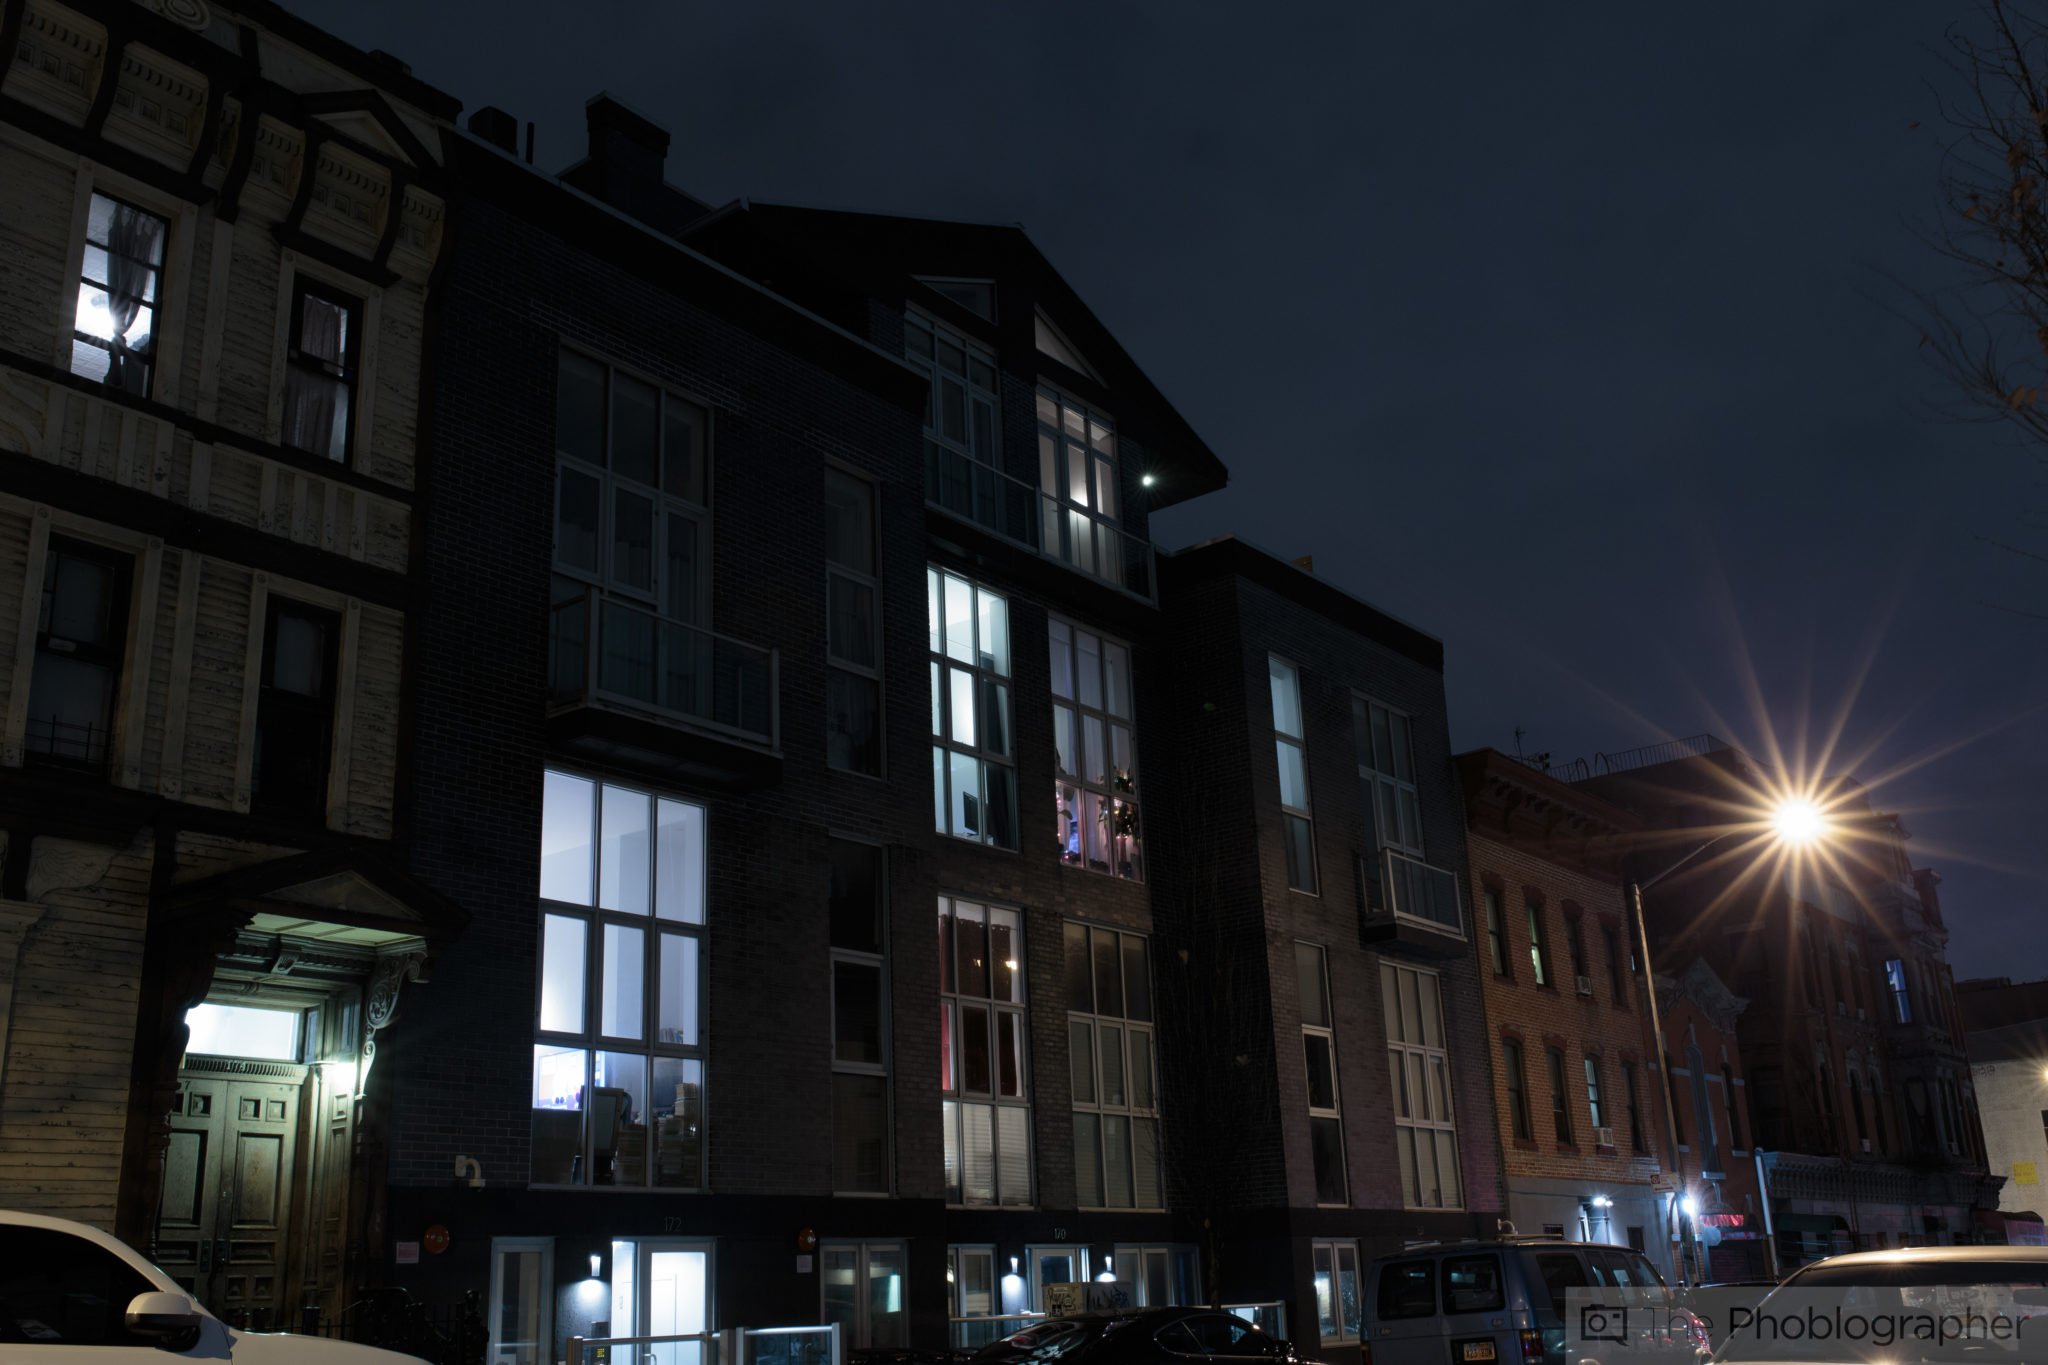
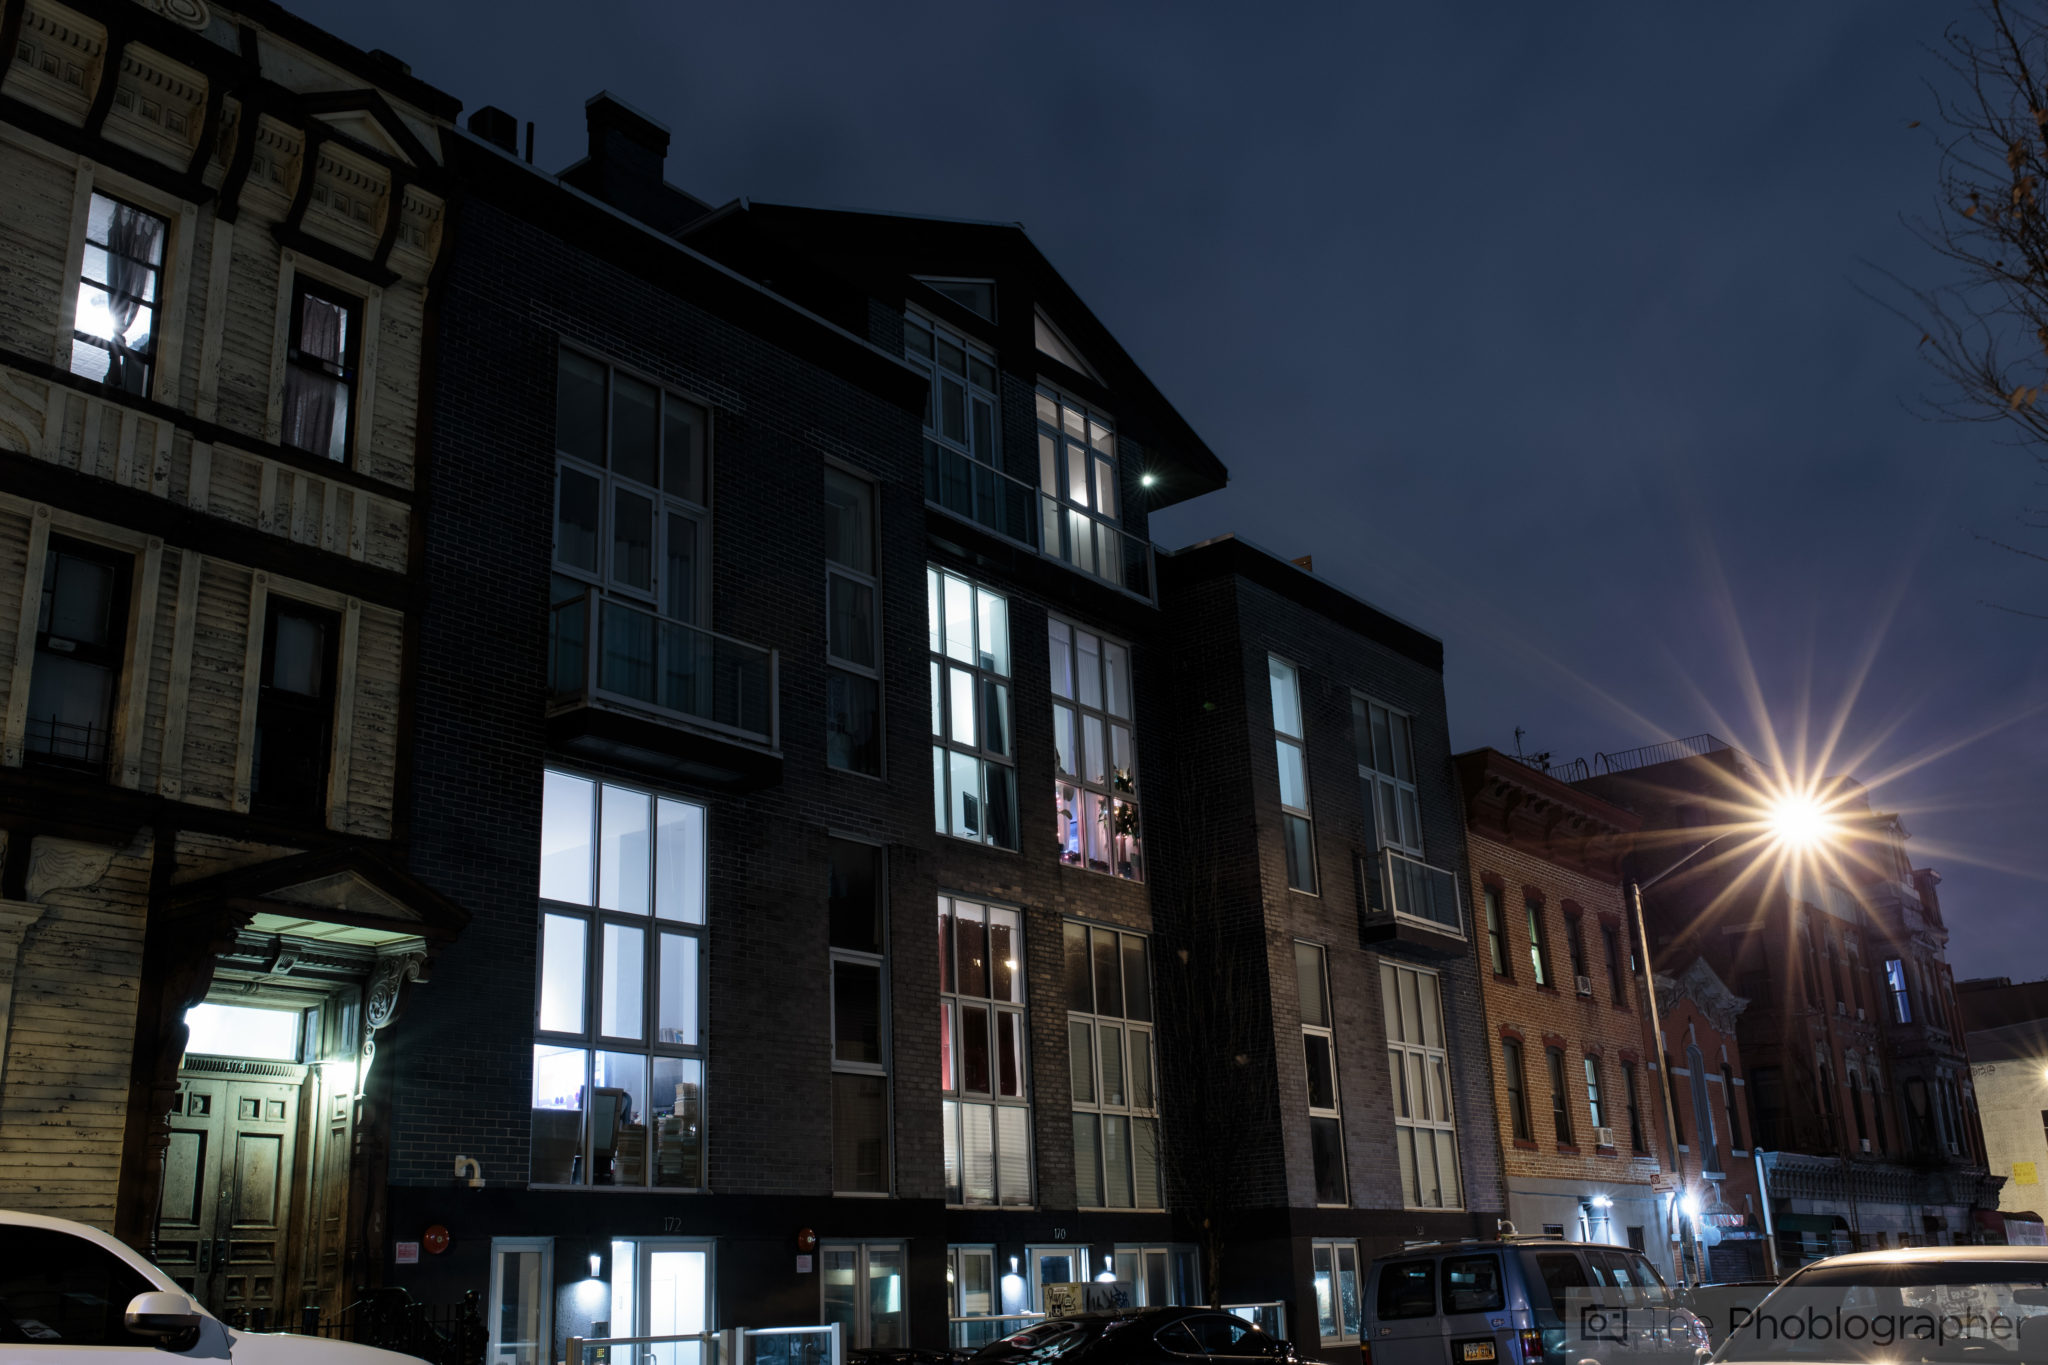
Here are the three original images:
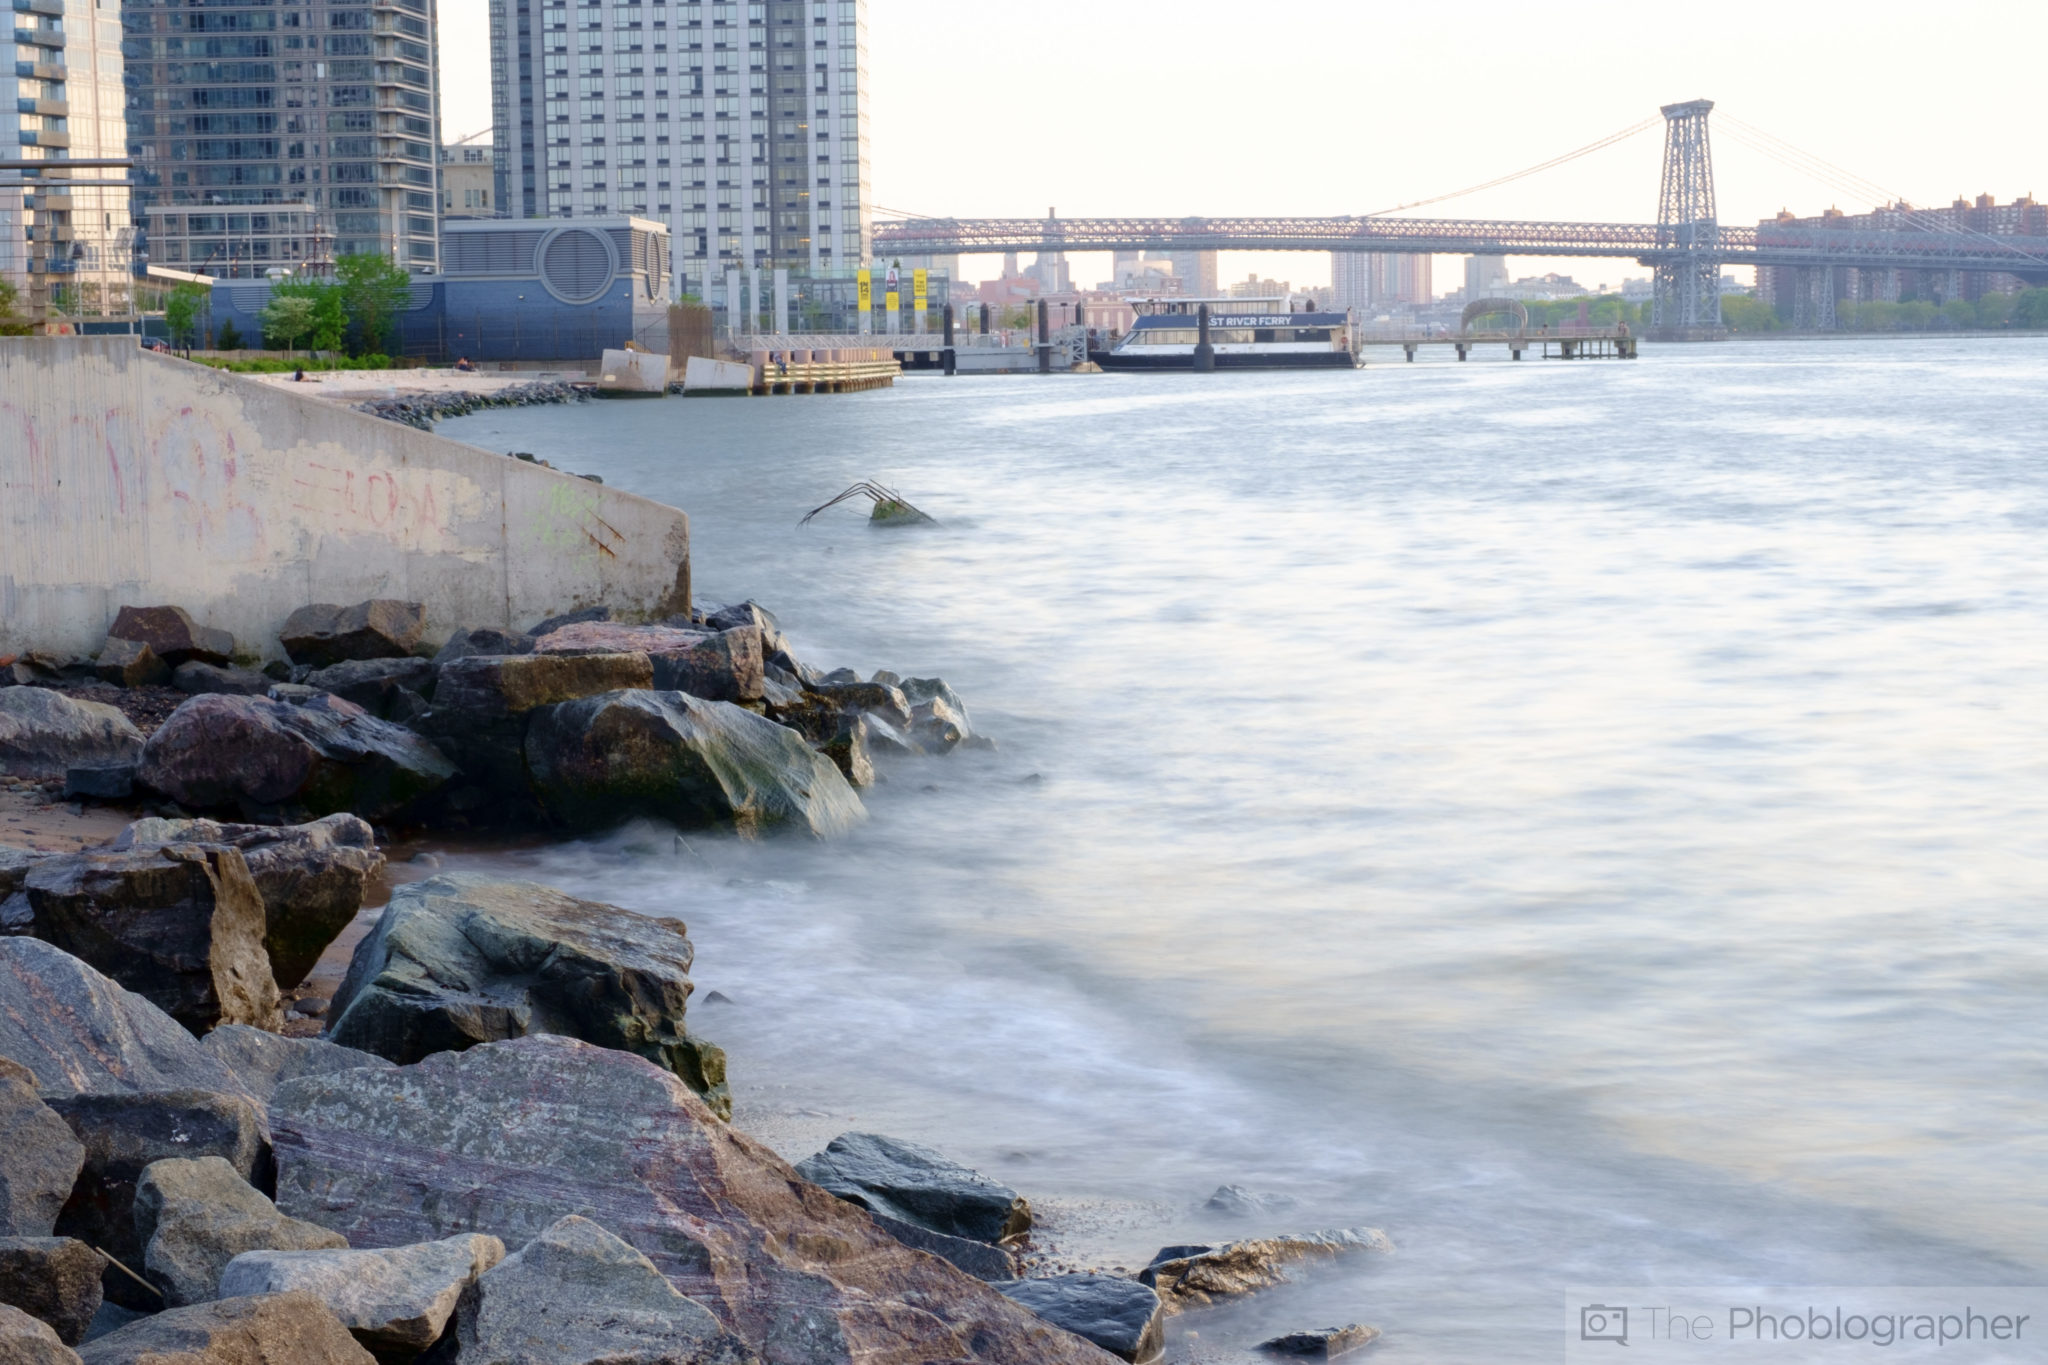
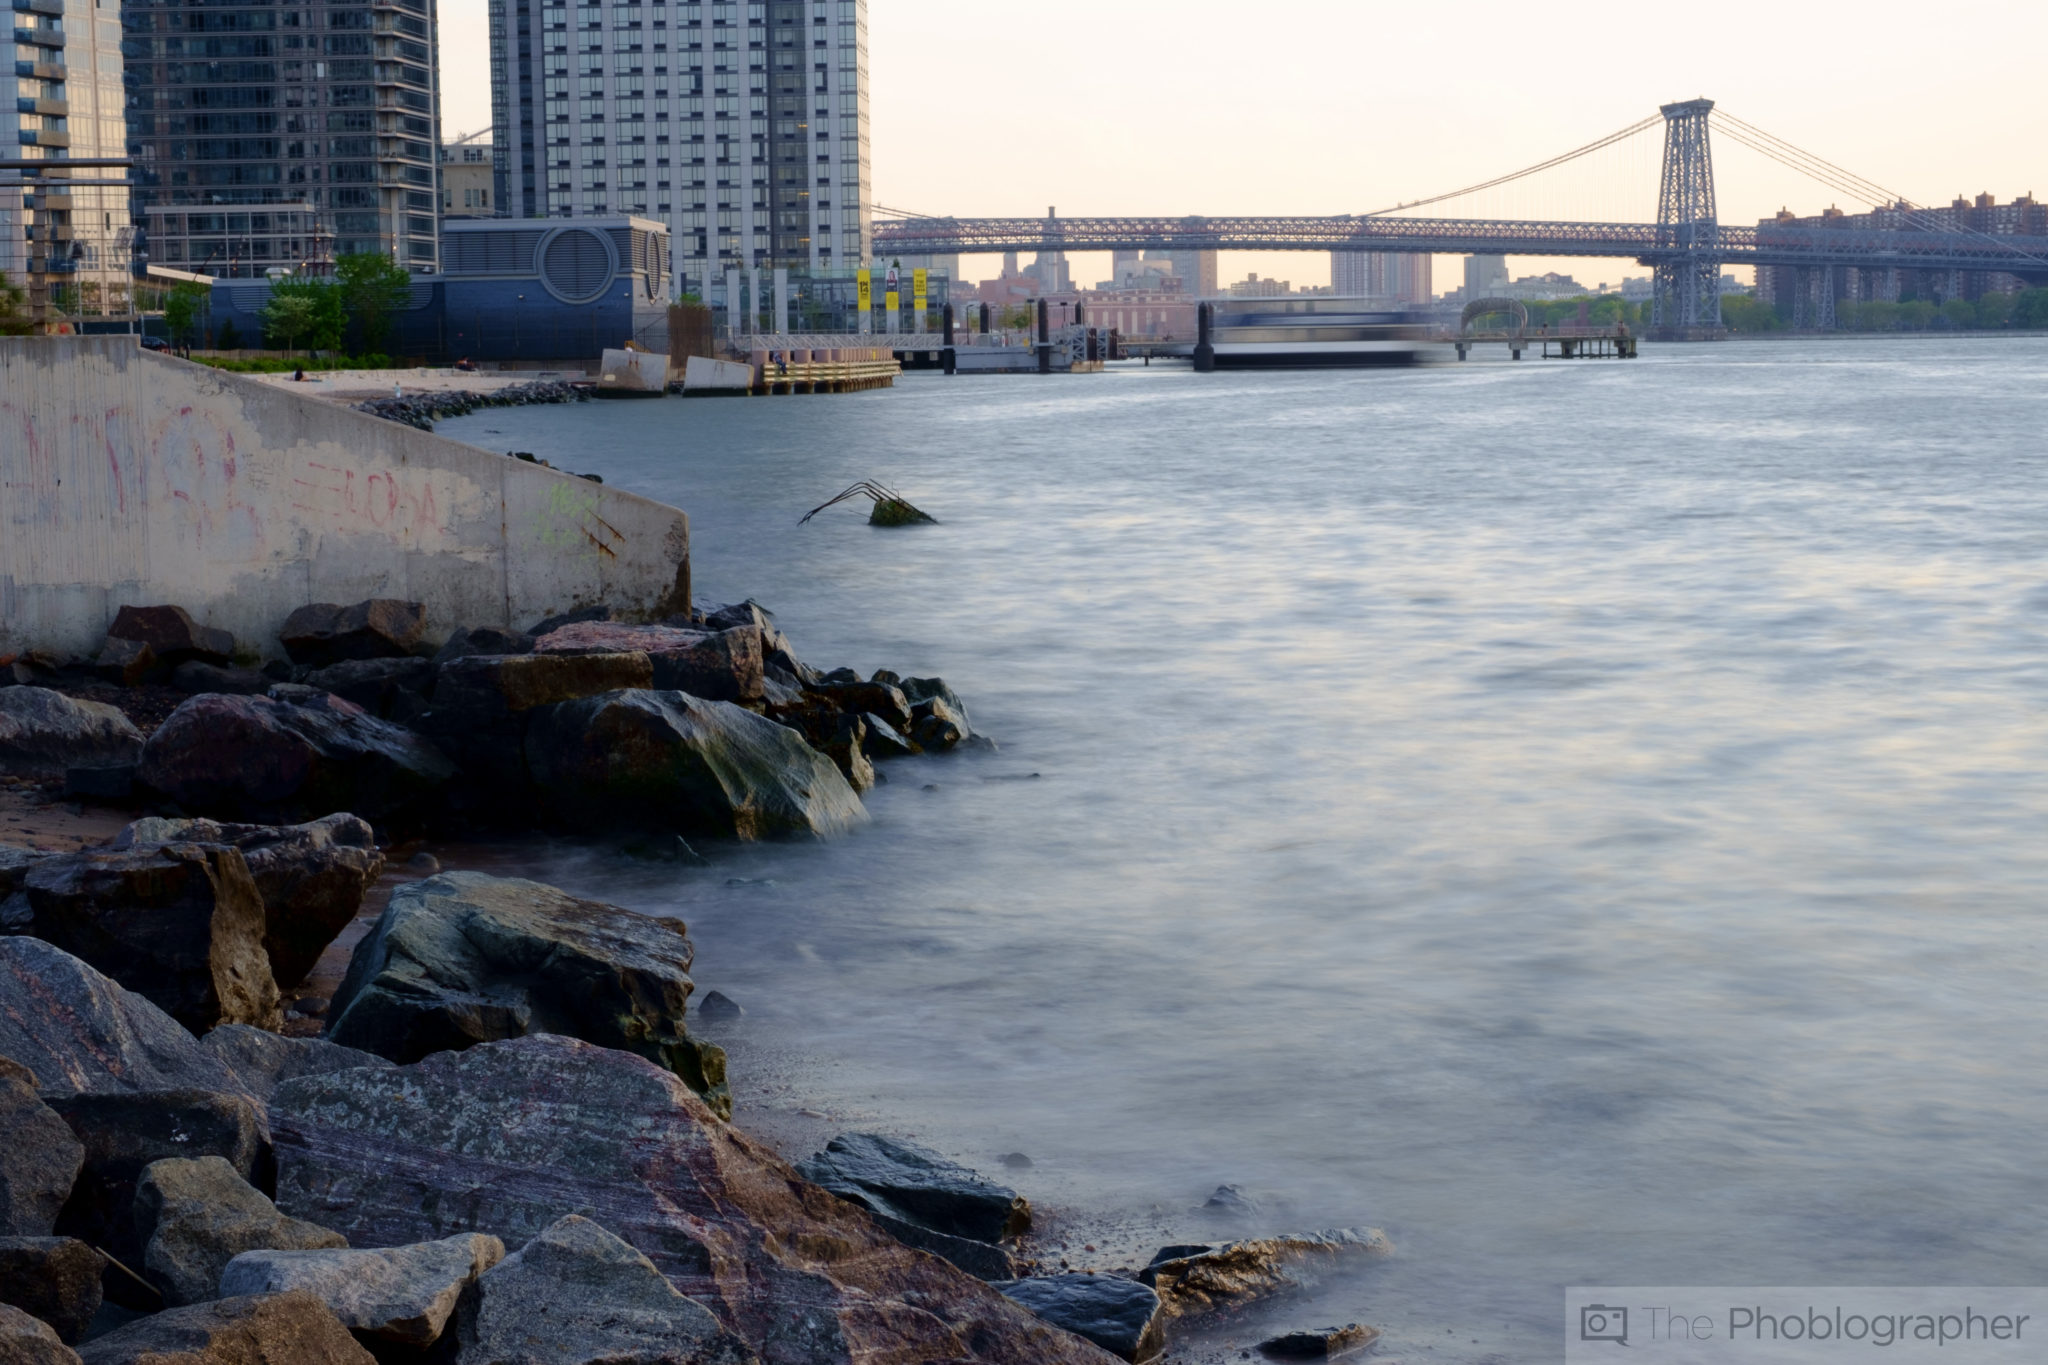
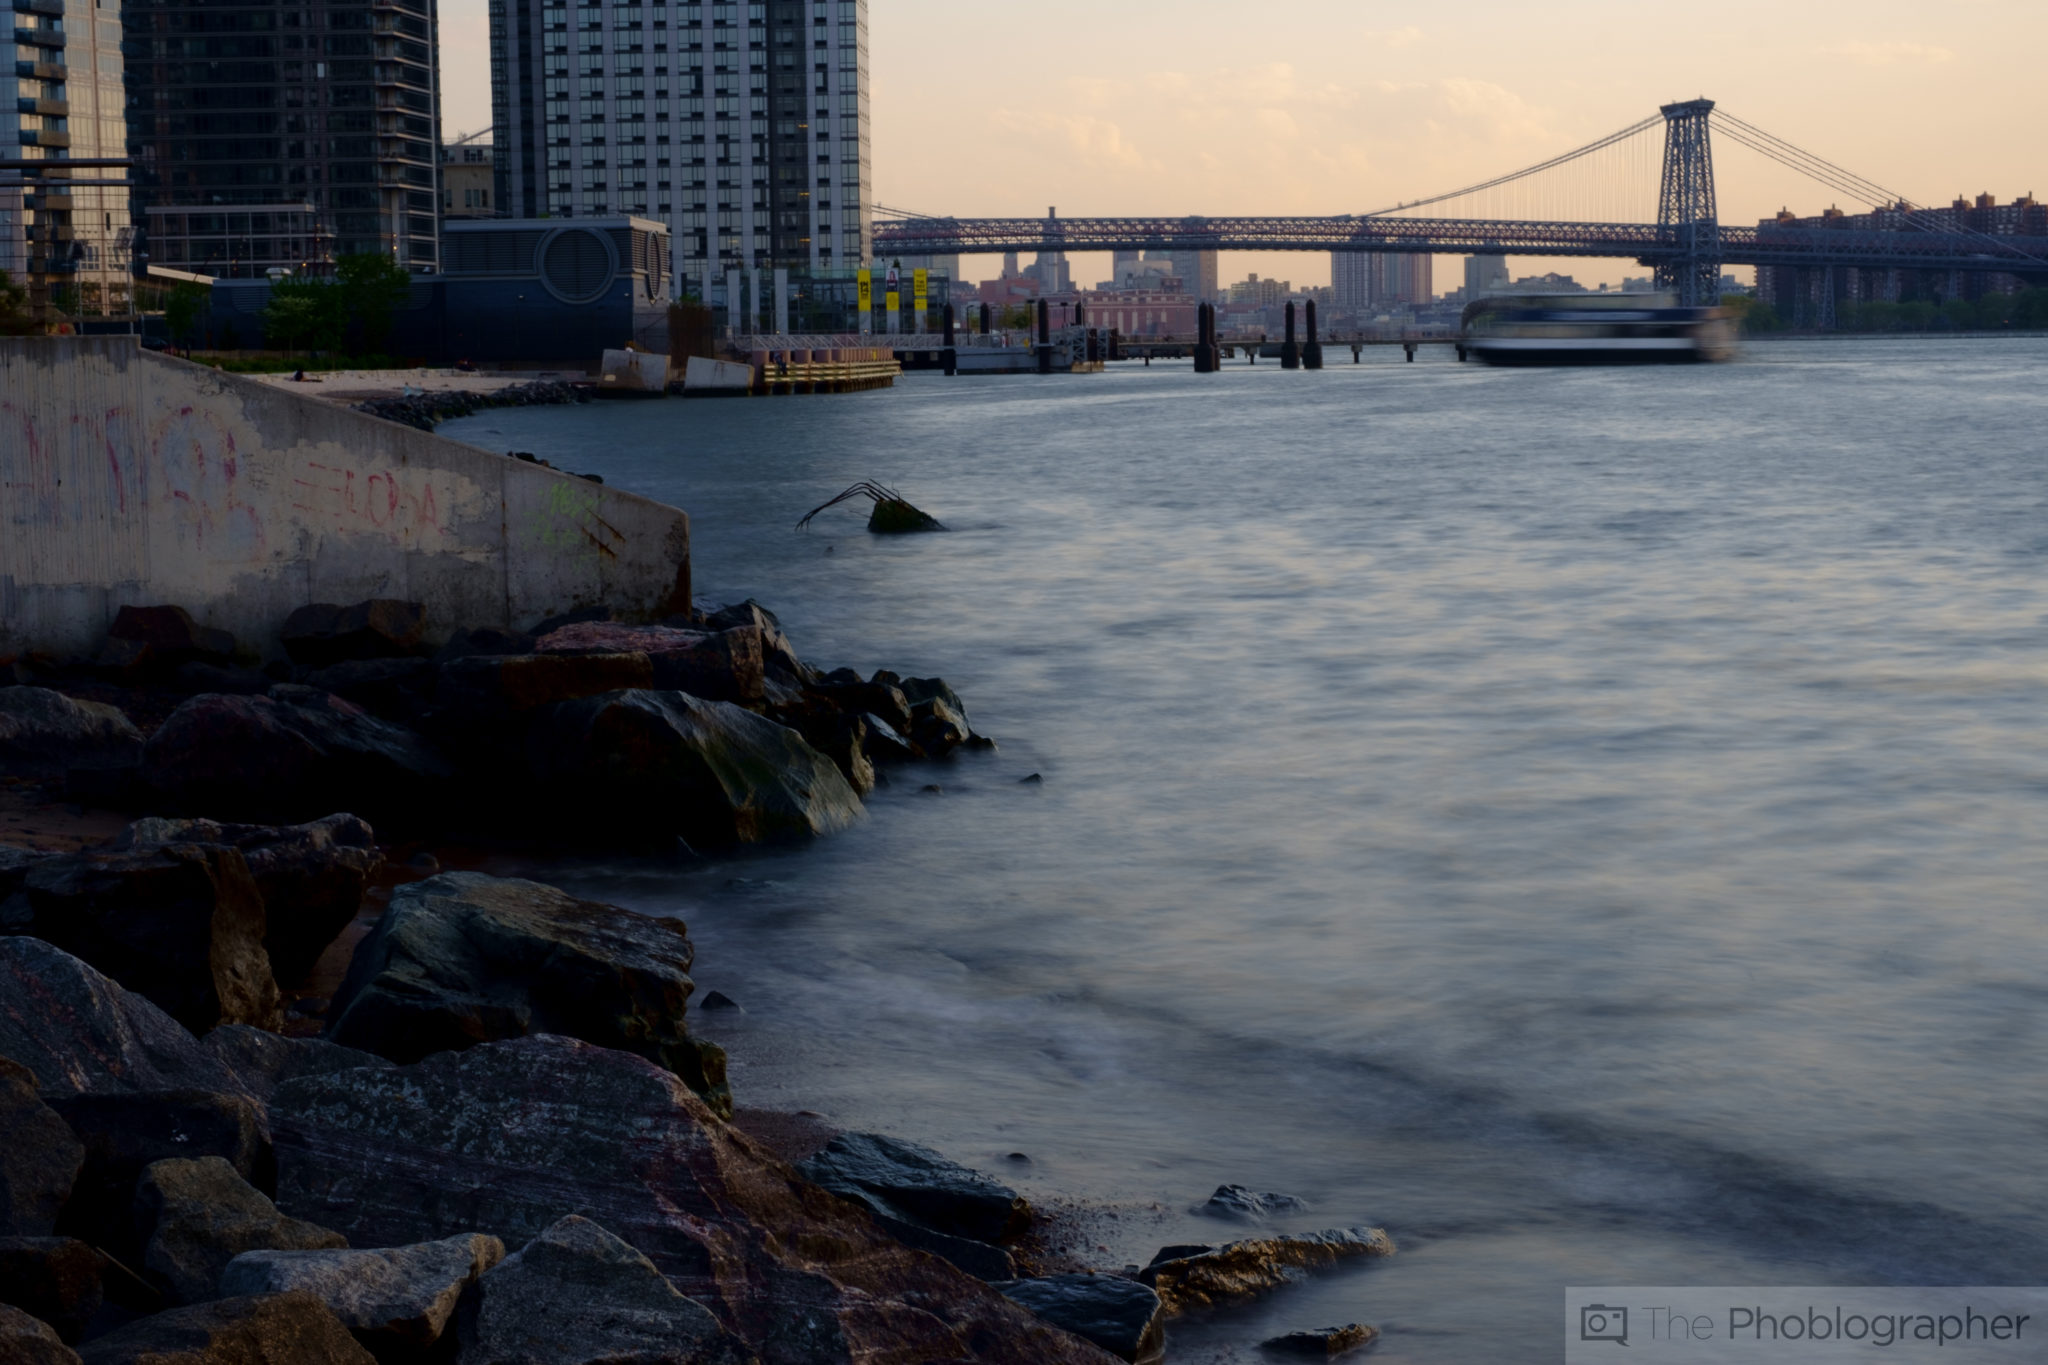
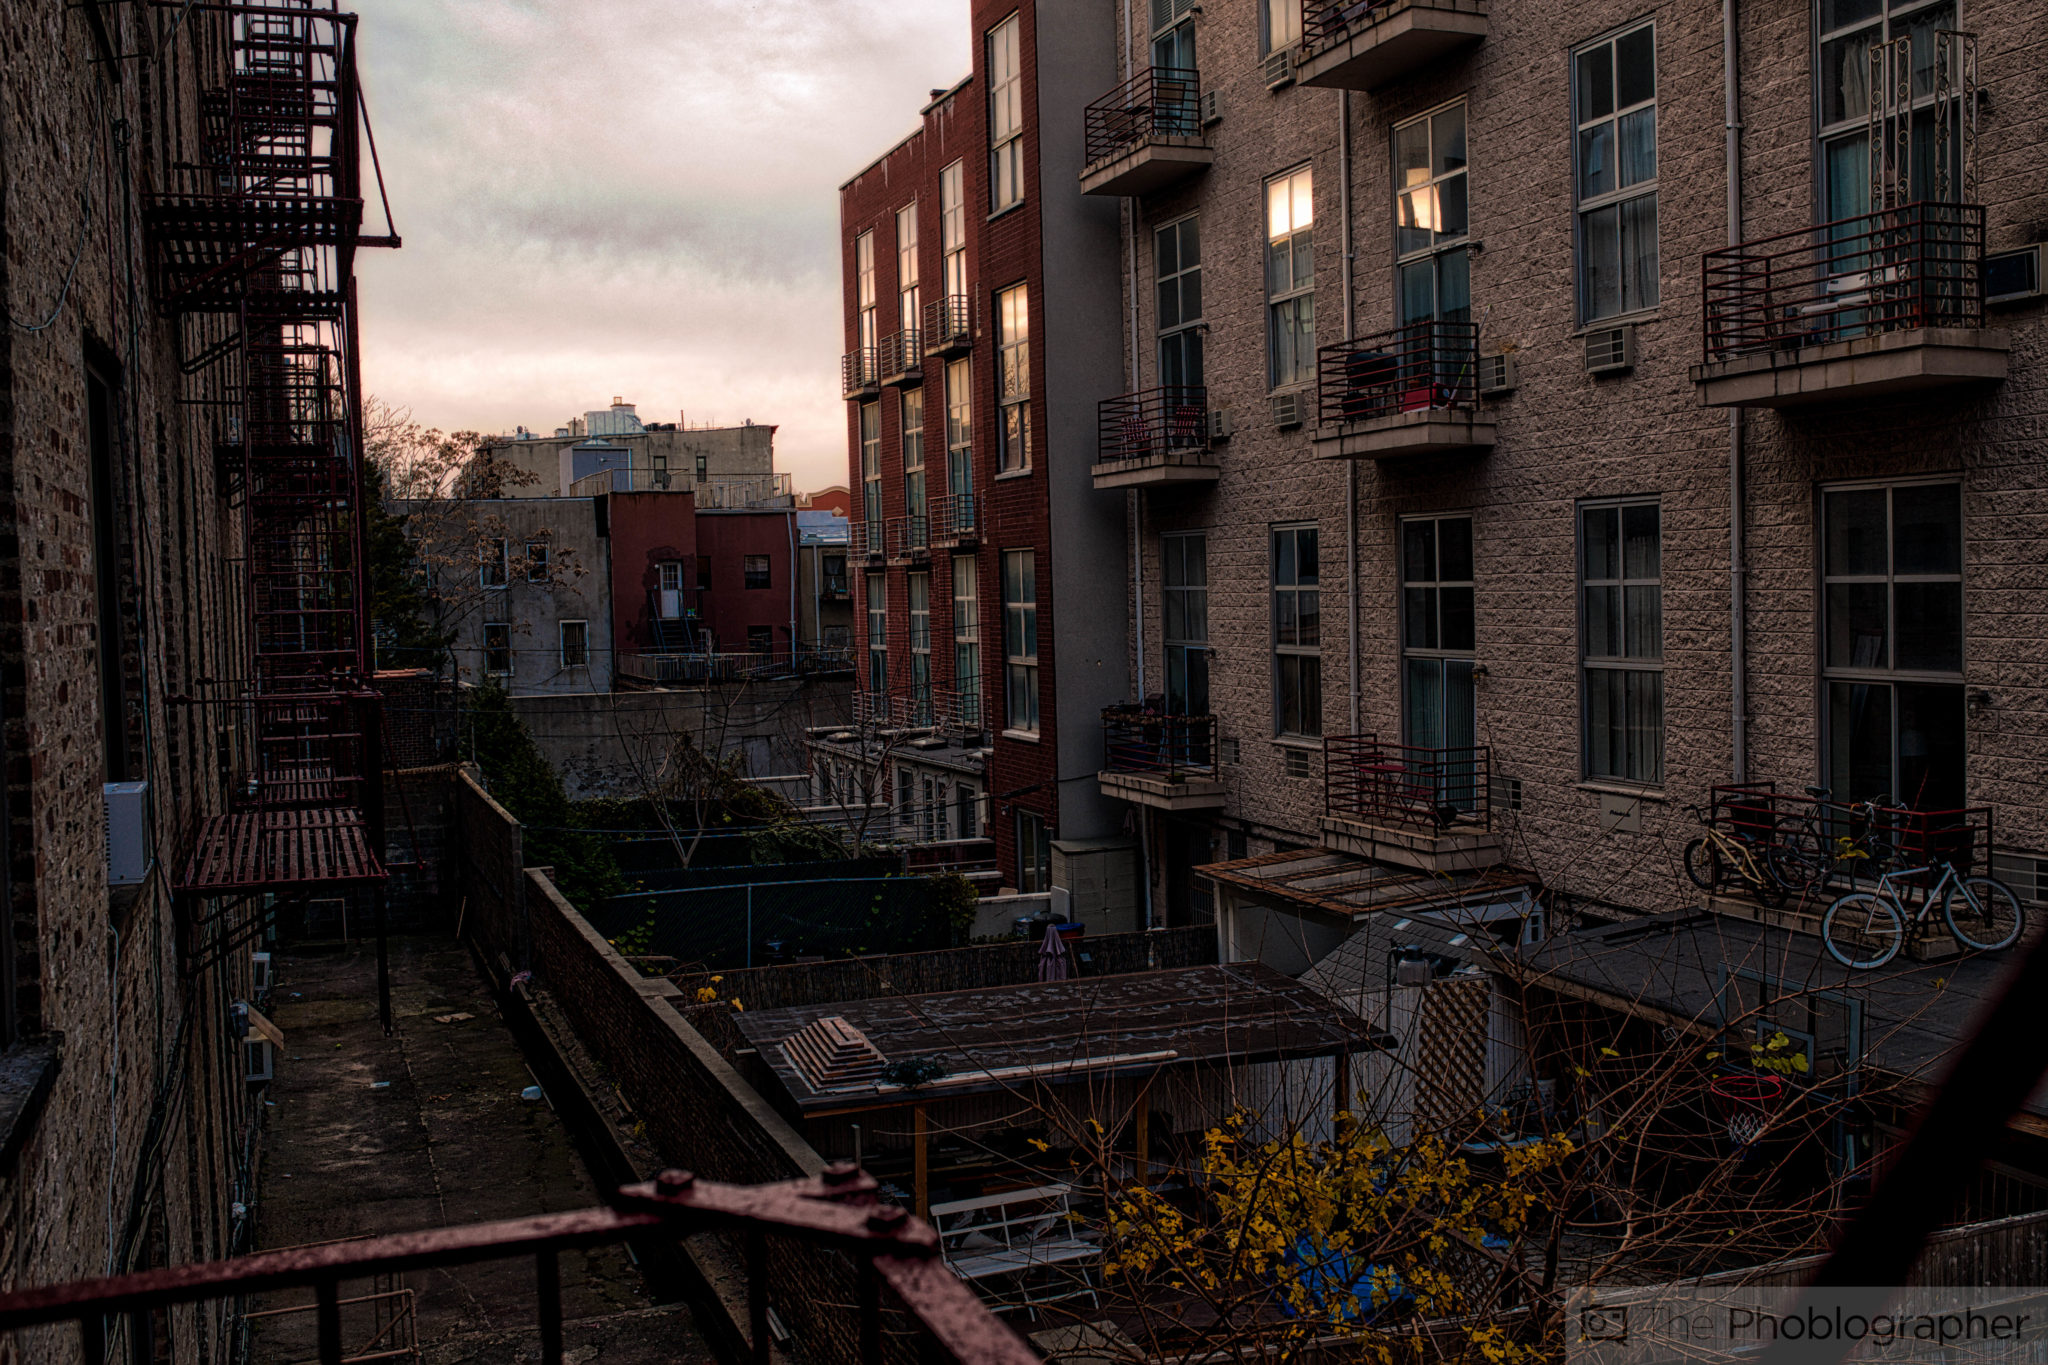
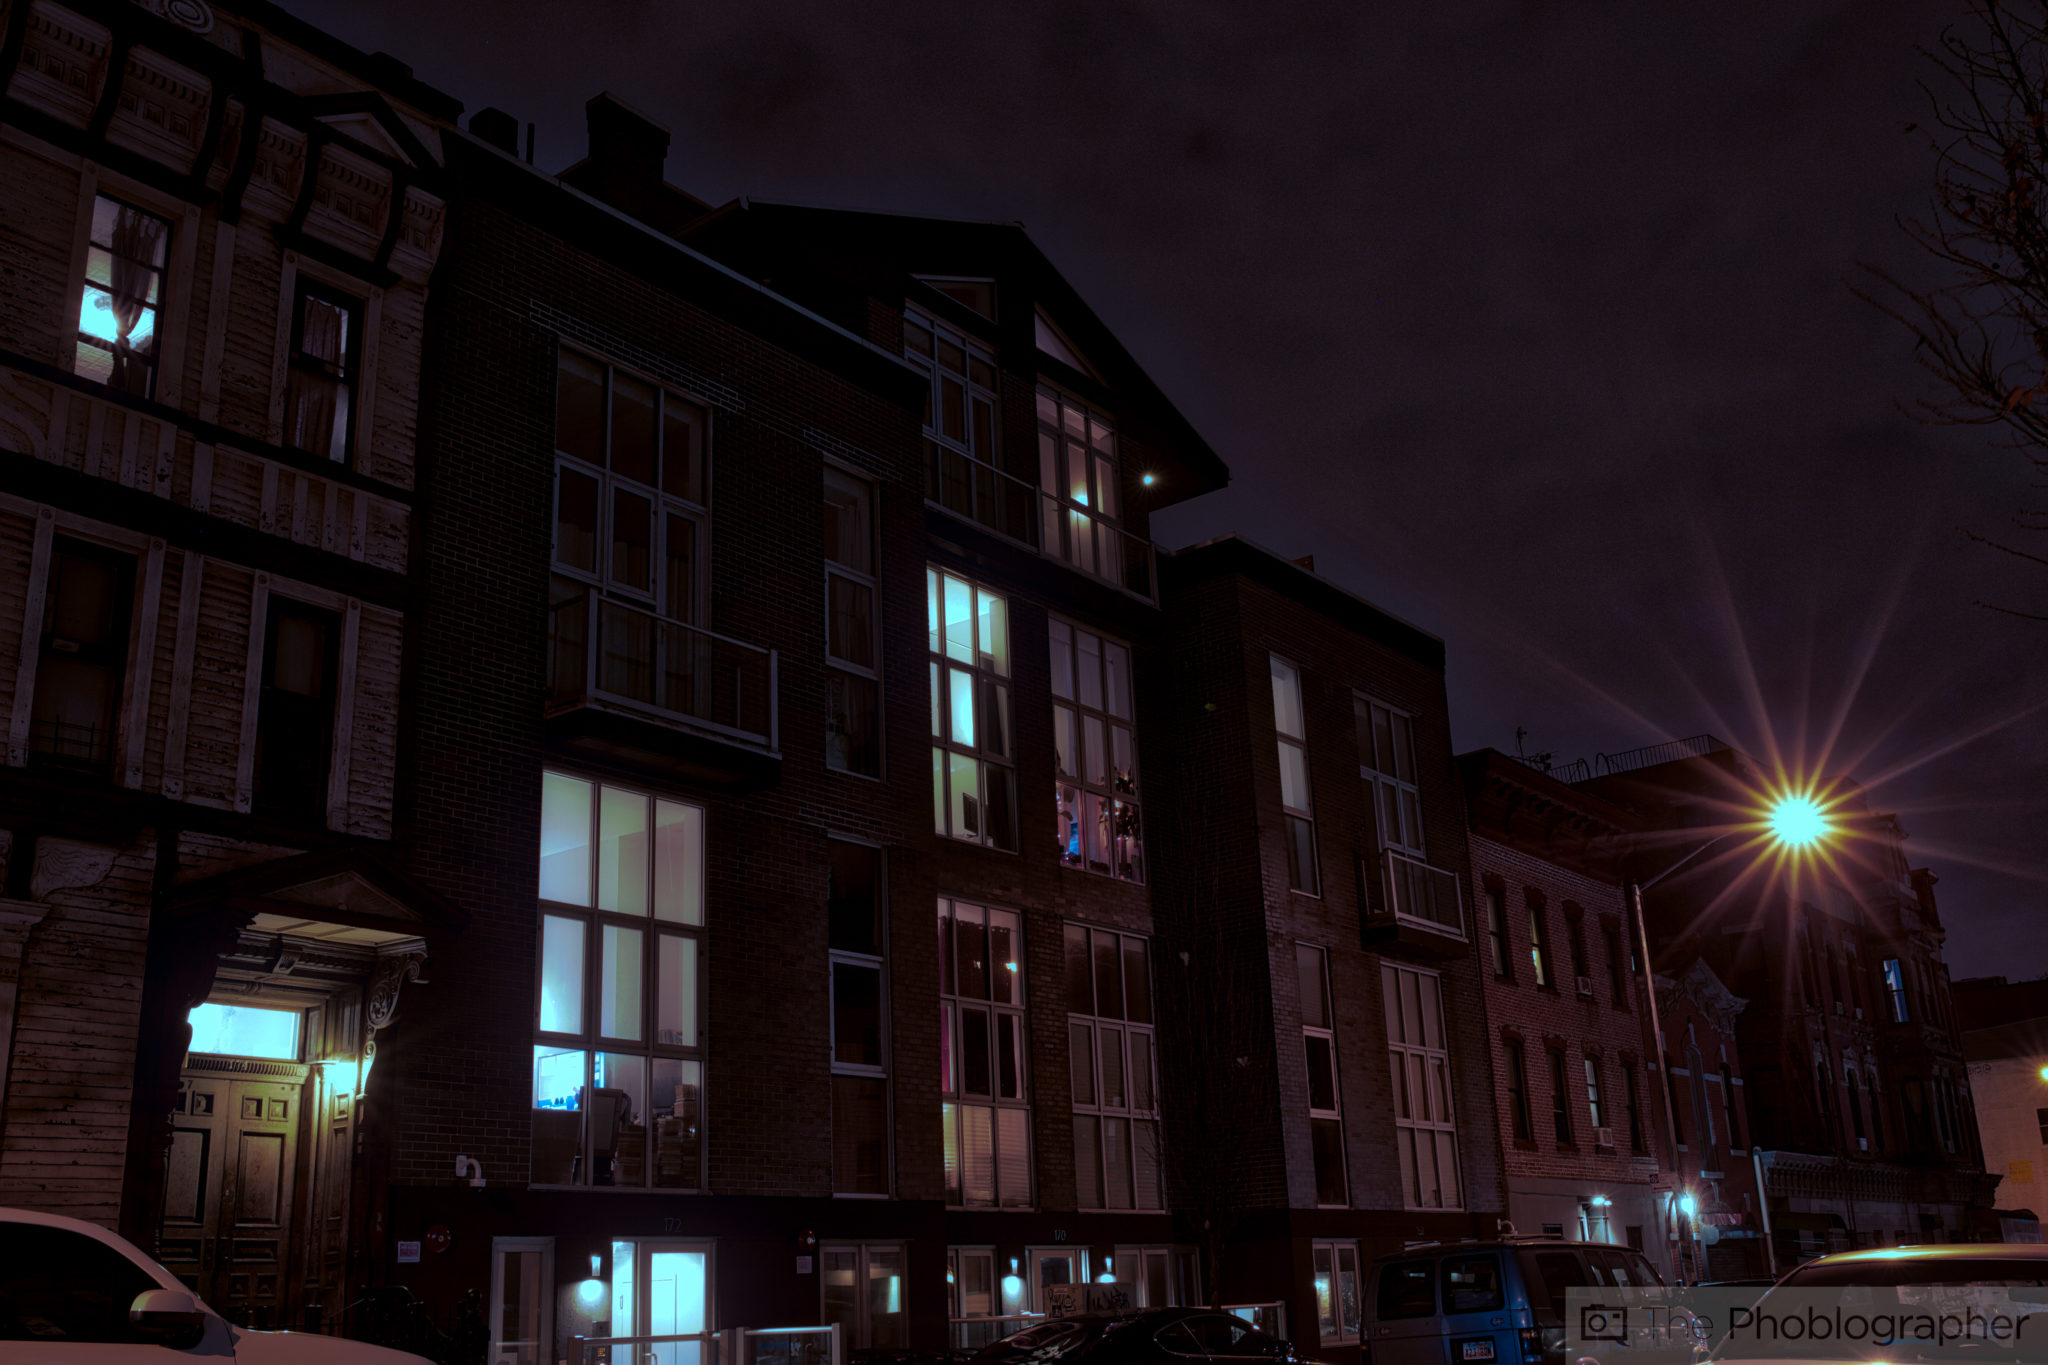
Now here’s the HDR that Aurora created.
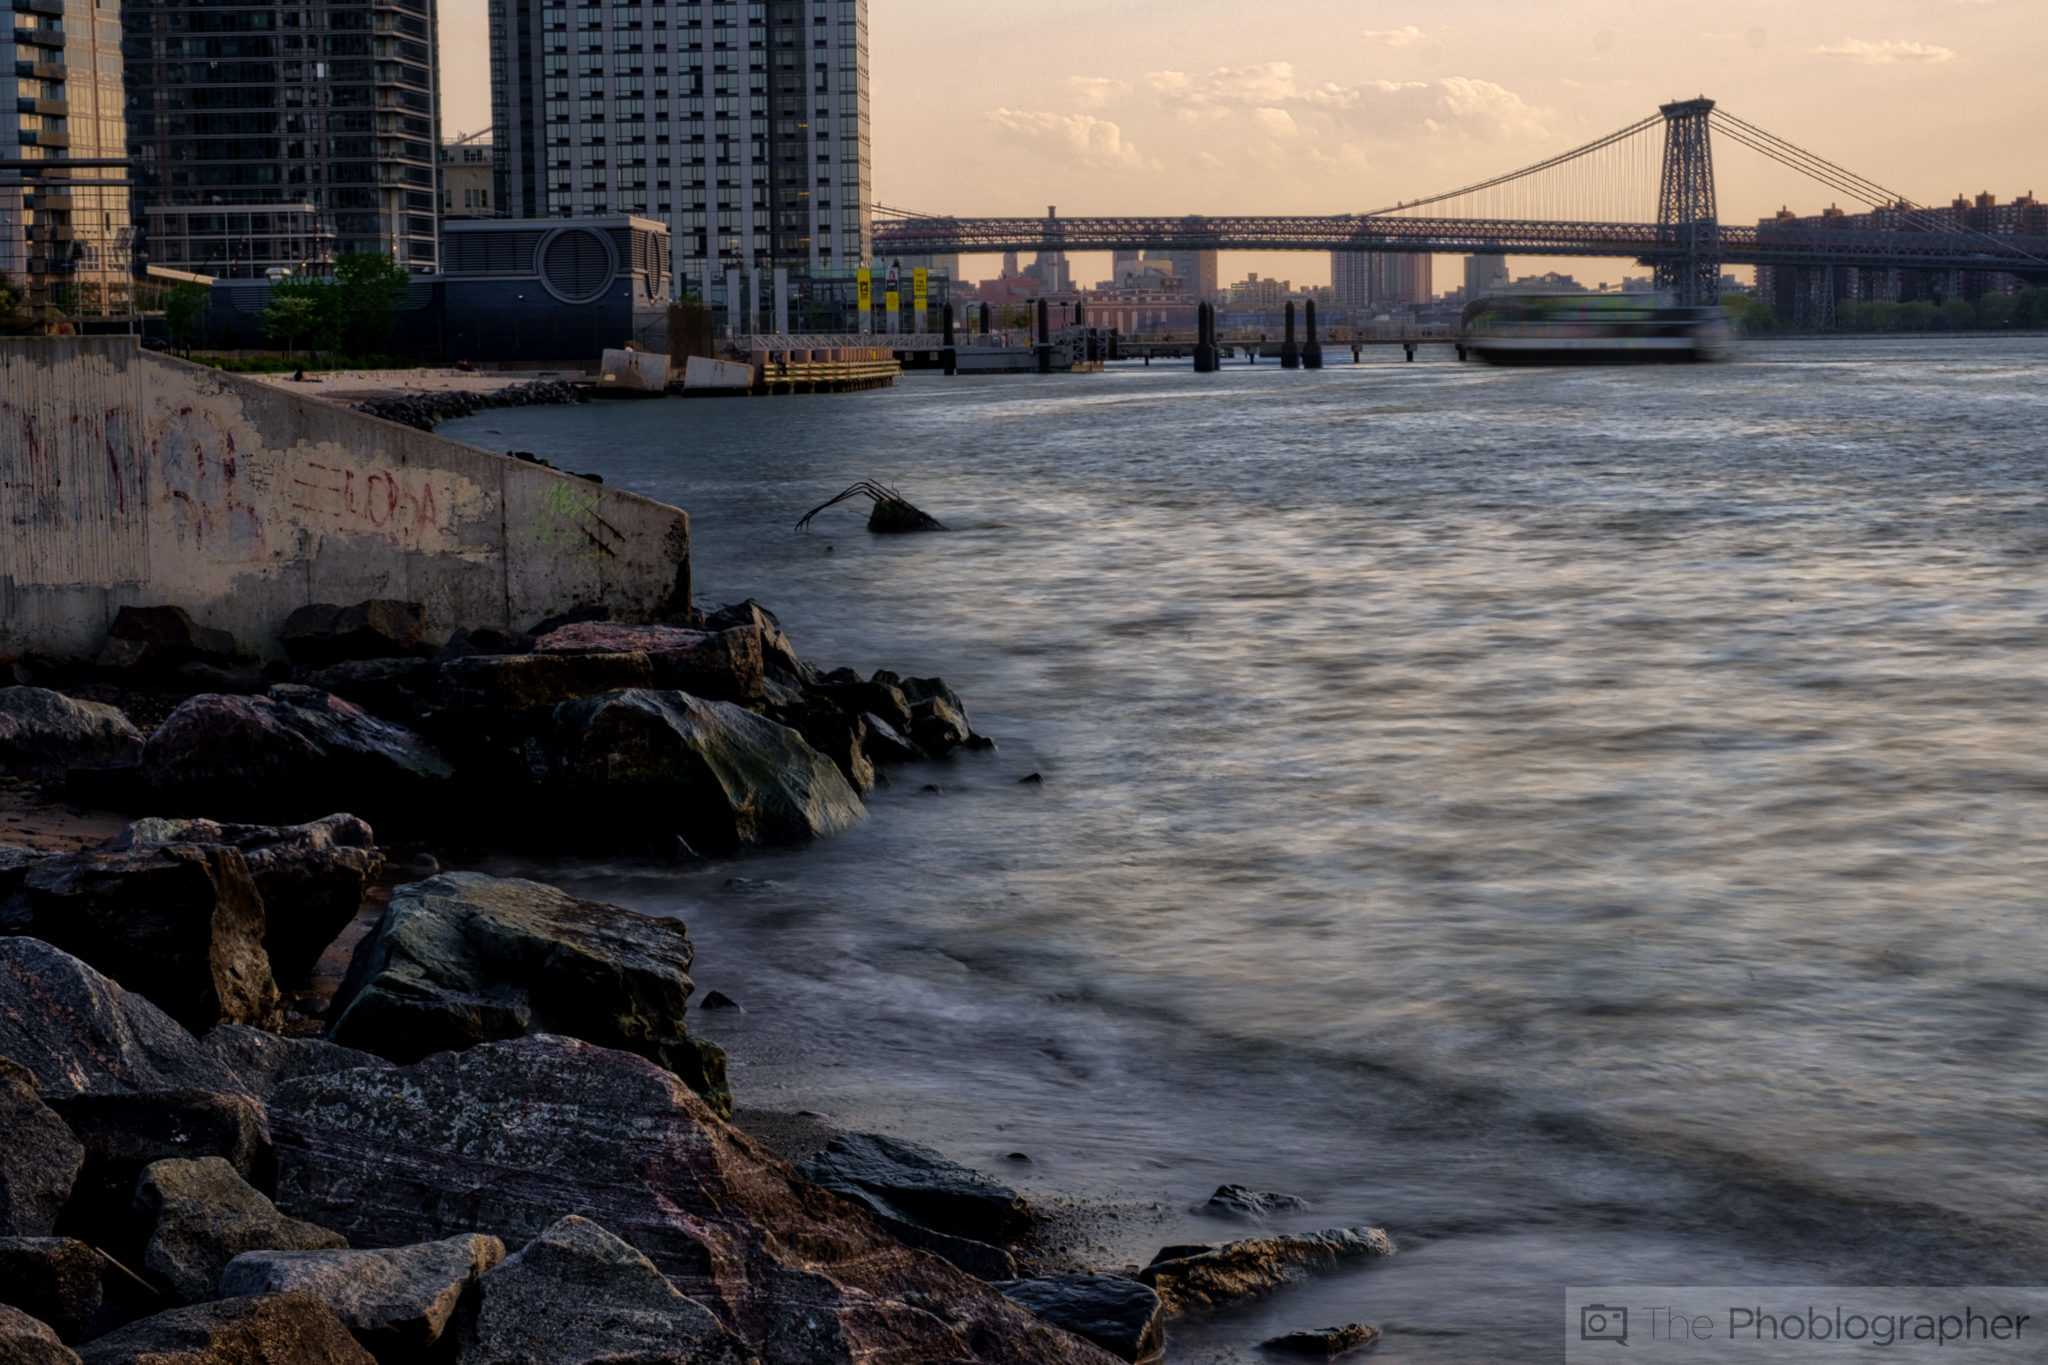
Personally, I really like it. It’s a bit dark, but it’s also pretty nice.
In comparison, here’s what Adobe Lightroom created with Photo Merge:
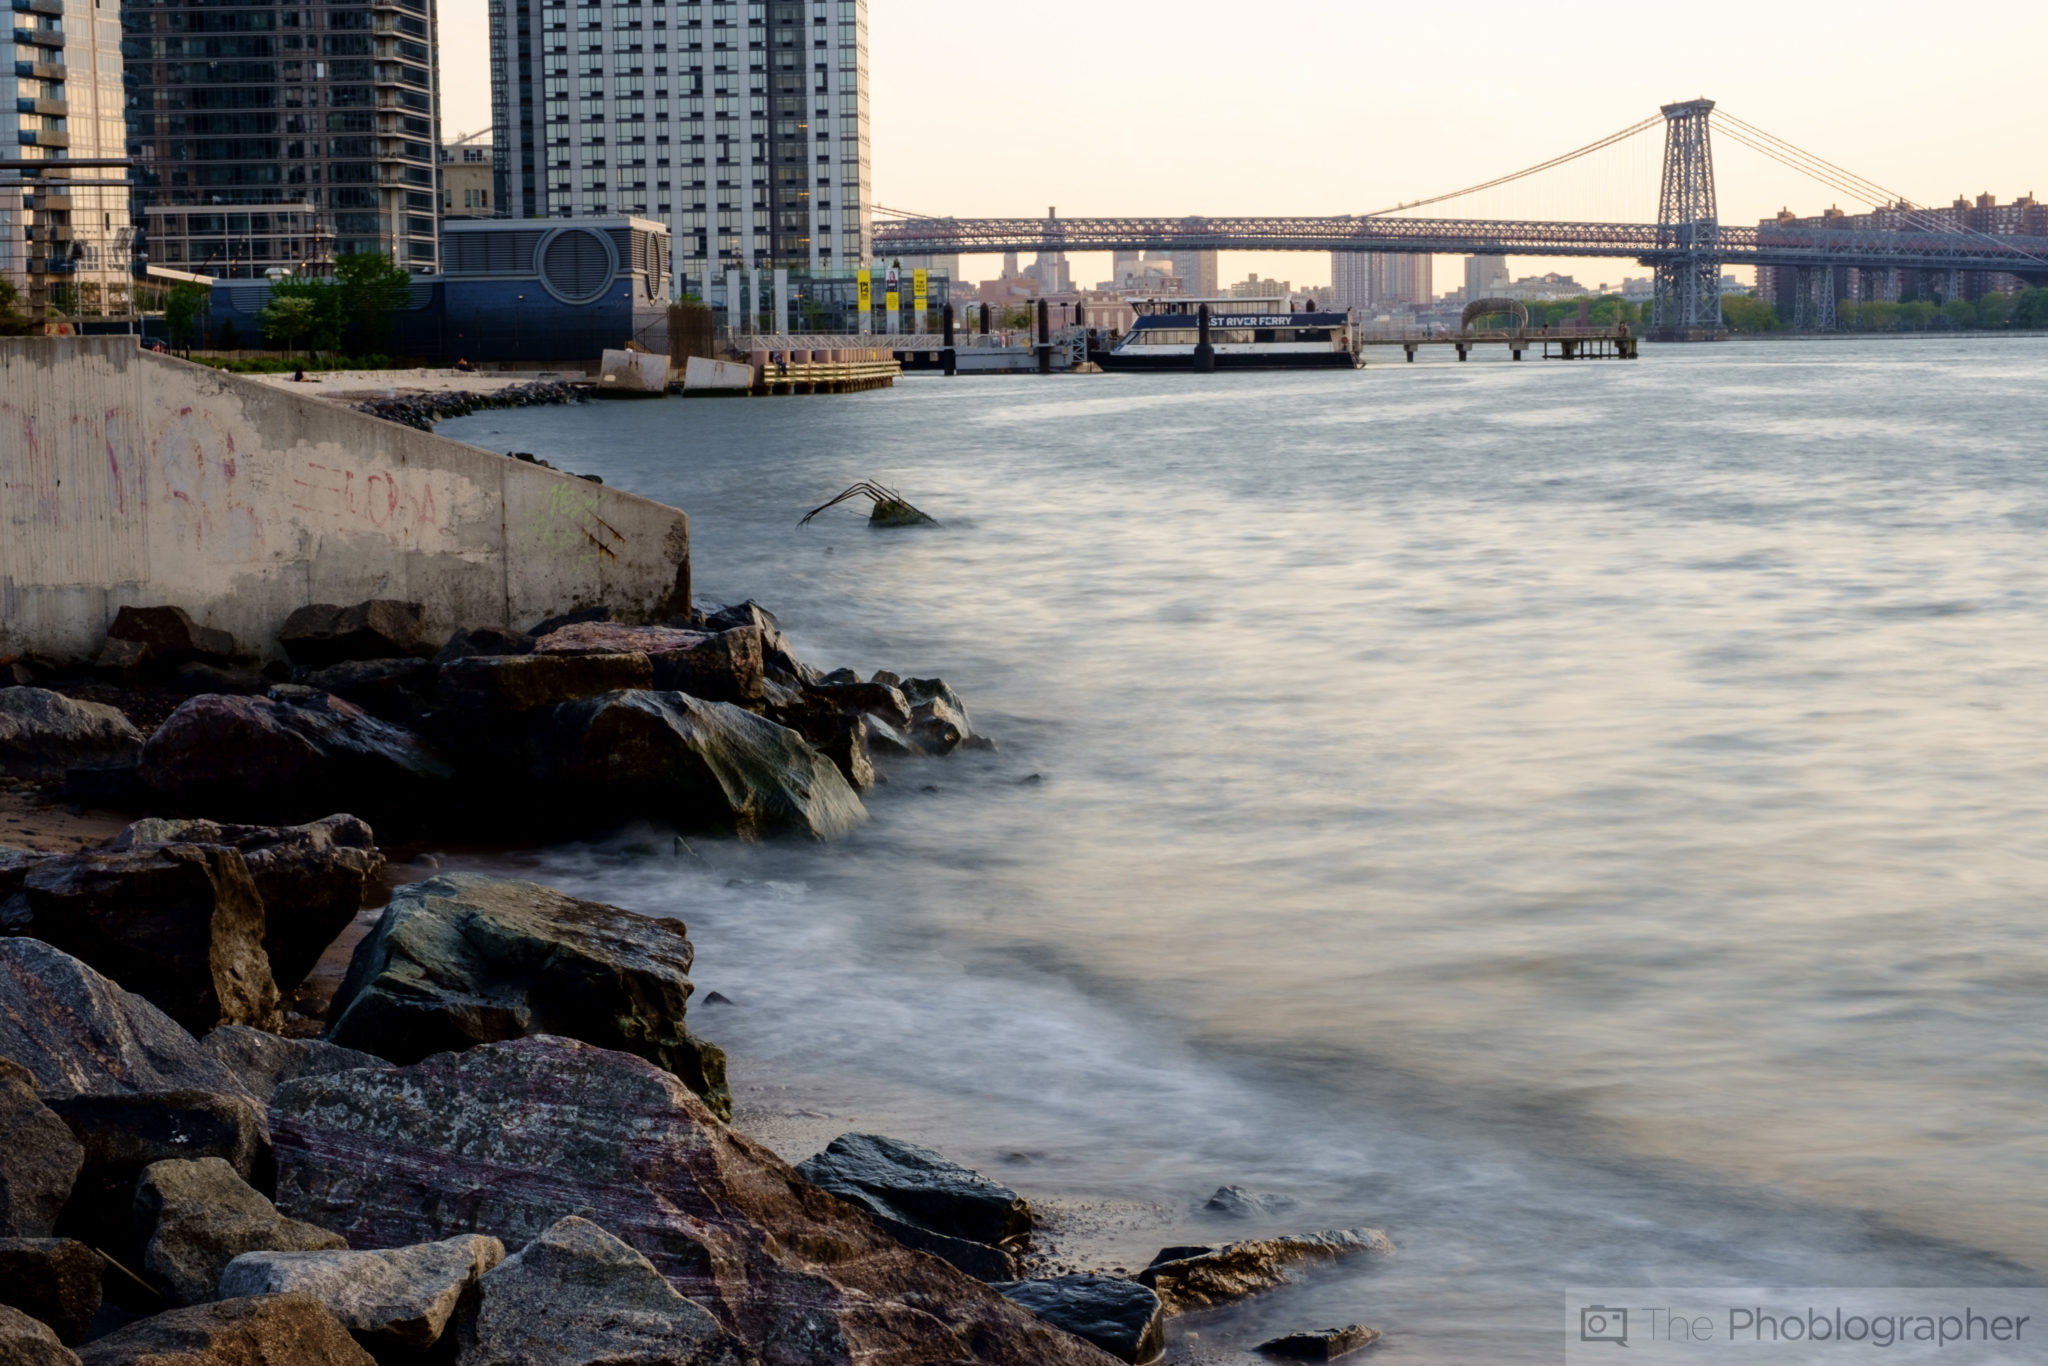
To each their own. To be fair, Adobe merges images and then exports them into the folder of your catalog as a DNG file. From there, I can reapply the Fujifilm Velvia profile and edit to my heart’s content with conventional Adobe Lightroom knowledge. But Aurora HDR offers me really fun presets that I can apply and then adjust on my own. Offering a preset as a starting point tends to speed up the workflow and inspire me with ideas.
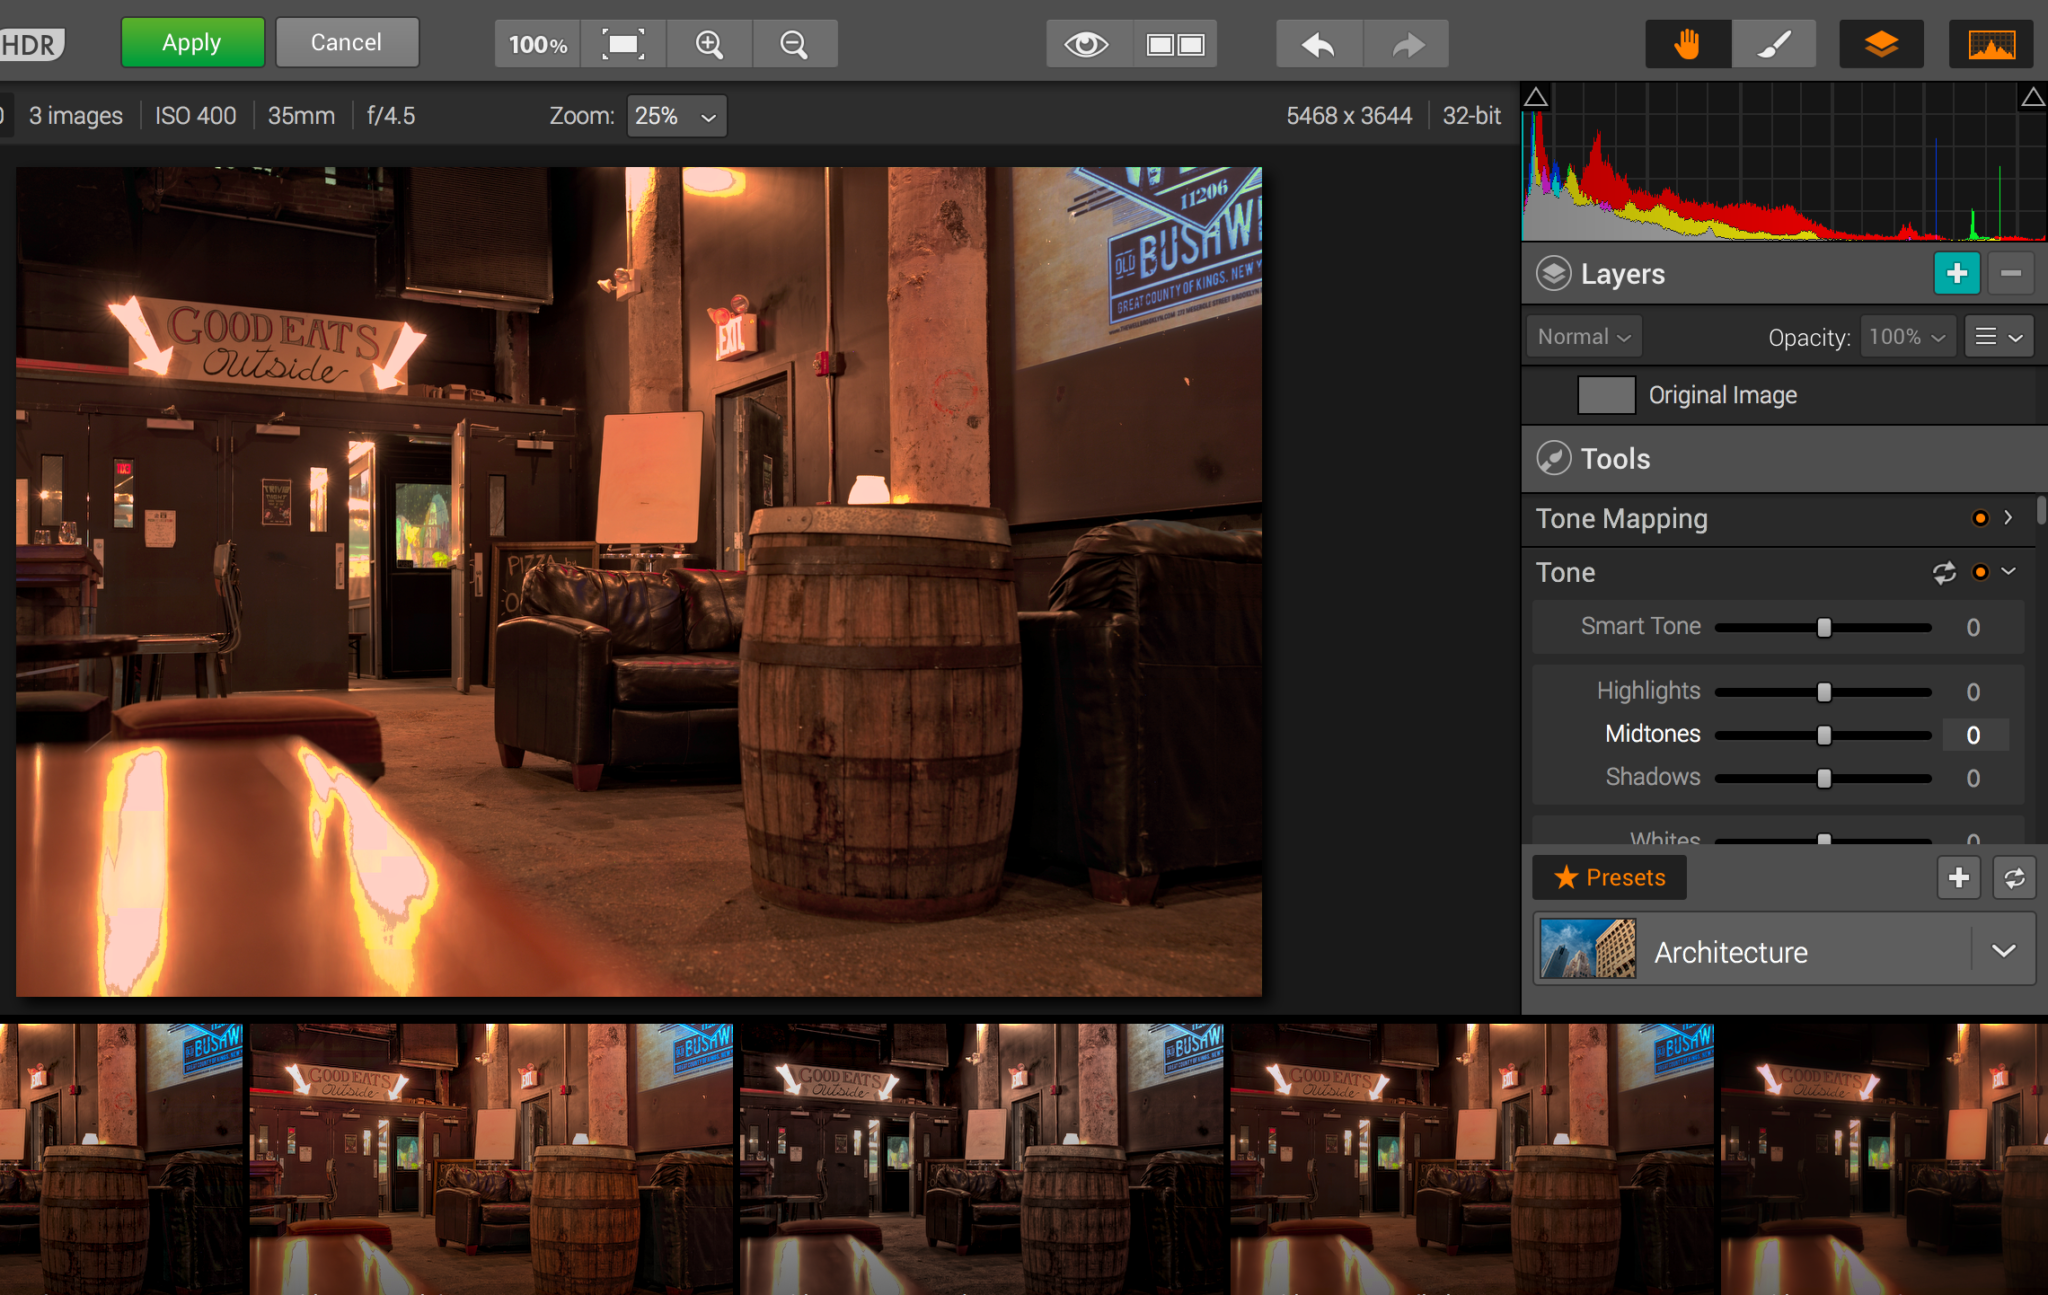
When you import an image into Aurora HDR you’ll get an editing suite like this. It’s biggest emphasis is on the image and applying presets. Aurora HDR looks at the type of image that you shot and figures out what presets it should apply. For example, there are presets specific to architecture. Of course, you can also completely forget about the presets and just edit the image the way you want using the development panel on the right hand side.

This panel gives lots of editing tools to the user; many of which Lightroom users will be familiar with. Then it adds in other things that are specific to HDR photography. The merge processing is slower than Lightroom’s but not as slow as Noiseless Pro. However, the export and all other things is faster. To clarify that statement, none of this is anywhere as slow as trying to stitch together a Brenzier effect image.
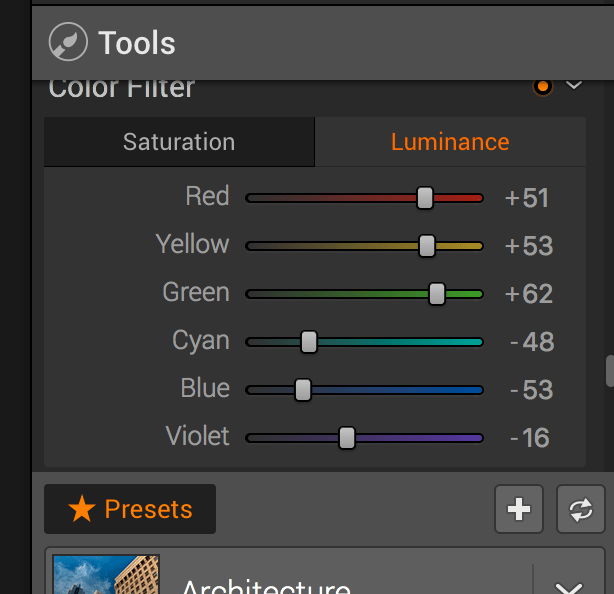
Something that’s really odd about Aurora HDR though has to do with the color filter editor. One would typically think that an editor would allow all of the ROYGBIV colors; but Aurora HDR doesn’t give you the ability to edit oranges.
So why might they do this? Sunsets and golden hour photography are my best guess as an answer to that question, but then what about all the folks who do HDR portraits? If they’re photographing a person with white skin, then chances are that any program will associate that skin tone with orange. In a situation like this, I’d recommend making lots of edits in Lightroom, merging here in Aurora and then returning to Lightroom to make your color edits. But to start, I’d avoid HDR portraits as I’ve never seen a good one in my life with the exception of being done with a flash using High Speed Sync.
Before I go on, this program and any sort of HDR editing works at its absolute best when your screen is properly calibrated.
If you’re a user of other types of cameras, (for example the image merge above was done with images from the Canon 6D) then you’ll want to make sure that the images are as right as possible before you send them over to Aurora HDR. By that, I mean that you should check the histograms of your photos and make sure that the darker image is really to the left, the brighter image is really to the right, and the middle image is smack dab near the middle. Sometimes, just going one or two stops just isn’t enough–and that’s why the abilities of the Lightroom editing are so valuable. For what it’s worth, the color tools aren’t as good as Lightroom’s. So with that in mind, work with specific color channels before you do the export into Aurora.
In the situation above, Aurora HDR didn’t register any of the details in the clouds or sky. It took a couple of tries but it eventually got it.
To that end, if you’re a Canon user you may also want to apply a camera profile like Camera Faithful, Camera Landscape, etc. This will provide a starting point to editing the images; then after that you can mess around with each the exact way that you want. The same rules will most likely also apply to Sony, Nikon and other users as it really just makes sense. Beyond that, modern sensors are so good these days that you may as well just go for it.
Here’s what this all looked like:
To be fair here, I should have edited the darker image to where I’d get the sky to begin with. But on that train of thought, Adobe would merge the images into an HDR DNG file where I could edit and get that detail with ease and may also pull that info from the file. Aurora does that too, but as a TIFF. Again though, it’s really not a majorly terrible problem as long as you get your exposures right.
Image Quality
Interior


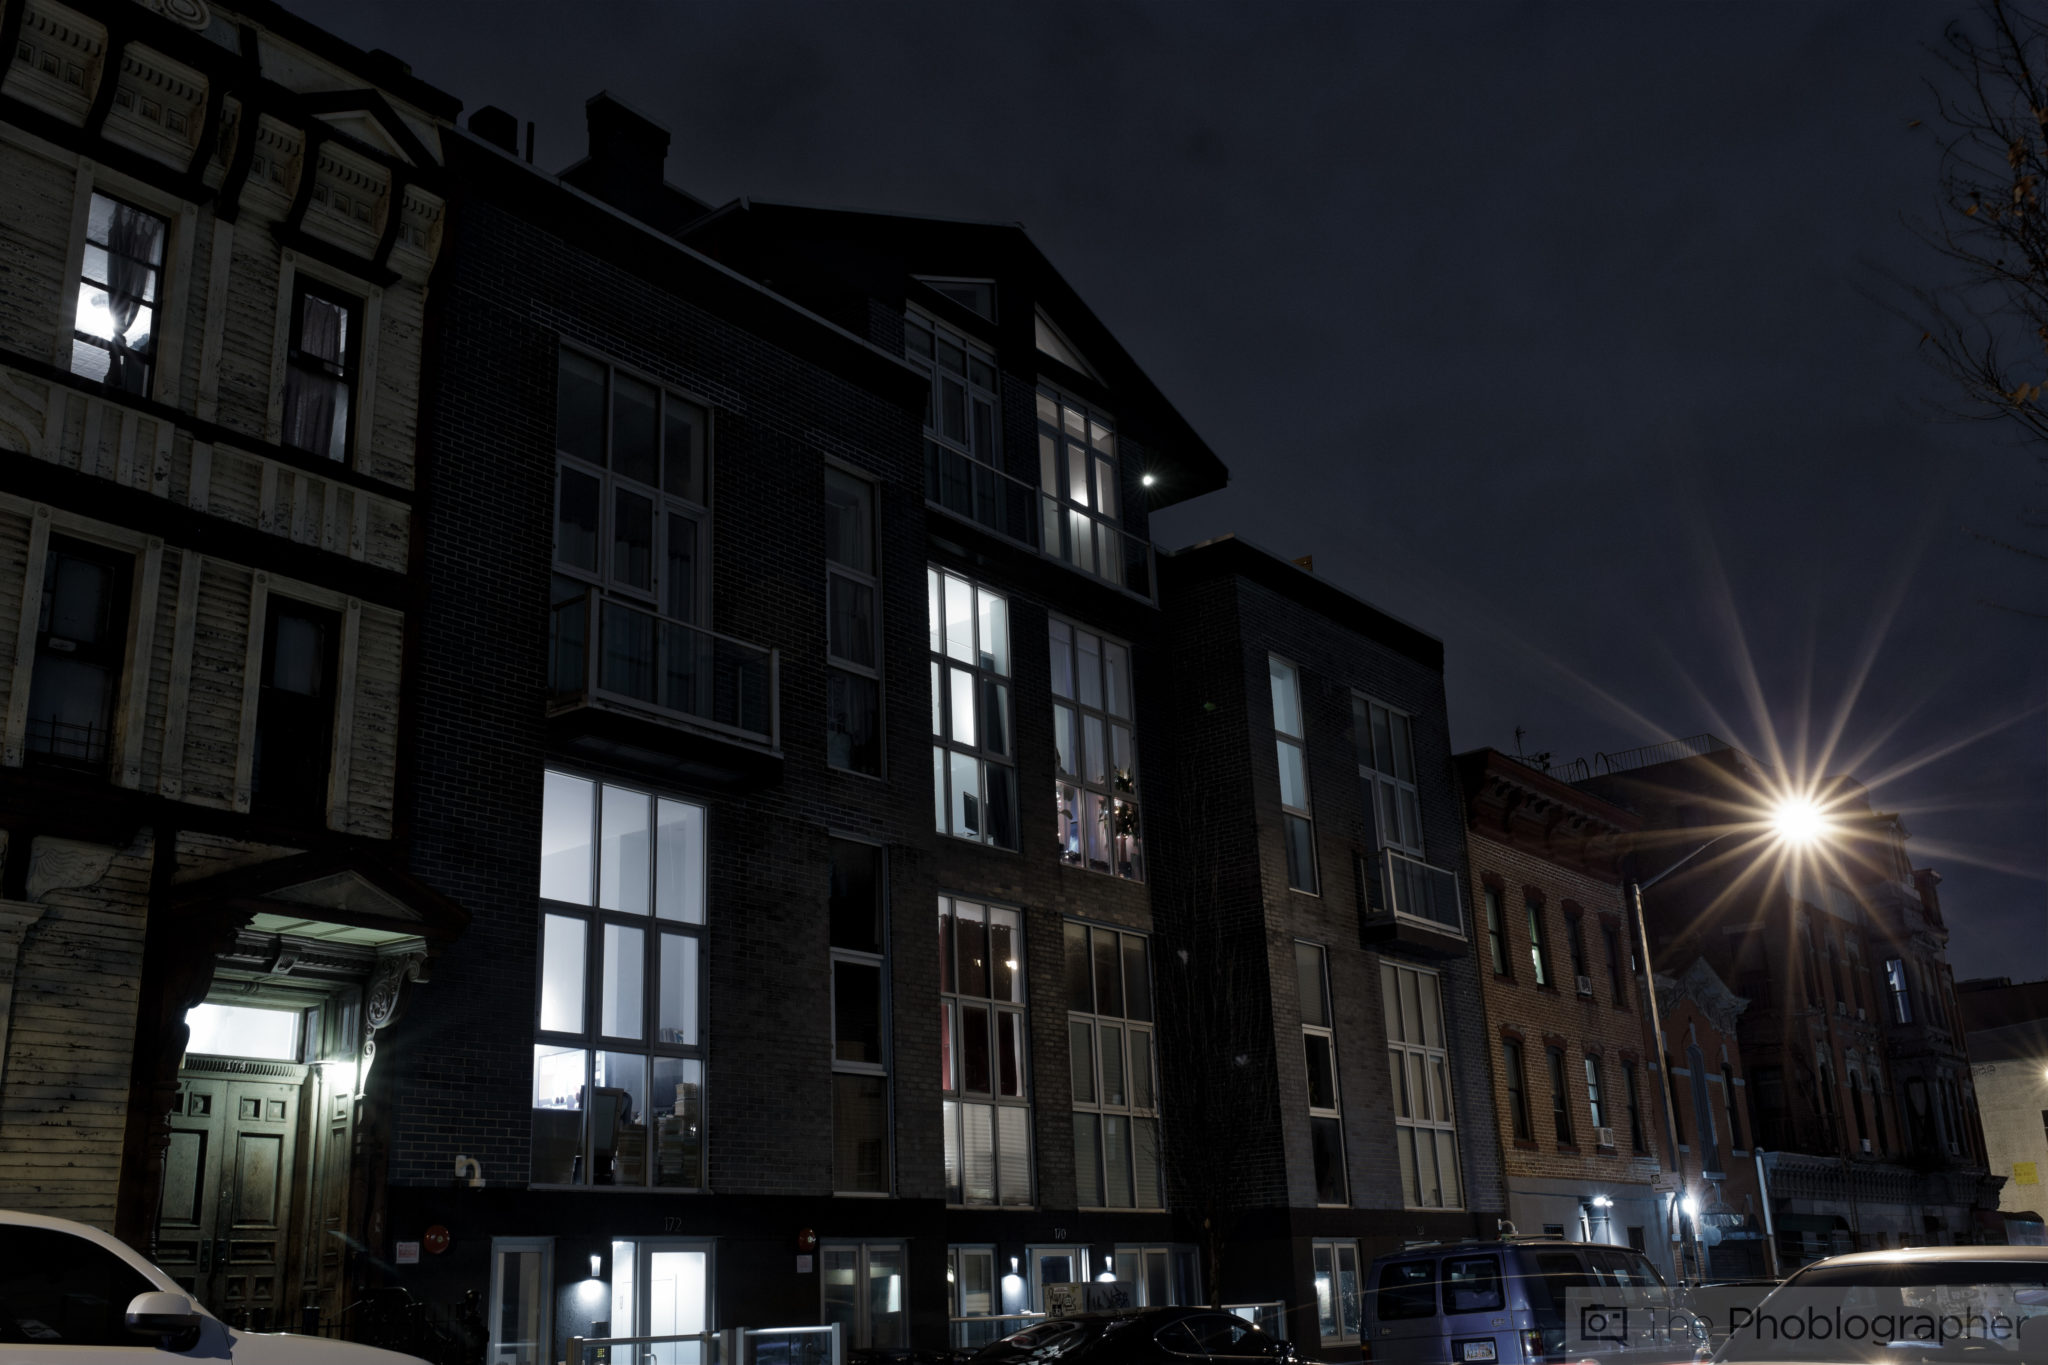
Building
Stylistically, I prefer the look of Aurora HDR–halos can look nice if done right and this is an instance where they’re subtle but still effective. If you’re a bigger fan of the natural look, then Lightroom’s may be what you’re after. Indeed, the natural look is what many are after most of the time. But sometimes, the actual HDR look can be effective when done right.
Here’s another edit that looks more natural from Aurora:
Aurora still managed to get more details out of the sky in one shot. Interesting given that before it couldn’t get it. Perhaps this is because Blue is the dominant color in the scene. Aurora HD also has a Realistic HDR rendering preset if you’re interested in that.
Conclusions
I’m typically the person that prefers to create an HDR image from one photo because modern cameras are just so good at doing it if you’ve got your metering mastered. But there is no denying that photographers can get even better HDR images by merging photos together. It just works; and it works well too as the technology has become better.
Aurora HDR does a very good job with all this for landscape photographers while also finding a way to help you embrace your creative side if your technical side’s raging mouth can be quelled for a minute or two. Further, Real Estate photographers can also enjoy further benefits from the program by making their images look better in a more straightforward and simple way that lets them spend more time with customers.
If you’re a photographer that doesn’t have very in-depth knowledge of using color channels and knowing exactly how to tweak the various highlight and shadow levels in Lightroom to get just the image that you want, then I recommend you let Aurora HDR do the work for you lest you spend hours or loads of money to learn how to do so. If you have that higher end knowledge, calibrate your screens, and own a camera made after 2012 then just use the newest features in Adobe Lightroom. However, the value that Aurora can still bestow on you is making you look at and think about your HDR images differently using their presets as a starting point.

Aurora HDR receives five out of five stars. At the publication of this review, it’s on sale at $99.
Get rid of the ads!
Did you enjoy reading this article as much as we enjoyed writing it? There's a way to support us and our reporting, getting ad-free navigation and more as a bonus. Subscribe to us for less than a coffee per month —just $3.99— or take advantage of our yearly subscription with a hefty discount for only $25.- An ad-free experience
- A free mystery box for Lightroom or Capture One
- All the books in our store
- 20% discount on Capture One
- 30% discount on Imalume Photo Theft Protection
- 20% off Herbs and Kettle Tea Company.
- 20% off your order from MPIX printing services.
- 5% off Viltrox Products via their eCommerce store.
- 10% off all film developing, printing and scanning services from Blue Moon Camera and Machine
- 15% off 7Artisans products: The lens and accessory maker is offering a sweet discount for Phoblographer's readers.