Before this year, the last frame of film I shot was probably 20 years ago, using my blue Mickey Mouse camera. Although as this year began, I found myself being drawn to old school, analog, film photography. I ended up challenging myself to shoot one roll of film, each week, for one year. I called this Project OneRollFifty2.
The more I shot film, the more I loved the look of it. Up until this point, I didn’t really know of any way to replicate these looks in digital photography. You could always take a shot into Photoshop, tweak a bunch of things, add textures, add noise, etc. and attempt to replicate film, but if would definitely be difficult to nail a certain film.
Then I heard about Alien Skin’s Exposure 4 software that mimics hundreds of different films and I had to give it a try. Alienskin says, “The result is a photo that looks like it was made by a human, not a computer”. Read on to see if they’re right.
Editor’s Note: This is a guest blog posting by Travis Lawton. You can find more of his work on his website at Travis Lawton Photography as well as his blog at The Lawtographer.
Features
- A huge list of one-click, very accurate film presets
- Full image customization beyond the presets
- Save user-created presets
- Non-destructive editing. A separate file is created if within Lightroom or a new layer is created when in Photoshop; perfect for blending the original with the Exposure layer.
- Batch processing
- Add texture overlays (scratches, dust, borders, and light leaks)
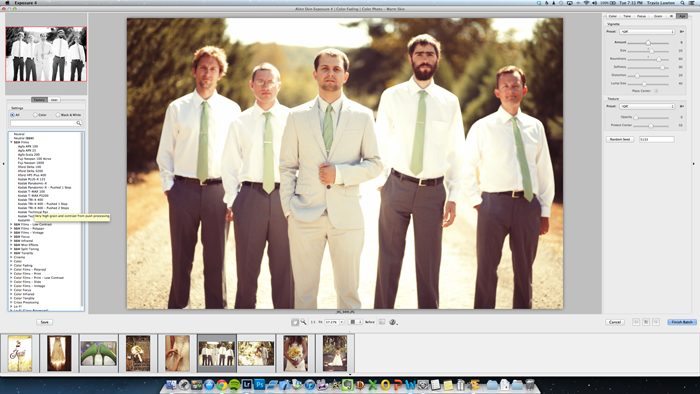
Exposure4 is a plugin that piggybacks onto Adobe’s Lightroom and/or Photoshop. Upon initially loading the plugin, you notice a fairly simple interface. If you a Lightroom user it will look very similar to what you’re used to.

The center is dominated by the large preview of your selected image. The bottom contains a “film strip” of your selected photos if batch editing. The left of the screen has the expandable menus containing all the different film types you can emulate. Above those is the small preview window that lets you preview what the image would look like as you hover over the different films. This works identical to Lightroom’s presets feature.
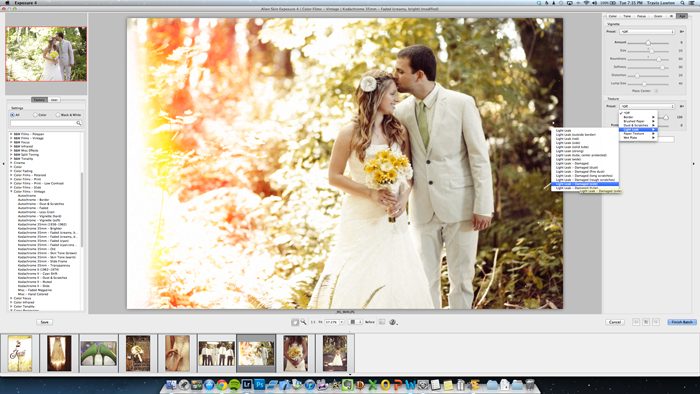
The right side of the screen is what really sets Exposure4 apart from regular old presets from within Lightroom. This section lets you customize every little aspect of the photograph all with an emphases on film. Anything from overall color and tone changes, adding custom tweaked grain, simulating an infrared image, all the way to added textures, borders, and even creating artificial light leaks.
Admittedly I didn’t use the total customization section that much as I wanted my photos to look as close as possible to the selected as to make it look like as if it was a film image all along.
Kind of interesting to think how far we’ve come; we shot film, then we advanced to digital cameras, and now we want to emulate or digital images to look like they were film.
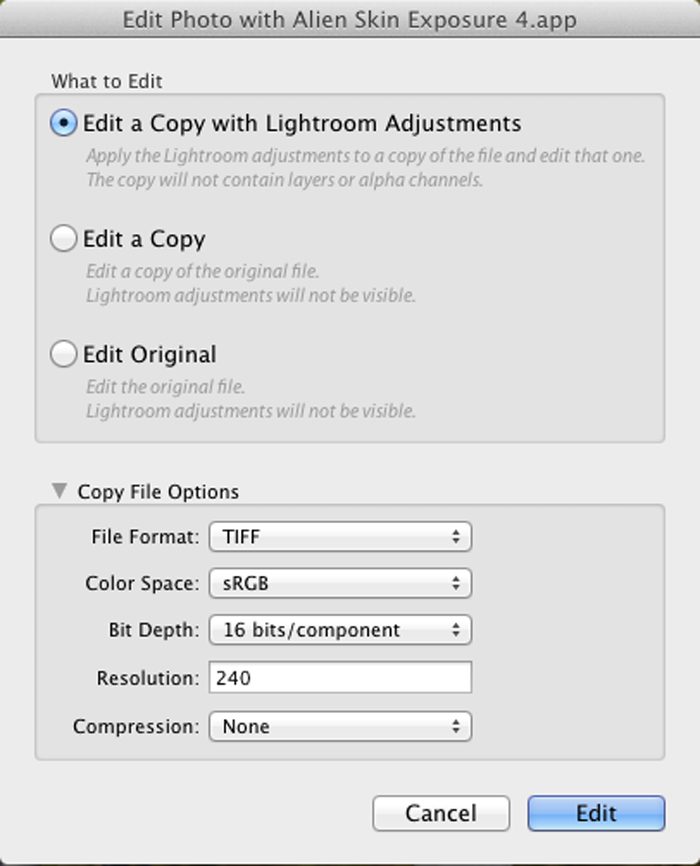
Exposure4 doesn’t come without a couple gripes. First, like most plugins, Exposure4 can’t edit the RAW files straight out of the camera. When selecting an image (or multiple images) to edit in Exposure4, you’re presented with a box on how to open them. This is similar to what happens when you want to edit an image in Photoshop from Lightroom. You have many options but to retain the most detail in the image, Exposure4’s default settings are to convert the selected image(s) to a 16-bit, 240 DPI TIFF with no compression. This took my 22mb file from my Canon 5DmkII and created a 126mb new TIFF right next to it.
Opening a handful of images in Exposure4 can quickly eat up gigabytes of hard drive space. Yes space is “cheap” nowadays but it does still cost money.
I shoot 1500-2000 during a wedding so I need to smartly plan ahead of time which images I want to run through Exposure4 to best utilize my hard drive space.
Speed would be the other issue. Since I do shoot weddings and have such a massive amount of images to cull through for each “shoot”, with needing to create a copy of the file, open Exposure4, perform edits, and save back into Lightroom, it can put a damper on your workflow. Yes you can do batch edits but like I said earlier, you really need to plan ahead which ones to throw into Exposure4 or risk losing hard drive space (although if you remember, you can go back into the hard drive and delete those created TIFF’s to get that space back).
I really loved the quality the preset films gave. And being a somewhat rookie to film, it taught me several things about the different films out there as well as expired films that may never see the light of day again (pun intended). This got me interested in possibly picking up an old Polaroid camera or getting into Lomography.
Conclusion
If you’re a film aficionado from back in the day or have been debating getting into film photograph, Alien Skin Exposure 4 might be a great way to “test the waters” using your digital images. However, I do think this program is better suited for shoots that don’t have thousands of images to go through. It can be tough on a wedding photographer’s hard drives. The program itself is quite snappy and responsive and allows you to achieve a great-looking finished product very quickly. Whether that be just using the film presets or tweaking until your heart’s content.
Please Support The Phoblographer
We love to bring you guys the latest and greatest news and gear related stuff. However, we can’t keep doing that unless we have your continued support. If you would like to purchase any of the items mentioned, please do so by clicking our links first and then purchasing the items as we then get a small portion of the sale to help run the website.
Also, please follow us on Facebook, Flickr and Twitter.
Get rid of the ads!
Did you enjoy reading this article as much as we enjoyed writing it? There's a way to support us and our reporting, getting ad-free navigation and more as a bonus. Subscribe to us for less than a coffee per month —just $3.99— or take advantage of our yearly subscription with a hefty discount for only $25.- An ad-free experience
- A free mystery box for Lightroom or Capture One
- All the books in our store
- 20% discount on Capture One
- 30% discount on Imalume Photo Theft Protection
- 20% off Herbs and Kettle Tea Company.
- 20% off your order from MPIX printing services.
- 5% off Viltrox Products via their eCommerce store.
- 10% off all film developing, printing and scanning services from Blue Moon Camera and Machine
- 15% off 7Artisans products: The lens and accessory maker is offering a sweet discount for Phoblographer's readers.