
Last Updated on 03/19/2025 by Alberto Lima
For years, Adobe Lightroom has been the pinnacle workhorse for photographers. The interface is clean, and simple to use, while batch editing significantly reduces precious editing time. But, one of the biggest complaints photographers have about the editing process is the time required behind a computer. Artificial intelligence is Adobe’s answer. The software giant is rapidly adding features that cut down on the time spent applying local adjustments, as well as features meant to keep users from abandoning ship for the competition.
.
We hate banner ads too. Download our app for iOS, iPad, and Android and get no banner ads for $24.99/year.
The latest updates (12.3 release, April 2023) meant to save time and competing up with the competition include an AI-powered Denoise as well as more portrait masking options and, finally, the ability to edit curves on a local mask. Is it enough? We think so. Keep reading to find out more.
Editor’s Note: Updated in April 2023.
Table of Contents
The Big Picture
In 2025, Adobe’s Lightroom continues to excel in helping photographers efficiently catalog their images—easily importing RAW vs. JPEG files and then quickly creating sub-catalogs or batch edits. The latest round of updates highlights Adobe’s AI strategy – the company strongly believes that photographers might warm up to the technology by providing AI-assisted enhancements to heavily used tools. Overall, the pros and cons remain the same – if you’re a photographer who shoots weddings, events, and portrait sessions that require lots of batch editing, Lightroom Classic is still a strong option for your workflow.
Adobe has added some significant functionality to its beloved Lightroom. The AI-based edits made over the last year have significantly sped up my editing timeline. Using a mask, you can finally adjust curves on just one small part of the image. The new Denoise preserves more details than the basic noise reduction sliders. And the ability to mask out different parts of the photo with one click is rapidly expanding.
Any photo software can do basic edits. The reason to choose Lightroom Classic is the mix of long-standing controls with new smart adjustments that mean fewer trips to Photoshop. While there are programs that are AI-heavy for beginners, like Skylum Luminar, Lightroom Classic offers a long list of classic controls mixed with modern shortcuts.
We prefer the Classic interface at Phoblographer, but we still use Capture One for our gear tests. While Lightroom Classic is steadily gaining more tools that used to require Photoshop, we’d still love to see a few more. A patch tool would be stellar, as would layers and localized HSL color edits. One can hope! That being said, Adobe is moving in the right direction and finally listening to photographers’ requests again.
It remains an excellent option for wedding, family, and senior portrait photographers. Batch editing has always been one of Lightroom’s strong suits — but it’s even more capable now thanks to AI-based masks that can automatically be applied to multiple images. Fashion and beauty photographers will still need the functionality of Photoshop to keep up with demanding industry standards.
We are giving Adobe Lightroom four out of five stars. Want to check it out for yourself? Head over to the Adobe website and try a free trial. Or, read our Lightroom CC review, Classic’s little sister designed to edit across mobile and desktop devices.
Pros
- Simple design
- Adjustable premium and adaptive presets offer flexibility
- Quick and accurate masking
- New Denoise algorithm does a good job
- Lots more local adjustment options
- Curves are now available in local adjustments
- Batch editing that works with many of the AI-based masks
Cons
- HSL edits in masked areas would be great
- No layers
- Still no patch tool
- Denoise tool is slow, destructive, and not batch editing compatible
Gear Used
We tested Lightroom on a 2021 16” Macbook Pro with an M1 Pro processor. The images used were captured with various cameras, including the Fujifilm X-T4, Fujifilm GFX100s, Sony a7 IV, and Canon EOS R5.
In our 2025 update (Lightroom Classic Version 14.2) we used a 2024 MacBook Pro with an M3 Pro processor. The images were captured on a Nikon Z8 and a Canon EOS R8.
2025 Update: What’s New in Lightroom Classic Version 14.2?
The latest version of Lightroom brings some major changes to the core editing functions with a new AI-assisted tool – Adaptive Profiles, Catalog Backup Management tools, focus point selection while tethered capture, and performance tweaks. In this section, we’ll go into each of these and ultimately try to answer the question: Is Adobe’s Lightroom still the standard bearer for photographers in 2025?
Catalog Backup Management

Lightroom is still the GOAT when it comes to catalog management. This single feature has kept me subscribed to their Creative Cloud product, even though options like Capture One have become better for editing in various ways. In Version 14.2, Lightroom now allows users to manage their backups—easily setting and opening backup locations, checking backup sizes, and even deleting old backups.
For those with commitment issues, this new backup management option allows users to delete single or multiple backups without deleting the backup file. And if you ever need to go back to an old backup that you deleted from your backup history, simply open the file and it will once again appear in your backups list. In the long run, this should allow you to work more efficiently in Lightroom from backups.
Tether Enhancement – Focus Point Selection

If you’re a photographer who relies heavily on tethered capture in Lightroom, this one is a godsend. Lightroom has long supported tethered capture from Sony, Nikon, and Canon cameras, but now, Lightroom allows you to access your camera’s autofocusing features within the Live View window.

While I do not typically use the tether capture feature, this update made me want to go back and try it out myself. In my testing, I found that I could quickly and intuitively access each of my test cameras’ (Canon EOS R8 and Nikon Z8) autofocusing menus without leaving my Lightroom workspace. If your workflow demands extensive use of tethered image capture, you’ll be happy that Adobe has brought over a feature that has long been available to Capture One. Just a fair bit of warning – ensure your camera is on this list of supported cameras before jumping in.
Adaptive Profiles

If you’ve been using Adobe’s Camera RAW for at least a few months, you might have encountered the Adaptive Profiles feature. Adaptive Profiles use Adobe’s AI to analyze the content of an image and suggest various color profiles that automatically adjust tones and colors, creating a custom color profile for each individual photo.


Additionally, Adaptive Profiles will create masks for your subject and skies – but these are done in the background, and you will not be able to select them independently of applying Adaptive Profiles to an image. That said, once you add an adaptive color profile to your photo, you can take full advantage of the newly created masks for localized edits. Adaptive Profiles can be a great way to get started on quick edits for a shoot – especially if you’re using raw HDR files; Adaptive Profiles are designed for HDR workflows.
Performance Changes
As with most updates, Lightroom v.14.2 brings some performance and quality-of-life changes to some of their most used tools. Firstly, the masking tool improves its responsiveness to the brush tool. The brush tool now works faster and with less lag, making the brush strokes far more fluid. The Crop/Rotation’s angle adjustment tool also benefits from some optimization, helping to reduce stuttering when adjusting, especially on high-resolution images or images that have been heavily edited. Lastly, the white balance slider also gets improved responsiveness that allows for a smoother transition while adjusting color temperature.
Ease Of Use
Both Lightroom Classic and CC remain simple and easy to use. Some of the functionalities have subtle differences between the two iterations.
Lightroom Classic is designed for pro photographers, where Lightroom CC is designed for new users and has a consistent interface across desktop and mobile apps. I prefer Classic primarily because I’ve used it for so long that I know where everything is, and it has more tools than CC. But, CC is the one designed for newbies.
Lightroom Classic’s user interface is divided into tabs with different workspaces. The Library workspace is for rating and culling photos, while the magic happens in the Develop tab. Print and Slideshow tabs, which are self-explanatory, can also be helpful. But, I’ve never really found much use out of the Map, Book, and Web workspaces.
I find the Library interface is best used with keyboard shortcuts. I like to use the arrow keys to flip through the images, then numbers 1-5 to quickly give them a star rating so I can easily decide which shots to edit.
The two most significant areas of the Develop module are a menu of different presets to quickly apply multiple edits at once and a bank of sliders from exposure to noise on the right. These sliders aren’t as logically arranged as in Lightroom CC, but I still prefer the old style as a longtime Classic user.
Smart Masks
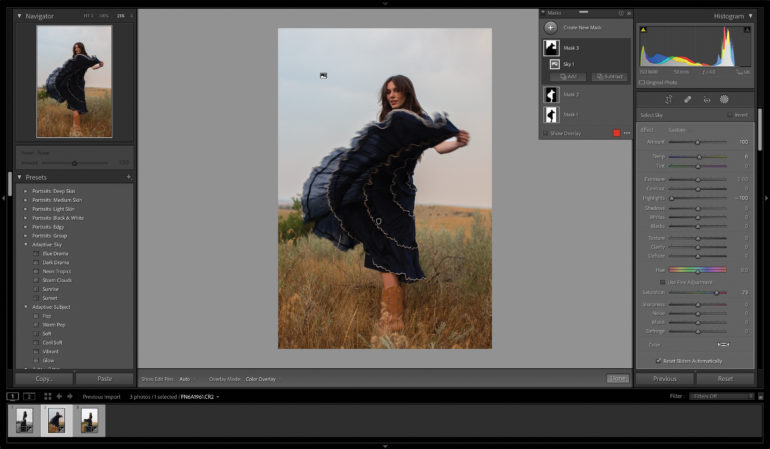
Nestled among the tools like crop and healing are the brush tools. While this used to only let you hand select an item or use a radial or gradient to apply local adjustments, the brush tool has seen major changes over the last few versions. All of them immensely increase how simple it is to make adjustments that apply only to one part of the photo. You can now select the subject, the background, or the sky easily. For portraits, you can select an entire person or parts such as eyes, skin, and hair. The program will differentiate between multiple people too.
The AI-powered options can also be used when batch editing very different photos. For example, I can use the brush tool to whiten teeth and then apply those settings to a group of images with the AI automatically finding the teeth for me. This is a huge feature for me when editing hundreds of photos from a wedding day. It saves so much time compared to re-doing each mask by hand for every single image.
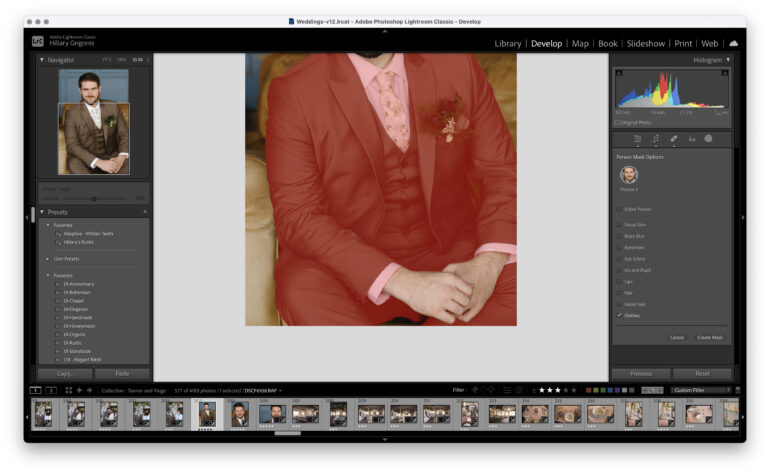
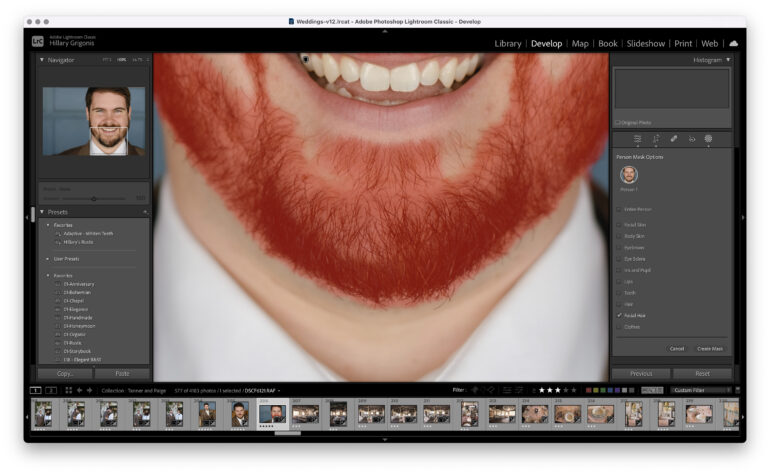
The latest tools to come to these local edits are the ability to select clothes and facial hair. This makes it simpler to say, change the colors of a shirt or darken a mustache. The clothing masking seemed pretty accurate, though it selects the entire outfit and not just the shirt or the pants — the option to differentiate between types of clothing would be a nice thing to see in later updates. The facial hair masking was less specific, selecting a bit of the skin too. That could be a problem if you adjust things like saturation, but it didn’t look odd with a simple darkening.

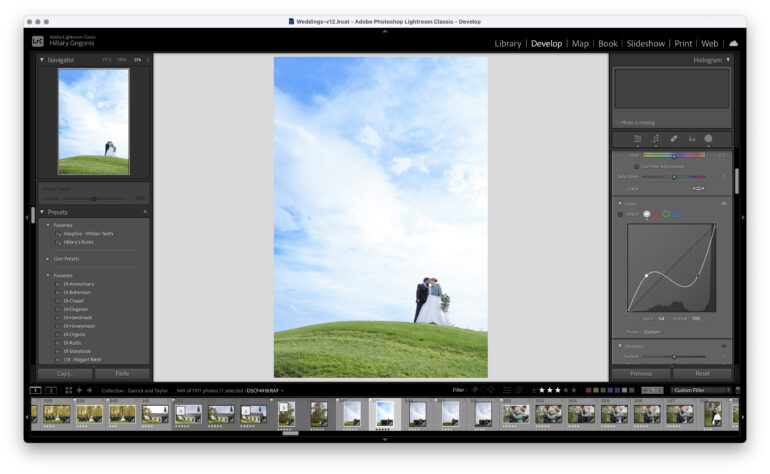
The list of adjustments that can be made to a mask isn’t as complete as the adjustments that can be applied to the whole photograph. But, Adobe just added the option to adjust Curves within a mask. This is a great tool to use in conjunction with the select sky.
While Smart Masks have been a game changer, there is one big addition I think Adobe needs to add: HSL color tools inside of the masking edits. When I remove skin redness, I often don’t want to remove the redness from the lips or clothing. If I had the HSL tools inside one of those smart masks, that would be very easy to do. The ability to adjust specific colors within that mask would be great, as the current local color options are limited.
Also, I would cry tears of joy if I could lighten the lenses of transition glasses in batch editing. This used to be a far-off dream, but if the software can recognize clothing, maybe masking the glasses is next.
DENOISE
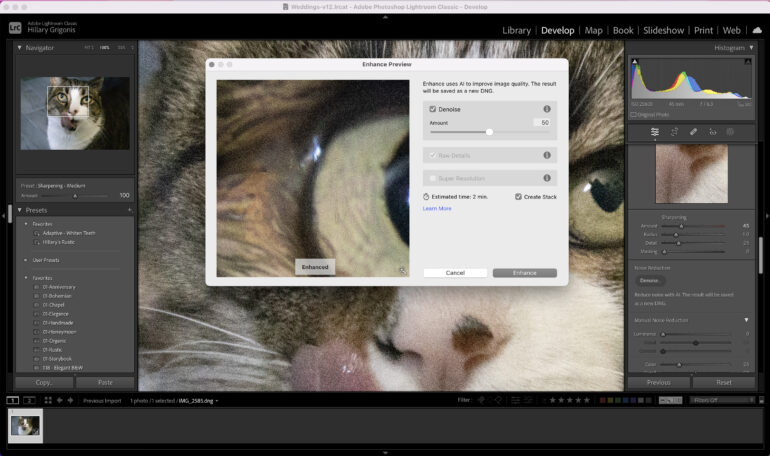
One of the highlights of the April 2023 update is an AI-based Denoise algorithm. The same noise sliders still exist tucked into a new Manual Noise Reduction sub-section. Those longstanding sliders are still the fastest way to edit noise, making the tools still helpful for mid-level ISOs. The highest ISOs, however, can benefit from the new DeNoise. However, the lack of a few key features — like bulk editing — makes the tool feel a little overhyped.
The Denoise tool opens a pop-up window where editors can use the slider to preview the effect before clicking OK. Like AI-based masking, the Denoise tool can take a few minutes. It also creates a new DNG tool rather than replacing the original file. This is because the Denoise tool isn’t non-destructive like most of Lightroom’s tools. Translation: You can’t undo the Denoise. You can go back to the original version of the photo, but you’d have to sync or re-do any edits made after the Denoise algorithm. Editors can compensate for that by using the Denoise last. But, that still means going back and adjusting the amount of the Denoise will be annoying. Sadly, the new tool also isn’t compatible with batch editing.


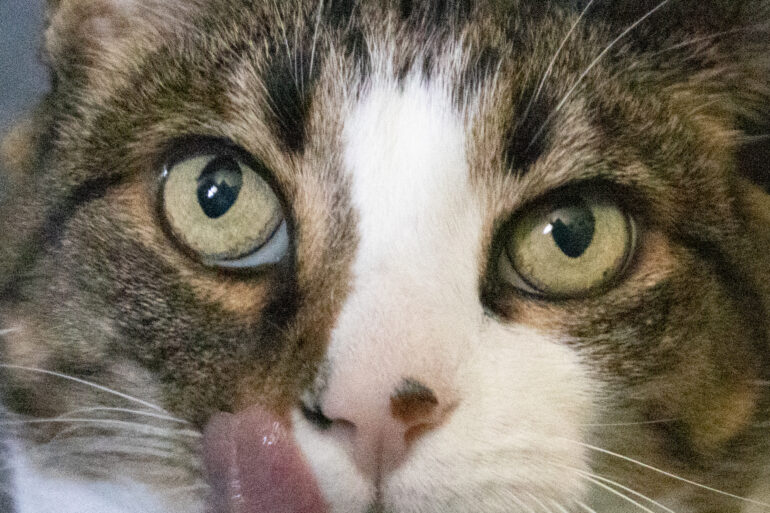

Overall, I think the Denoise tool did a good job of smoothing out noise with less softening than the original sliders. It will still smooth out some detail, but the slider lets you choose how much to preserve. It’s a great tool, but it’s not earth-shattering. I think it’s likely enough to stop some from purchasing additional noise reduction programs. But the lack of batch capability and the destructive nature of the tool will keep many photographers using the original manual controls instead.
ADJUSTABLE PREMIUM PRESETS
Lightroom is equipped with various premium presets akin to Capture One styles. The software includes skin tone effects to apply to your portraits. There are also a variety of other style categories to choose from. Click an image, and scroll through the presets to see the desired effect. I found the presets designed for food photography to be pretty decent.
Hover your mouse over one of them to see the desired effect and click it to apply it. You can adjust the intensity by moving the amount slider generated under the preset.
ADAPTIVE PRESETS
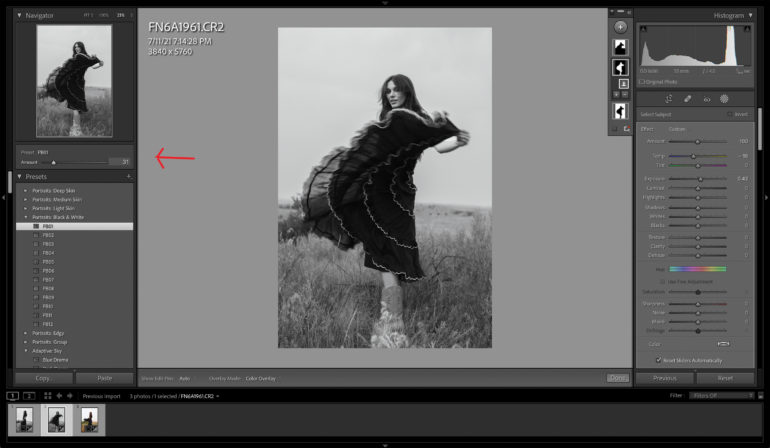
Adobe has introduced adaptive sky and subject presets. They are based on the same AI technology used for the Select Sky and Select Subject masking tools. The software accurately masks the subject or sky and only applies the effect to specific parts of your image.
There are nine adaptive sky presets, and eleven adaptive subject presets to choose from. The latest update adds Polish Portrait, Enhance Clothes, and Darken Beard to the earlier list of options. These are also adjustable and can be applied when batch editing. Many of these feel a bit overdone — teeth whitening tends to be too strong, for example. But they are a simple way to do complex edits quickly. I wish there were more options for the adaptive sky presets, although this is a huge time saver!
Who Should Buy This?
Adobe is doing something very right with this newest rendition of Lightroom. It remains the same advanced tool that photographers have used for years, except it’s now faster to do a number of different local adjustments and more capable of reducing noise without smoothing out too much detail. Lightroom is a beautiful program for photographers of all genres and skill sets. And the updates have convinced me to keep my monthly subscription fee.
Masking is fast and impressively accurate, which makes editing a breeze. The ability to do basic local adjustments like whitening teeth or smoothing skin and then apply it to multiple images without re-masking is a huge time saver. The Denoise is an excellent addition, but it isn’t non-destructive like the rest of Lightroom Classic and doesn’t work with batch editing.
There are a few things I would still like to see added to Lightroom. Layers are at the top of that list because I want to see my adjustments. While it is sufficient for weddings, family photos, and senior portraits, I would love to see a patch tool for better skin retouching for fashion imagery. More work is needed for fashion and beauty photography demands. That’s where Photoshop comes in. I would also love to see HSL controls within the local masks which could limit trips back and forth between Lightroom and Photoshop.
Get rid of the ads!
Did you enjoy reading this article as much as we enjoyed writing it? There's a way to support us and our reporting, getting ad-free navigation and more as a bonus. Subscribe to us for less than a coffee per month —just $3.99— or take advantage of our yearly subscription with a hefty discount for only $25.- An ad-free experience
- A free mystery box for Lightroom or Capture One
- All the books in our store
- 20% discount on Capture One
- 30% discount on Imalume Photo Theft Protection
- 20% off Herbs and Kettle Tea Company.
- 20% off your order from MPIX printing services.
- 5% off Viltrox Products via their eCommerce store.
- 10% off all film developing, printing and scanning services from Blue Moon Camera and Machine
- 15% off 7Artisans products: The lens and accessory maker is offering a sweet discount for Phoblographer's readers.