
Last Updated on 05/05/2018 by Mark Beckenbach
If you’re working in Lightroom and want to work with more of those camera profiles, here’s how!
When we reported on Adobe’s Profiles-centric update last month to Adobe Camera Raw, Lightroom Classic, and Lightroom CC, one of the questions we kept hearing was how and when end users will be able to create their own creative profiles, just as many have done with presets. We’re happy to report that you’ll finally be able to do so today.
Many photographers have begun selling their own presets to other photographers looking to achieve the same signature looks, and we’re sure many will be doing the same with profiles as well now that the ability to create your own profiles is available. Note that as of now, the only place you’ll be able to create these profiles is within Adobe Camera Raw, and these profiles will only be supported in Adobe Camera Raw 10.3 or newer, Lightroom Classic 7.3 or newer, and Lightroom CC 1.3 or newer.
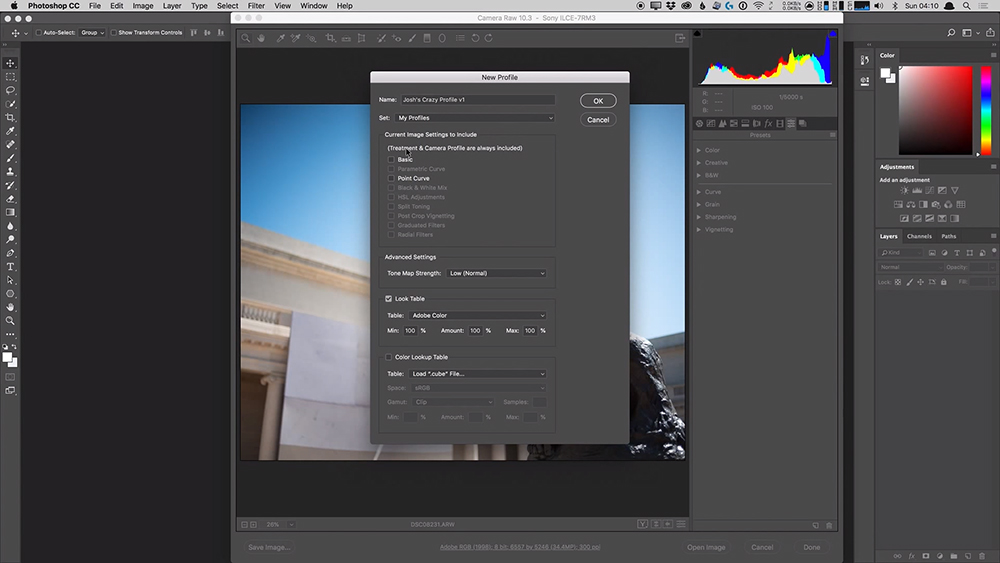
Similar to presets, you’ll be able to bake the following settings into a custom creative profile:
- Basic Adjustments
- Parametric Curve
- Point Curve
- Black & White Mix
- HSL Adjustments
- Split Toning
- Post Crop Vignetting
- Graduated Filters
- Radial Filters
Note that the slider values for these settings will not be visible nor are they adjustable unlike after applying a preset, so take special care when including these adjustments into your custom creative profiles.
In addition to the image settings, you’ll also be able to adjust the Tone Map Strength and apply Look Tables and Color Lookup Tables (a la Photoshop, After Effects, and Premiere Pro) when creating a custom creative profile. Tone Map Strength dictates how Adobe Camera Raw, Lightroom Classic, and Lightroom CC handles the overall dynamic range of your image, and is set to “Low (Normal)” by default. You have the option to crank up the Tone Map Strength should you feel the need to recover additional highlights and/or shadows, but the resulting image may end up looking unrealistic. That may very well be your intended goal, so apply with discretion. Look Tables refers to specific color adjustments applied to an image from one of Adobe’s own profiles, or a custom DCP profile. You’ll generally want to leave this option unchecked to ensure that your custom creative profile is compatible with the widest range of images possible, rather than limited by the associating profile. Color Lookup Tables, commonly referred to as LUTs, are powerful reference files that changes the colors of your images from one to another, usually applied for stylized effects, and you’ll be able to include them into your custom creative profiles. To incorporate a LUT into your custom creative profile, simply load it in the New Profile creation dialog box, identify the color space that the LUT was created in, define how you want the profile to treat colors outside the LUT’s color gamut, and how strong you want the LUT’s effects to be on your images.
The process involved in creating a profile can be rather complicated, certainly more so than simply adjusting some sliders when creating custom presets. Thankfully, Josh from Adobe has kindly created this step by step video walking us through the profile creation process:
If you’re looking to create your own creative profiles, Adobe’s created a SDK that covers the entire process in great detail, available for free here.
Get rid of the ads!
Did you enjoy reading this article as much as we enjoyed writing it? There's a way to support us and our reporting, getting ad-free navigation and more as a bonus. Subscribe to us for less than a coffee per month —just $3.99— or take advantage of our yearly subscription with a hefty discount for only $25.- An ad-free experience
- A free mystery box for Lightroom or Capture One
- All the books in our store
- 20% discount on Capture One
- 30% discount on Imalume Photo Theft Protection
- 20% off Herbs and Kettle Tea Company.
- 20% off your order from MPIX printing services.
- 5% off Viltrox Products via their eCommerce store.
- 10% off all film developing, printing and scanning services from Blue Moon Camera and Machine
- 15% off 7Artisans products: The lens and accessory maker is offering a sweet discount for Phoblographer's readers.