")
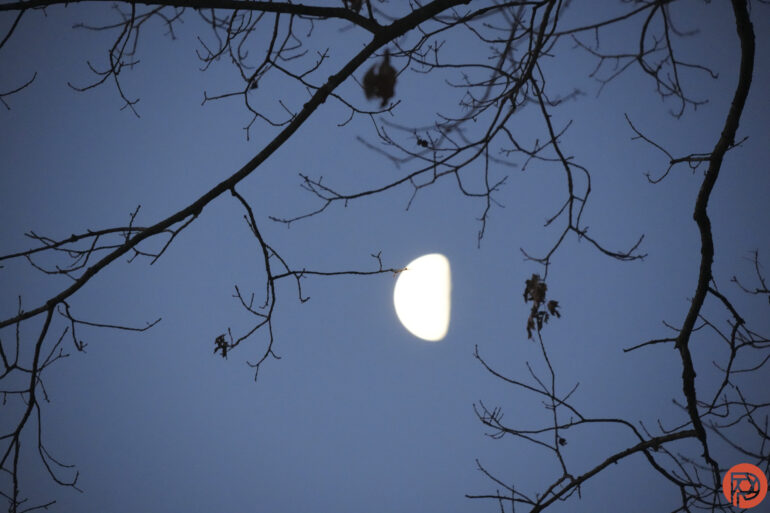
A journalist was inspired to take a photo of the orange moon through the trees. The problem? When he focused, he realized that it was actually a Burger King sign. But Van Applegate’s meme-worthy mistake is true of most moon photography that I find floating around my feeds — it’s often just a blurry orb floating in the sky. But why is taking a photograph of the moon so hard? Just how hard is it to learn how to take pictures of the moon?
The combination of the dark night sky and a bright moon makes moon photography particularly tricky. That’s why many photographers that have taken photographs of the moon weren’t surprised when an experiment proved that Samsung’s 100x Space Zoom just uses artificial intelligence to replace the moon in the photograph. The lack of zoom and small sensor makes moon photography generally challenging for smartphone cameras (though I’ve taken a few quick smartphone landscapes that included a very tiny, distant moon).
Here’s what you need to know if you want to take (real) photos of the moon that don’t look like maybe they could also be a Burger King sign.
Table of Contents
What gear do you need for moon photography?
Night sky photography is typically a complicated process involving hauling a tripod. But a full moon and even a half moon is so bright that the photographs don’t always require a tripod. A tripod may be helpful when the moon is just a sliver of light in the night sky, or perhaps if you have a 600mm lens without image stabilization. But it’s not necessary for every single moon photo.
However, to make the moon appear large in the photos, you’ll need a long lens, ideally well beyond 200mm. Even if the vision in your mind is of a vast open landscape with the moon tucked in one corner, the moon will appear larger if you walk further away from the scene and use a big telephoto lens. When you head out to photograph the moon, pack your longest lens.
Of course, with that lens, you’ll want a mirrorless or DSLR body. Smartphones don’t typically have the zoom required to get a great close-up of the moon and work best when limited to landscape shots. But, outside of the camera and a lens — with the memory card and battery — moon photography doesn’t require any fancy accessories.
Why auto mode sucks for taking moon pictures
Moon photography may not require any weird accessories, but it does require getting your camera off of auto mode. If you take a photo of the moon in auto mode, you’ll get a dark sky and an unidentifiable glowing orb. If you want to see the man on the moon, you have to get off of auto mode or, at the very least, use exposure compensation.
Why does auto mode take crappy moon photos? It has to do with the built-in meter. The camera’s meter measures the light in a photo in order to automatically set the exposure. But when you point a camera at the night sky, it sees a lot of black and thinks, “Okay, this scene is really dark.” Because the meter thinks the photo is super dark, the camera overcompensates and makes the moon too bright. When the moon is too bright, all the details, including those craters, become washed out. That’s what creates the unexceptional “moon” photo of a blurry orb that could be the moon, could be an alien life form.
How to take moon pictures with manual exposure
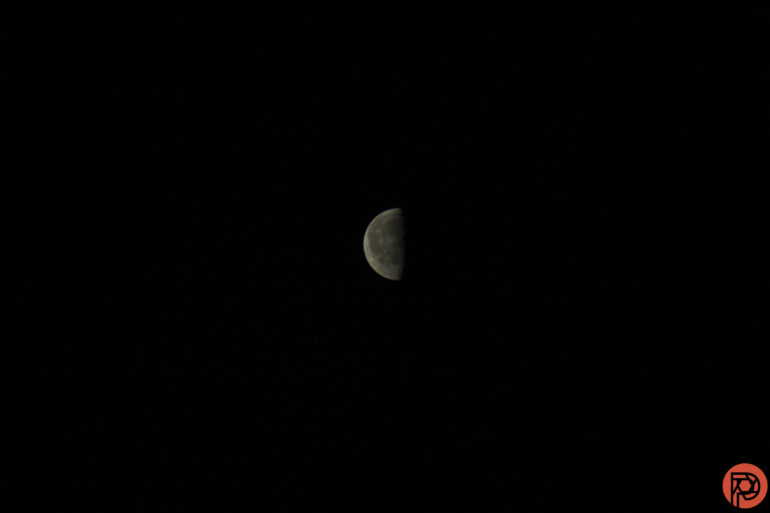
When I took a photo of the moon on auto mode and then took another photo on manual mode, the difference between the two was eight stops. That’s not a small difference. When photographing the moon on manual mode, you need to severely underexpose the shot.
There are two easy ways to determine how to properly expose the moon. If you are using a mirrorless camera, the easiest way to determine the proper exposure settings for the moon is to use exposure preview, the setting that displays what the exposure will look like right in the viewfinder. In manual mode, choose a shutter speed that’s at least the reciprocal of your focal length. For example, on a 200mm lens, use a shutter speed of 1/200 or faster. Then, adjust the ISO and shutter speed until you can see the detailed craters on the moon. If the moon is a pure white circle, the photo is overexposed.
If you don’t have a mirrorless camera or loathe the exposure preview, there’s another way to get a proper exposure without guessing and checking the photo in playback. Adapt the Sunny 16 rule to moonlight. The Sunny 16 rule says that on a sunny day, you can set your aperture to f16, and your exposure will balance if you set the shutter speed to one over whatever the ISO value is, such as f16, 1/200, ISO 200. The equivalent rule for the moon is to apply the same concept but use f11 rather than f16. For example, at f11, you can set the shutter speed to 1/200 and ISO 200. If you’re using a 600mm lens and worried about camera shake, you could use f11, 1/640, and ISO 640.
Do you need manual focus to photograph the moon?
Another reason that auto mode doesn’t work for the moon is because it doesn’t often pick the right spot to focus on. But, unlike photographing the stars, most cameras can use autofocus. Turn the autofocus area mode to single point. Then, move the autofocus point to the moon’s edge, where there’s lots of contrast.
How to make the moon appear larger in photos
Have you ever wondered how some photographers make the moon appear so large in photos? Well, the simple answer is that there are a good many moon photos floating around the internet that are Photoshopped composites. But, a few tricks to make the moon appear larger in photos apply to photographers and not digital artists.
The moon appears to be the largest when it’s closest to the horizon. But that’s just an optical illusion — the moon isn’t closer. Many photographers prefer to shoot the moon at moonrise because the position on the horizon makes it easier to photograph the moon with foreground elements. Photographing the moon with other objects in the image may help the moon appear larger by providing a sense of scale.
The moon looks giant in some photos and small in others because of the lens. The longer the lens, the larger the moon will appear. There are two reasons for this. The first is the obvious one — a longer lens zooms in closer on the moon. The second reason, however, is less apparent. The longer a lens is, the closer objects in the photos will appear. When a telephoto lens makes a tree and the moon appear closer together, the moon will look more prominent.
How much zoom do you need to make the moon look huge? Probably more than you think. The featured photo above was taken with a 600mm lens.
Photographs of the moon, when done right, are often inspiring and literally out of this world. That’s even more true during lunar events, like a harvest moon. But, if you want your photo to look like, well, the moon and not a Burger King sign, you’ll need to get your camera off of auto mode.
Get rid of the ads!
Did you enjoy reading this article as much as we enjoyed writing it? There's a way to support us and our reporting, getting ad-free navigation and more as a bonus. Subscribe to us for less than a coffee per month —just $3.99— or take advantage of our yearly subscription with a hefty discount for only $25.- An ad-free experience
- A free mystery box for Lightroom or Capture One
- All the books in our store
- 20% discount on Capture One
- 30% discount on Imalume Photo Theft Protection
- 20% off Herbs and Kettle Tea Company.
- 20% off your order from MPIX printing services.
- 5% off Viltrox Products via their eCommerce store.
- 10% off all film developing, printing and scanning services from Blue Moon Camera and Machine
- 15% off 7Artisans products: The lens and accessory maker is offering a sweet discount for Phoblographer's readers.