
There’s a hot trend going around the web about the Blurry Photo aesthetic. Gen Z has gotten really into buying old digital cameras that deliver blurry shots. The reason they’re so blurry is partially because of the pixel density and how autofocus worked back then. Luckily, I’m young enough to know how to mimic this look and old enough to know how to do it correctly. So if you want to do the blurry photo aesthetic with a modern digital camera, here’s what you need to know.
Table of Contents
What You Need

Quite honestly, the blurry photo aesthetic can be made with any standard digital camera from the past decade or so. To clarify, it can be done with any Four Thirds, APS-C, Full-frame, or Medium format sized sensor. The good thing is that autofocus modes have evolved yet kept many of their basic premises. That’s what we’re building on here.
To really get that old school blurry photo aesthetic you might also want to do things like use a fill-flash. I’d even probably also find a way to get red-eye back in the photo too.
TLDR: any modern digital camera can do this. A few years ago, Fujifilm even worked with us on a sponsored piece on how to make it happen.
The Settings
Here’s what you must do Settings-wise to get the blurry photos aesthetic. This is what you can do with any modern camera with a larger sensor. You can’t do this with a smartphone because the sensor is way too small. That also means that the depth of field is pretty much infinite.

Single Autofocus, Not Continuous
Modern cameras tend to be left in continuous autofocus mode with tracking. Turn that off. Go back to the old single autofocus point, and don’t use the touchscreen to focus. Turn off all the scene detection and AI settings. Seriously, to get the blurry photos aesthetic, you need to dumb your camera down a lot.
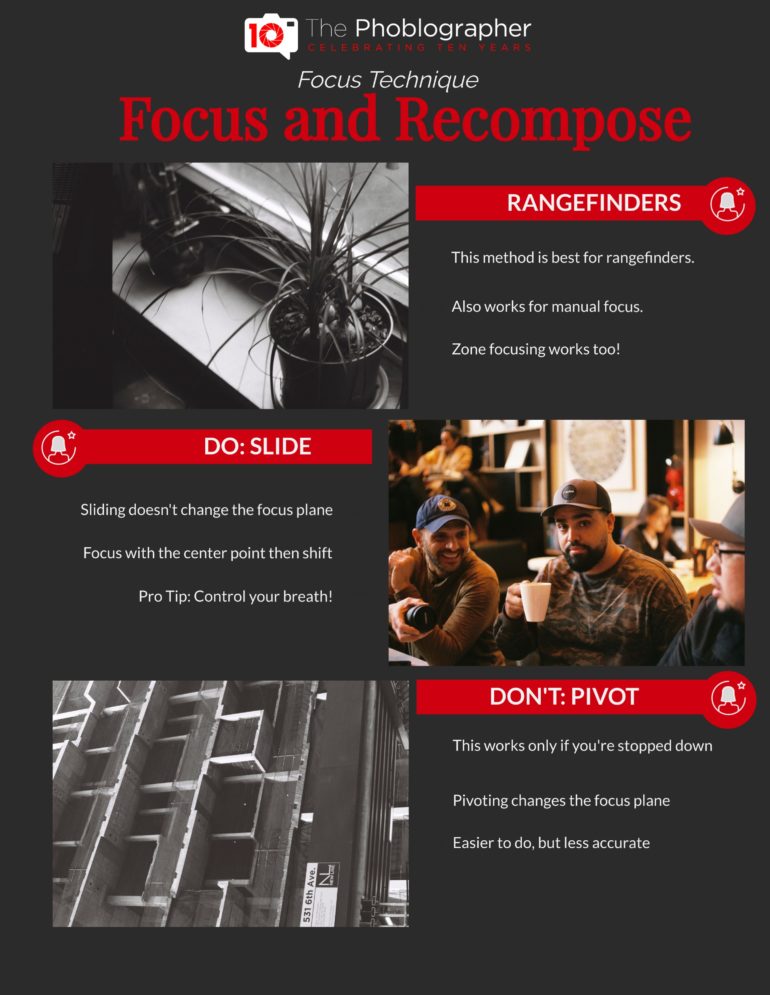
To start this off, don’t set the camera to automatically choose a focus point for you. The reason why is that this overly complicates things. Instead, make sure the center focusing point is always selected. It gives you the most room when recomposing an image.
How to Properly Focus and Recompose
Center Focus Point
Back then, a lot of folks just used the center focus point. Many of the other focus points from the cameras weren’t very reliable or good at all. This happened all the way into even 2009. So just use the center point. Trust us, later on, you’ll understand why this is such a critical part of the blurry photo aesthetic.
Aperture to f3.5
Many standard lenses from back in the day were at f3.5. But if you really want, you can open up the aperture more than that. This is a critical part of the blurry photos aesthetic.
ISO 200 to 800
Old digital cameras went from ISO 100 to 1600 and sometimes beyond. But no one really used them beyond ISO 400 because the sensor technology wasn’t all that great.
Let the Shutter Go
Basically, let the shutter go where it’s going to go. A slower shutter speed can deliver a really fantastic effect. It’s also bound to be very fast.
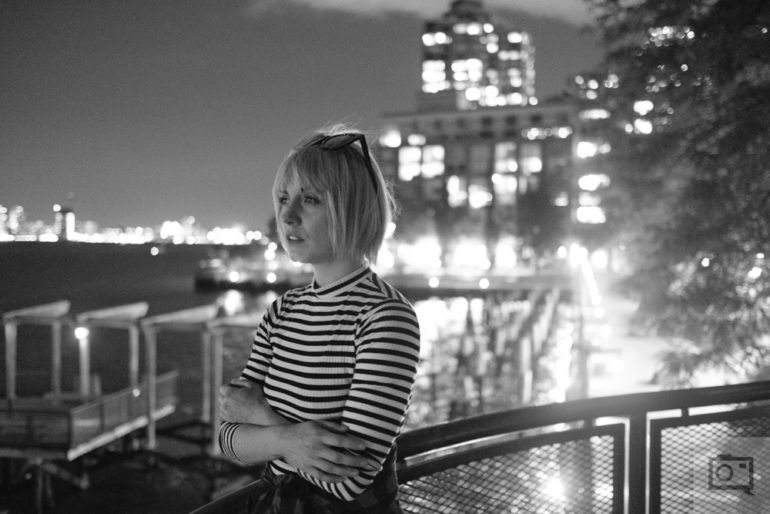
How to Get the Blurry Photos Aesthetic
Now that you’ve got your settings figured out, getting the blurry photo aesthetic is just all about doing the focus and recompose method. There’s a universally accepted method to doing it, but to get this look, you can’t do it properly.
Use the Center Focus Point to Focus on Your Subject
First, start off by centering your subject in the frame. Also, use the center focus point. Remember, your camera has hundreds of focus points, but you’re only using this one. And all AI and scene detection modes need to be disabled.
Pivot the Camera
Once your camera gets focus on a subject, pivot the camera to recompose the scene. This takes some foresight. Maybe you want to put your subject on the rule of thirds line so that their head is on the top right intersection.
Snap the Photo to Get the Blurry Photos Aesthetic
That’s it. The science behind this is that you’re throwing off the focus plane. So it naturally delivers a blurry photo.
Nail it!
Keep doing this, again and again, to get the blurry photo aesthetic. When you want to shoot a photo, just move the center focus point to your subject, focus the shot, and recompose before pressing the shutter. In our opinion, this works best with an off-camera flash because it tells your subject when they should change their pose better than them listening for your camera’s quiet shutter.
Get rid of the ads!
Did you enjoy reading this article as much as we enjoyed writing it? There's a way to support us and our reporting, getting ad-free navigation and more as a bonus. Subscribe to us for less than a coffee per month —just $3.99— or take advantage of our yearly subscription with a hefty discount for only $25.- An ad-free experience
- A free mystery box for Lightroom or Capture One
- All the books in our store
- 20% discount on Capture One
- 30% discount on Imalume Photo Theft Protection
- 20% off Herbs and Kettle Tea Company.