
We’re sure that many of you didn’t know the trick in this photography cheat sheet.
You’ve heard of clarity, sharpness, and toning for sharper images–but have you ever thought about deeper blacks? This is a secret that I learned years ago and that I continue to notice in images across the web. Those who love making their photos black and white probably have heard of this before and started incorporating it into their workflows. Getting deeper blacks is admittedly easier to do in post-production, but there are ways to do it in-camera using exposure tricks. It starts with having control over your lighting–which is a method that begins in-camera. But luckily, this technique applies to any situation you could possibly think of, though we’ve seen it done best with low key lighting.
“Low key lighting is specifically used in storytelling to draw a subject’s eye to a particular part of a scene. That’s how it works in cinema but it can be applied to photography for sure.”
– Getting Sharper Looking Portrait Photos Using Low Key Lighting
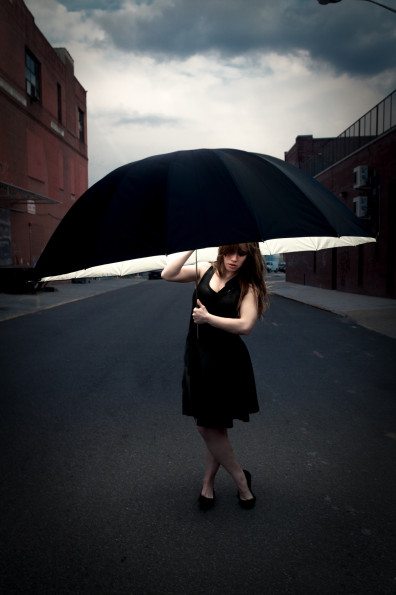
At its root, the idea behind the more profound blacks technique has to do with the spotlight effect. Think about a subject on a stage at a play and consider how the lights are dimmed. The stagehands and lighting crew typically work to ensure that the lighting is specifically hitting a particular place. If they want you to pay attention to the entire scene, then they light all of it. If someone is having a monologue, then they fade the lights and put a spotlight on that person. The spotlight effect is basically the same thing, but in photography. Some call it low key lighting, but you can also call it a spotlight effect. You’re essentially putting everything that’s not important into darkness and making people focus on the brighter parts of the image. This effect seeps into the micro-level of details.
“The deeper the blacks are in your image, the sharper the eye will perceive them because it focuses more on other areas by default. After this, boost the contrast. Added contrast is nice because it makes a larger difference between the whites and the blacks–which means that your shadows get darker and your highlights get brighter.”
– The Secrets Behind Making Your Images Look Sharper
If you were trying to make this effect happen in-camera, you’d shoot with an off-camera light and overpower the ambient lighting so that your continuous light or strobe is emitting the stronger light in the scene. Many photographers have referred to this idea as Overpowering the Sun. And in many ways, that’s precisely what you’re doing. What you need to do is think like a creator and not someone who simply captures. Sometimes, it will mean that you don’t even really have to do any post-production. But if you’re trying to create this effect in post, then also be sure to work with your contrast and shadows. Balance the details of the shadows out.
“The reason for this is because it tends to boost the colors overall and it adds a bigger difference between the brightest brights and the darkest darks by cutting down the overall dynamic range in the scene. When not looking at 100%, it will make your subject pop out more.”
– How to Get Sharper Images Through Proper In-Camera and Post-Production Routines
Our cheat sheets are created using Visme.
Get rid of the ads!
Did you enjoy reading this article as much as we enjoyed writing it? There's a way to support us and our reporting, getting ad-free navigation and more as a bonus. Subscribe to us for less than a coffee per month —just $3.99— or take advantage of our yearly subscription with a hefty discount for only $25.- An ad-free experience
- A free mystery box for Lightroom or Capture One
- All the books in our store
- 20% discount on Capture One
- 30% discount on Imalume Photo Theft Protection
- 20% off Herbs and Kettle Tea Company.
- 20% off your order from MPIX printing services.
- 5% off Viltrox Products via their eCommerce store.
- 10% off all film developing, printing and scanning services from Blue Moon Camera and Machine
- 15% off 7Artisans products: The lens and accessory maker is offering a sweet discount for Phoblographer's readers.