
Last Updated on 06/13/2018 by Mark Beckenbach
Manually masking in Photoshop and Lightroom can be a real drag, but Auto Masking can save you time
If you have ever wanted to get more advanced with your post-processing, but hated the idea of trying to mask out specific sections of your images in Lightroom, then you are not alone. Manually masking, and doing a good job, can take a tone of time. If you are needing to process a lot of images in a short period of time, then you simply don’t have the time to spend on that sort of work. Thankfully, the team at Adobe recognized this limitation and developed a powerful, but often overlooked tool to help make the process go a lot smoother: Auto Mask.
One of the reasons that we love Youtube is the plethora of personalities and channels sharing their experiences and tricks to being a better photographer and post-processor. One such channel that we have stumbled across is Signature Edits, which in a recent video talked about Lightroom’s Auto Mask feature and demonstrated how powerful it can be if used correctly. This tool literally allows you to intelligently mask wide swaths of your image in one quick go rather than spending tedious minutes (or hours) masking out blades of grass or your client’s t-shirt.
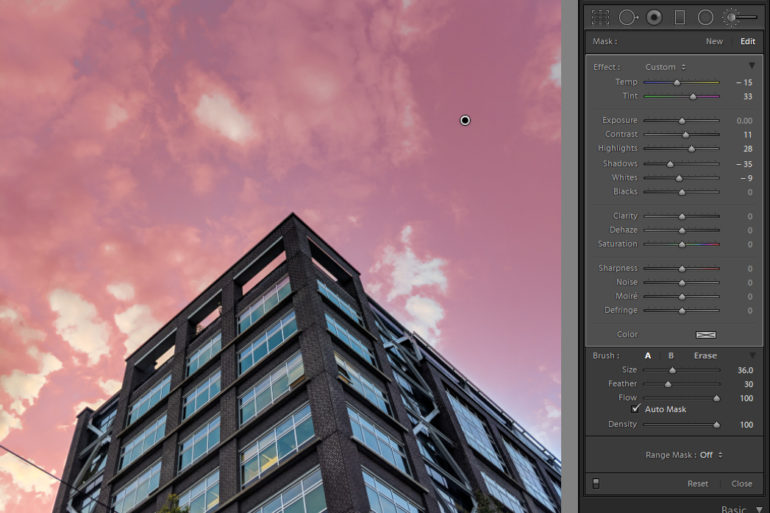
As you can see in the video above, the Auto Mask tool is located in plain sight right from the Lightroom masking panel; just below the Flow slider. If you want to make use of the tool all you need to do is select that little checkbox and you’re ready to rock. Make sure and watch the full video for some excellent tips on utilizing the tool to its full potential, but out of all the tips that were shared by Signature Edits, one really stood out to us.
You see, the Auto Mask tool figures out what to mask based on the color and brightness of the point that you first select on the image when you are drawing the mask. If you make your brush large enough to cover your whole image and then select one point, Lightroom actually can do a really decent job at selecting what you need masked. If it gets a small section wrong you can always erase that part of the mask, or if the point you selected wasn’t different enough and the mask isn’t good. You can always click on the sample point and drag it to another part of the image and watch the Auto Mask adjust based on the new sample point that you select. This will allow you to quickly and easily find the best selection point in your image to get the mask as close to what you need it to be as possible so that cleaning up the mask is a quick and simple process.
Now open up your Lightroom and give this a try! If you aren’t using masks to highlight or modify your images you are missing out on an excellent tool to take your images from good to great!
Get rid of the ads!
Did you enjoy reading this article as much as we enjoyed writing it? There's a way to support us and our reporting, getting ad-free navigation and more as a bonus. Subscribe to us for less than a coffee per month —just $3.99— or take advantage of our yearly subscription with a hefty discount for only $25.- An ad-free experience
- A free mystery box for Lightroom or Capture One
- All the books in our store
- 20% discount on Capture One
- 30% discount on Imalume Photo Theft Protection
- 20% off Herbs and Kettle Tea Company.
- 20% off your order from MPIX printing services.
- 5% off Viltrox Products via their eCommerce store.
- 10% off all film developing, printing and scanning services from Blue Moon Camera and Machine
- 15% off 7Artisans products: The lens and accessory maker is offering a sweet discount for Phoblographer's readers.