Last Updated on 06/03/2016 by Chris Gampat
Creating the Photograph is an original series where photographers teach you about how they concepted an image, shot it, and edited it. The series has a heavy emphasis on teaching readers how to light. Want to be featured? Email chrisgampat[at]thephoblographer[dot]com.
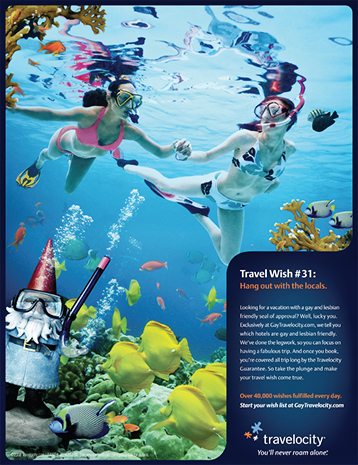
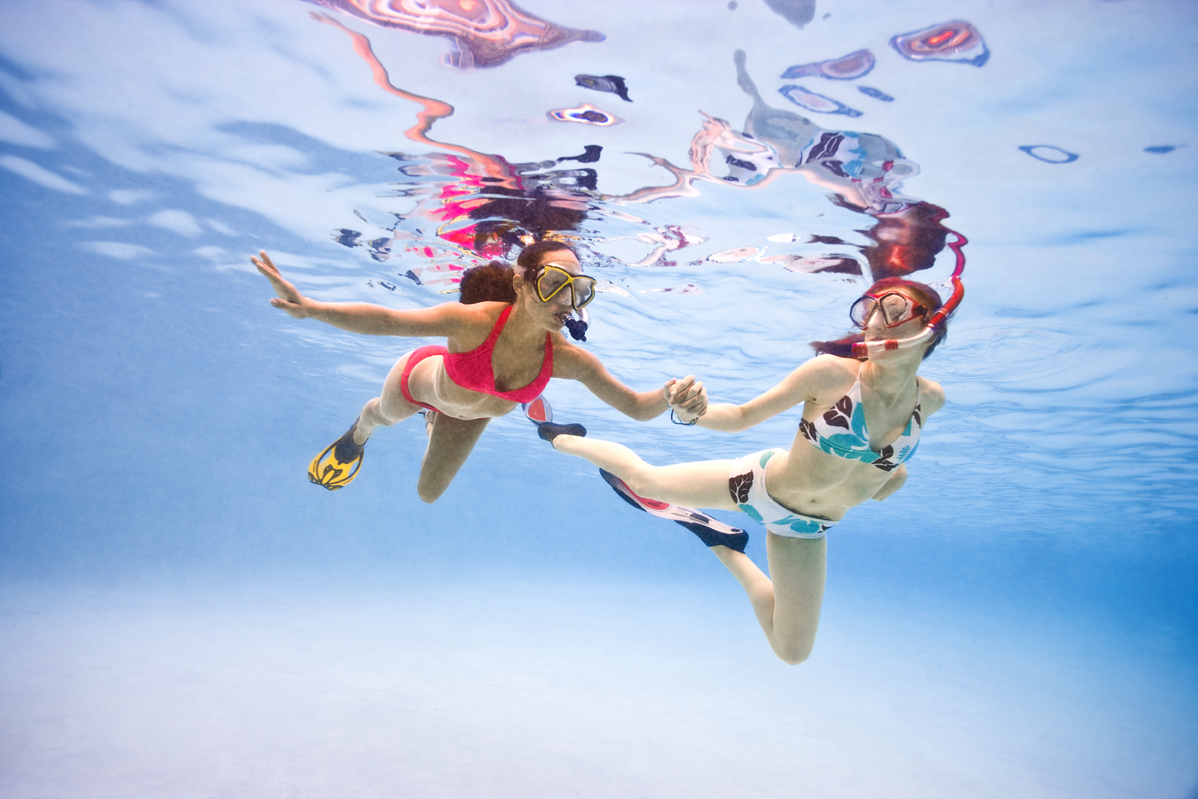
“In the end what you end up with is a shot that looks very much like two ladies snorkeling in crystal clear Caribbean waters.” says photographer Peter Barrett when explaining his idea for a photo he created for Travelocity. Pete does a ton of travel and documentary work that you can catch on his Instagram channel, and this is evidenced in our previous interview with him on the site. Pete has been shooting photos since High School and started shooting professionally in the mid-90s on various projects. Indeed, he’s a highly accomplished photographer that continues to both create and capture–the dream of many aspiring professional photographers.
So when it came to creating an image for Travelocity, he had to find a way to make something ordinary look a bit more vibrant.
The Concept
This image was part of a multishot ad campaign we did a few years back for Travelocity with The Martin Agency. It was part of a niche market promotion they were doing that targeted advertising specifically to the gay and lesbian markets.
For this particular shot we were challenged with the task of shooting these two ladies underwater in a crystal clear Caribbean water snorkeling scene. The client wanted clear shallow water with no reef structure or other distracting elements. The hard part was we were not shooting in the Caribbean. As this is a smaller market segment for them, the budget was not as great as what they would normally spend on an average campaign for more traditional markets. As such we had to find one area that was ambiguous enough that we could shoot everything. This entire campaign was shot here in the states in Miami in various spots and we then retouched the images to make them look like more exotic foreign locals.
The Gear
- Canon 5D Mk II
- Canon 24mm f/1.4 lens
- Custom underwater housing with wide angle lens port
- Remote custom flash synch rig with wizard radio slaves to fire strobes
- 3- 2000 watt Dynalite power packs firing a cluster of 3 – Dynalite 2050 heads with parabolic reflectors.
- 2- Mombo Combo Highboy Stands, 50 feet of 1&1/2 speed rail, 2- Honda 2K Generators (daisychained)
- a TON of sandbags.
The Shoot
To accomplish this for the ladies snorkeling shot we opted to shoot in a large hotel pool. This was in part because we had another shot at this location, where we were shooting a group of guys around the same pool deck earlier in the day, and also because the pool was the right shape, depth & clarity that it would work well to give the illusion of being a caribbean paradise. One other challenge: The weather was forecasted to turn for the worse mid day after the guys’ shot so we needed to light the pool for the underwater shot.
As predicted, right around lunchtime the clouds rolled in and took away our beautiful sunshine which took what would have been a very simple shot in a sunny pool and made it much more challenging. I am fortunate to work with a VERY talented and resourceful group of people and can handle just about anything thrown at us. We simply had my producer get on the phone and arrange for a couple of extra grips to work the job and brought in the necessary arsenal of grip and lighting equipment to make it sunny regardless of what mother nature threw our way.
The quality of the lighting was pretty basic. I wanted a singular light source from up high shining straight down in an over the shoulder slight 3/4 angle shining back toward camera. This meant spanning the pool and rigging a cluster of heads directly over the pool. To accomplish this we used two Mombo Combo stands which are not only very large but also can go high and support heavy weight loads. We rigged about 50 feet of speed rail across with the heads mounted in the center and spanned the whole thing across the pool. Whenever working around water with strobes, safety is an issue as they are discharging huge pulses of power and there can be no accidents or someone can die. So we take all sorts of precautions to make sure that there is no danger of any electricity coming into contact with water anywhere. I chose to shoot with Dynalites for this instead of Profotos as Dynalite heads and power packs are ultra light weight and would add very little sag to the large speed rail we had crossing the pool. The power packs were secured to the stands up high on either side and long head extensions ran out to the heads. The packs were set to 50% power to give a faster recycle time and to ease the load on the generators. To secure the stands we did a combination of LOTS of sand bags and also tied off the stands with heavy rope to multiple trees around the pool. We even ran a couple safety lines up from the cross member to a nearby treetop to support the weight of the speed rail.
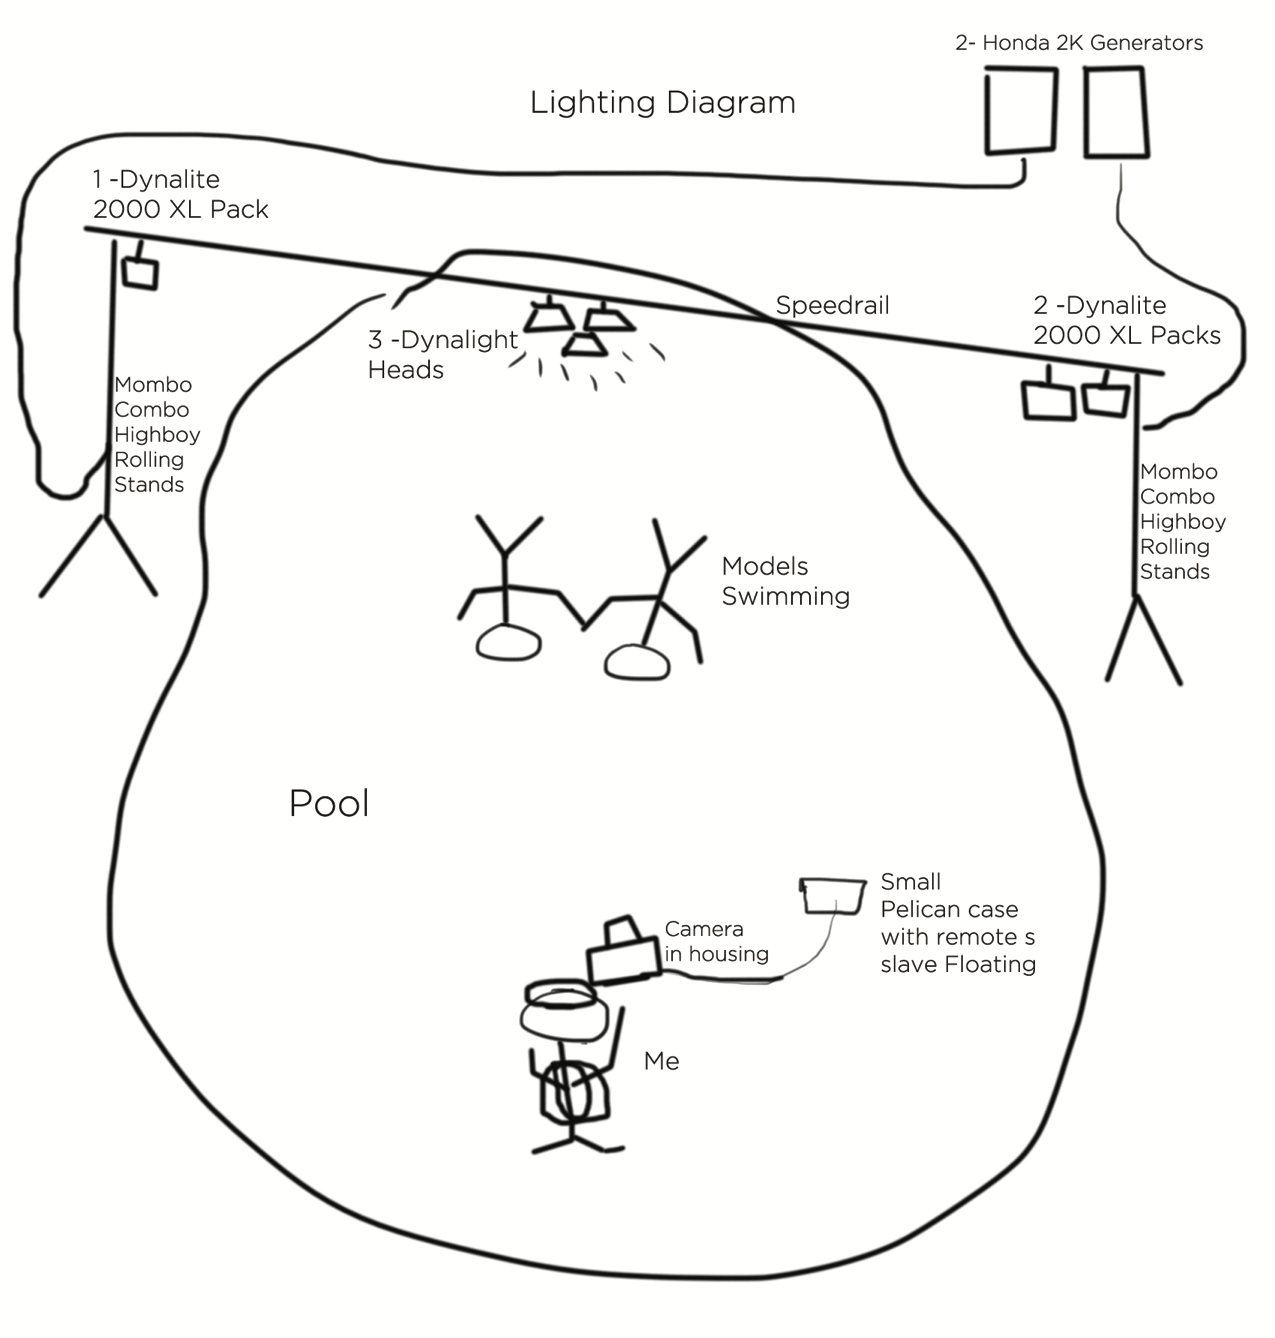
At no time is there any connection of anything electric to the pool water so there is zero chance of anyone getting electrocuted. Strobe synch was accomplished by using a custom made strobe slave synch rig. The camera is connected to the lights via a underwater flash connection that has been retrofitted to go to a long household extension chord that goes into a Pelican Case which floats on the surface just out of frame behind me. The remote must be on the surface as the water prohibits the signal from transmitting. Inside the Pelican Case floating on the surface is a Wizard remote slave that synchs with the power packs, triggering the strobes. On the strobe heads themselves we use a heavy warming gel like 2&1/2 full CTO’s (color Temperature Orange) which warm the light to 2 & 1/2 times toward the tungesten end of the spectrum. It is necessary to warm the light this much as the combination of cloudy day and the water filtering out most of the red light would make the models very blue and this counteracts that and gives a more pleasing skin tone.
Once the rigging is done, the rest of the shoot is surprisingly simple. We simply meter the strobes by putting a Minolta flash meter in several ziplock sealed bags and off we go. I was equipped with a dive tank, BC and mask and shot from just below the models looking slightly up and across the pool using using the 5D Mkii in the custom made water housing. My exposure was critical as I want it to look as natural as possible by basing the aperture setting on the strobes and setting the ambient exposure just below that, you get a pretty close mix that looks just like normal sunlight and is not flashy with a nice fall off in the background. I set my camera to AV mode so the camera’s meter would compensate for any fluctuations in the ambient light and set the the exposure compensation at minus 2/3’s of a stop to ensure the ambient was always just under… lastly I set the aperture at around f/8 which was a constant coming from the strobes. This just left giving the models the direction I wanted them to give to me and we were done in no time!
Post-Production
Post production on this was relatively simple. All that was needed was to remove anything that gave away that this was a pool. I removed the pool ladders and lights and gave it a bit of a blue vignette, further cleaned up the skin tones and did the final color grade to give it a slightly more punchy look.
Before/After

Get rid of the ads!
Did you enjoy reading this article as much as we enjoyed writing it? There's a way to support us and our reporting, getting ad-free navigation and more as a bonus. Subscribe to us for less than a coffee per month —just $3.99— or take advantage of our yearly subscription with a hefty discount for only $25.- An ad-free experience
- A free mystery box for Lightroom or Capture One
- All the books in our store
- 20% discount on Capture One
- 30% discount on Imalume Photo Theft Protection
- 20% off Herbs and Kettle Tea Company.
- 20% off your order from MPIX printing services.
- 5% off Viltrox Products via their eCommerce store.
- 10% off all film developing, printing and scanning services from Blue Moon Camera and Machine
- 15% off 7Artisans products: The lens and accessory maker is offering a sweet discount for Phoblographer's readers.