
This blog post was syndicated by Emanuele Faja. It and the images here are being used with permission. Check out Part 1 here.
So, you read Part 1 of the Ultimate guide to the Sunny 16 Rule and you are hungry for more?
That was just the starter, now, onto the main course…
Btw, if you have just landed on this page, you probably want to read Part 1 of this guide first, or even my Exposure 101 Guide before you tackle this article.
You have pretty much all information you need to get started using the Sunny 16 Rule in Part 1. Part 2 is the advanced course for those who types who want to know everything and want to nail their exposures every time, without using a light meter. This is probably complete overkill for most people, but here we go…
LET’S GEEK OUT
We I skipped an incredibly fundamental point in Part 1. We never discussed what units light is measured in! It’s seems pretty basic, right? It’s not crucial to know this to learn how to guess exposure well but who knows, it may come in handy one day.
Light (or should I say, the intensity of light) is measured in various units. We have Foot Candles,Candelas and Lumens.Foot Candles are the traditional way of measuring light. One Foot Candle is the amount of light that a candle produces 1 foot away from the candle. To me, this doesn’t seem particularly helpful.
Candelas is actually a measure of how much light a certain light source produces. This is measure from the source itself, unlike with Foot Candles. The full definition of a Candela is the following:
“luminous intensity of a light source producing single-frequency light at a frequency of 540 terahertz (THz) with a power of 1/683 watt per steradian, or 18.3988 milliwatts over a complete sphere centered at the light source.“ tweet
I’m not even going to pretend to know what the hell that means!
The easy way of looking it at it that Foot Candles are a measurement of light at a particular illuminated object while Candela is how much total light is coming from the source.
Lumens is a measure of the total “amount” of visible light emitted by a particular source. You may also have heard of the term Lux, all that means is lumens per square meter.
PS: If you REALLY want to geek out, read the Wikipedia entry on light.
MAKING THINGS SIMPLE AGAIN
Fortunately, we can leave all that rubbish to the scientists. As photographers, we have our own simplified scale.
We can plot this scale out using Exposure Value (EV) numbers. All that an Exposure Value number tells you is what combination of Aperture and Shutter Speed to use for any given scene.Exposure Value (EV) is often confused withLight Value (LV). While Exposure Value tells you how much light is allowedinto the camera, Light Value (LV) tell you how much light there is in the scene. At ISO 100, LV and EV are equal to each other, while for other ISO speeds you need to add or subtract. We won’t cover this in detail as it’s fairly redundant and we really only need to deal in EV Numbers. Just be aware that when I talk about the Exposure Value of a scene, it’s technically only correct for ISO 100.
These numbers range from -6EV to 23EV. -6EV is virtually pitch black, while +23EV is so bright it’s not even found in nature. Unless you working at a Nuclear power plant and something goes horribly wrong, you will never see anything brighter than 16EV. Well, you might, but I doubt you will be photographing it.
The Ev scale is logarithmic. This means that each time the Ev number increases by 1 the amount of light is doubled. Thus, 14Ev is twice as bright as 13Ev, but only half as bright as 15Ev. Here is a lovely graphic comparing the most commonly used Ev numbers and their relative brightness:Just a quick note, different Ev numbers describe different brightnesses if you photographed them with the same aperture and shutter speed. Obviously you change your shutter speed and aperture as and when needed.
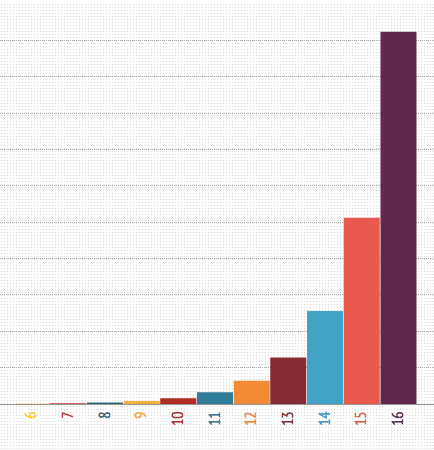
If you think about it, 23Ev is over 500 Billion (2 to the power of 29) times brighter than -6Ev!
Get your Ray Bans out!
So, let’s take a look at what kind of scenes correspond to the various EV numbers
-6
This is when you are out in the countryside, far away from the city and the only light source are the stars in the sky. How romantic ^^
-5
This is the same as above, but there is also a sliver of the moon visible, just like in the DreamWorks logo.
-4
Again, you’re away from the city with only stars in the sky but this time there is half a moon visible.
-3
Same old story, but with a full moon. It’s highly recommended to use a tough-as-nails SLR camera like a Nikon F or Pentax K1000 so you can use it to fight off the werewolves.
-2
Same as -3Ev, but you’re in the snow. Sounds horrible!
-1Ev & 0Ev
Enough about the moon, I won’t mention it again. These two Ev numbers are for subjects which are lit by dim ambient artificial light. An example of this is a lamp on a table or a fixture on the ceiling.
+1
This is for a lighted skyline which is at a distance
+2
I actually lied when I said I wasn’t going to mention the moon again. I totally forgot about total eclipses of the moon! This is when the earth goes between the Sun and the Moon. The moon goes red, it’s pretty cool. You can also use this setting to capture lighting, as long as you have a long enough exposure time.
+3
Fireworks! ![]() Again, you need to have a long enough exposure time for these!
Again, you need to have a long enough exposure time for these!
+4
This is great when you want to take romantic candle lit close-up portraits of your girlfriend/wife/mistress. It’s also good for taking photos of all those horrible Christmas lights that get put up each year as well as floodlit monuments, fountains and buildings.
+5
This is useful for taking portraits of people around a camp fire and also for home interiors at night , with normal house lights.
+6
This is for brightly lit scenes in a house and at amusement parks.
+7
In the forest, indoor sports, at the theater, and brightly lit street photography.
+8
This is when you want to take pictures of people telling stories by the campfire and also for sports at night.
+9
Landscapes about quarter of an hour after sunset
+10
Landscapes just after sunset
+11
Sunset or subjects which are heavily shaded
+12
Heavy overcast day or a subject in the shade.
+13
A bright, cloudy day with no shadows
+14
For a day with a weak sun, or when the sky is hazy
+15
Subjects on a sunny day (hence the Sunny/16 rule!)
+16
Subjects on a sunny day at the beach, desert or on snow.
+17 to +23
You will most probably never encounter this type of intense light, except in a nuclear meltdown or other man-made event.
THE CHARTS
You can find a more boring serious Exposure Value chart that you can actually print out and take with you at Fred Parker’s website.
You can train yourself to use the EV scale by carrying the chart around with you, then consulting the following chart which is the EV to f/stop & shutter speed chart and you’re done!
(There is also an easier way which I’ll share a little later on..)
Note: This is for Iso 100
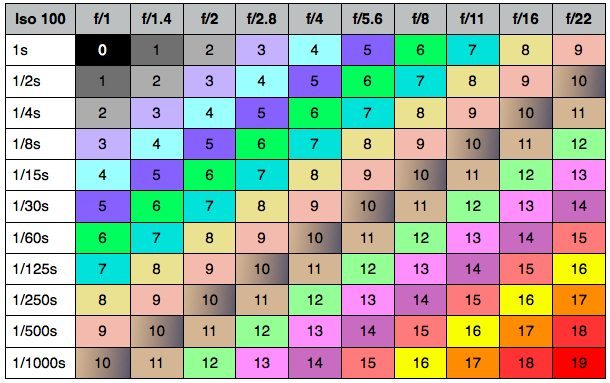
A quick pointer on how to use these charts.
Find Ev number and look it up and then choose best shutter speed/aperture combination for your scene. It’s all about YOUR artistic interpretation of the scene. When shooting film, I would think more about areas of the chart than specific boxes.. you can often get away with murder if you overexpose. If you underexpose, you are the one getting murdered.
I wouldn’t recommend trying to commit any of these to memory, that sounds like far too much work!
Reach the point where you just know the correct exposure…It’s much easier ![]()
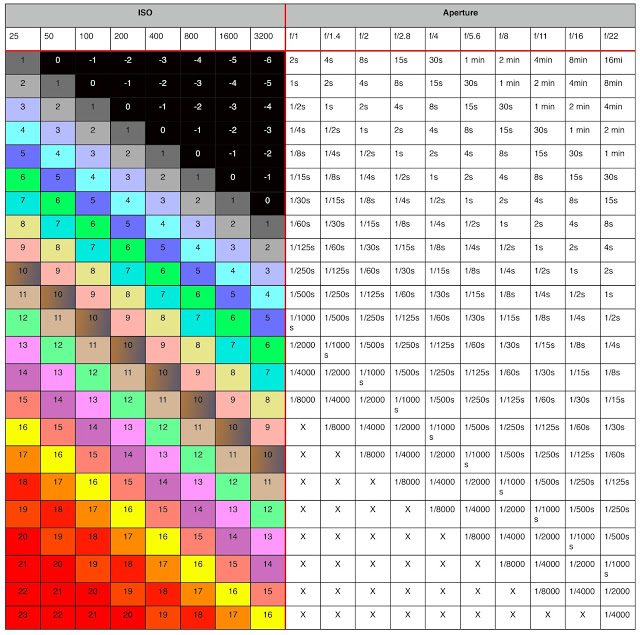
Just in case you are a genius, here are ALL of the Exposure Value Charts rolled into one!
This is truly the Mother Of All Exposure Value Charts! I recommend that you right click and save this to your computer so you can view it full-size.
I don’t actually think this table is needed because you should be shooting the same film/Iso (and yes, you really should be shooting film) while you are learning the Sunny 16 Rule.
THE MOTHER OF ALL EXPOSURE VALUE CHARTS
THE ULTIMATE SUNNY 16 RULE CHEAT SHEET
Ok, if you found all those charts up a bit too difficult, here is a great little cheat sheet that you can print out and carry with you and it will be good enough 97.38% of the time.
Alternatively, you could just stick the Sunny 16 Rule cheat sheet found inside every box of Kodak onto the back of your camera. That’s what I did when I was learning. You can find a copy of Kodak’s cheat sheet at the beginning of Part 1 of this guide.
Note that I’ve included a description of what the shadows should look like. This is often the easiest way to know what setting your camera should be on as you walk around and then you can adjust for each individual subject as you see fit.
A word of warning: remember to expose for the shadows and the highlights will take care of themselves! This is especially important when shooting film (which, as always, you should be). As the overexposure latitude of colour negative and black and white film is so large, you are better off exposing a little too much by calculating your exposure from the darker parts of your subject and relying on this enormous latitude to not “blow” the highlights. If all this sounds like Greek to you, you probably need to read my guide to Exposure.
Get rid of the ads!
Did you enjoy reading this article as much as we enjoyed writing it? There's a way to support us and our reporting, getting ad-free navigation and more as a bonus. Subscribe to us for less than a coffee per month —just $3.99— or take advantage of our yearly subscription with a hefty discount for only $25.- An ad-free experience
- A free mystery box for Lightroom or Capture One
- All the books in our store
- 20% discount on Capture One
- 30% discount on Imalume Photo Theft Protection
- 20% off Herbs and Kettle Tea Company.
- 20% off your order from MPIX printing services.
- 5% off Viltrox Products via their eCommerce store.
- 10% off all film developing, printing and scanning services from Blue Moon Camera and Machine
- 15% off 7Artisans products: The lens and accessory maker is offering a sweet discount for Phoblographer's readers.