
This blog post was syndicated from Emanuele Faja. It and the images here are being used with permission.

The Sunny 16 rule is actually simple set of rules to help you shoot without a light-meter but we are going to take it much further than that. In this article you will find all the information you will ever need to take photos without using light meters – whether handheld or in-camera.
I decided to write this guide after having gone through the arduous process of mastering the Sunny 16 rule without really knowing what I was doing. I tried finding information online but most of it was just generic, run-of-the-mill information about the Sunny 16 rule that has been copied and pasted all around the web.
I won’t be throwing graphs and charts at you in Part 1 of this guide. In Part 2, where we will go into huge detail, you will have more charts and graphs than you can possibly handle ![]()
This guide will provide a short and brief explanation of the Sunny 16 rule and some tips as well as a much longer step by step approach on how to nail the exposure every time, because that is what really matters. If, after a short period of adjustment, you can’t trust an exposure system then it’s just not good enough. The Sunny 16 rule works for me and it will work for you.
I shoot a Leica M3 and a Pentax K1000 (which has a broken light meter) using only the rules laid out on this page and I get 36 great exposures (but not necessarily great pictures!) in every roll of film. I’ve taken these two cameras all over Austria, Spain, Italy, England and even as far away as Cambodia! It doesn’t matter if you shoot , outside or inside, at night or during the day or even at sunrise or sunset. The Sunny 16 rule works.
After much deliberation I’ve come to the conclusion that the camera you use doesn’t really matter, it’s all about what you point it at! It’s irrelevant if you shoot film or digital, a rangefinder or a SLR, colour or black and white. I believe that the most important thing is to make sure you shoot subjects which you are passionate about. I really enjoy the company of people and travelling and so most of my images are portraits or travel shots.
I haven’t written this article because I believe that my way of doing things is superior or because I want to “convert” anyone to shooting without a light meter. It’s for people who are considering making the move, for everybody else it can hopefully be an interesting read and even if it just makes you think a little more about how you go about taking photographs then I feel I’ve achieved something. I also don’t consider myself an authority (what a word!) on photographic matters, I’m just a regular guy who guys has a slightly different approach to photography. All the photographs in this article were shot using the Sunny 16 rule.
Anyway, let’s begin. Remember to bookmark this post as you might need to refer back to it in your journey to master the Sunny 16 rule.
Note: This is partly a continuation of the Exposure 101 article, in this article we will also discuss the more advanced aspects of exposure.

WHY USE THE SUNNY 16 RULE?
It might seem incredibly archaic to guess exposure in the 21st century but there are some distinct advantages of being able to accurately assess the intensity and quality of light in any given situation.
- You might have little choice! If you shoot an all manual film camera like the wonderful Leica M3 and don’t fancy carrying around a separate light meter then you need to learn the Sunny 16 rule. A small price to pay to be able to use such a fabulous tool.
- In tough lighting situations you can’t trust your camera to get it right. Light meters can easily be fooled by scenes that contain large contrasts and on a bright day they can also be fooled by very shiny objects. Also, your camera cannot read your mind and know what effect you want to create. Remember, photography is not just about capturing the scene, it’s about your interpretation.
- What happens if the batteries in your film camera run out and you are left with no light meter? This has happened to me before on my Pentax K1000 when the light meter was actually working. While not a likely occurrence, learning the basics you insure yourself against this event. Your light meter could also permanently stop working but you would still have a useable camera if you know the Sunny 16 rule.
- Taking personal responsibility. This is the same reason why many photographers shoot/scan in RAW instead of jpeg. It takes the decision making process away from the electronics inside your camera and gives it back to the photographer. By learning to use the Sunny 16 rule you take ultimate responsibility about how your image will turn out. You can’t blame your tools!
- It feels great. I find that it’s a satisfying feeling going out with just my Leica M3, a 50mm prime lens and my pockets full of film. I have no batteries to worry about and a perfectly clean viewfinder with no blinking lights or needles that move around. I find that it really helps me focus on the moment. Also, it’s refreshing to take a step back from technology once in a while.
- Mastering the Sunny 16 rule gives you huge respect from the mere mortals who still use in-camera metering.
 I met a photographer on a boat in Cambodia who was shooting with a Canon S100, a wonderful little point and shoot digital camera and the look on her face was priceless when I told her I was using my experience and intuition to nail the exposure. Not sure how valid a reason this is but it’s quite nice when it happens!
 - It makes you use your head which is never a bad thing. I think most artistic endeavours require a huge amount of thinking. Guessing exposure by using the Sunny 16 rule will force you to pause and actually look at the quality and intensity of the light for each and every shot you take. You may be surprised at how much more you begin to see…
Right now the mere thought of just going out and using your eyes and brain to calculate the aperture and shutter speed probably seems a little crazy. It brings up images of doing calculations on the back of scraps of paper or of being one of those tough-as nails war photographers from last century, changing rolls crouching behind a rock while being shot at.
This couldn’t be further from the truth. Once you have mastered the Sunny 16 rule you will find that your camera will already be set to the correct combination of shutter speed and aperture before you even raise to your eye and all you have to do is compose the shot, focus and then fire away. It will seem the most natural thing in the world and you will never hesitate.
EXPOSURE 101
This is just a quick recap of the various terms you will find further on. If you are very new to photography, or just want a refresh, then you will want to read my in-depth guide to photographic exposure.
- Aperture – This is the adjustable opening in the lens. The bigger the opening, the more light hits your sensor at any one time.
- Shutter Speed – This determines how long the shutter will stay open. The longer the shutter stays open the more light hits the sensor.
- ISO – This is a measurement of how sensitive your film or digital sensor is to light. More on this later.
THE SUNNY 16 RULE IN A NUTSHELL

If you are more of a “hands on” type of person who prefers to be outside shooting instead of reading then this section is dedicated to you! Short, sweet and to the point.
On a sunny day set aperture to f/16 and shutter speed to the reciprocal of the ISO for a subject in direct sunlight.
tweet
Let’s quickly break this down. The only part were some people might get confused is setting the shutter speed to the “reciprocal of the ISO”. This is actually very simple. It means you turn the shutter speed into a fraction of a second. So:
- If you are shooting at Iso 200 then your shutter speed will be 1/200s
- If you are shooting at Iso 400 then your shutter speed will be 1/400s.
- If you are shooting at Iso 800 then your shutter speed will be 1/800s.
- And so on…
- If you don’t have these exact shutter speed settings on your camera (i.e. you have 1/250s instead of 1/200) don’t worry about it, just use the closest settings available.
Easy! On a sunny day you set the aperture to f/16 and your shutter speed to 1/200 if you are using Iso 200 film.
Of course, feel free to use any other equivalent exposure. If you aren’t quite sure what that means, you probably need to read my in-depth guide to exposure before attempting to use the Sunny 16 rule.
Good luck and make sure you check out the tips at the end of this post!
THE FULL NINE YARDS
This is really the crux of the guide. By all means read the “Quick ‘n’ Easy Way” first as a quick introduction to the Sunny 16 rule but this really is the full nine yards. After reading and absorbing this section you will know everything you need to know about guessing exposure and the Sunny 16 rule. Take a deep breath and read on!
EQUIPMENT NEEDED TO USE THE SUNNY 16 RULE

There isn’t a huge amount that you need to learn the Sunny 16 rule. After all, the whole point is to keep things simple!
- A camera which can be set into manual mode. This can be a film or digital camera. This doesn’t need to a Leica M system, any camera will do.
- Something to measure exposure. This could be a dedicated hand-held light meter, your current camera with a built in light meter or even a smartphone with a light meter app. Try beeCam for Android and Pocket Light Meter for iPhone. Both are free.
- Your brain and eyes. Hopefully you have these.
- A good attitude and a healthy dose of patience. As with everything in life…
YOUR FIRST TIME USING THE SUNNY 16 RULE
The first time you hit the streets to attempt using the Sunny 16 you probably shouldn’t expect great results. Like most things, it takes some time and practice to get good.
The first thing you need to do is calibrate your eyes and brain to a default exposure setting. Unless you travel constantly (lucky you if you do!) then you will probably be shooting in similar light most of the time. This is why it makes sense to calibrate the sunny 16 rule for which ever part of the world you live in.
For example, when I was learning Sunny 16, I was splitting my year between Sicily, London and Austria and each country required a slight alteration. In the middle of the summer in Sicily the Sunny 16 Rule needs to be altered to become the Sunny 22 Rule because incredibly bright and there are zero clouds in the sky. So I decrease my default aperture from f\16 to f\22. In London in the summer it never reaches that kind of level so I would stick to Sunny 16, or even change it to Sunny 8. Don’t go to London in the summer, it’s always horrible weather.
How to calibrate? Easy! Take your metered camera or light meter and go outside on a typical sunny day for your area of the world and take several readings in bright sunlight. You might want to do this over the course of a week and then average the results for more accuracy but that is probably overkill. Remember that obviously your average rule will change depending on the seasons too but it’s usually a small change and with a little common sense you won’t have any problems.
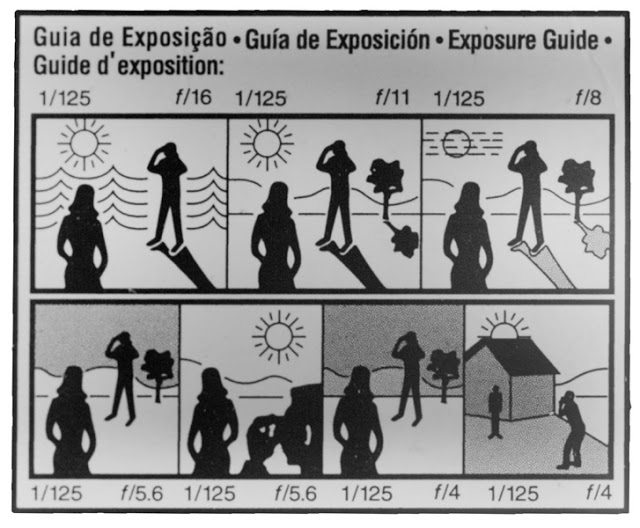
Now that you have calibrated your eyes and brain to a default exposure setting it’s time to get used to changing that for specific situations. If you want, print off a copy of the exposure guide at the beginning of the article and carry it around with you. Try and guess the exposure before taking the shot. Look at a scene and say to yourself f\16 @ 1/200 or whatever you think the settings should be. Try shooting directly towards the sun, away from it, in the shadows etc. Then check and see what your camera or light meter tells you. Remember that your camera or light meter don’t know how to compensate for backlit subjects and don’t have artistic taste. So don’t think that you are wrong just because your exposure is different! Try and get a feel for how much you are overexposing or underexposing. I explain in the tips sections how to expose for side lit and backlit subjects.
A quick tip: If you are shooting digital it’s fine to underexpose a small amount but if you are shooting film you want to aim for either spot on exposure or overexposure. You can get away with murder overexposing film but if you overexposure in digital often you will “blow” the highlights. This means you will get horrible blocks of white, usually the sky. If you underexpose with film you lose lots of details in the shadows and it generally looks awful.
That’s it! After a day’s shooting, you should have a general idea of how to use the Sunny 16 rule. Make notes of the mistakes you made and make sure you learn from them. If you are shooting digital then you can review your images and see how you did. If you are shooting film then write all your exposures down and then get your film developed and then printer and/or scanned.
Eventually, try not using the exposure guide and just keep the Sunny 16 rule in your head. As long as you can remember f\16 and 1 over the Iso you are good to go.
TIPS
Here are various tips that I have either discovered the hard way or found by talking to other photographers
- Keep it Simple! There is no need to write down all the possible exposures for every lighting situation known to man. A little common sense goes a long way. If unsure, bracket your shots in one stop increments.
- Don’t make it harder for yourself! I recommend sticking to the same ISO settings regardless of whether you are shooting film or digital. This effectively turns the infamous exposure triangle of ISO, shutter speed and aperture into a seesaw of just shutter speed and aperture. Once you have the hang of it, then you can start bumping that ISO up!
- If in doubt, overexpose. This only applies to the film shooters. Colour print film and Black and White film have a huge latitude for overexposure. If I remember correctly, colour print film can be overexposed up to 5 stops and still produce a picture. It probably won’t be the image you had in mind but c’est la vie. That’s like shooting at f\2 when you should be shooting at f\16!! This leads me nicely onto the next tip…
- f\8 And Be There. What is far more important that getting an absolutely perfect exposure is actually being there and taking the shot! Just setting your camera on f/8 will mean you will get something, which always beats getting nothing! Make sure you explore places properly and don’t just take the same old snapshots that everybody else takes. This old photographic rule is actually why my blog is named AndBeThere.com . We try and capture the essence without getting bogged down in the mundane.

- Rate your film slightly slower! Again, a tip for film shooters. If you rate your film slightly slower, so for example you rate ISO 200 film at 150, you will automatically have a slightly overexposure, usually by around one 1/3 of a stop. This is often beneficial as, in my experience, it gives a slightly cleaner exposure.
- For film make sure you expose for the shadows. Don’t take this as gospel but it’s often the right way to go about things. For example, if I am shooting a portrait and there is strong light coming from the side then part of the face of the model will be in shadow. You want to expose for that side of the face so you don’t lose detail.
- For backlit subjects overexpose by two stops. If you are walking around on a sunny day and you want to shoot a backlit subject, increase your aperture by two stops (i.e. f/16 to f/8) or increase your shutter speed by two stops (1/250s to 1/60). Remember you can mix and match! Increase both parameters by one stop each or you could choose a faster shutter speed like 1/1000s and then have a larger aperture such as f/4 so you get less depth of field for a flattering portrait. Remember it’s all about your creativity. This obvious is a rule of thumb, some subjects will require more exposure compensation, some will require less.
- You can turn your camera into a point and shoot. If you shoot with a manual focus lens then you already have the fastest camera available. Pre-set your exposure using the Sunny 16 Rule and then estimate the distance to your subject and use the DoF scale on your lens to focus. All you need to do now is point the camera in the right direction and take the picture! That’s how I shot a bicycle race the other day with a Pentax K1000 and a 50mm manual focus prime lens.
CONCLUSION

This is the end of part one of the Ultimate Guide to the Sunny 16 Rule. Check out Part 2 (coming soon) where we go into much more detail about everything we covered today and also learn some new things! Be warned, a fair bit of maths and charts lie ahead!
I believe that regardless of how you shoot, learning to guess exposure will make you a better photographer. When we take photos we are painting with light and so spending some time thinking not only about how much light we use, but the quality of it will surely help us improve our skills. I hope you have found this guide useful and if you have any questions or feedback please do not hesitate to comment below.
Get rid of the ads!
Did you enjoy reading this article as much as we enjoyed writing it? There's a way to support us and our reporting, getting ad-free navigation and more as a bonus. Subscribe to us for less than a coffee per month —just $3.99— or take advantage of our yearly subscription with a hefty discount for only $25.- An ad-free experience
- A free mystery box for Lightroom or Capture One
- All the books in our store
- 20% discount on Capture One
- 30% discount on Imalume Photo Theft Protection
- 20% off Herbs and Kettle Tea Company.
- 20% off your order from MPIX printing services.
- 5% off Viltrox Products via their eCommerce store.
- 10% off all film developing, printing and scanning services from Blue Moon Camera and Machine
- 15% off 7Artisans products: The lens and accessory maker is offering a sweet discount for Phoblographer's readers.