This is a syndicated blog post from Emanuele Faja. It and the images in this post are being syndicated with permission.
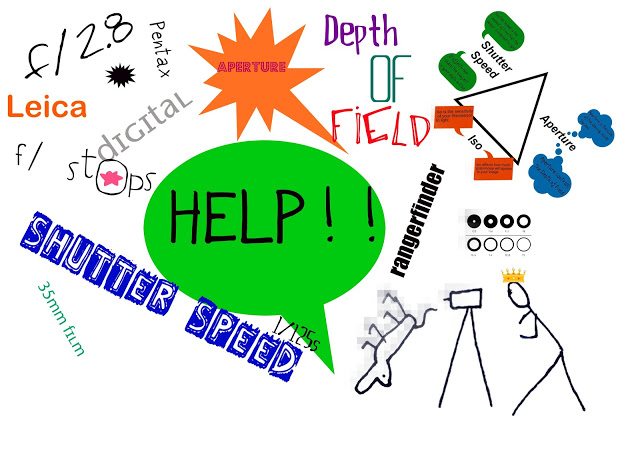
I decided to write this guide after having finished writing the Ultimate Guide to the Sunny 16 Rule. I realised that I had put the cart before the horse and just assumed that all my readers would know enough about photography to just jump straight in! Instead of redirecting you guys to another website elsewhere I decided that I would put in the work myself and come up with a clear, concise guide on photographic exposure. In this post you will find all the information you need to understand how the different aspects of photography come together to form an exposure and how each setting has a distinct effect on the final outcome. Please remember, this is a guide on the basics, the more advanced facets of photography exposure will be covered in a separate guide in the future.
If, after having read through this guide, there is something you don’t quite understand then please do not hesitate to leave a comment with your question and I will answer it.
Another point to keep in mind as you read this guide: There is no such thing as a “correct” exposure! It’s all about YOUR artistic vision and it will vary with every scene. There is no “cut and paste” method. It will require plenty of thinking on your part if you wish to take your photography to the next level.
You will want to bookmark this page because there is a lot of information and it will require reading a few times.
WHAT IS EXPOSURE?
Exposure is simply the amount of light that you allow to reach the light sensitive photographic medium inside your camera. This medium could (or should!) be film or it could be a digital sensor.
The more light you let in the brighter your image will look and, conversely, the less light you let in the darker your image will be. You see? It’s not exactly rocket science!
The factors that affect Exposure.
There are three things that you modify to make your image darker or brighter.
- Aperture – This is the adjustable opening in the lens. The bigger the opening, the more light hits your sensor at any one time.
- Shutter Speed – This determines how long the shutter will stay open. The longer the shutter stays open the more light hits the sensor.
- ISO – This is a measurement of how sensitive your film or digital sensor is to light. More on this later.
So far so good? Right now you only have to remember three things. Easy ![]()
Now let’s talk about each of these three factors in more detail. I will go over the basics of each factor and then explain how each one affects your image.
APERTURE
The Aperture setting on a lens is expressed in “f stops”.
This is actually part of a conspiracy created by photographers who don’t want anybody else to understand how photography works so they can charge ever increasing fees for their work 😉
Of course, I’m just joking. The f/stop is actually a ratio that’s reached by doing some tedious mathematics. It’s the ratio between the diameter of the aperture in the lens and the focal length of the lens. Got that? No? Good, it doesn’t really matter…
This is all you need to know for now:
The standard sequence of f/stops:
2 2.8 4 5.6 8 11 16 22
Going from right to left (f22 to f2) each f stop lets in twice as much light as one before. So f/8 lets in twice as much light as f/11 but only half as much as f/5.6.
Got it?
Yes?
Good.
Because of the tedious mathematics, the smaller the number, the bigger the aperture. This is because they are actually ratios and the f stop number is the bottom number of the ratio/fraction. So they really should read 1/2, 1/2.8, 1/4 etc but they don’t… probably part of that conspiracy theory by photographers…
Here is a nice little graphic to make everything even easier to understand:
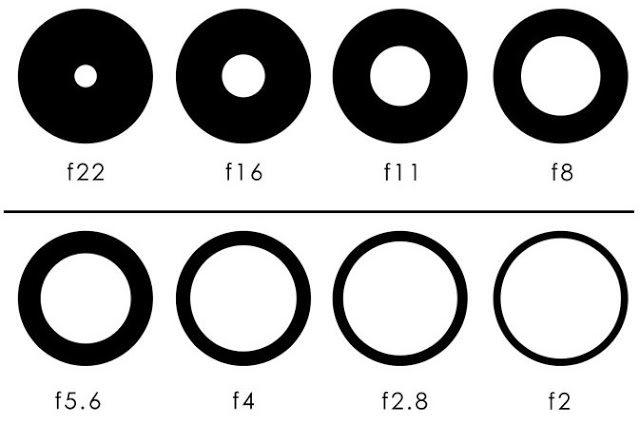
The smaller the f/stop number, the larger the f/stop.
There are lenses which go beyond f/2. For instance, I own a Pentax SMC K 50mm f/1.2 lens. There are various reasons why a photographer would want to own such a lens. We will talk about that a little later but it’s worth mentioning that the lenses become much heavier and more expensive as you go beyond f/2.
SHUTTER SPEED
Shutter speed is expressed in seconds or fractions of a second.
Most cameras have shutter speeds ranging from 1 second to 1/2000 of a second and also a “bulb” mode that will keep the shutter open for as long as you keep the shutter button pressed down.
1 1/2 1/4 1/8 1/15 1/30 1/60 1/125 1/250 1/500 1/1000
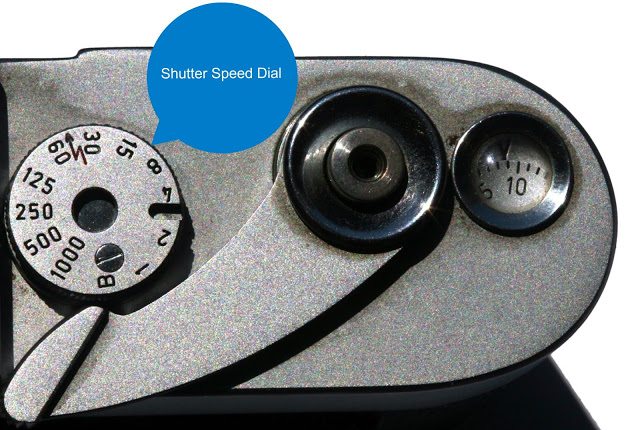
Going from left to right (1 to 1/1000) each shutter speed is twice as fast and so lets it half as much light. 1/125s lets it twice as much as light as 1/250s but only half as much as 1/60s.
Easy!
Instead of tediously writing 1/125, 1/250, 1/500, 1/1000, the shutter speeds are just written as numbers on the shutter speed dial.
ISO
Iso is a measurement of how sensitive your film/sensor is to light.
Iso is actually a throw back to the lovely pure days of film photography. It’s named after theInternational Standards Organisation which decided the ratings in the first place. Different films would have different Iso ratings and a photographer would select which film to use depending on the situation and, of course, personal preference. A few examples:

In order not to confuse the hell out of everybody when photography went digital the camera manufacturers continued to use the term Iso and also the same scale:
25, 50, 100, 200, 400, 800, 1600, 3200, 6400
Going from left to right (25 to 6400) each Iso setting is twice as sensitive to light. Iso 400 is twice as sensitive as Iso 200 but only half as sensitive as Iso 800.
The higher the number, the greater the sensitivity of the film/sensor.
The greater the sensitivity of the film/sensor, the less light is required to create an image.
The sensors in new digital cameras today are becoming so good that they reach ridiculous Iso numbers like 51200 and even higher! This does mean that digital is great for night-time photography but I do wonder what will happen in a few years time when Iso numbers in digital photography will be 7 digits long!
A QUICK RECAP
So now you should know the following:
- What are the three factors that affect exposure?
- Which is the bigger aperture: f/2 or f/16?
- Which shutter speed lets in more light: 1/2s or 1/500s?
- Which Iso setting is more sensitive to light: Iso 200 or Iso 1600?
Test your answers on your favourite photography forum.
All good?
Great!
Let’s continue!
IF ONLY IT WAS THAT SIMPLE!
I have a confession to make. I have not been entirely honest with you in this article but I did it for your own good. Instead of drowning you in information right away I just introduced you to the three factors that make up exposure but I did not tell you the “side effects” that these factors have.
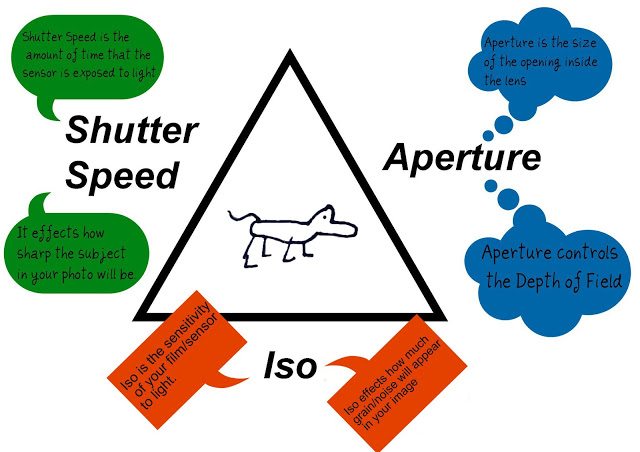
- Aperture also effects the Depth of Field. I will explain what it is in just a moment.
- Shutterspeed also effects how sharp your final image will be due to movement.
- Iso is linked to how much film grain or digital noise your final image will have.
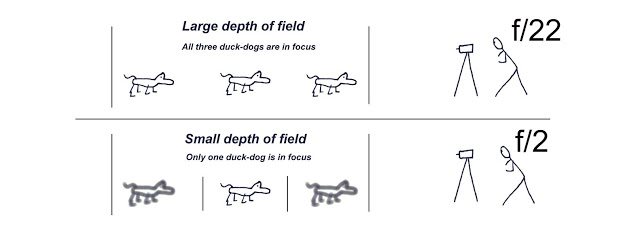
DEPTH OF FIELD
The distance in front and behind the subject that is acceptably in focus tweet
Depth of field is often abbreviated to “dof”
The smaller the aperture, the greater the depth of field. So at f/22 (small aperture) you will have a much bigger (deeper) depth of field than you would at f/2 (large aperture)
Depth of field is actually determined by three factors:
- The aperture – We just saw how that effects the depth of field.
- The distance to your subject – The further away you are from your subject the greater your depth of field.
- The focal length of your lens (35mm, 50mm, 85mm etc.) – The longer your focal length (i.e. 100mm vs 35mm) the shallower your depth of field.
Boring Note: Sensor size also plays a big role because of the way it magnifies the focal length of a lens. Most DSLR cameras these days have “cropped” sensors which are around half the area of a full 35mm frame. This means that they magnify the focal length of a lens by roughly 1.6. So a 35mm lens becomes roughly a 50mm lens.
My advice: shoot 35mm film and forget about it.
SHARPNESS
Generally speaking, if you are hand holding your camera you should be using, at least, this shutter speed if you wish to get optimally sharp images:
1
————————————————
Focal length of your lens
So this means if you are using a 50mm lens your shutter speed should be at least 1/50s (or 1/60s if your camera doesn’t have a the 1/50s setting). I find this to be true if you are shooting a camera that uses some kind of mirror system (analog or digital SLR systems) . If you are shooting a rangerfinder camera (which is a different type of system which has no mirror and thus far less movement going on when you press the shutter) you can get away with far slower shutter speeds. Some people claim they can shoot a rangerfinder at 1/10s or slower!
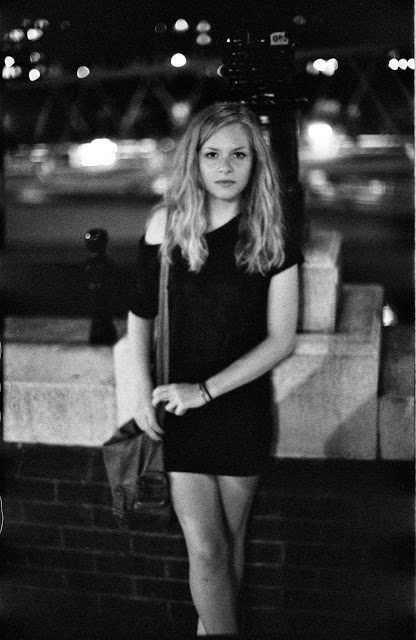
Here is an example of a picture I took using my Pentax K1000 at a low shutter speed. I had no choice. It was late at night and I had Iso 1600 film and my lens was fully open at f/1.2 so my only option was to lower the shutter speed below 1/60s. If I remember correctly, this was taken at 1/15s.
You can clearly see that the image is not sharp because I was holding the camera and the cars that were crossing the bridge in the background are also very blurred. This is also due to the very small depth of field at f/1.2
You also need to choose a shutter speed that is fast enough to capture your subject while they are moving. We will talk about this a little later on…
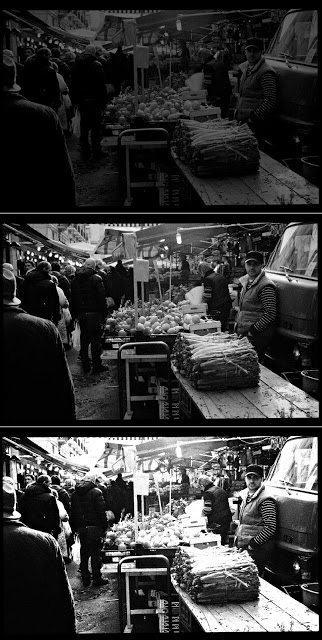
GRAIN/NOISE
The higher the Iso the more film grain or digital noise you will have in your final image. Film grain can be quite lovely while digital noise is alwaysdisgusting. Thankfully, digital cameras are getting “cleaner” as the technology matures.
A quick example:
PUTTING IT ALL TOGETHER
Time for another little test. ![]() Feels like being back at school eh?
Feels like being back at school eh?
- Define “Depth of field”
- What will have more in focus: A large d.o.f or a small d.o.f?
- What is, generally speaking, the longest shutter speed you should use when shooting hand-held with a 50mm lens?
- Fill in the missing word: The higher the Iso the more ______ your image will have.
Again, use your favourite photography forum to check your answers…or use the comments on this website.
Don’t worry…
We haven’t finished yet! ![]()
Let’s now talk about the Exposure Triangle that is created by Aperture, Shutter Speed and Iso.
Let’s assume that a particular scene can be shot at f/8, 1/250s with an Iso of 200.There are actually many other equivalent exposures that we could use to shoot this scene. If you change one factor of the triangle of exposure then you must do an opposite change with another factor to keep the exposure the same.
For example:
Original exposure: f8 1/250s, Iso 200
Equivalent exposure 1: f5.6 1/500s, Iso 200
Equivalent exposure 2: f2 1/2000s, Iso 200
Equivalent exposure 3: f11 1/125s, Iso 200
Equivalent exposure 4: f8 1/125s, Iso 100
There are are a huge number of variations but they all have one thing in common. The exposure (brightness) of the image will be the same.
What does change between these equivalent exposures is the following:
- Depth of field due to Aperture
- Sharpness due to Shutter Speed
- Grain/noise due to Iso
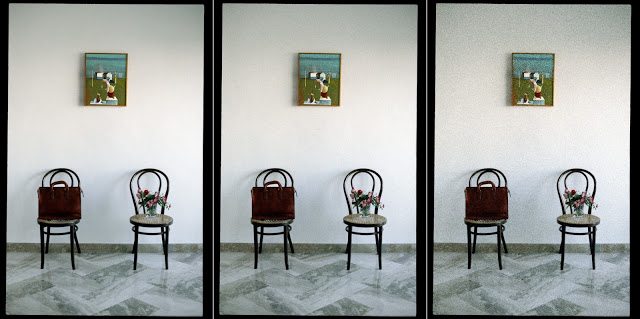
So what happens when you under-expose or over-expose an image?
The first image is under-exposed,
The middle one is a normal exposure.
The bottom image in over-exposed.
If you under-expose a scene then you will lose details in the shadows and your image will be dark.
If you over-expose a scene then you will “blow” the highlights which are the bright areas of the image. They will usually come out as blocks of white.
You can find out more about over & under exposure in the Ultimate Guide to the Sunny 16 Rule.
ARTISTIC CONSIDERATIONS
Now this is the fun part. You have gone through all the theory and now it’s time to see how you can use it in the real world and how it can spark your creativity.
As I mentioned at the beginning, there is no “correct” exposure. It’s all about YOUR artistic vision. Each scene you photograph has a certain dynamic range (the range between the darkest and lightest parts) and often it’s greater than the dynamic range that you can capture with your film or digital sensor. It’s up to you to decide how to handle the situation.
Before we jump straight in I want to say one last thing:
You need to previsualise the effect you want to create in your head before you start to change the settings on your camera and lens. Otherwise will you have a hit and miss approach and you will never understand why you aren’t capturing the type of photographs you want.
A few ideas to set you thinking:
- Using Shallow Depth of Field for flattering portraits.
This is perhaps one of the most common uses of shallow depth of field. By taking a portrait of somebody using a large aperture (i.e. f/2) you blur the background. This is especially useful if the background would otherwise be distracting to the overall feel.
- Using slow Shutter Speeds to create artistic effects with water.
This is incredibly common all over the internet and for good reasons too. It looks great.
Take a quick look on Google.
Remember that if you are shooting fast moving subjects then you probably want to use a fast shutter speed like 1/250, 1/500 or 1/1000.
- Using large Depth of Field for landscapes.
If you shoot landscapes you should try and use a large depth of field so that the entire image appears sharp. This means you will need to use an aperture of f/8 or smaller (f/11, f/16, f/22 etc).

While my subjects in this photograph were the two people sitting on the benches I also wanted to highlight the beauty of the houses looking onto the sea and so I took the photograph from slightly further away and used a smaller aperture. Both of these actions resulted in a larger depth of field so I had acceptable sharpness in the background.
Sometimes photography is about compromise. I couldn’t use a really tiny aperture like f/22 because the sun was going down and so that would have meant that my image would have been under-exposed.
- Mix it up a little!
What ever your artistic choices, make sure you don’t always do the same thing. Don’t shootevery portrait with a shallow depth of field, the background can often add to the the image!
As this is an introduction to exposure, I’ve not covered exposing for backlight, sidelight and exposure compensation. This is covered in the Ultimate Guide to the Sunny 16 Rule.
CONCLUSION (AND THE BEST WAY TO LEARN EXPOSURE)
Don’t worry if you don’t understand everything yet. This does take a little while to all sink in.
The best way to learn, in my opinion, is to get yourself an all manual camera like a Pentax K1000 and 10 or 15 rolls of cheap film like Kodak Supercolor 200.
There are a few reasons why I recommend using a simple all manual film camera like the Pentax K1000.
- These cameras they have a real shutter speed dial on the camera body and an Aperture ring on the lens. This means that you are always aware of the settings you are using. Also, the physical location of the shutter speed dial and aperture ring remind you that one is a function of the camera and the other is a function of the lens.
- There is no “auto” mode! This means you are forced to think at all times about what settings you are going to use! Don’t worry, there is a light meter to tell you if your exposure is correct.
- By starting out with a film camera and using the same type of film you take Iso out of the equation. If you take my advice and only shoot one type of film while you are learning it means that you will always be using the same Iso value. This means that you only have to worry about shutter speed and aperture. It makes it even easier! You are turning the exposure triangle into a see-saw.
- There are plenty of reasons to shoot film. Once you try shooting film you might just want to stick to it! Check out my article on giving film a try.
Shoot 3 or 4 rolls a week while also making a note of the aperture and shutter speed setting and in less than a month you will have it down like a pro. As a bonus, you may also have some lovely pictures too ![]() After you have shot your 15 or so rolls and got accustomed to manual setting the exposure then feel free to move to scanning, digital or a more advanced camera…It’s up to you!
After you have shot your 15 or so rolls and got accustomed to manual setting the exposure then feel free to move to scanning, digital or a more advanced camera…It’s up to you!
Thanks for taking the time for reading this guide and I hope you found it helpful. Feel free to leave some feedback about what could be improved. I’ve tried my best to explain everything as clearly as I can. If there is something you don’t quite understand then don’t hesitate to leave a comment below and I will clear it up for you.
Remember to check out the Ultimate Guide to the Sunny 16 Rule!
Get rid of the ads!
Did you enjoy reading this article as much as we enjoyed writing it? There's a way to support us and our reporting, getting ad-free navigation and more as a bonus. Subscribe to us for less than a coffee per month —just $3.99— or take advantage of our yearly subscription with a hefty discount for only $25.- An ad-free experience
- A free mystery box for Lightroom or Capture One
- All the books in our store
- 20% discount on Capture One
- 30% discount on Imalume Photo Theft Protection
- 20% off Herbs and Kettle Tea Company.
- 20% off your order from MPIX printing services.
- 5% off Viltrox Products via their eCommerce store.
- 10% off all film developing, printing and scanning services from Blue Moon Camera and Machine
- 15% off 7Artisans products: The lens and accessory maker is offering a sweet discount for Phoblographer's readers.