
Creating the Photograph is an original series where we interview photographers about a photo that they shot and how it was achieved. The results are some knowledge passed on to you. Want to be featured? Email chrisgampat[at]thephoblographer[dot]com.
Tracie Maglosky is the first female Olympus Trailblazer; but beyond working with the company she is also a wedding and portrait photographer that hails from Cincinnati, Ohio. And for anyone that believes that only DSLRs can create great images that will please your clients at a wedding, Ms. Maglosky will surely prove you wrong. Tracie does what many true professional photographers do: work with ideas and creativity to give their clients the beautiful images that make their jaws drop. And that’s partially the concept behind the image above that was done for a maternity shoot.
Here’s Tracie’s story.
Concept
I have an idea! For me, the initial spark of creativity usually starts with the words, “I have an idea!”. For those who know me best, this simple phrase is cause for panic. They know I’m going to ask them to participate in some fashion and that until the idea is born in a photograph I will be distracted and useless for any other purpose. Often the concept of an image begins in my head as a feeling. The challenge is finding all of the elements that bring that exact emotion to life. So begins the search for fabric, flowers, tiebacks, specific looks for hair and make-up artistry, the perfect subject and location and so on. This image, simply put, bears the truth about every expectant mother. The anticipation and wonder, the love and creation of something precious while yet unseen and the solitude of the experience of maternity.
Gear
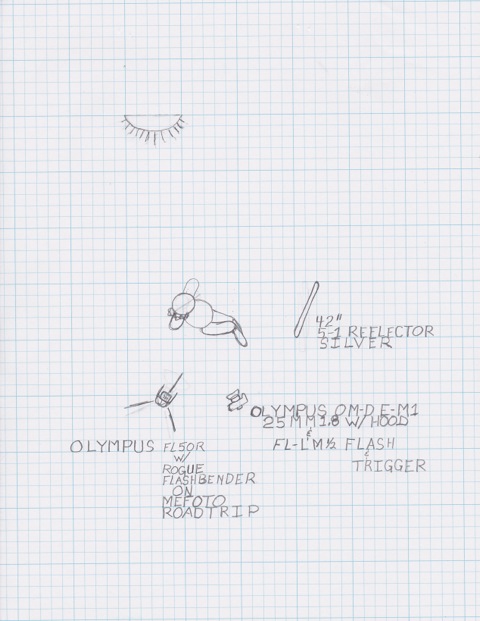
Olympus OM-D E-M1
Olympus FL50R
MEFOTO Roadtrip Tripod
Interfit Collapsible 5-in-1 Reflector (42″)
The Shoot
In Cincinnati, Ohio, we have a ridiculous amount of picturesque locations. Parks, overlooks and waterways dot our landscape. To foster the perfect lighting situation, I needed to find a location that was easily accessible to a mom that was nearly 8 months pregnant, a waterway shallow enough to work in, slopes high enough to filter the sun as we approached the “Golden Hour” AND open enough to illuminate the treelined banks eliminating deep shadow. We chose this little brook at a local park called Sharon Woods where the evening light would spill in just so.
I chose Ariel Danielle as my model because of her untamed hair, opaque skin and glorious baby bump. Her soft features were a perfect fit for my idea and the mood of this image. Sitting her in the brook with the sun behind and slightly to the right of camera let just enough light spill in for a dramatic, yet not “dark” feeling image. We added a reflector to the right of camera (Thank you Tony Pollard for helping me create the perfect lighting) to illuminate her face & an Olympus FL50R with a Rogue Flashbender on a MEFOTO Roadtrip Tripod for fill flash to the left of camera to offer a nice boost for front lighting. In order to allow the light to wrap around our subject, I chose to shoot at an aperture of 2.2. To eliminate shadows while gaining greater control of my strobe, I shot at ISO 640 with a shutter speed of 1/125th of a second. The Olympus OM-D E-M1 is perfectly suited for this type of photography. It’s light weight and splash proof rugged magnesium alloy body is perfect for outdoor adventures. The E-M1 also has in body remote flash operation which cuts down on the amount of sensitive photography equipment I needed to carry.
Post Production
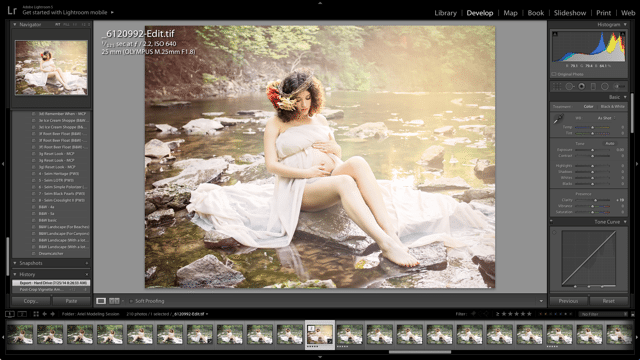
For this image, I had a vision of something a little more fall like than what was provided by the deep green foliage in mid July. As always, I started in Lightroom 5 to make the small adjustments needed to provide a clean starting image to work from in Photoshop CC. I set a custom white balance in the field so all I would have to focus on in post is manipulating the colors in the background a bit to convey a “Fall like” setting. My first goal is to make sure that Ariel will not get lost in the image. The fix is to paint a touch of clarity onto her face and belly. Next I add a touch of vibrance to the entire image before adjusting tints individually. I then move to the green foliage. I simple bump toward the yellow in Hue and a little desaturation work well in this case to flatten the background. Now we are ready for Photoshop CC.
In Photoshop CC, I like to work in layers and masks to make it easier to adjust later. I love the non-destructive environment of PS. First, I use the clone tool to remove small distractions from the image. I then working from the background to the for ground and darkest to lightest using layers of gradient photo filters to paint the scene. Using the gradient filter brings more texture and depth to your image by allowing you to manipulate your colors more realistically. Shadow colors are stronger farther away from your light source and inversely highlight colors are strong the closer to the light source. (HINT: when working in dark areas I like to change my lighting option to burn and with highlights I like to work with overlay) I apply layer a masks to each of the photo filters so I can paint on and off the effect where I want it. Final touch, I use a gaussian blur mask to work on skin imperfections. Did I mention Ariel is a model, there was very little gaussian blur work needed (thank you Ariel). Lastly I bring the image back into Lightroom to apply a slight Post-Crop Vignetting.
The total editing process took 10 – 15 minutes.
Get rid of the ads!
Did you enjoy reading this article as much as we enjoyed writing it? There's a way to support us and our reporting, getting ad-free navigation and more as a bonus. Subscribe to us for less than a coffee per month —just $3.99— or take advantage of our yearly subscription with a hefty discount for only $25.- An ad-free experience
- A free mystery box for Lightroom or Capture One
- All the books in our store
- 20% discount on Capture One
- 30% discount on Imalume Photo Theft Protection
- 20% off Herbs and Kettle Tea Company.
- 20% off your order from MPIX printing services.
- 5% off Viltrox Products via their eCommerce store.
- 10% off all film developing, printing and scanning services from Blue Moon Camera and Machine
- 15% off 7Artisans products: The lens and accessory maker is offering a sweet discount for Phoblographer's readers.