Creating the Photograph is an original series where we interview photographers about a photo that they shot and how it was achieved. The results are some knowledge passed on to you. Want to be featured? Email chrisgampat[at]thephoblographer[dot]com.
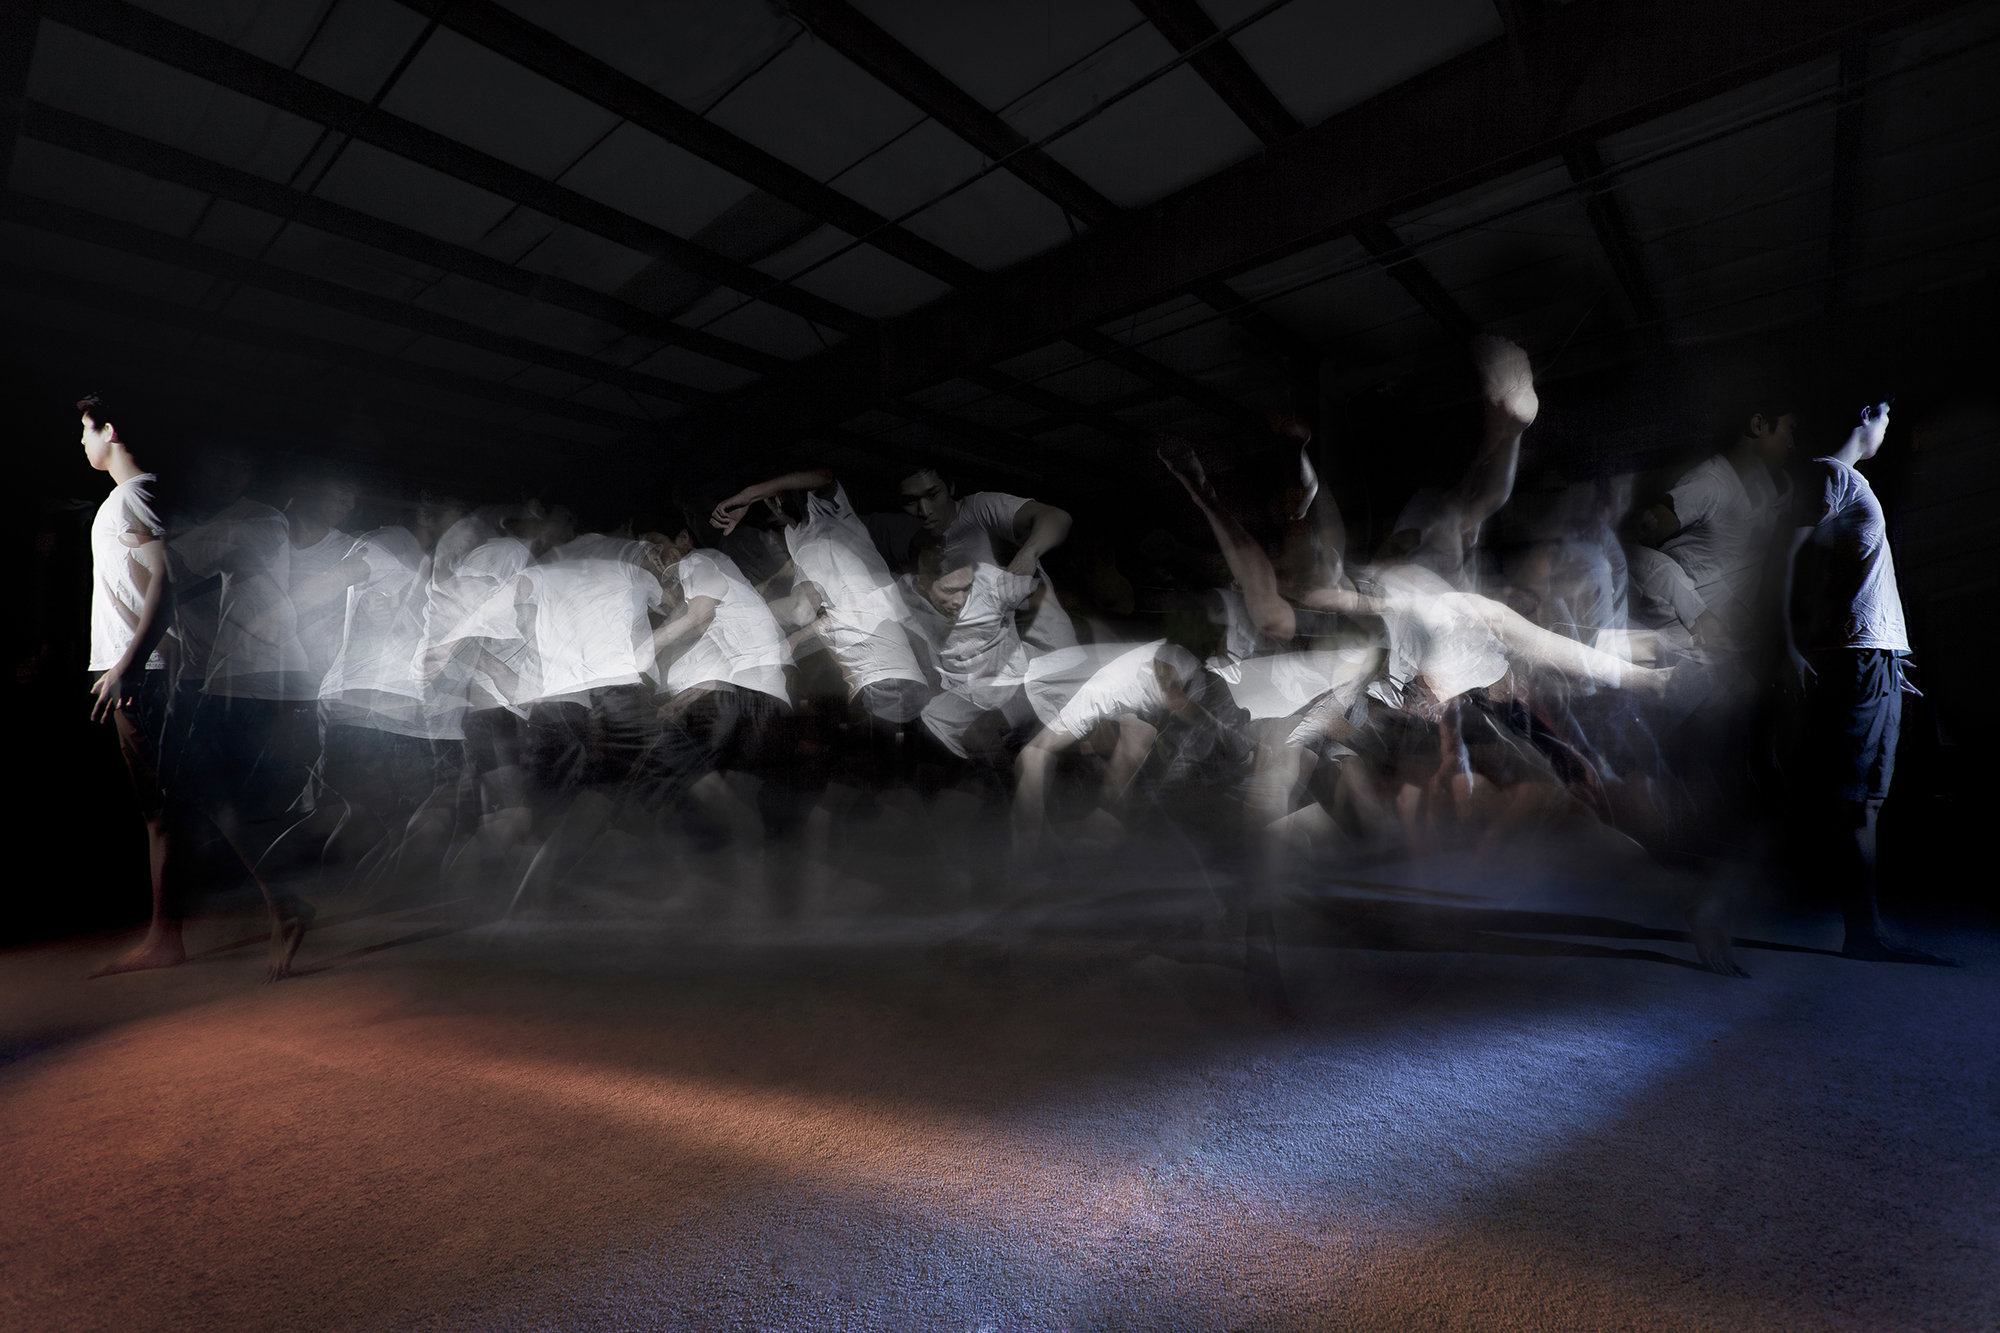
Dan DeArco is a photographer based in California and describes himself as a commercial dance/action photographer. He got into doing this type of work because he was a dancer and acrobat himself. He uses knowledge of the human body and creative ideas to create the photos that he does. Upon finding some of his work on 500px, we were intrigued by his Acrobatic Temper image. Dan’s image uses a method called Stroboscopic flash in order to get all of this into one image.
Here’s his story.
The Concept
About a year and a half ago, I shot this concept as part of my portfolio series focusing on performing arts and encompassing movement within images. Being an acrobat/dancer myself, I knew that this idea could reach full potential due to the fact that my personal experience with acrobatics and coaching made directing extremely easy. This concept was entitled, “Acrobatic Temper”, and displays the change of mood from adrenaline fueled power while performing something difficult (reddish orange), to sheer amount of calmness and relief after pulling it off (blue). I suppose this could be translated to the kind of feeling an NBA player gets before/after he’s made a 3 pointer, or a baseball player before/after making the dive for home plate. The subject––Andrew––performed what’s called a, “Butterfly Twist”, and he is an old training buddy of mine.
Gear List
• Canon 1Ds Mark II
• Canon 17-40 F/4 ultra wide angle L lens
• Dolica ZX600B103 carbon fiber tripod
• (3) Yongnuo YN-560 II flashes
• (4) Yongnuo RF-603 radio transceivers + shutter release cable
• (2) 12” x 56” strip softboxes
• Honeycomb spot grid for speedlight
• Full stop CTO (color temperature orange) gel
• Full stop CTB (color temperature blue) gel
A year and half ago at this time, I used a lot of speedlights and pretty much a completely different set of lighting/camera gear.
The Shoot
The details and the technical
There was so much going on, but I will try and keep things understandable. To cover the technical broad strokes…
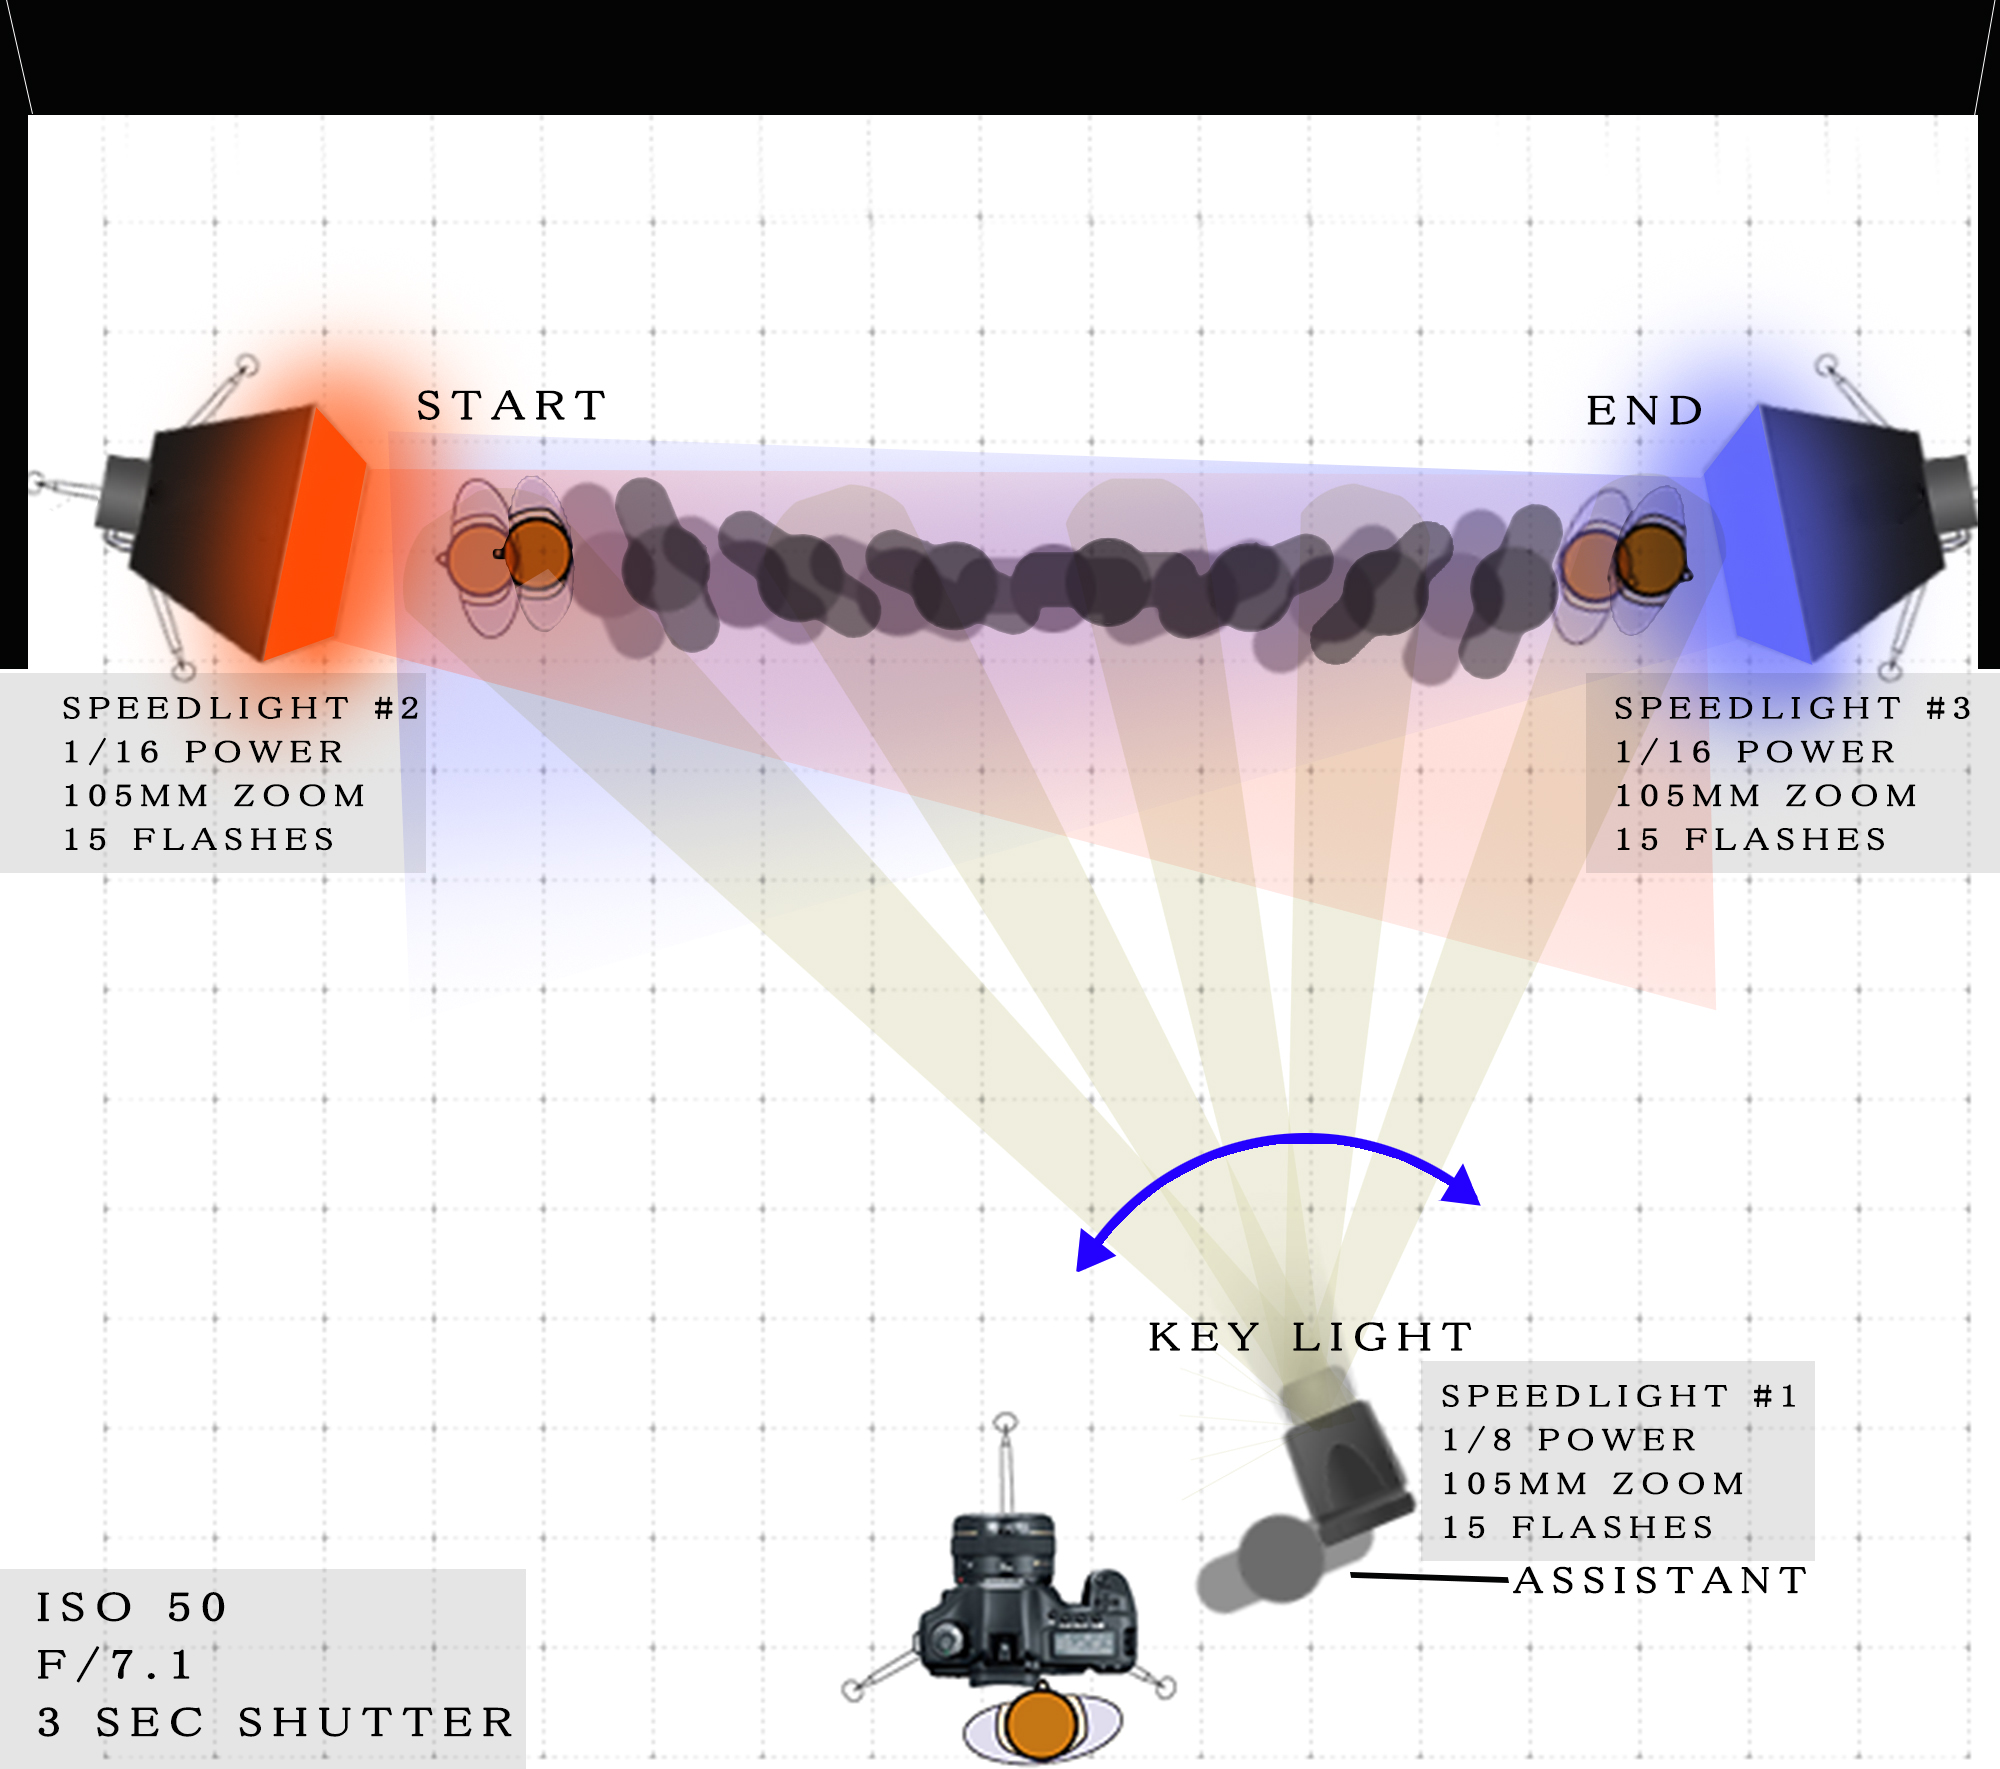
• The camera was set to: ISO 50, F/7.1, 3 second shutter speed, and was shot at about 20mm wide.
• The key light was set to 1/8th power, while the 2nd and 3rd speedlights were at 1/16th power. All were manually controlled, zoomed to 105mm, and set to stroboscopic flash mode.
• Two of the speedlights were in non-diffused strip softboxes on opposing sides, and the main speedlight was being handheld by my assistant (who was standing on either a high stool or stack of gymnastics mats) and panned with the model as he moved from left to right. This was the key light and it was aimed around 45 degrees down at the model.
• The flashes were triggered by the Yongnuo RF-603 radio transceivers, which were also acting as a shutter release for my camera. I had the camera on a tripod so I could hold composition, as well as step away to direct the subject.
To be honest––this was one of my first shoots with stroboscopic, and this session was all about trial, error, and getting things done in the essence of time (2 hours). Performing artists are athletes, and athletes can get tired regardless how skilled they are, so my job was to have things carefully thought through and on the ready to improvise when needed before the subject got tired and prone to injury. Safety is the #1 thing that I try to cover before any shoot.
Now, stroboscopic mode (or “repeating flash” for Nikon) is a very tricky technique to be working with. Here are a few of the things that we watched out for during the 2 hour shoot
Keeping the background completely dark and underexposed

If there’s one thing that stroboscopic flash photography requires—it’s a dark background. The moment the background behind the subject is exposed, the subject becomes transparent, and you end up with the “ghosting” effect. Having the background black leaves the subject sharp without textures bleeding through the model from behind. We used my honeycomb grid on the key light to expose only the subject as he moved through the foreground, and the strip softboxes on the sides had no diffusers on them, which kept the lighting linear, directional, and controlled. This is evident in the red/blue light streaks on the floor. The shutter speed was 3.2 seconds long, so the lights were turned off to avoid ambient light spill on the background.
Thinking through the placement
I had to reiterate where the subject needed to start and where he had to end up. Using a wide angle lens made the angles and movements look visually dynamic; however, any significant changes in his positioning affected the exposure of his body and how large he was in the frame. If he were to go off to the sides, the lights would not hit him—leaving him underexposed. If he were stationary for too long, the stroboscopic flashes would hit him multiple times—leaving him overexposed and brighter at certain points. This is where my experience with coaching and acrobatics helped the most. I directed his movements and left small marks as start and end points. The rest was up to the subject and his ability to calculate the perfect distance… I might add that he did a great job at that!
The lighting ratios between the speedlights x camera settings
Without question, this was the most difficult part. Speedlights aren’t as powerful as my studio strobes, so I had to figure out how many flashes I could get out of them within 3 seconds while still pumping out enough flash power to expose the subject. I noticed that the flip took about 3 seconds for him to complete, and I wanted the flashes to fire about 15 times for each sequence. The general rule in stroboscopic mode is: Take the number of desired flash pulses, divide that number by the hertz cycle, it will equal the corresponding shutter speed. So basically, 15 flashes ÷ 5 hz = 3 seconds. After getting these flash settings, all that was left was getting the correct camera settings (ISO 50, F/7.1, 3 second shutter speed)
Post Production
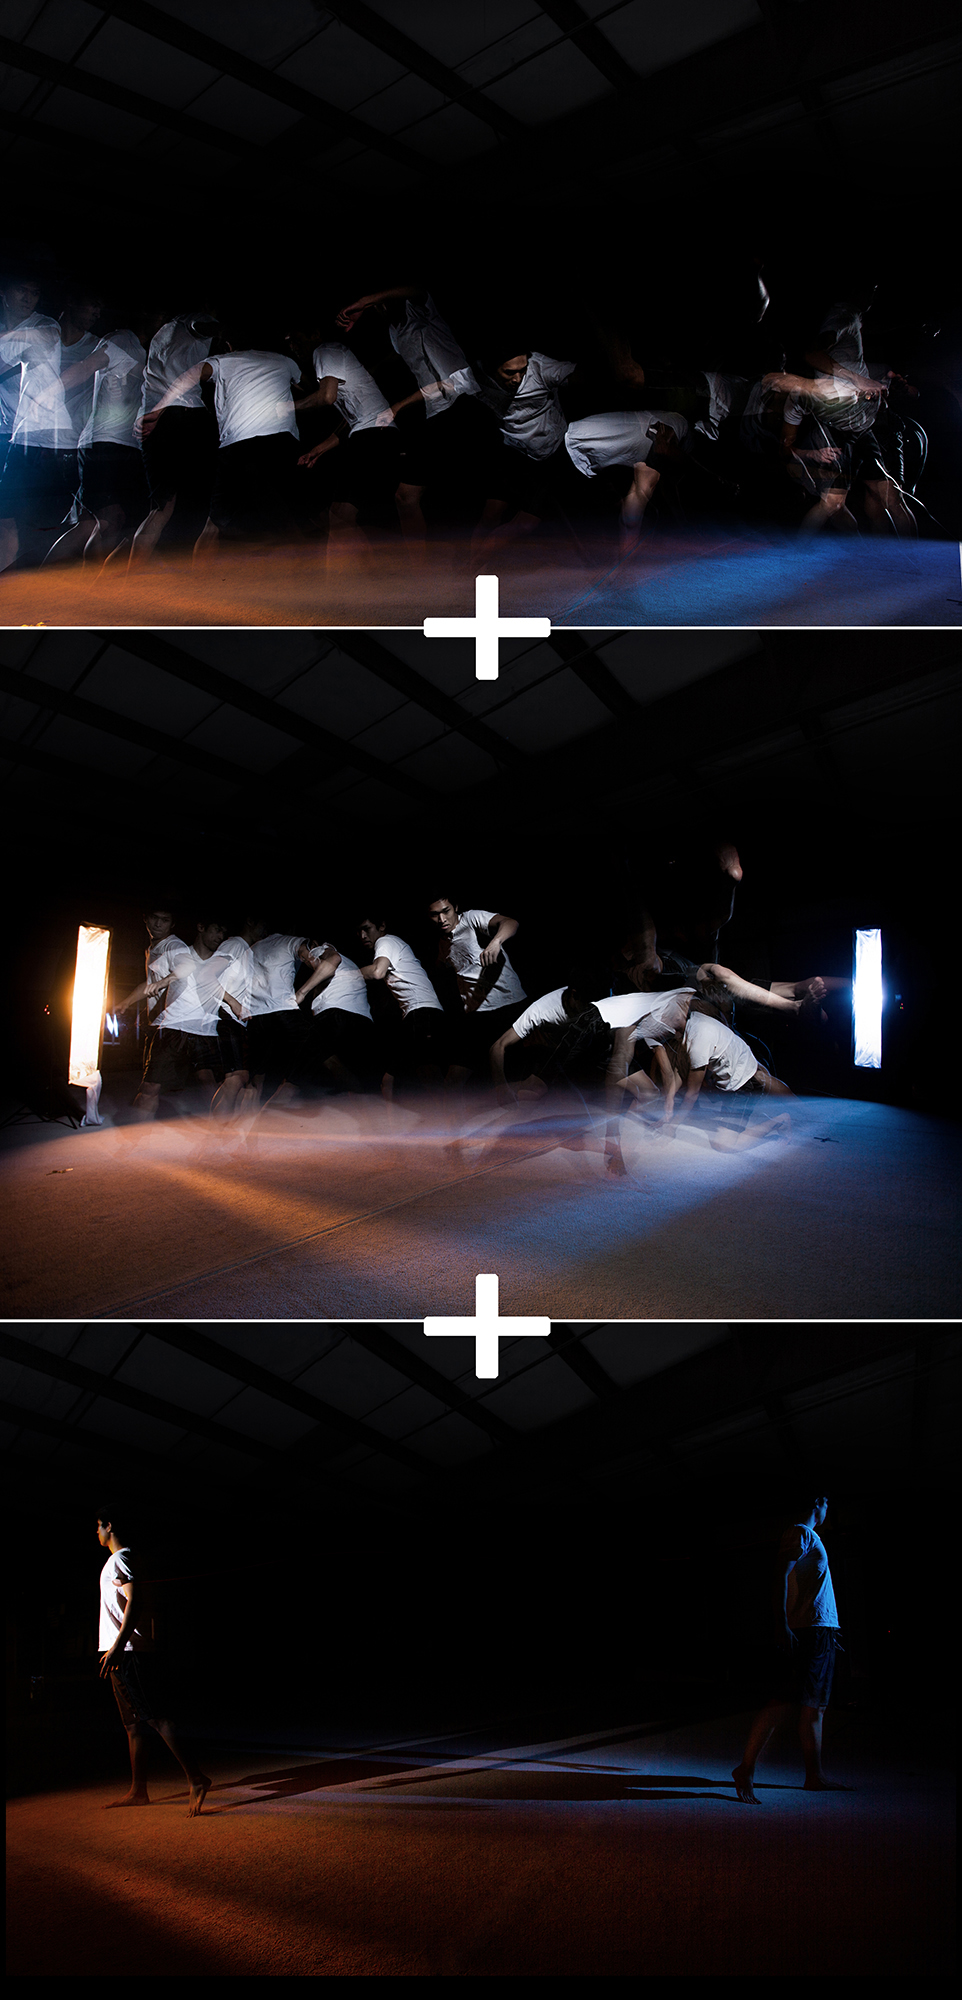
Post-production for this image was quite simple. I wanted to merge 3 exposures together to get the final image: two of the best stroboscopic shots, and one photo (double exposure) with the subject standing in front of both the red orange and blue gelled strobes. This would represent his start and end points. I darkened the shadows to leave out any detail from the background, and boosted the whites to make the subject pop more. The colors were slightly desaturated. Aside from that, there was just some basic clean-up and retouching to do throughout the image. I will mention that if I were to go back and re-shoot this project, capturing the entire thing in one shot would definitely be possible with the knowledge that I have now.
This shoot was very fun and challenging. Even though this was the only real shoot that I used stroboscopic in, it gave me great insight on how to execute multiple exposures and shutter drag (refer to my portfolio for the shutter drag shots). You could say that this image helped steer me in the direction of low-key dance/action photography, and led to bigger and better projects.
Website: www.danieldearco.com
Facebook: www.facebook.com/danieldearcophotography
Blog: www.dearcolovesphoto.wordpress.com
Instagram: www.instagram.com/danieldearcophoto
500px: www.500px.com/danieldearco
Flickr: https://www.flickr.com/photos/danieldearco/
Google+: https://plus.google.com/+DanielDeArco/posts
For more, please follow us on Facebook, Google+, Flickr and Twitter.
Get rid of the ads!
Did you enjoy reading this article as much as we enjoyed writing it? There's a way to support us and our reporting, getting ad-free navigation and more as a bonus. Subscribe to us for less than a coffee per month —just $3.99— or take advantage of our yearly subscription with a hefty discount for only $25.- An ad-free experience
- A free mystery box for Lightroom or Capture One
- All the books in our store
- 20% discount on Capture One
- 30% discount on Imalume Photo Theft Protection
- 20% off Herbs and Kettle Tea Company.
- 20% off your order from MPIX printing services.