Last Updated on 03/23/2014 by Julius Motal
For many of those photographers who only got into the hobby a few years ago with the advent of digital SLRs and the like, large format photography seems like a strange ancient rite whose ins and outs are totally divorced from the camera they use everyday. I certainly felt that way before I bought my 4×5 on eBay about 7 years ago.
The thing is, the physics of the two are the same and the elements of the camera are the same. It’s just a matter of mechanics, and that I can explain.
Mechanics
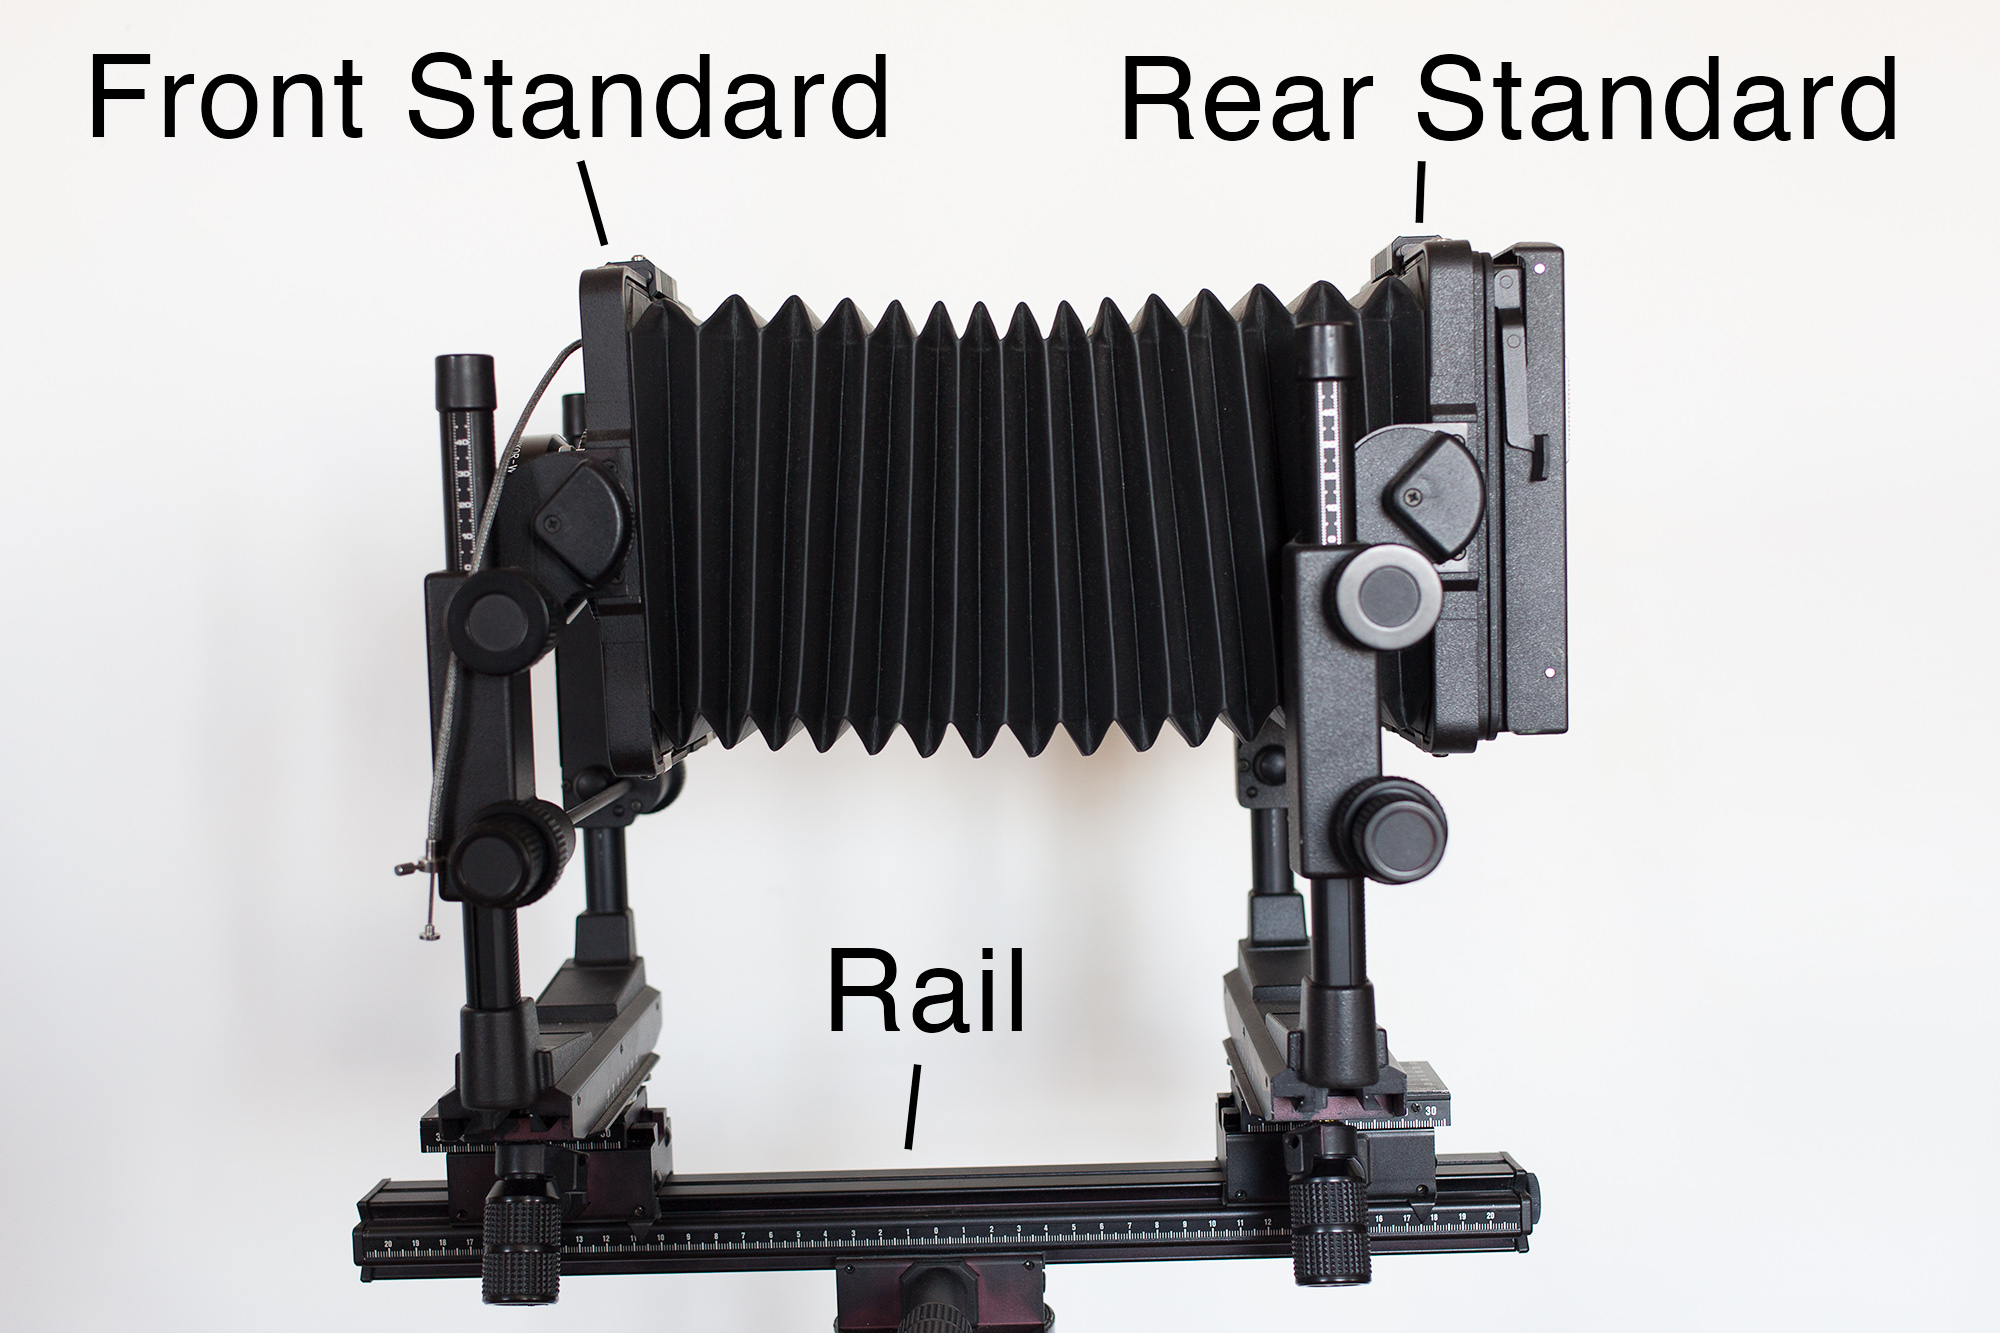
Large format cameras are very simple devices. Or at least the principles at work are simple. Basically there are two main pieces: The front board (or ‘standard’) which contains the lens, and the rear standard which has a ground glass installed for focusing and is where the film holder goes when you’re going to take the picture. These two boards are connected by bellows or a bag which keeps the whole thing light tight while still allowing you to change the distance between the front and the rear standards.
To accurately control the location of the two standards, studio camera generally have the two standards connected to a long rail which lets you gear them forward and back in both rough and precise amounts. Most portable cameras move just the front standard to control focus while the rear remains stationary.
One of the great advantages of a view camera like these is that you can also move one or both of the standards to either tilt/shift the plane of focus (so instead of parallel to the film, the plane of focus could go from left rear to right front of the frame for example) or move the standard up or down to control perspective (especially useful when trying to photography converging lines in architecture and the like).
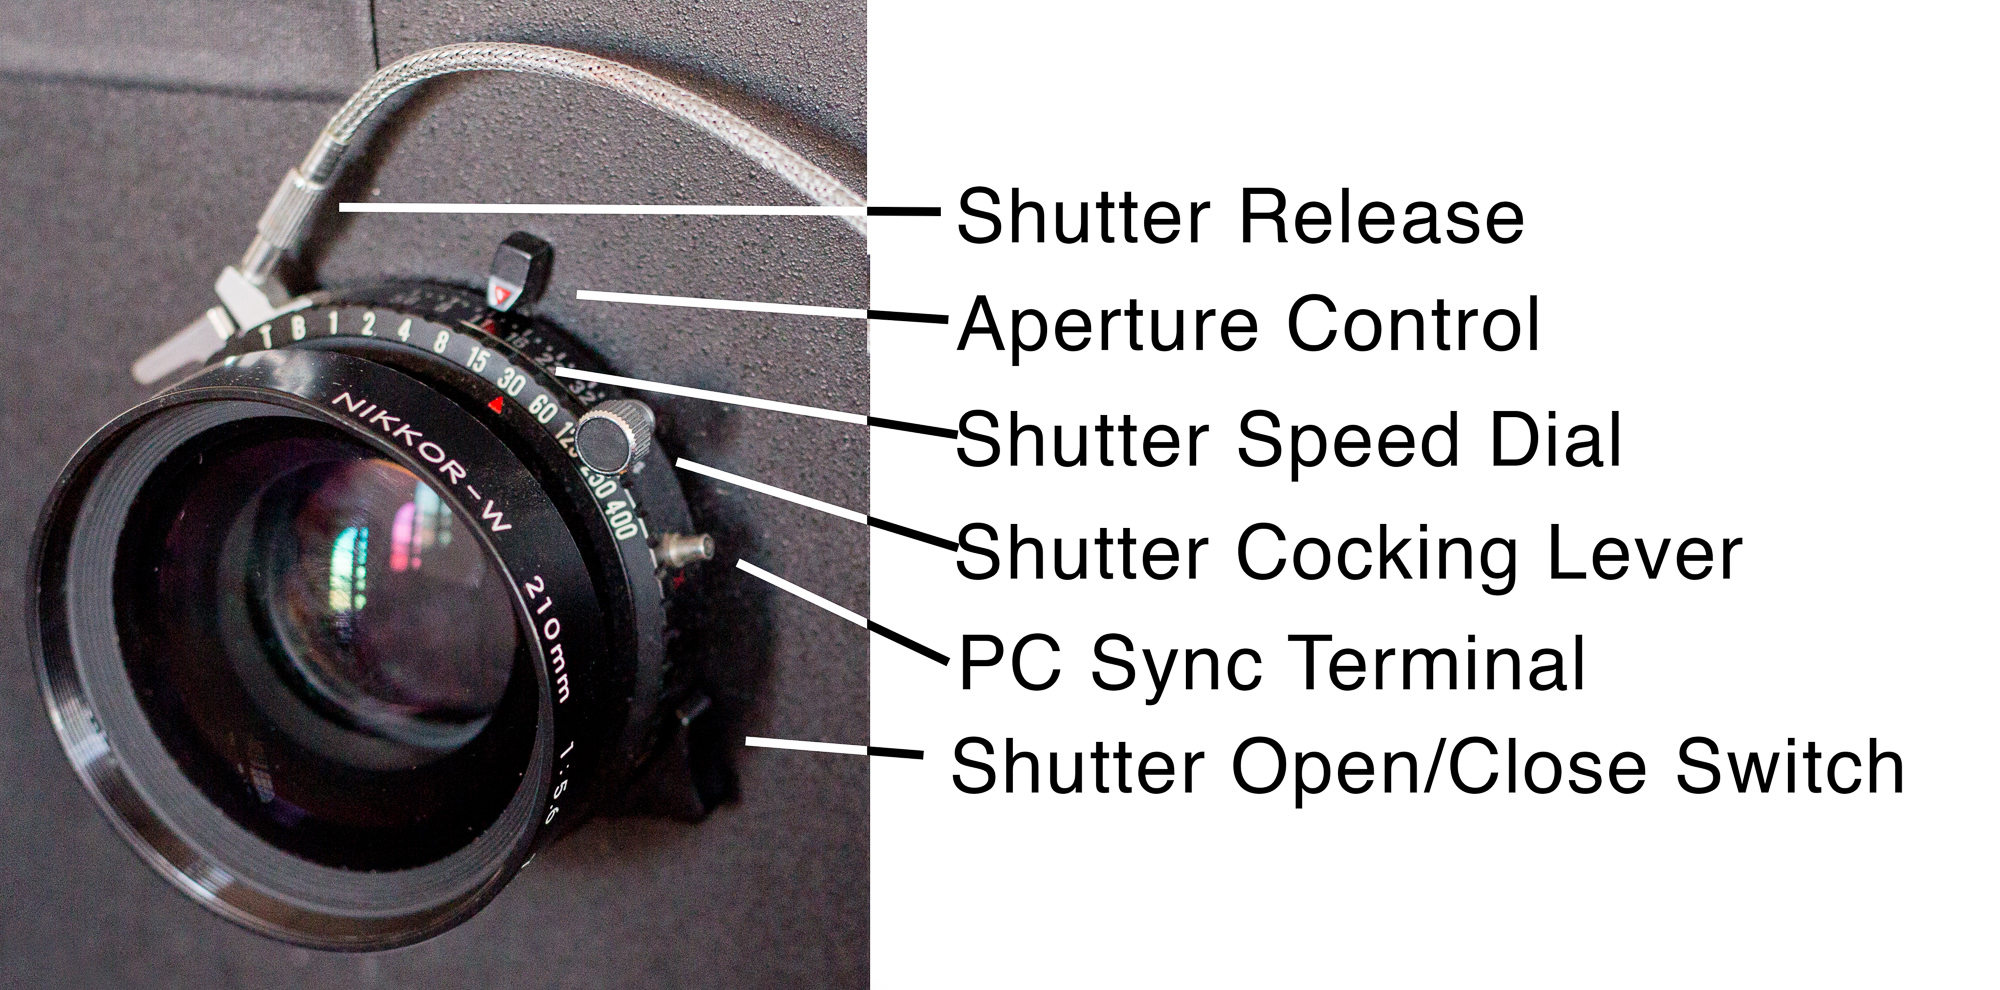
It’s the lens on a large format camera does most of the work, the rest is really just an empty black box. It’s where you set the shutter speed and aperture as well as where the leaf shutter resides.
Focus
You focus by changing the distance between the front and rear standards. A large format camera is focused at infinity when the distance between the front and rear standards is the focal length of the lens (say 210mm). The closer your subject, the larger the distance between the two.

So you flip the switch on the lens to open the shutter and you look at the image projected through the ground glass on the rear standard. Because the image on the glass is typically very dim, people will put a dark cloth over their head to block out as much light as possible (You’ll also want to open up the aperture on the lens all the way for best results. Just don’t forget to stop it back down before you take the picture).
You then unlock the rear standard and move it forward or back to get the image in the right focus ballpark. Then lock it down and use the gearing and generally a loupe (small magnifier that you stick against the glass to see a small portion in detail) to get the subject in focus.
Exposure
Once your have the image in focus, you can turn to your exposure settings. At infinity, your exposure works just like it would with any smaller camera, just meter the amount of light you’ve got and decide what aperture and shutter speed are right for the subject. However be aware that if you’re focusing closer than infinity (like almost all of the time) because the front and read standards are further apart, the image that the lens is projecting onto the ground glass gets bigger, like if you pull a projector further away from the screen, meaning that less light will be hitting the film and this effects your exposure. Taking this ‘bellows factor’ into account is one of the trickier parts of large format.
There are numerous ways to figure out how much extra light you’ll need (typically no more than a couple of stops) but explaining the best way to do it is beyond the scope of this post. One method I’ve seen involves an object of known size being held in front of the subject and then measured on the ground glass in the back. You can also measure and use an online calculator like this one. I also learned a new way of doing it this weekend that’s almost impossible to explain without showing you so it’ll remain between me and the next guy I pass it down to.
Also remember that the larger your film format, the smaller your depth-of-field at a particular aperture. So for instance, the widest aperture on my 4×5 lens might be f/5.6 which on 35mm would be stopped down quite a bit and a couple of feet of depth in decent focus, but on the 4×5 that same f/5.6 is like f/1.4 on your 35mm camera. So stopping down to f/16 or even f/64 is not strange in the large format world. Add to that slower film speeds and you’ll see that you generally either need a lot of light or longer exposures when shooting with these big guns.
Taking the Picture
Once you’re done with all of the above, you’re ready to actually take the picture that you’ve so carefully composed and focused. To do that you need to close the shutter so that no light gets into the camera and then cock the shutter so that it’s ready to fire when you press the shutter release.
Next you load the film into the camera by placing the film holder in front of the ground glass at the rear of the camera. The ground glass frame is held in place by a spring system so that you can pull it a bit out of the way and slide the film holder in so that in the end the film is in exactly the same plane that the ground glass was. Once it’s situated, you remove the dark slide to expose the film to the inside of the camera.

Now you’re finally ready to go back to the front of the camera and press the shutter release to actually expose the film and take the picture. <insert shutter sound here> Don’t forget to replace the dark slide in the film holder before you remove it from the camera or else you’ll ruin your latent image you worked so hard to produce. Then in a completely dark room, remove your film from the holder and get it processed to see what you’ve made.
Here’s a video of me going through most of this process using Fuji Instant film and a ring light.
Why Bother?
After reading this, some people are going to think that it all sounds like a giant pain in the ass and ask ‘Why Bother?’. That’s a good question with no definitive answer. There are certainly a few things which a view camera excel at, like perspective correction and short depth of field, not to mention overall image quality. Some people like the idea of slowing down the photographic process and to be more hands-on. It’s also a way to appreciate how easy we have it with modern cameras that do all of this automagically. To think that WeeGee was shooting crime scenes on the street at night with a Speed Graphic that works essentially this same way and you’ll gain a new appreciation for his work. Or remember that Ansel would carry one of these to the top of an otherwise inaccessible location in Yosemite to sit and wait for the weather to be just right. It’s a very very different way of taking pictures than just pulling out your iPhone and pressing the red button.
Personally I like doing it to keep a little spice in my photographic life. Different cameras make you see things differently and cause your subject to react toward you differently. In this day and age of instantaneous feedback, sometimes it’s nice not to know what you’re going to get back from the lab in a day or two.
Any way you slice it, it’s an experience, and one what I think every photographer should have at least once. So if you know someone who will let you borrow theirs for a day or two, it’s a worthwhile expense to mess around and have some fun with.
This was a guest blog post by photographer Bill Wadman and was originally posted on his blog. Bill is one of the hosts of the On Taking Pictures podcast; one of the best podcasts on photography out there. You can also follow him on Twitter.
Get rid of the ads!
Did you enjoy reading this article as much as we enjoyed writing it? There's a way to support us and our reporting, getting ad-free navigation and more as a bonus. Subscribe to us for less than a coffee per month —just $3.99— or take advantage of our yearly subscription with a hefty discount for only $25.- An ad-free experience
- A free mystery box for Lightroom or Capture One
- All the books in our store
- 20% discount on Capture One
- 30% discount on Imalume Photo Theft Protection
- 20% off Herbs and Kettle Tea Company.