Editor’s Note: Creating the Photograph is a new series that we’re starting where we interview photographers all about the photo that they shot and talk to them about how it was achieved. The results are some knowledge passed onto you. Want to be featured? Email chrisgampat[at]thephoblographer[dot]com
We met Claude Sadik at our reader’s meetup not long ago, and were blown away at the quality of his work. Claude is one of those photographers that I personally believe is a hidden gem. His fantasy concepts and his overall vision is positively stunning. Upon seeing our first iteration of Creating the Photograph, we asked him to volunteer to teach you all a little bit about a photo that he shot. Now despite the fact that the image above may look very simple, it’s actually quite complex–and mixed lighting is only the tip of the iceberg.
And that’s part of Claude’s arsenal–creating simplistic looking work that’s actually quite clever and complex. Here’s how he did it all in how own words.
The Concept
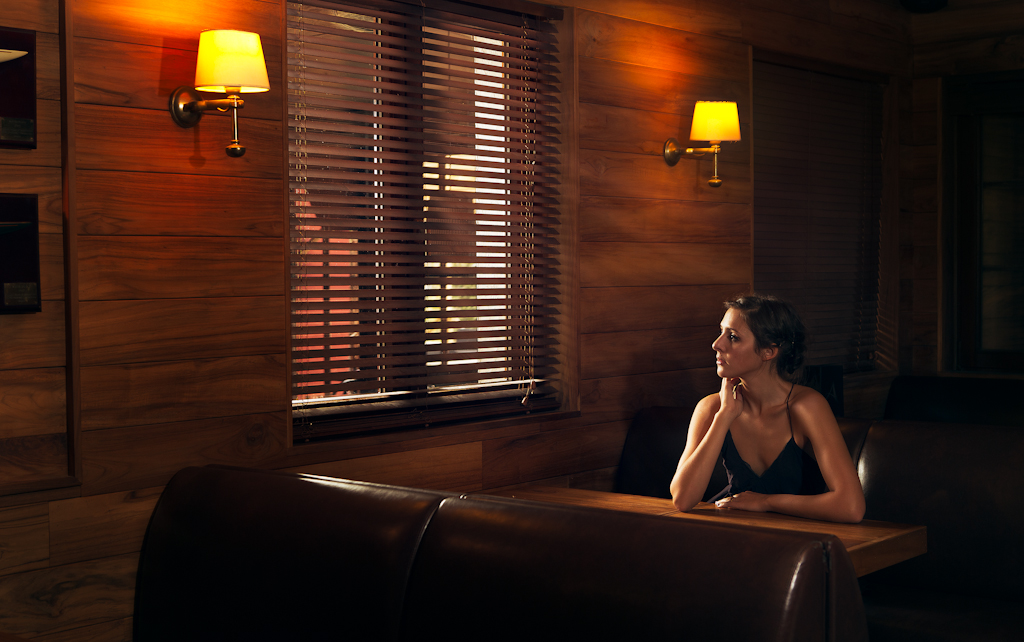
I went out for a few drinks with some friends one night and we ended up in a very cool bar. A bar with wood walls and tables, leather sofas, soft warm lights and a fireplace. As you can see; a very cozy place. After talking with some friends that knew the owner, we managed to get access to it. Awesome! But having a location is not enough. What would make this photo interesting? I personally like when a photograph makes you stop and think. So I thought I should present it in a way that contrasts with the location. Therefore, instead of going for a sexy girl looking straight at the camera, inviting the audience to sit with her. I wanted to leave a strange uneasy feeling in the room that would diverge from the cozy atmosphere.
Thus my concept was to capture an empty bar with a lonely and slightly troubled girl leaving the audience wondering what is going on in her mind? Why she looks troubled?
Gears
Gary Fong lightsphere collapsible
Vivitar 283 with reflective umbrella with YN RF-602.
The Shoot
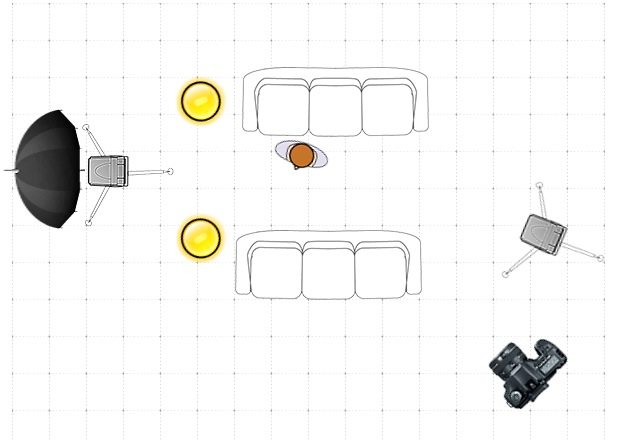
For this specific shot, I wanted the window to be my key light, while the wall lights would fill the room, preventing it from falling into darkness. As is, there wasn’t enough light coming through the window to achieve the look I was looking for. Now, I had to my disposition 2 flashes: 1 Canon 430 EXII and 1 old Vivitar 283. As you may know, the Vivitar cannot be dimmed and has to be used at full power. On the other hand, the 430 EXII is more controllable, so I wanted to keep it for something subtler. Hence, I mounted the Vivitar on a reflective umbrella, which I placed on the other side of the window, in order to get that large soft light.
By setting up my camera at f/5.0, I was getting just the amount of light I needed from the window. And by slowing down my shutter speed to 1/30th I was able to capture some of the ambient light in the room. At that point, I was already pretty close to what I wanted to achieve but, I still felt like the interior could be a bit brighter. That’s when I used the Canon 430 EX II with a Gary Fong lightsphere that I placed camera right to brighten up the bar and add some fill light to my model.
I directed my model to take a calm, slightly troubled, pose and asked her to look outside; leaving the audience wondering what she could be looking at. Framing-wise, I chose to go for a relatively wide shot, in order to show the emptiness around her.
Post Production

I always start by importing my photos into Lightroom. If I know I won’t need to tweak the photo too much, I usually just stick to Lightroom and do most of the basic adjustments from there. However, in this case, I wanted to have more control over the lights and colors. Therefore, I only applied the lens correction profile before sending it into Photoshop CS6. Within Photoshop, I asked myself how could I draw further attention to my subject. This can be done several ways using contrast, light or colors: and that’s exactly what I did, using a series of curves adjustment layers and masks. I slightly darkened the right side of my image, giving it a blueish-greenish look, while I warmed up the left side. Using a level adjustment layer, a high pass filter and some dodge and burn, I added a bit more contrast and sharpness to the model. Finally, I created some very subtle light rays coming through the blinds. Now, if I knew how to do it efficiently I would have liked to clean up in between the blinds. Aaron Nace from Phlearn.com offered to replace the window entirely.
Check out his tutorial.
Be sure to visit Claude’s website, Facebook page and Twitter.
Before and After

Want to be featured? Email chrisgampat[at]thephoblographer[dot]com
Please Support The Phoblographer
We love to bring you guys the latest and greatest news and gear related stuff. However, we can’t keep doing that unless we have your continued support. If you would like to purchase any of the items mentioned, please do so by clicking our links first and then purchasing the items as we then get a small portion of the sale to help run the website.
Also, please follow us on Facebook, Flickr and Twitter.
Get rid of the ads!
Did you enjoy reading this article as much as we enjoyed writing it? There's a way to support us and our reporting, getting ad-free navigation and more as a bonus. Subscribe to us for less than a coffee per month —just $3.99— or take advantage of our yearly subscription with a hefty discount for only $25.- An ad-free experience
- A free mystery box for Lightroom or Capture One
- All the books in our store
- 20% discount on Capture One
- 30% discount on Imalume Photo Theft Protection
- 20% off Herbs and Kettle Tea Company.