
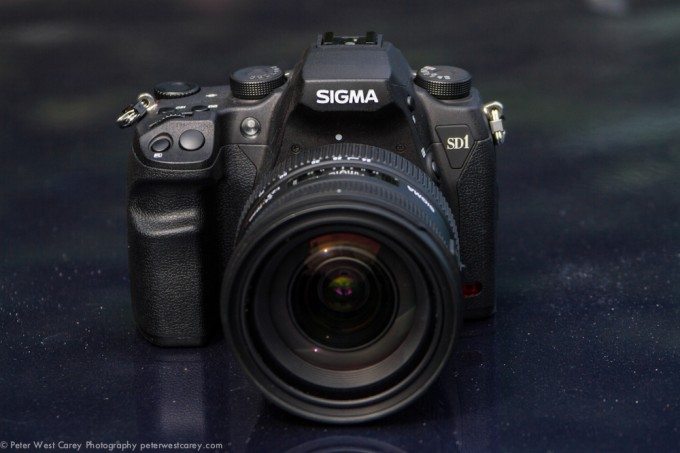
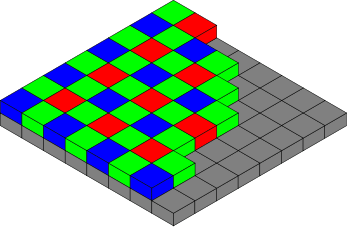
The Sigma SD1 Merrill is in its own right a revolutionary camera. Every other color camera on the market uses a Bayer pattern of alternating Red Green and Blue pixels, which they then interpolate data from nearest neighbors to fill in the missing two colors. This is a primary reason for jaggies, blurred edges, moire, low light artifacts and other unpleasantries. Sensor manufacturers have found various solutions to these issues both physical such as antialiasing filters and through improved fimrware and software. The only cameras on the market which do not have to deal with these issues in some way or other are dedicated black and white cameras such as the Leica M Monochrom for stills and the Red EPIC Monochrome (available soon) for video.
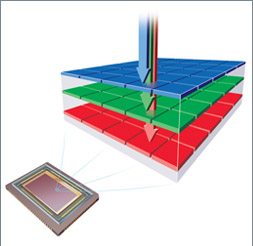
The Technology Behind the Sensor
Sigma however has taken an entirely new approach by using the Foveon sensor. This unique sensor is translucent, allowing light to pass through it after it collects the data. By stacking three of these sensors, each with a dedicated filter for Blue, Green and Red (the order each color can penetrate easiest), every pixel in the resulting image has captured its’ own RGB data without having to steal from neighboring pixels. This makes it an exciting addition to the development of digital SLRs.
We reviewed the SD1 Merrill and it’s little brother the DP2 which also uses a Foveon sensor, back in September. If you missed these you should probably read them first as I will avoid duplicating information. Instead I will focus on the SD1’s performance in the studio where the SD1 should really shine.
Primary Gear Used:
Incidental gear also used:
- Lexar Pro 1000x 32 GB CF Card
- Speedotron strobes
- Pocket Wizards
- Seconic light meter
- Photoflex XL Softbox
- 2 Photoflex 45″ umbrellas
Software:
First impressions
When I began using the SD1 my first reaction was that this is definitely not geared at the Consumer or even Prosumer markets. There are no auto modes or video capability for example. Additionally the body is noticeably void of buttons so it even takes a professional some getting used to. Without white balance, exposure control, continuous focus, quality control and other buttons we’re accustomed to seeing on a large DSLR, you’ll find yourself going into menus much more often than you’re used to. Also there is no battery indicator without going into a menu, something which did cause problems for me which I’ll get to. Interesting they did include a built-in flash, something some other high-end cameras eliminate since professionals rarely use them. A side note is that you can only use Sigmaa lenses on the SD1, something people heavily invested in Nikon or Canon glass will be disappointed by.
Ergonomically the body is very sturdy and feels good in the hands. It looks and feels like a professional body in every way. Their unique grip, with depressions for your second finger and thumb makes it feel safe and secure in one hand even with rather heavy lenses on it. Others have expressed dislike for this grip, but I appreciated it, especially since I don’t like to use straps when I shoot. My only complaint about the ergonomics is the one I already mentioned which is that it is missing several buttons I use regularly, requiring me to take the camera away from my face more often than I’d prefer.
As for first impressions shooting I’ll mention a few things I noticed before taking it on set. First off I will confirm what Peter wrote. This camera is slow in every way. From navigating the menus when setting it up, to slow focus (sometimes taking up to 5 seconds to lock focus), to it’s extremely slow write speeds. The last is improved by using a fast CF card, but even then it still takes longer than I am used to. More importantly while my Nikon allows me to review images and access menus to make changes while it’s writing, the Sigma completely locks up and the only thing you can do is take more photos (until the buffer fills which happens after 7 shots) – and is also not practical if you need to review the previous image before taking your next photo.
I also noticed right away thst it does not perform well with ISOs above 400 – confirming my assumption that this is primarily going to be a studio camera.
Note: all image samples below are completely unretouched to give you the best idea of how the images come out of camera. They are not as delivered to the client.
On to the Studio – Music Shoot
My first studio shoot with this camera was of a musician. It taught me a lot about how to use the camera. My first mistake was not checking the sync speed and assuming it was at least 1/200s. Turns out it is actually rated at 1/180s, a strange number considering you can’t actually set it to 1/180s – so it’s actual sync speed is 1/160s. Because of this my metering was off at first.
The second issue I ran across was that there was noticeable lens flare (see especially bad on his right arm). I don’t know whether that is the camera or the lenses but I experienced it with both lenses. I know exactly why this was happening – I was backlighting a fabric background. While I usually use seamless paper or a cyc, I used a fabric background in this case because I was on location and it would have been hard to get seamless to the shoot. That said, my Nikon D300 with the Tamron 28-75mm f/2.8 did not show flare with the identical setup. This suprised me since lens flare is at least in part associated with Bayer filters (and also on focal length, distance of lens elements to the CCD or film and other factors – lens flare is not unique to digital cameras).

The third issue I had was the speed. It is difficult to tell a model to hold a position while you wait for the camera, and even harder with someone that is not a professional model.
Second Shoot – Outdoor Fashion Shoot
For the second shoot, I took the camera on was a complete failure. While in the first and third shoots I had my Nikon with me as backup, in this case I was hiking out on railroad tracks in PA so I had to stay light, so I only brought the SD1. When the model and I got to the location I took the camera out and got a message that the battery was empty, so we couldn’t shoot. Now part of that is my fault – I didn’t check the battery before I left and I forgot the spare. However, the battery was fully charged the last time I put the camera away, and I didn’t notice the battery level because you have to push the function button to find out what the battery level is – normally I subconsciously check the battery level while shooting in the same way I know the remaining shots available on my card. To be honest it never occured to me to check the battery level since my Nikon can shoot in the field for weeks without a recharge (as proven by my 2 week trips in Haiti with rare power available), and if I leave it in my case for a while the slow battery drain is barely noticeable. I just never thought that I would have to even look at the battery level after one shoot and a few days off and in my case. I learned my lesson, but lost the shoot.
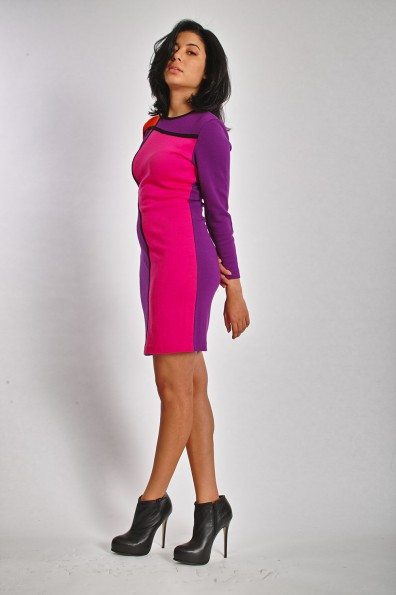
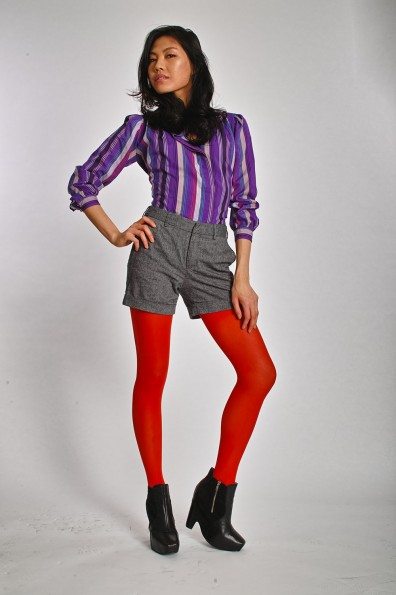
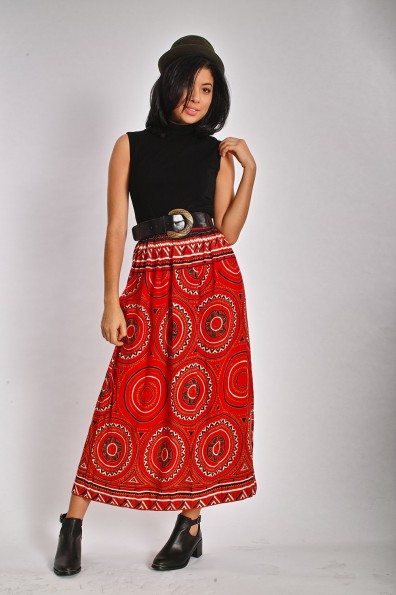
Third Shoot – Fashion Lookbook
I went into this shoot with high hopes that I had finally mastered the nuances of this camera. With both batteries fully charged, a fast CF card and a greater understanding of the workings of the camera I figured this was my chance. To a large extent I was right. I was able to get some very good images to work with.
However lookbook work is very fast paced compared to editorial work. Rather than having a few looks that you’re building a carefully planned story with, the goal is to move through as many looks as possible, capturing front, back and profile (and sometimes details as well) of each one. The lighting stays the same so you pretty much just move from one look to the next as quickly as the models can get ready. On this particular day we did 17 looks in 4hrs. So again I ran into issues with the write time of the images, with my team and models actually snickering as I repeatedly had to tell them to wait for the camera.
So let’s bring it into the computer and see what we got.
Post production
The SD1 is currently not supported by Lightroom or Capture One Pro, so you have to use Sigma Photo Pro to review images and do any raw editing. To Sigma’s credit the software is free and has more features than other manufacturers’ software. However it is not nearly as smooth or featured as the two forementioned options, but third party support is largely up to the other company, and it may be very difficult to add support for such a different raw format than other companies are using. That’s all I will say about the software because what I’m really here for is to look at the images.
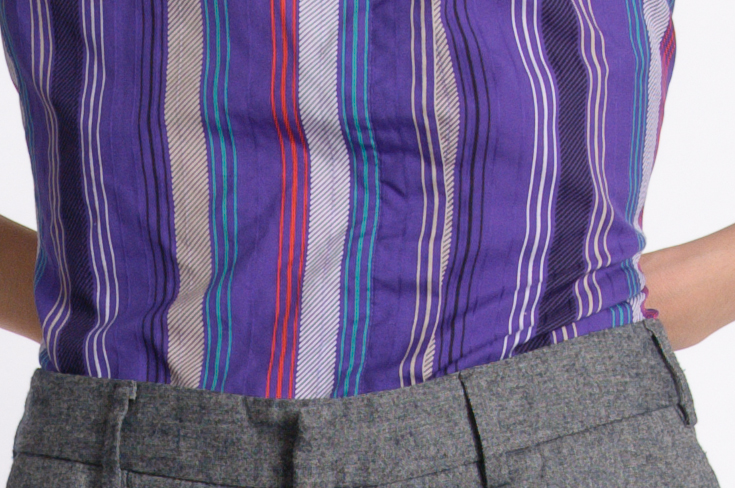
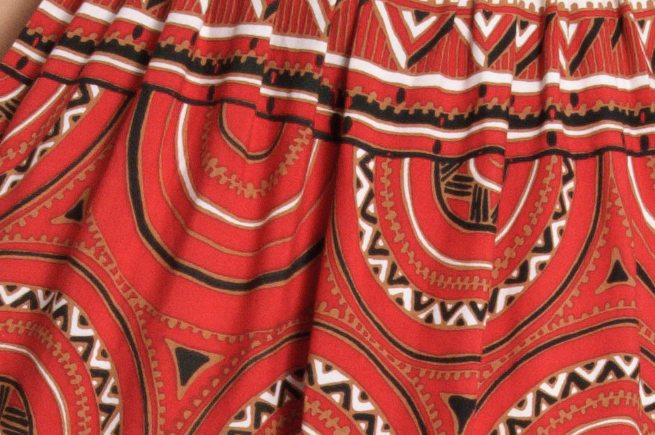
Looking at the final images you can see where this camera really shines. Color accuracy is excellent and detail is pristine. The fabrics look so real I feel like I can touch them. Zooming into 100% on some particularly tricky fabrics and comparing with the same outfit from my Nikon you can see the blurring that the antialiasing does on the edges, particularly with diagonal patterns. There is none of that visible with the SD1 (actually there’s a bit in the samples but that’s because of JPEG compression – the raw is super crisp). Color saturation is also much more pronounced in the SD1 images, but that may be because of different in-camera settings and can easily be fixed in post – the SD1 is much truer to the actual colors of the clothing though.


Who is This Camera For?
While the SD1 has a long way to come before it would be useful for the way I shoot, the sensor is indeed impressive and if future models address some of the limitations Sigma may become a strong contender. At this stage, I could picture it being a product photographer’s dream. Often shooting in the studio and requiring high levels of clarity and color accuracy, tethered and able to be patient, a product photographer would be able to take advantage of the SD1’s strengths without being particularly hindered by it’s weaknesses. I occasionally do this kind of work, but not frequently enough to make the SD1 my primary camera.
Please Support The Phoblographer
We love to bring you guys the latest and greatest news and gear related stuff. However, we can’t keep doing that unless we have your continued support. If you would like to purchase any of the items mentioned, please do so by clicking our links first and then purchasing the items as we then get a small portion of the sale to help run the website.
Also, please follow us on Facebook, Flickr and Twitter.
Get rid of the ads!
Did you enjoy reading this article as much as we enjoyed writing it? There's a way to support us and our reporting, getting ad-free navigation and more as a bonus. Subscribe to us for less than a coffee per month —just $3.99— or take advantage of our yearly subscription with a hefty discount for only $25.- An ad-free experience
- A free mystery box for Lightroom or Capture One
- All the books in our store
- 20% discount on Capture One
- 30% discount on Imalume Photo Theft Protection
- 20% off Herbs and Kettle Tea Company.
- 20% off your order from MPIX printing services.
- 5% off Viltrox Products via their eCommerce store.
- 10% off all film developing, printing and scanning services from Blue Moon Camera and Machine
- 15% off 7Artisans products: The lens and accessory maker is offering a sweet discount for Phoblographer's readers.