Last Updated on 08/17/2012 by Chris Gampat
ISO 200")
The Canon 5D Mark III is one of the most highly anticipated cameras ever released. The 5D Mark II has been a workhorse of a camera for many wedding and portrait photographers, but has also been maligned by these same photographers for the shortcomings. With it came some incremental upgrades to address the Mk II’s supposed shortcomings as well as adding on some other features.
In the end though, is it right for you? More importantly, is it worth the upgrade from the 5D Mk II?
Editor’s Note: This review has been done over the period of a couple of months. Additional contributing was done by Thomas Campbell and Thursten Kent.
Gear Used
Tech Specifications
Specs pulled from B&H Photo:
| AV Recording | |
|---|---|
| Video Recording | Yes, NTSC/PAL |
| Aspect Ratio | 3:2, 16:9 |
| Video Clip Length | Up to 4GB or 30 Minutes 1 |
| Audio Recording | With Video, Stereo |
| Focus Control | |
|---|---|
| Focus Type | Auto & Manual |
| Focus Mode | Single-servo AF (S), Continuous-servo AF (C), Manual Focus (M) |
| Autofocus Points | 61 |
| Flash | |
|---|---|
| Max Sync Speed | 1 / 200 sec |
| Continuous Shooting | Up to 6.0 fps |
| Dedicated Flash System | eTTL Remote Firing |
| External Flash Connection | Hot Shoe, PC Terminal |
| Performance | |
|---|---|
| Start-up Time | 0.1 Seconds |
| Self Timer | 2 sec, 10 sec |
| Interval Recording | Not Specified By Manufacturer |
| Connectivity | AV Output, USB 2.0 |
| Wi-Fi Capable (With Optional Transmitter) | Yes |
| Physical | |
|---|---|
| Dimensions (WxHxD) | 6 x 4.6 x 3″ / 15.24 x 11.68 x 7.62 cm |
| Weight | 30.34 oz / 860 g |
What’s New?
From Thomas Campbell
There are a lot of great new features to the 5D series cameras in this iteration. The first thing you might notice is that the back LCD screen is now a bigger, more wide screen version at 3.2″ rather than the 3.0″ on the 5D Mark II. The LCD is quite vibrant and is very easy to see, even in daylight. I am sure it will be much better for focusing for videographers as well.
The second thing I noticed was the ON-OFF switch moved to the top of the camera. I’ve left my camera on when putting it in the bag and killed the battery in transport, so I am very glad I can easily look into my bag and see that my camera is off.
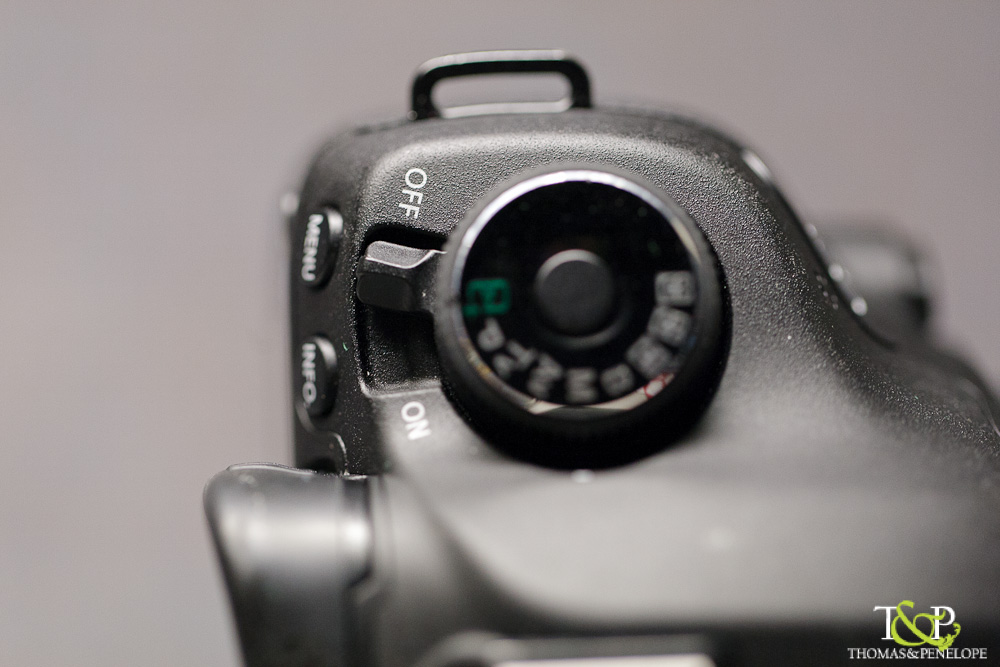
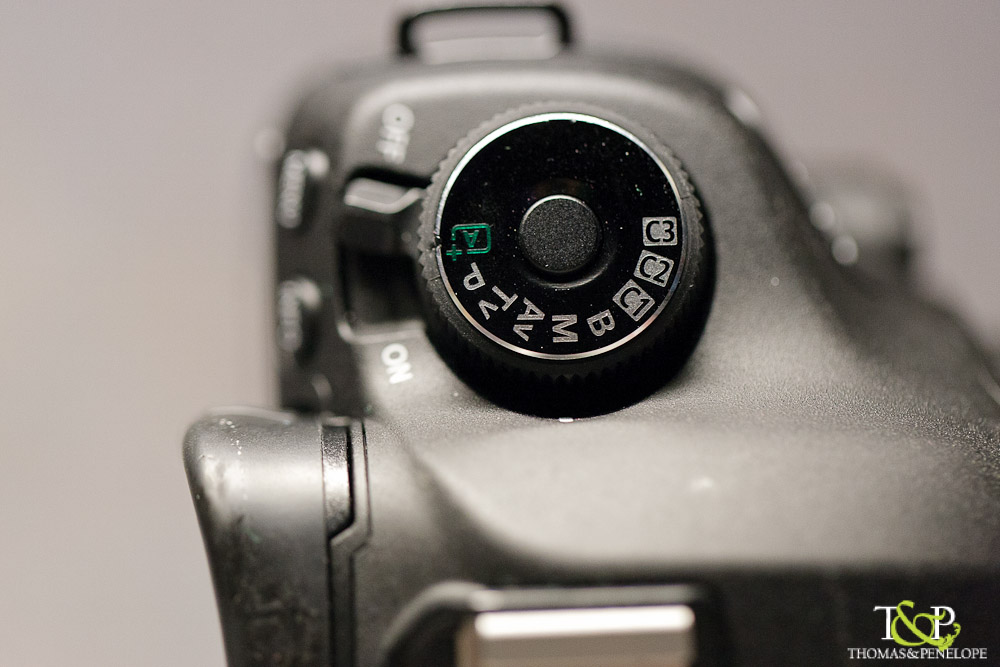
Just above that is the dial to change shooting modes, which now comes standard with a locking button. To switch to an automatic setting from manual, you just need to press the button. I use Black Rapid straps and more times than I care to recount, my 5D Mark II switched to bulb from manual as it swung by my side. Having it locked into manual will help me tremendously.
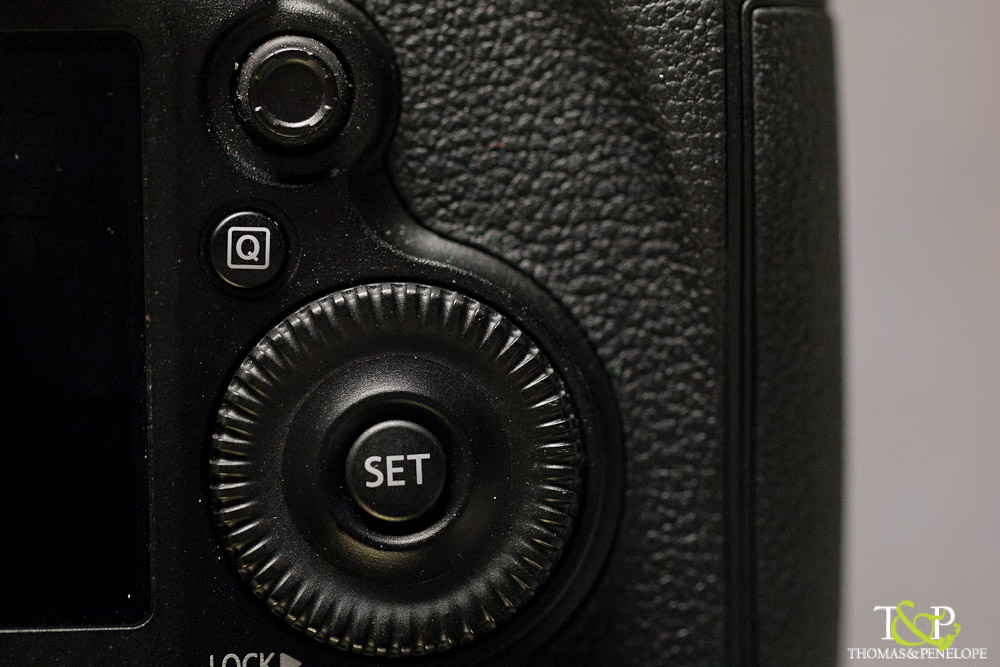
Canon added a switch for stills to video and a Q button – both of which had been on the 7D, but are new to the 5D-series of cameras. I really love the Q button. With such a deep set of menus, the Q button allows you to do things like change the white balance or the image quality without going through the menu system. I shoot my white balance in Kelvin, so being able to switch it easily without going through dozens of menus is very useful.
Canon also laid out the buttons around the LCD differently and added a RATE button and a ZOOM button. These two adds are my favorites.

The rate button allows you to add a star rating to your images in camera – a first for Canon cameras. This allows you to actually cull in camera or mark your favorites while shooting – and you can even mark them different ways unlike the protect button on the 1DX. I often have an assistant editing for me while I shoot, so having an easy way for them to see exactly what I want edited is an invaluable feature to me.

The zoom button is great for checking focus on the killer new LCD. I have it set so that when I press the button, it will zoom into 100% on the chosen focus point. This is invaluable, especially for a prime shooter working with insanely shallow depths of field from the phenomenal Canon 85mm f1.2L II.
Some additions you can’t see from the 5D Mark II are the addition of the HDR mode and the multiple exposure mode. They also changed the DOF preview button (a button I have never used previously on any camera.) I don’t find that I will use multiple exposure or HDR mode often. Both process multiple files and render a JPEG for you. I don’t think this will be something I will use often, simply because I want more control of my final product. I will be able to create an HDR or multiple exposure file quicker and easier than I could in post processing, but I prefer to have the control that Adobe Photoshop will afford me in post processing.
A less welcome change is the fact that you can no longer use focusing screens.

From Chris Gampat
ISO 400")
First off, yes: the woman in the photo above was wearing a garbage bag because it was raining cats and dogs.
Something that Thomas didn’t mention that I felt is an absolute necessity is the fact that Canon included a silent shutter option for the camera to mute the very tin-like sound of the current shutter. The 5D Mk II’s shutter was quieter than the standard shutter on the 5D Mk III in my opinion. But when the 5D Mk III uses its quiet shutter option, you can never tell that the camera is there. In fact, the silence seems to trump those of some mirrorless cameras I’ve used.
For street photography or for on-location portrait photographers looking to get into an area and get out quickly without drawing too much attention to themselves, the quiet shutter is quite useful. In one instance, I took many photos of people around my on the subway. A woman sitting next to me smiled and asked if anyone ever yells at me for taking their photos. I replied, “I’ve never been caught.”
She smiled. I followed up with, “Also, you didn’t.” That’s proof that someone sitting right next to you might not even realize that you’re photographing them.
And for that, Canon must be applauded. It must also be said that in the quiet shutter mode, the shutter does slow down to 3fps as opposed to the 6fps that is standard with the normal shutter mode.
If you can live with that (and most 5D Mk II shooters should have been able to adapt) you’ll be fine.
Camera Menu System Changes
The Canon 5D Mark III is definitely not the type of camera that you can just pick up and start shooting with. It is much more complicated than previous cameras, with a pay off in lots of great features. The menus are extensive and detailed. I highly suggest spending some time with your manual, but am also supplying my settings for the camera below. This may not be the best for every situation, but with few tweaks, this has been really great for me for a couple dozen photoshoots.
SHOOT 1
- Image Quality RAW Unless I am shooting on deadline, everything is RAW.
- Image Review 2sec
- Beep Disable
- Release shutter without card OFF
- Lens aberration correction Enabled
- External Speedlight Control
- Firing Enable
- E-TTLII Meter Evaluative
- Flash Sync in Av AUTO [I don’t use Av]
- Mirror Lockup OFF
SHOOT 2
- AEB – Leave at ZERO unless I am bracketing shots for a reason
- ISO Speed Setting:
- *ISO Range: 50 (L) – 12800
- *Auto ISO Range: 100-12800 [I don’t use AutoISO]
- *Min Shutter Speed: AUTO
- AutoLightingOptimizer: DISABLE
- WB Depends on the shoot
- Custom WB Depends on the shoot
- WB Bracket I have never used this
- Color Space ADOBE RGB I always shoot in Adobe RGB.
SHOOT 3
- Picture Style: Faithful I am happy to edit on the computer, not the camera.
- Long Exposure Noise Reduction: OFF [I rarely shoot long exposures]
- High ISO speed NR : STANDARD [this only affects jpegs]
- Highlight Tone Priority OFF
- Dust Data Delete [I prefer to keep my sensor clean and use photoshop if something gets on the sensor]
- Multiple Exposure DISABLE [enable when using]
- HDR Mode DISABLE [enable when using]
SHOOT 4
- Live View: DISABLE
- AF More LIVE [I don’t really use Live View, so it doesn’t affect me]
- GRID OFF
- Aspect 3:2
- Expo Simulation: Enable
- Silent LV shoot Mode 1
- Metering timer 16 seconds
AF 1
- Case 2, but depends on what I am shooting. I will probably use Case 4 or 6 when shooting field or court sports.
AF 2
- AI Servo 1st Image Priority: EQUAL
- AI Servo 2nd Image Priority: EQUAL
AF 3
- USM after One-Shot AF ON
- AF-Assist bean firing ON
- One Shot Focus Priority: FOCUS
AF4
- Lens drive when AF impossible ON
- Selectable AF Points ONLY CROSS-TYPE AF POINTS
- AF area Select Mode:
- I use spot AF if I am trying to focus through something like a cage or foreground object
- I use Single Spot for more accurate every day shooting
- I use expand AF area for general shooting and sports
- I do not use AF area surround, zone or auto.
- AF area selection method M-Fn
- Orientation linked AF: Same for horizontal and vertical
AF 5
- Manual AF point CONTINUOUS
- AF point display during focus: Selected Constant
- VF Display Illumination: ON
- AF Microadjustment: I highly recommend doing this with every lens and every camera you own.
Play 1 and Play 2 don’t really have shooting options
Play 3
- Highlight Alert ENABLE [this lets you know if you are blowing out whites on the review]
- AF Point Display ENABLE [red dot on focus point on image review on back LCD]
- Playback Grid OFF
- Histogram BRIGHTNESS
- Movie TIME CODE
- Magnification ACTUAL SIZE [one of my favorite features. Press zoom and instantly see your pic at 100% and see that it is in focus]
- CTRL over HDMI Disable [I wont use this as it is a video thing]
SET UP 1
- Rec Function STD
- File Numbering Continuous
- File Name _TC1 – I use _ because I use ADOBE RGB color space, the camera will put this anyway. I use TC1 for my initials and what camera number the file is coming from.
- AutoRotate ON [camera][computer]
SET UP 2
- AutoPower OFF 1 Minute
- LCD Brightness MANUAL
- Date/Time www.time.gov
- VF Grid DISABLE
SET UP 3
- Video NTSC
- info button display options: ELECTRONIC LEVEL
- Rate button RATING (and I only rate 1*, so one press is 1* and two presses is 0*)
SET UP 4
- Register your shooting modes
- Copyright info: I have my name and website here
- Current firmware
CFn 1
- Exposure 1/3
- ISO 1/3
- Bracketing auto cancel ON
- Bracketing sequence 0-+
- Number of bracketed shots 3
- Safety Shift DISABLE [again, I am a manual shooter and don’t really use it]
CFn 2
- Warnings in viewfinder NONE
- LV Shooting MASKED
- Dial Direction NORMAL
- Multifunction lock NONE
- Custom controls:
- Shutter button: METERING START [Back button focus will help you when you do have to focus and recompose or prefocus a shot.]
- AF ON: Metering and AF
- *: *
- DOF button: OFF
- Lens AF Stop: AF Stop
- MFn: *
- Set: ISO (BIGGEST gripe about this camera is I can’t make this set WB on the back screen. However, you can have the Q button remember to go to WB, so it is easier to set WB manually on this camera)
- Top wheel: shutter speed in manual
- Back wheel: aperture in manual
- Multifunction dial: AF point
CFn 3
- Add Cropping information OFF
- Default erase: Cancel
Ergonomics
From Chris Gampat
ISO 200")
The Canon 5D Mk III contains incremental upgrades on the inside with ergonomics additions and changes stylized after Canon’s 7D on the outside. But there are some things that stay very close to Canon’s past: such as the simplicity on the front of the camera with barely any buttons.
ISO 200")
At a quick glace, the 5D Mk III may not stand out much more from the 5D Mk II, but upon closer inspection you’ll see that it really does differentiate itself. The top mostly remains the same with some very basic additions.
At this point in the review, I should also mention that the finish on the camera is much different; and is also the reasons why there are so many scratches on the finish. The 5D Mk II’s finish wasn’t so prone to being damaged.
ISO 200")
The top LCD screen still displays all the important info you’ll ever need right where you need it. The buttons up here also once again serve multiple functions. The addition of the M FN button is nice because it allows more versatility in the autofocusing.
ISO 200")
As stated earlier on, the finish on the camera is also different and is easily scratched off. Some gaffers tape should fix that.
ISO 200")
The mode dial has the addition of a lock button: this is a design accent taken from the 60D that was very successful in real life use. This is also where the on/off switch has been moved to as opposed to down below near the bottom of the camera.
ISO 200")
The back of the camera has been completely redesigned with more emphasis on the Q button on the right in combination with the video/photo switch that worked so well with the 7D. The left has a bunch of new buttons, so if you’ll want to zoom in on your photo for example, you no longer need to use the buttons on the top right as one did with the 7D and 5D Mk II.
The LCD is big, bright and quite useful. But even so, I don’t consider a major advancement over the 5D Mk II’s.
ISO 200")
Canon decided to use a 100% viewfinder for the 5D Mk III. In my tests, it was indeed much better than the Mk II’s especially when using Rokinon’s manual focus lenses without AF confirmation. The only problem is that you can’t switch the focusing screens now.
ISO 200")
Canon’s 5D Mk III has some new ports for videographers. Like the Mk II, there is a microphone jack but now there is also a headphone jack.
Rejoice for the run and gun news shooter!
ISO 200")
The other big addition: the inclusion of an SD card slot. In my tests, I tested this with small JPEGs going to an Eye-Fi card and the RAWs going to my CF card. Unfortunately, because of all the metal in the 5D Mk III and the fact that the card goes in sideways as opposed to rightside up, the transmission was quite slow even with Eye-Fi Mobile; which I’ve found to generally be super fast on T-Mobile’s 4G speed and TimeWarner Cable Roadrunner’s connections in NYC.
From Thomas Campbell
The 5D Mark III is much more closely following the build and design of the 7D than the 5D mark II. For me, that is a welcome change. I always felt like the area where you placed your right thumb around the AF-ON button felt much better on the 7D than it did on the 5D Mark II. The rubber is also a different material than before and has a ‘grippier’ feel to it than the 5D mark II had.
The 5D Mark III moved the power switch from the bottom center of the back of the camera to the top panel on the left. This is a very welcome adjustment for me, because it makes it much easier to look in your camera bag and see if you accidentally left the camera on while packing them or before you zip up your bag. I’ve definitely been that guy that left my camera on and killed the battery during transport.
The buttons are laid out MUCH better than before. New to the button layout is the Q button for quick changes. When you press this, you can change almost anything affecting the image without having to go to the menu system. I shoot my white balance primarily in Kelvin and not the presets, and it was a huge pain to go into the menus to change the WB as you shoot. No longer with the Q button. When you press it, the menu that pops up remember the last thing you adjusted and leaves you there. So I just press set and I can change my WB. This will save me so much time. You can also change your shutter speed, aperture, ISO, exposure compensation, auto-exposure bracketing, flash exposure compensation, what type of file is written to each card, auto lighting optimizer, picture style type, drive mode and metering mode.
Right next to the Q button is the SET button, which I remap in custom controls to control my ISO. I have always hated having to change my ISO by looking up on the little screen on top. This is a much welcomed improvement.
There is a picture style button on the left that lets you chose if you are going to change your picture style, use multiple exposures or the new HDR in camera processing.
Finally, my two favorite new features: the RATE button and the ZOOM button. With the RATE button, I can instantly rate an image with one to five stars and that rating will be visible in Photo Mechanic or Lightroom. I shoot hard news on deadline, and being able to rate images quickly and easily helps so much when on deadline. Previously, you could protect images, which tags them in PhotoMechanic, however you had to go through the menus to do that on the 5D Mark II. The 1D-series had a dedicated protect button.
Autofocus
From Thomas Campbell
Here is the all-important thing that makes or breaks the camera. And quite frankly, the auto-focus is amazing. It is great for portraits, details and even sports.
From Chris Gampat
![]() For the most part, I need to really agree with Thomas on this one. Canon took the focusing from what seems to be the Canon 7D and applied it to the 5D Mk III with some changes. Indeed, this is what many of the company’s users were clamoring for.
For the most part, I need to really agree with Thomas on this one. Canon took the focusing from what seems to be the Canon 7D and applied it to the 5D Mk III with some changes. Indeed, this is what many of the company’s users were clamoring for.
In real life use, the AI Servo mode is much improved. The photo on the left was shot with the AI Servo mode on and by using a single focusing point to constantly hit Dave’s face. All the while, he was walking towards the camera and I was walking backward (a skill that I learned while being a paparazzo.)
The image is acceptably sharp; especially for a lens almost wide open.
Most users of this camera will be very pleased with the focusing on the 5D Mk III and in real life use it isn’t really that bad at all. My only concern comes with the placement of the focusing points.
For example, I really wished that the focusing points were placed towards the outer sections of the imaging area instead of all of them being near the center. Because of this, I often needed to move around a lot more when shooting with primes.
In my tests, the main points (not expanded) points of the 5D Mk II were almost as strong as those on the 5D Mk III. And in low light tests, the two lenses were pretty much neck in neck in terms of AF performance. The 5D Mk III doesn’t focus faster (that is based on your lenses) than the 5D Mk II at all, but it is indeed smarter and offers more points to be used. But for a portraitist like me, I really wanted the points to be spread out more amongst the frame.
Finally, the system also still works best when the focusing points are placed on contrasting areas. This was also the case with the 5D Mk II.
Metering
ISO 200")
In my short tests, the Canon 5D Mk III excelled and passed our Sunny 16 tests with flying colors. Photographers with traditional knowledge of metering will be pleased.
Ease of Use
ISO 320")
If you’re very used to Canon’s layout and ergonomics, the 5D Mk III will come as second nature to you. The stylistic decision to make it like the 7D also seems to have worked out well for most users. However, the 7D was also originally designed to be very Nikon-like in design. When I handed the camera off the some Nikon users, they were confused, especially by the new menu system which can surely be a bit intimidating at first.
Event Photography
ISO 3200")
For event photography, the 5D Mk III seems like a natural choice for many photographers looking to upgrade or wanting something new. The camera has more autofocus points though they are still around the center for the most part (which the 5D Mk II also had despite having significantly less AF points). During events, things can be moving along very quickly. So to take the most advantage of the new AF system, I really recommend fast focusing lenses with lighter elements like the 50mm f1.4 and 85mm f1.8; though my 35mm f1.4 still remains to be my mainstay lens. Additionally, the lenses can still misfocus due to camera system and the best and most accurate focusing still comes from the points being placed on places of contrast.
ISO 6400")
As I will get to sooner or later in the review as well, don’t sit there and think that you still won’t need a flash either. Canon’s speedlites and still deliver quite a bit of a different look that is valued amongst event and wedding clients.
If you’re going to spring for this camera, I would still recommend that you already have an investment in either speedlites or a monolight system.
Street Photography Candids
ISO 400")
One of my favorite ways to shoot street photography is by using my camera from the hip because of the totally different point of view that it gives you. For street photography candids, this camera can excel quite a bit not only due to the autofocus system, but also because of the fact that the high ISO results are so good that one can crank it up to 3200 ISO with little to no worry at all. This was my go to ISO setting with my 5D Mk II in lower lit situations or when I needed the speed, but this goes double for the 5D Mk III. Part of this has to do with just how versatile the files are.
ISO 400")
A lot of value must also be added to the fact that the camera is also extremely quiet and the metering works very well. For the absolute best results though, I still believe that Zeiss lenses are the kings of street photography due to their depth of field scale on the lens. The 25mm f2 is a perfect example.
Street Photography in the Rain
ISO 400")
Sometimes shooting in the rain can be a bit tough to do for various reasons. Precipitation falling from the sky can screw with your camera’s focusing (and I’ve seen it happen often) but your camera might not always be able to survive the torrential downpour. I used the 5D Mk III with the 50mm f1.4, which isn’t a weather sealed lens. The two still performed quite well together in the tough downpour that NYC has been experiencing this summer.
ISO 400")
This proved to me that it can surely survive the wear and tear that a street photographer would experience in the rain or that a wedding photographer/photojournalist might face during a heavy downpour.
Portraits
ISO 160") One of the places where the 5D Mk III excels is with portrait photography. Skin tones are often rendered very true to life: if anything I would say that they are exactly like Fujifilm 400H Pro film. And to be honest, that’s a reason to get excited. It seems that many cameras these days either lean towards Portra or other films. The sensor on the 5D Mk III though will be loved by lovers of that film.
One of the places where the 5D Mk III excels is with portrait photography. Skin tones are often rendered very true to life: if anything I would say that they are exactly like Fujifilm 400H Pro film. And to be honest, that’s a reason to get excited. It seems that many cameras these days either lean towards Portra or other films. The sensor on the 5D Mk III though will be loved by lovers of that film.
Like the 5D Mk II, it is still best to place the focusing point on an area of contrast, like an eye or something else like that. And with that said, you should use the focusing setup that allows you to really narrow down the middle of a specific focusing point.
It should also go without saying, but it also works best when you microadjust the lens that you’re using.
The 5D Mk III worked flawlessly with my Phottix Odin TTL triggers with my flashes being placed in a large softbox. Even better: the metering in high speed sync also worked much more predictably with the 5D Mk III than it would with the 5D Mk II. This made shooting much easier on both myself and a model.
If you’re doing action shots, it is also essential to say that the AI Servo tracking focus setting also works great for keeping a subject constantly in focus. If set to the right autofocus parameters, it can track a subject throughout the frame like the 7D did before it.
Once again though, you’ll need to keep the subject still around the center of the imaging area because those are where the focusing points are placed.
If you’re working with primes, keep all that in mind.
Image Quality
As stated before, the image quality from the 5D Mk III is really second to none. However, I really do have to add that I strongly do not recommend using the color profiles already added into the camera. Instead, make your own. I have three custom settings on my 5D Mk II that I use for different situations.
If anything, it could use a bit of a contrast boost with lower saturation if you’re shooting sports, but with portraits you may want to lower the contrast and add a tiny bit of a boost to the saturation.
The automatic white balance also seems to skew itself a bit toward the blue side of the spectrum; so also keep that in mind.
Raw File Versatility
![]()
The 5D Mk III raw files are extremely versatile and take editing like a champ. For the best results, I often used gradients in Adobe Lightroom 4. But beyond this, the files also have a ton of information in both the shadows and highlights; and it very easy to recover any lost details.
![]()
Or, you can embrace what the camera can do naturally by working with the laws of metering. As far as I go, not everything needs to look like an HDR.
High ISO Results
ISO 3200")
ISO 3200 is pretty clean, though I didn’t think it to be significantly cleaner than the 5D Mk II’s output. This continued onto ISO 6400.
ISO 25600")
ISO 25,600 is where I started to see lots of noise. Thankfully, when the raw files are coupled with the excellent processing in Adobe Lightroom 4, you can shoot at this ISO almost worry free.
Here are a couple more samples:
ISO 25600")
ISO 25600")
Extra Images
Here are more images from the 5D Mk III for your observance.
ISO 160")
ISO 160")
ISO 160")
ISO 160")
ISO 160")
![]()
![]()
ISO 400")
ISO 400")
ISO 400")
ISO 400")
ISO 6400")
ISO 6400")
ISO 6400")
ISO 6400")
ISO 3200")
ISO 3200")
ISO 800")
ISO 800")
Videography
From Thursten Kent
The video above is from our Switronix Torch light review; which was all shot on the 5D Mk III.
The 5D Mk III is an improvement over the Mk II in video. Let’s look at some of the nice things that I wanted to briefly touch on:
For the first time ever on a budget-friendly full frame Canon DSLR, you have a headphone jack to monitor the sound of the on-board mic, or if you are using an external mic like the Rode Video Mic Pro. This is a nice feature. Heck, you even have the ability to monitor it on screen while recording.
However, I think most of us who make movies with this camera prefer to do things the only real way you can and that involves manually recording a separate audio track with an audio recorder that will give you much better audio than the 5D Mk III can make on it’s own. This way you just sync up and swap out the on-camera audio with the better sounding version.
Time code has been added. It will make it easier to sync up multiple camera shots in post. This was an option that was asked from video makers with the Mk III.
Now, the biggest thing is the 2 types of compression methods used in the Mk III. You can use IPB, or ALL-I. Both of these methods will both use the H264 codec found on all Canon DLSRs. But the compression scheme is different. Now, without getting into exhaustive detail about the codecs let’s just try and simply the explanation: IPB is kind of a like Long-GOP format. So, in theory is it’s more compressed than the ALL-I or “Intra-Coded Frame” scheme. The files sizes are from what I’ve seen 3x larger than the standard IPB format. To access the menu for selecting frame rates and recording types head to the movie recording size menu.
Did I see a real difference between the 2two? Not really. Regardless of which method I chose to use, I still transcoded the footage in 5dtoRGB Batch to get the highest quality transcode to ProRes.
The one thing I did notice, was that in video mode, the imagery looked at least one stop cleaner than that of the Mark II.
Canon has some incredibly stiff competition with the rise of affordable interchangeable lens purpose built cameras. The Black Magic Cinema camera surprised the whole entire world to offer RAW capture without the RED price tag. It’s still cheaper than the 5D.
A rumor is floating around that Sony has an A99. A camera that the engineers asked and listened to real-deal filmmakers purpose built for film-makers. The price is suppose to right as well. But, this one for now is speculation.
A lot of us Canon fans (including myself) are still a little sore when the 1DC and C300/C500 were announced. The 5D Mk III was kind of a let down. We wanted more. I’m hoping somewhere in a very quiet and busy lab, Canon’s top engineer’s are figuring out a way to design a C100 without cannibalizing on the C300. Which to most people is still out of the budget of the commoner.
The way I see it, Canon is a little out of touch right now for what it’s Indie/Budget customers want. We are telling you what we want.
Just listen!
Vs the 5D Mk II?
We did two different tests in terms of image quality:
– In our high ISO test, most people couldn’t tell the differences at ISO 6400
– It was also tough for people to tell the difference at lower ISO settings.
In terms of ergonomics, I want to say that the 5D Mk III feels much more business-like than the 5D Mk II’s more elegant and simplistic feeling. As far as I go, there isn’t enough for me to make me want to upgrade; though Thomas has done so already and Thursten is waiting for the Black Magic Cinema Camera.
Don’t get me wrong: the quieter shutter, faster fps, more AF points (though not in the areas I want) and the better options for videography make this a very tempting option. But I’m not sure that I would want to take that plunge when there is absolutely nothing wrong with the 5D Mk II as it is except for some focusing issues.
Conclusions
In the end, I really did love the 5D Mk III. Throughout the review period, I periodically went back to my 5D Mk II and put it against similar situations that the Mk III was put against. In most situations, it matched the Mk III. As I am now finishing this review, my Mk II is now having terrible focusing issues. I’m wondering whether or not it is because my lenses have been on the 5D Mk III loaner unit, then to the Rebel T4i loaner unit I have right now, and Thursten Kent’s camera. I’m not exactly sure what’s going on right now. After cleaning the contacts with Isopropyl Alcohol, the problem has seemed to disappear a bit, but I’m going to do more investigation into the matter.
In terms of image quality, the 5D Mk III is excellent, but I see no reason to upgrade over the 5D Mk II. If anything, you’ll upgrade for the better ergonomics. Even that’s a vague statement as I prefer the 5D Mk II’s simpler and cleaner feel.
The 5D Mk III gets our highest recommendations; but we do not rule out the 5D Mk II just yet.
Please Support The Phoblographer
We love to bring you guys the latest and greatest news and gear related stuff. However, we can’t keep doing that unless we have your continued support. If you would like to purchase any of the items mentioned, please do so by clicking our links first and then purchasing the items as we then get a small portion of the sale to help run the website.
Get rid of the ads!
Did you enjoy reading this article as much as we enjoyed writing it? There's a way to support us and our reporting, getting ad-free navigation and more as a bonus. Subscribe to us for less than a coffee per month —just $3.99— or take advantage of our yearly subscription with a hefty discount for only $25.- An ad-free experience
- A free mystery box for Lightroom or Capture One
- All the books in our store
- 20% discount on Capture One
- 30% discount on Imalume Photo Theft Protection
- 20% off Herbs and Kettle Tea Company.
- 20% off your order from MPIX printing services.
- 5% off Viltrox Products via their eCommerce store.
- 10% off all film developing, printing and scanning services from Blue Moon Camera and Machine
- 15% off 7Artisans products: The lens and accessory maker is offering a sweet discount for Phoblographer's readers.