

Have you ever had the urge to take gallons of colored paint and throw them at inanimate objects? If so, then you are in good company because I would love to do that too. Since defacing national monuments or other ancient forest artifacts is frowned upon, I decided to use flashlights instead. Amazingly, the results are pretty good when carefully done.
But before you go out and get yourself arrested for destruction of public treasures, read this and find a way to satisfy that inner child with a box of virtual crayolas and not have to clean up when you are done. Interested?
You can go out any night and experiment with your dad’s Ray-O-Vac, but you won’t be happy because like everything else these days, there are special tools for specific applications and the way to get great results is to find the tool that fits the bill.
The colors on the concrete panels took several hours because I had to hand “paint” each panel and for different amounts of time using The Rosco Lux Swatchbook Gels. With a 10 minute exposure at ISO 100 F6.7 I had to run from panel to panel and stay out of the frame while “flashing” since one small mistake ruins the exposure. I do everything in camera except flattening of multiple images for star trails.
The Perfect Flashlight
Before I reveal the absolute perfect tools for this activity, lets narrow down what we want in great flashlight:
- Light weight
- Bright, sharply focused beam
- Choice of lighting temperatures (incandescent or daylight)
- Long life, inexpensive batteries (preferably rechargeable)
- Waterproof (very important)
- Plastic, not metal
- Momentary touch trigger for precise timing
- Belt clip or belt sheath
- Low priced
There’s probably more things to consider but this is a good list to start and I will tell you up front that on one flashlight is all of this in one package but with just two flashlights, you can be very well covered.
My favorite all-around flashlight is the SureFire Nitrolon Tactical Incandescent Flashlight which is the closest any flashlight has ever come to being perfect. You should also get the daylight version which is the Surefire G2-LED Nitrolon Tactical Flashlight. It’s pretty powerful at 80 lumens, runs 2 hours on just two inexpensive CR123 batteries and throws a clean, powerful beam. The reason I particularly like these models is because they are designed to go on the barrels of high powered weapons. There isn’t a lot of room for failure in that application, so you get a solid, light powerful flashlight in a tiny package.
In the story’s lead image above, I made seven 15 minute exposures at F6.7 at ISO 1o0.
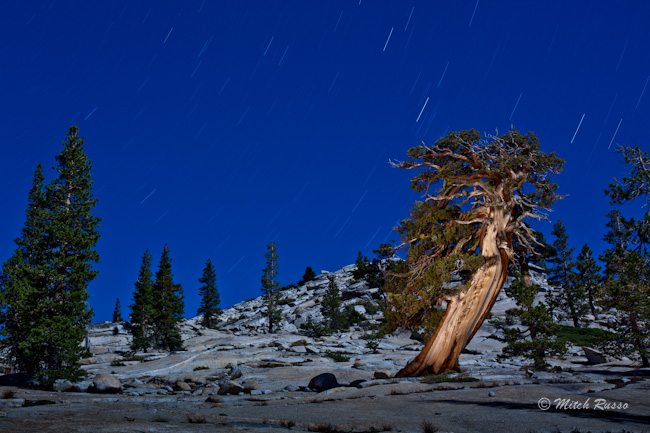
In the this image, I painted the interior of the tree with the incandescent version of my Surefire flashlight which took just a few minutes, then I turned off the flashlight and let the star trails accumulate. Using an Intervalometer which can be programmed for may different exposure combinations, I set up my Canon 5D MkII to fire off 7 consecutive exposures, one second apart. Because I had 15 minutes for each exposure, I had time to watch a few episodes Battlestar Galactica on my iPhone. I specifically used the Incandescent flashlight here because the color of the light best matched the tree interior.
The one other flashlight that’s essential to have when you are out at night; a dim red light to see the settings on your equipment. If you use one of your SureFire’s for that, you will ruin your night vision. I highly recommend the Gerber Recon which has the ability to switch colors, where mine is set to RED all the time. It also has a clip which I place on my camera strap or belt loop. At night, you want to know where everything you need is located for easy reach.
Techniques for Light Painting
Light paining is very personal and pre-visualizing your image is essential. The image below was just a rock in a small pool of water. During the day, you would have easily missed this. Yet at night and with a little help from your flashlights, it comes to life.
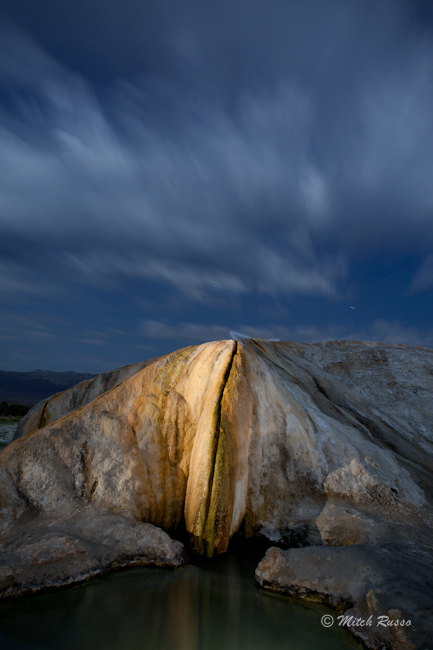
When I first approached this location, I saw the beautiful tones in the stone and watched as the sky developed a beautiful night cloud formation. The pool in front of the stone was dead black. Step one was to side light the “crack” from the left, step two would be the edges of the pool. Finally, I wanted the pool to be luminous so I held my breath and submerged my SureFire directly into the water and made six circular sweeps. This exposure took 3 hours because I had pre-visualized exactly what I wanted and I wouldn’t settle for less. Each successive attempt brought me closer to nirvana and finally, it appeared exactly as I had seen it.
This exposure was 10 minutes at F6.7 which gave me time to “cook up” this image with all the steps required to get it right. The SureFire flashlights were essential and without them I couldn’t have made this image. There is no editing, it’s straight out of the camera.
Before you go out for your own light painting adventure, make sure you have good heavy clothing, great flashlights, a fully charged iPhone and lots of coffee.
Do you have any tips of your own for successful light painting? Let us know in the comments below.
Please Support the Phoblographer
We love to bring you guys the latest and greatest news and gear related stuff. However, we can’t keep doing that unless we have your continued support. If you would like to purchase any of the items mentioned, please do so by clicking our link and then purchasing the items as we then get a small portion of the sale to help run the website.
Get rid of the ads!
Did you enjoy reading this article as much as we enjoyed writing it? There's a way to support us and our reporting, getting ad-free navigation and more as a bonus. Subscribe to us for less than a coffee per month —just $3.99— or take advantage of our yearly subscription with a hefty discount for only $25.- An ad-free experience
- A free mystery box for Lightroom or Capture One
- All the books in our store
- 20% discount on Capture One
- 30% discount on Imalume Photo Theft Protection
- 20% off Herbs and Kettle Tea Company.
- 20% off your order from MPIX printing services.
- 5% off Viltrox Products via their eCommerce store.
- 10% off all film developing, printing and scanning services from Blue Moon Camera and Machine
- 15% off 7Artisans products: The lens and accessory maker is offering a sweet discount for Phoblographer's readers.