
Last Updated on 07/21/2020 by Chris Gampat
Just because the sun goes down and the sky turns dark, it doesn’t mean you can’t go out and shoot street photography.
Shooting street photography at night is great fun. Sadly, many shooters (especially newbies) are put off by the fact that they won’t have natural light to illuminate their scenes. Although shooting conditions are different at night, you can still create quality street photographs. Actually, shooting in the dark of the night encourages you to be more creative. As a result, you can get more compelling images. Of course, there are some techniques and approaches to be familiar with to execute street photography at night well. In this piece, we’re going to go over them, getting you ready to shoot when the sun goes down.
Pump Up That ISO for Night Street Photography

Shooting street photography at night isn’t rocket science. Sadly, the biggest barriers tend to be the reluctance of photographers to use the tools they have. “If I raise my ISO my pictures will be grainy.” Eye roll. It’s not clear when the “anti-grain” movement began, maybe it was when the digital camera hit the mainstream? But whenever it was, it was the worst movement and it needs to stop. Do you think the likes of Henri Cartier-Bresson worried about some grain in his images? Does anyone look at his masterpieces and think, “If only there were a little less grain?” The answer to both is no.

It’s not clear when the “anti-grain” movement began, maybe it was when the digital camera hit the mainstream?
Maybe grain matters in the world of commercial photography, where the suits at the top want their pretty little marketing campaigns, but grain should never be a concern in street photography. Grain can be aesthetically pleasing when you allow your mind to accept it. It can make raw, dark, candid street photography look even edgier. Most importantly, it allows your sensor to be more sensitive to the available light: something that’s crucial when you’re not going to have much to play with.
Slow Down Your Shutterspeed

“But, my images will be blurry.” Again, eye roll – you are precious, aren’t you? The slower the shutter speed, the more light passes through and hits your sensor. Again, this is very important when shooting in low light environments. And that motion blur, which many street photographers fear, can offer depth and character to a photograph. It can make an otherwise mundane scene compelling and more attractive.
Street photography is one of the most creatively freeing genres. Anyone serious about the craft knows it goes way beyond sharp, perfect, pretty pictures. So use that freedom, and more so, enjoy it. A little blur isn’t going to damage your street cred.
Shoot Street Photography Wide Open

A common “rule” in street photography is to shoot at an aperture of around f8 – f16. The reason for this is that it keeps your scene sharp from edge to edge, giving it more depth and story. Well, rules are meant to be broken, and shooting at night is the best time to do it.
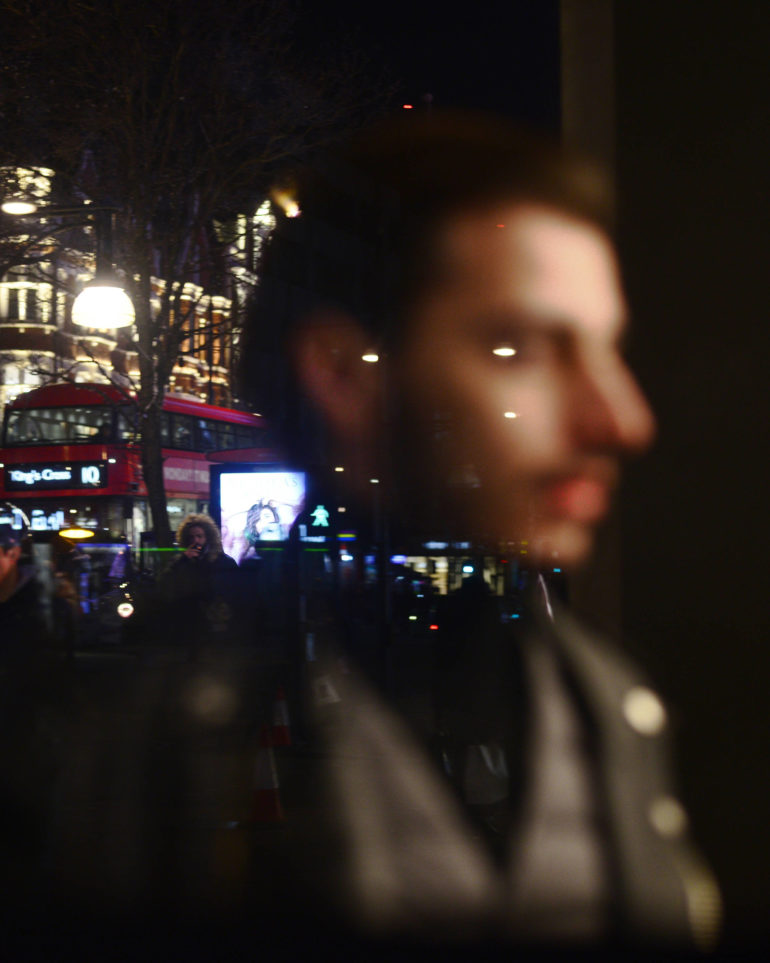
I regularly shoot street photography with a wide-open aperture. My 50mm lens opens up to f1.8 and is lovely for isolating subjects from the rest of the hustle and bustle on the streets. Isolating a subject highlights the importance of their role in the image. It also gives the image more creative flair, especially if you have light in the background or foreground that becomes bokehtastic.
But remember, shooting wide open isn’t just about isolating your subject. You can still keep your scene pretty sharp even with a wide aperture. If you want to avoid a blurry, out of focus background and/or foreground, stand further back from the scene you are shooting. Ensure there’s nothing between you and your subject: otherwise, this will create an out of focus element in the foreground of your image. The same is true with the background. By doing this, you can have a relatively sharp image while still bringing in more light with a wide aperture.
Stand on the High Street
The high street, with all its consumerism and generic brands, can be a sad place to stand. But at night, it offers something very important: light – and plenty of it!
The huge branding and storefronts are brightly lit to attract customers. So the good news is, not only do you get an illuminated scene, but you get plenty of footfall as well! Stand with your back against any department store and just observe. People walking through a rotating door may not sound interesting, because let’s be honest, it isn’t. However, if you take your time and use some of the techniques above, you may create an interesting image.
I shot the above image standing in front of a huge department store with a wide-open aperture. The main subject is out of focus, but the image still works and is interesting. Remember, as said above, you’re in a genre of photography where you’re encouraged to break the rules!
The beauty of many of these stores is that they use a range of colorful lighting. So vibrant colors like reds, purples, and blues can give your image a better aesthetic when compared to standard light.
Should You Use Flash?
We can’t talk about shooting street photography at night without mentioning flash. It’s naturally the go-to solution for illuminating a scene that may otherwise be dark. Personally speaking, my use of flash depends on the environment. For example, if the scene is too dark and has no available light, I won’t use a flash. That may sound like the best time to use it, but here’s why I don’t. The burst of the flash in near to total darkness would be too invasive and may shock or scare someone on the street. I don’t want that kind of confrontation and would suggest you don’t want it either. Yes, as street photographers, we push boundaries. We do, however, also need to respect those who walk the streets and allow us to do what we do.
In a more well-lit environment, the flash won’t be as overpowering. If you don’t stand right in front of your subject, it won’t be as shocking and dazzling either. You can use flash to your creative advantage too.
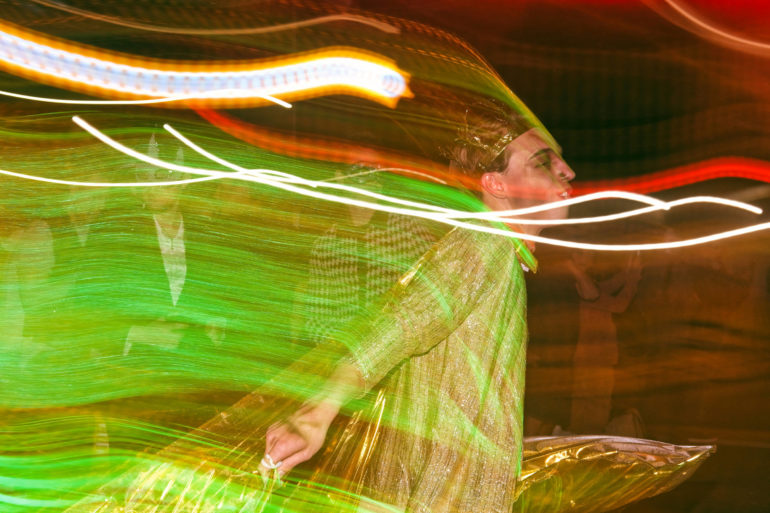
As you can see from the image above, two things are happening. First, my subject is nice and sharp. Second, the light around them is blurry and in motion. It was my flashgun that allowed me to execute this look.
I used a shutter speed of 1/4th of a second, which, in most cases, is going to result in lots of motion blur. However, by using the flashgun, it freezes my subject, keeping them sharp. How did I create the light trails? After hitting the shutter button, I dragged my camera to the left. My flash had already frozen my subject, and the movement dragged the lights. Try for yourself; you will have lots of fun using this technique.
Go Out and Enjoy

Shooting at night is rewarding. There are no reasons why you should see it as an obstacle to creating good street photography. Of course, be mindful of your environment and ensure you are safe. Be streetwise; if you stay in populated areas, you will be fine. Use the knowledge provided above, get over any issues you have with blur and grain, and have plenty of fun.
Get rid of the ads!
Did you enjoy reading this article as much as we enjoyed writing it? There's a way to support us and our reporting, getting ad-free navigation and more as a bonus. Subscribe to us for less than a coffee per month —just $3.99— or take advantage of our yearly subscription with a hefty discount for only $25.- An ad-free experience
- A free mystery box for Lightroom or Capture One
- All the books in our store
- 20% discount on Capture One
- 30% discount on Imalume Photo Theft Protection
- 20% off Herbs and Kettle Tea Company.
- 20% off your order from MPIX printing services.
- 5% off Viltrox Products via their eCommerce store.
- 10% off all film developing, printing and scanning services from Blue Moon Camera and Machine
- 15% off 7Artisans products: The lens and accessory maker is offering a sweet discount for Phoblographer's readers.