
Wondering how you can get great results using solid ND filters? Here’s a photography cheat sheet you can use as a reference for your next practice!
Lens filters are among the most useful tools you can turn to when you want to control the light or achieve specific effects in-camera, especially for shooting landscape photos. Neutral Density (ND) filters, in particular, are important for shooting situations that require very wide aperture or long shutter speed settings, as they decrease the amount of light that hits the camera sensor without affecting the colors. In a separate photography cheat sheet, we saw how ND filters come in different stops, and how much light each stop reduces. Today’s featured photography cheat sheet puts the knowledge to work with some tips for getting perfect exposures with a solid ND filter.
In the cheat sheet below by Digital Camera World, we are shown how to shoot with two kinds of solid ND filters: Standard ND filters, which reduces the light intensity by two or three stops, and Strong ND filters, which, as their names suggest, reduces the amount even more. Both have their pros and cons, and you might find that your scene requires one over the other.
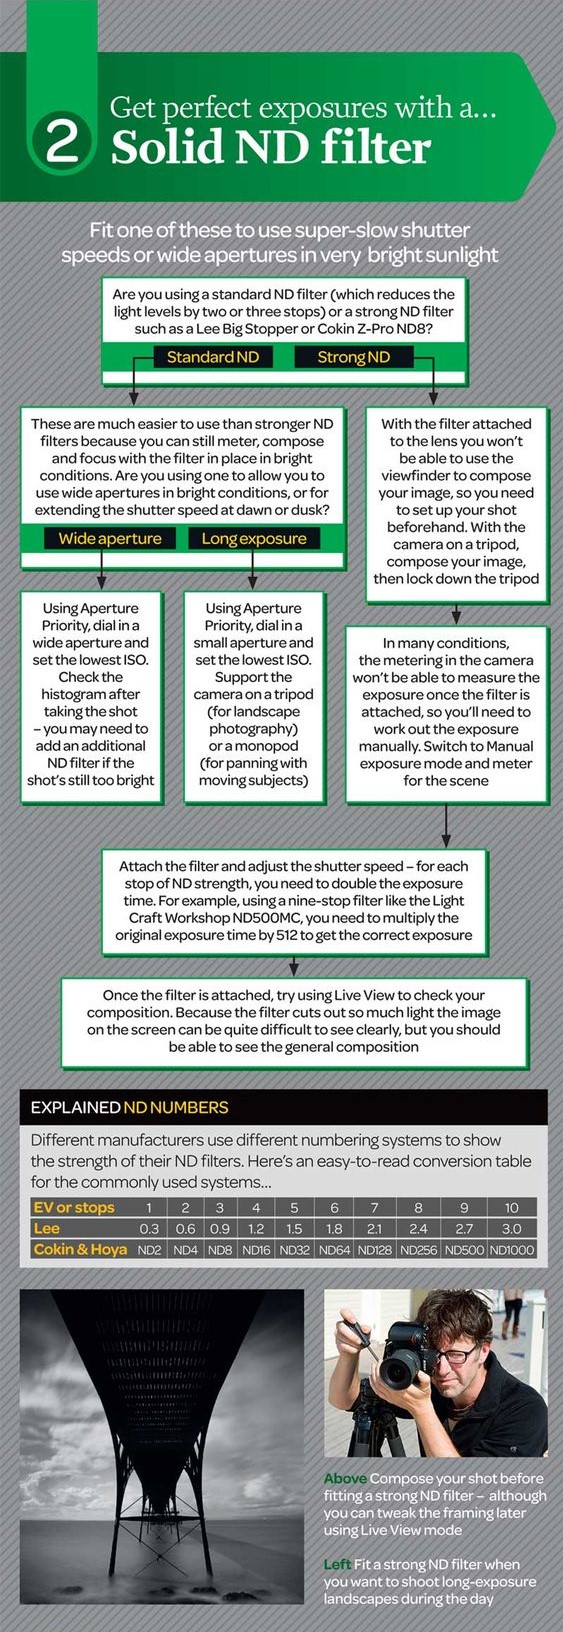
Standard ND filters, as mentioned in the guide, are easier to use because they still allow you to meter, compose, and focus in bright light even when they’re attached to your camera. You can use them for shooting in wide apertures during bright conditions, or for extending the shutter speed during the Golden Hour. For the former, shoot in Aperture Priority Mode, set a wide aperture, and set the lowest ISO. Take a test shot and check the histogram after, and see if you need to stack another ND filter if the shot is still too bright. For the latter, shoot in Aperture Priority and set the lowest ISO as well, but use a small aperture. Prop your camera on a tripod if you’re shooting landscape photos, or a monopod if you’re panning along with moving subjects.
Strong ND filters, meanwhile, won’t allow you to use the viewfinder to compose your shots when they’re attached on your camera. Instead, you have to set up your composition beforehand, your camera attached to a tripod. You’d also need to shoot to Manual exposure mode and meter the scene, as the camera also won’t be able to measure the exposure with the filter on. Double the exposure time (shutter speed) for each stop of ND filter strength. Since the filter cuts out much of the light, it may be a bit of a challenge to check through the Live View, but it’s still possible to see the general composition before you take your shot.
Need more photography tips and tricks like this for your next shoot or ongoing project? Don’t forget to browse through our photography cheat sheet collection!
Get rid of the ads!
Did you enjoy reading this article as much as we enjoyed writing it? There's a way to support us and our reporting, getting ad-free navigation and more as a bonus. Subscribe to us for less than a coffee per month —just $3.99— or take advantage of our yearly subscription with a hefty discount for only $25.- An ad-free experience
- A free mystery box for Lightroom or Capture One
- All the books in our store
- 20% discount on Capture One
- 30% discount on Imalume Photo Theft Protection
- 20% off Herbs and Kettle Tea Company.
- 20% off your order from MPIX printing services.
- 5% off Viltrox Products via their eCommerce store.
- 10% off all film developing, printing and scanning services from Blue Moon Camera and Machine
- 15% off 7Artisans products: The lens and accessory maker is offering a sweet discount for Phoblographer's readers.