
Still wondering how neutral density filters work and which one to choose for your next shoot? Let today’s photography cheat sheet serve as your handy guide.
If you’re just getting into landscape photography, among the tools of the trade that you must have heard about are neutral density filters (ND filters). These lens filters are particularly essential to landscape photography — or any shooting situation that requires a very wide aperture or long shutter speed — because they decrease the amount of light that hits the camera’s sensor. Today’s featured photography cheat sheet will introduce you to ND filters and what they do for your shots.
The handy photography cheat sheet was put together by Esmer Olvera, and shared by Loaded Landscapes as part of their intro to filters for the landscape photographer. There, they explain how three of the most common filters prove useful to those who want to achieve their desired exposure in-camera instead of fiddling with filter-like effects in post-production.
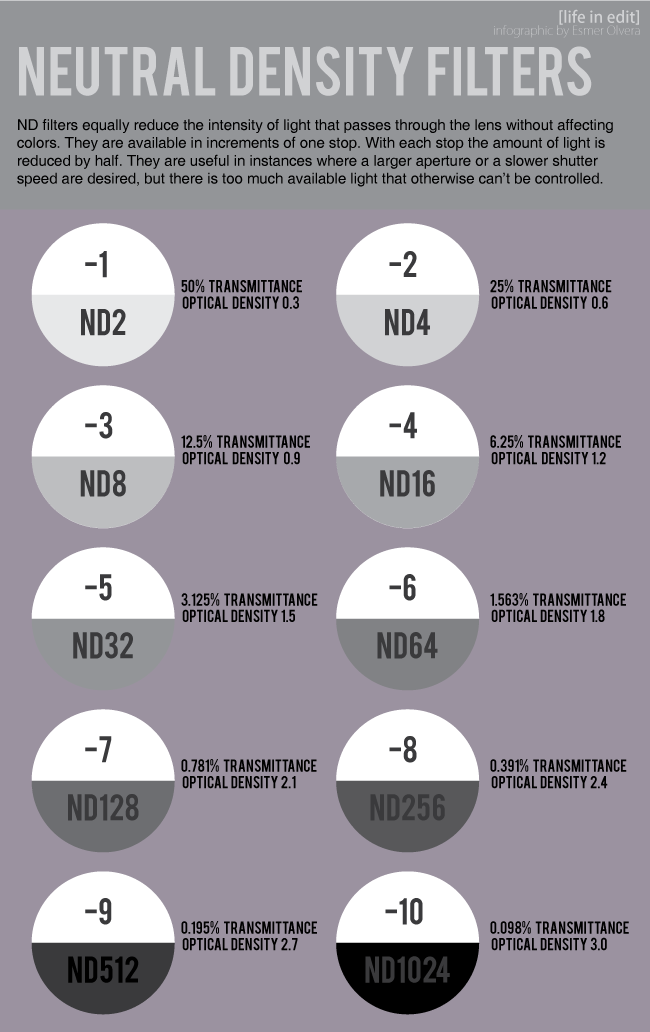
According to Olvera, ND filters do not affect the colors even if they reduce the intensity of light that passes through the lens. They come in one-stop increments, with each stop reducing the amount of light by half. These filters allow landscape photographers to use larger apertures or slower/longer shutter speeds in situations that would typically overexpose the shots.
In the chart above, the filters are labeled according to strengths, as well as the corresponding light transmittance and optical density. So, when you want to decrease the exposure by one stop, use the ND2 filter. A typical scenario for balancing out the exposure this way is to avoid overexposing the entire image when shooting with a wide aperture. However, if you want to darken the skies only, you may want to use a Graduated neutral density filter instead. Essentially, it works the same as ND filters, but it only darkens half of the frame. This way, the exposure for the sky and above the horizon is decreased, but the exposure below the horizon all the way to the foreground is retained. More about that here.
When shooting long exposures, Marc Newton of The School of Photography tells us that only the shutter speed changes when using these filters. By using a 1-stop ND filter and halving the amount of light, we need to double the amount of time we expose our image. So, if you have a 1-second exposure without an ND filter, you’ll need to adjust your shutter speed to 2 seconds when using a 1-stop filter. If you tally all the stops up to 10, you’ll see that they correspond to the ND numbers indicated in the chart above.
To make things more confusing, manufacturers often use different numbers to indicate the stops of their ND filters. They may either indicate the optical density or ND factor. In the cheat sheet above, the top half of the circles indicate the number of stops, while the lower half indicates the ND factor. You can refer to these numbers when researching ND filters to purchase.
Lastly, how do you know how many stops to decrease, and consequently, what ND filter to use? An ND Filter exposure calculator app will come in handy for this!
Need more useful photography tips and tricks like these? Don’t forget to check out our collection of photography cheat sheets so far!
Get rid of the ads!
Did you enjoy reading this article as much as we enjoyed writing it? There's a way to support us and our reporting, getting ad-free navigation and more as a bonus. Subscribe to us for less than a coffee per month —just $3.99— or take advantage of our yearly subscription with a hefty discount for only $25.- An ad-free experience
- A free mystery box for Lightroom or Capture One
- All the books in our store
- 20% discount on Capture One
- 30% discount on Imalume Photo Theft Protection
- 20% off Herbs and Kettle Tea Company.
- 20% off your order from MPIX printing services.
- 5% off Viltrox Products via their eCommerce store.
- 10% off all film developing, printing and scanning services from Blue Moon Camera and Machine
- 15% off 7Artisans products: The lens and accessory maker is offering a sweet discount for Phoblographer's readers.