
Last Updated on 10/25/2019 by Mark Beckenbach
Ever wondered how to achieve the milky or frozen water effects for landscape photography? We have just the right photography cheat sheet for you!
One of the tried and tested techniques for eye-catching landscape snaps is to blur the motion of flowing water. It creates a dreamy and sometimes painterly look and imparts a serene and calming mood to your landscape photos. If you’ve ever wondered how it’s done, today’s photography cheat sheet from Digital Camera World will show how to either freeze or blur the movement of water for your landscape shots.
The photography cheat sheet below is part of Digital Camera World’s series of flowcharts for various landscape photography tips and tricks. This one works in conjunction with the flowchart for getting spot-on exposures when shooting landscapes, so pull that one up as well. Make sure you also have your tripod and, if possible, ND filters at the ready.
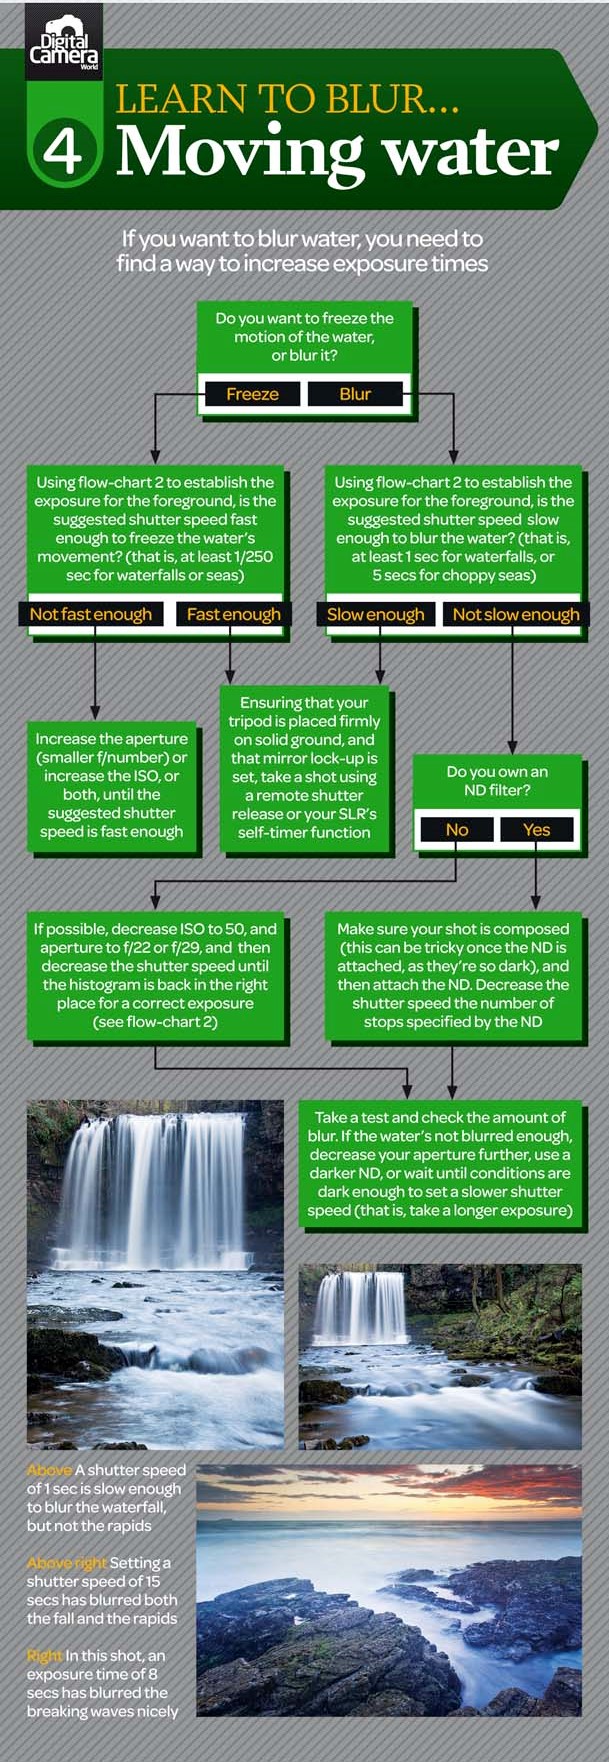
The flowchart begins by letting you decide whether you want to freeze or blur the motion of water in your shot. First, let’s go for the latter. Using the flow chart for exposure, expose for the foreground and check if the suggested shutter speed is slow enough to blur the water (at least 1 sec for waterfalls or 5 secs for choppy seas). If it’s slow enough, make sure that your tripod is set firmly on the ground, set up the mirror lock-up if you haven’t yet, and take a shot using a remote shutter release or your camera’s self-timer function.
If shutter speed isn’t slow enough, it’s time to use an ND filter. First, compose your shot before attaching the ND filter: it can be tricky to do because what you see from the viewfinder tends to be very dark. Once it’s attached, decrease your shutter speed by the number of stops indicated by the ND filter. Don’t have an ND filter? Set your ISO to 50 and the aperture to f22 or f29 if possible, and decrease the shutter speed until the histogram shows the correct exposure, based on tips from the exposure flowchart. Take a test shot and check if the water is blurred enough. If not, you can increase your aperture, use a darker ND filter, or wait until the scene is dark enough for you to take a longer exposure.
What if you want to freeze the movement of the water instead? Simply set the exposure for the foreground following the exposure flowchart, then check if the shutter speed is fast enough — at least 1/250 sec for waterfalls or the sea. If it’s not, switch to a larger aperture/smaller f-number or increase the ISO (or both) until the shutter speed is fast enough.
Need more photography tips and tricks like this? Don’t forget to check out the rest of our photography cheat sheets so far!
Get rid of the ads!
Did you enjoy reading this article as much as we enjoyed writing it? There's a way to support us and our reporting, getting ad-free navigation and more as a bonus. Subscribe to us for less than a coffee per month —just $3.99— or take advantage of our yearly subscription with a hefty discount for only $25.- An ad-free experience
- A free mystery box for Lightroom or Capture One
- All the books in our store
- 20% discount on Capture One
- 30% discount on Imalume Photo Theft Protection
- 20% off Herbs and Kettle Tea Company.
- 20% off your order from MPIX printing services.
- 5% off Viltrox Products via their eCommerce store.
- 10% off all film developing, printing and scanning services from Blue Moon Camera and Machine
- 15% off 7Artisans products: The lens and accessory maker is offering a sweet discount for Phoblographer's readers.