")
Last Updated on 11/20/2019 by Brett Day
The Flashpoint XPLOR 400 Pro TTL may be the only monolight most photographers will ever need.
A few years ago, Flashpoint released the original XPLOR 600 TTL rechargeable monolight, and it quickly became a firm favorite with many photographers thanks to its incredible power, great battery life, and its relatively low price. Recently, Flashpoint released the XPLOR 600 Pro TTL, which updated the older model and promised to offer better build quality, more features, and better overall performance. In addition, they also added the XPLOR 400 Pro TTL to their line-up as well. The XPLOR 400 Pro TTL is a smaller rechargeable monolight that promises big things from a smaller, less expensive package than the XPLOR 600. Let’s Find out if that’s the case.
The Flashpoint XPLOR 400 Pro TTL sits right in-between the eVOLV 200 and the XPLOR 600 Pro in terms of power output and in theory it should give photographers a great rechargeable monolight option that’s suitable for both indoor and outdoor use. Flashpoint is Adorama’s in house brand of lighting, with Godox actually being the manufacturer. The XPLOR 400 Pro is the same as the Godox branded AD400 Pro Witstro; the only difference is that with the Flashpoint version, any warranty concerns are dealt with in the US and not overseas. Let’s take a look at the pros and cons.
Pros and Cons
Pros
- Easy to use
- Built-in TTL
- Can be used with Fujifilm, Canon, Nikon, Sony, Olympus, and Panasonic with the correct radio transmitter
- Excellent build quality
- Great battery life
- Ultra-fast recycle times
- Quality, consistent lighting
- Big, bright, easy to read LCD display
- Can work with multiple modifier types
Cons
- When the Bowens adapter is attached, the fastener for the light stand mount almost doesn’t have enough clearance to loosen and tighten the mount.
- The included beauty dish comes pre-installed with a Godox mount adapter, and it takes tremendous force to remove the mount and reveal the Bowens mount.
- Replacement Flash tubes are pricey.
Gear Used
We tested the Flashpoint XPLOR 400 Pro TTL Monolight with the Fujifilm X-T3, The Flashpoint XProF TTL R2 transmitter, the Fujifilm 56mm f1.2, the Fujifilm 55-200mm f3.5-4.8, and 30-inch octa box.
Tech Specs
All technical specifications for the XPLOR 400 Pro TTL have been taken from the official Adorama listing.
Model
Flashpoint ModelXPLOR 400Pro TTL
Power
400WsGuide No. (m ISO 100)236ft / 72m ISO100 – with standard reflector
Compatible Cameras w/R2 Wireless Radio:
Canon, Nikon, Sony, Olympus, Panasonic, and Fujifilm
Flash Mode
Wireless off: M/Multi, Slave Unit of R2 radio transmission: TTL/M/Multi
Flash Duration
1/240 to 1/12820 seconds
Power Output
9 Stops: 1/256~1/1Stroboscopic FlashUp to 100 times, 100Hz
Flash exposure Compensation (FEC)
Manual. Adjustable ±3 stops in 1/3 stop increments.
Sync Modes
High-Speed Sync (up to 1/8000 second), First-Curtain Sync, and Second-Curtain Sync
Delay Flash Feature
0.01~30 seconds
Color Temperature
5600°± 200°K
Stable Color Mode
5600°±75°K Throughout
Mask Feature
Yes
Fan
Yes
Audio Beeper
Yes
Modeling Lamp (LED)
30W / 4800°K / TLIC 93
Optical Slave Sensor
S1 Standard /S2 Smart
Direct Sync Trigger
3.5mm Sync Cord
Flash Duration Indication
Yes
Display
Dot-matrix LCD Panel
Wireless Flash Function
Slave, off
Controllable Slave Groups
5 (A, B, C, D, and E)
Reception Range (approx.)
328ft / 100m
Channels
32 (1~32)
Wireless ID
99
Power Supply
Lithium Battery pack (21.6v/2600mAh)
Full power flashes
390
Recycle time
Approximately 0.01-1.0s
Battery indicator
Yes
Power indication
Power off automatically after approximately 30~120 minutes of idle operation. User-selectable in Custom Functions.
Dimensions (with battery)
8.6×4.0x5.0in / 220x102x128mm (sans flash tube & reflector)
Net Weight (with battery)
4.6lb / 2.1kg
Ergonomics
The Flashpoint XPLOR 400 Pro TTL is a relatively small monolight that is very easy to handle. With dimensions of 8.6-inches x 4-inches x 5 inches, the monolight is easy to carry around and doesn’t take up much space. The XPLOR 400 also comes with a nicely padded carrying case that makes it very easy to keep the unit protected and to keep all of the accessories together. There is a removable handle on the bottom rear of the device. I left it on, though, as it does make carrying around the 4.6lb monolight easier when it’s not stored in its case.
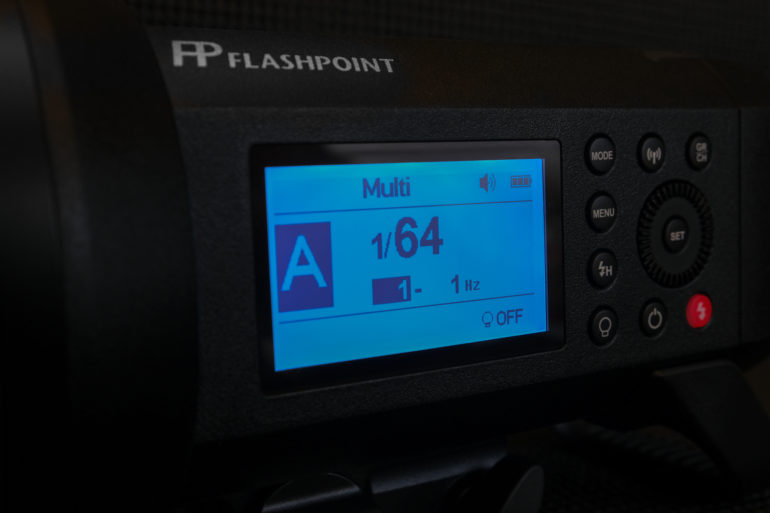
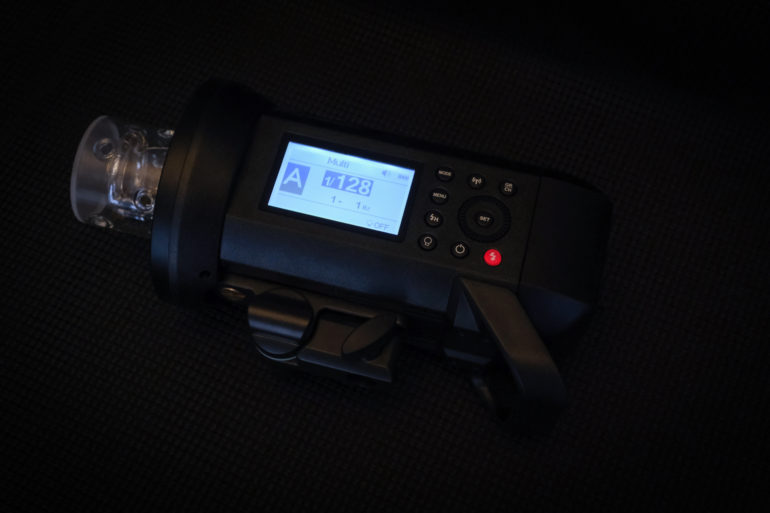
One side of the XPLOR 400 Pro TTL is dominated by a large, brightly lit LCD that makes it easy to see what your settings are at a glance. You’ll also find the nine main control buttons as well as a scroll wheel that is used to navigate the menu system located here. All of the controls are easy to see and are easy to use. You won’t need a step stool when the back of the unit is pointed up to see what’s going on like you have to do with lights where the LCD is mounted on the back.
The physical controls include group and channel settings, wireless mode, mode settings, the menu button, High-Speed Sync, modeling lamp, the power button, and the flash recycle and test switch. Inside the scroll wheel, you’ll find the set/ok button, which is used to confirm selections.
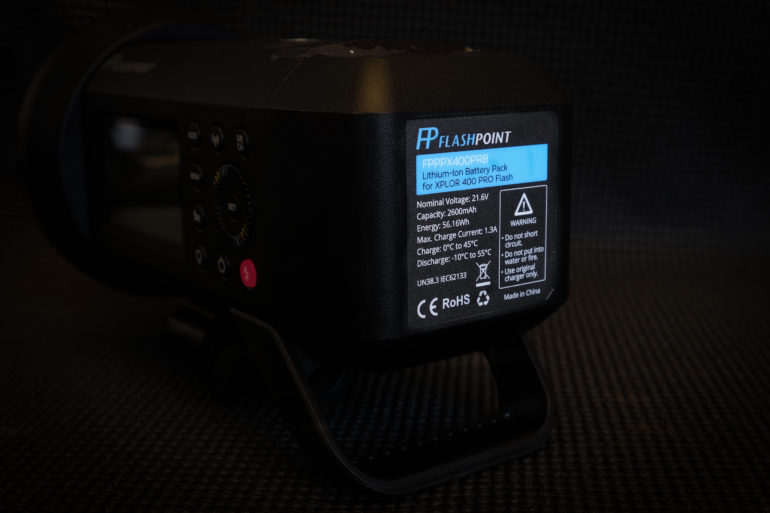
The back of the XPLOR 400 Pro TTL is where you will find the 2,600 mAh battery. The battery itself slides and locks into position with minimal effort, and is quickly released from the unit with a sliding clip that’s located on the bottom of the battery. There is also an AC power adapter that can be used in a studio environment instead of the battery. This is not included, though, and will have to be purchased separately.
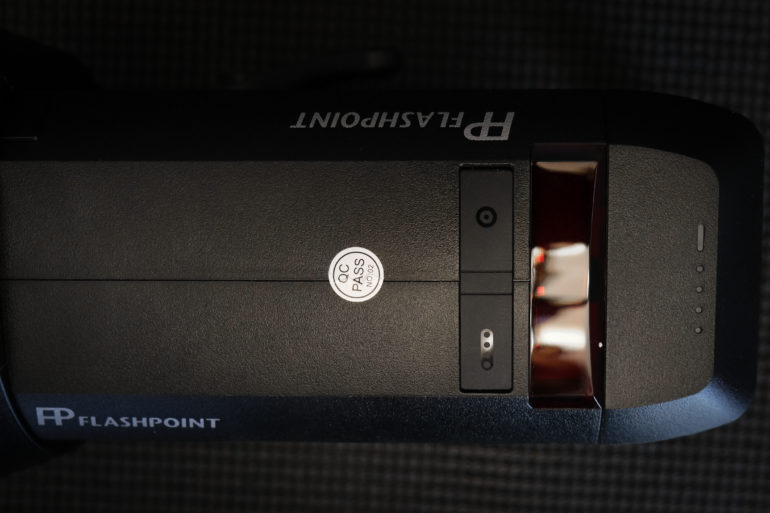
On the top of the monolight, you’ll find the 3.5mm sync cord jack, one type C USB port, which is used to update the XPLOR 400’s firmware, and the light sensor, which stretches across the width of the unit. All of these ports are located under well fitted, tight rubber covers. On top of the battery, you can also see a remaining charge indicator. The oblong button to the right of the four-round indicators is what you’ll press to show the current charge.
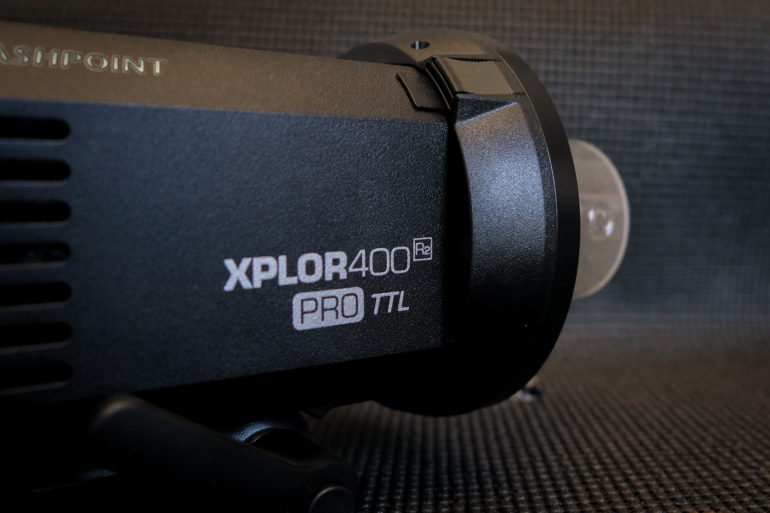
This side of the XPLOR 400 Pro is relatively nondescript. You’ll see the fan inlet, the branding, and at the top of you’ll see the light modifier light release. In this image, I have the Bowens mount adapter screwed on to the light. Out of the box, the XPLOR 400 Pro TTL will have a Godox mount adapter installed. Once you have it removed, you can attach various other adapters to the unit by simply sliding the adapter onto the body and securing it with four screws. The XPLOR 400 pro TTL comes with a Bowens mount adapter, 4 screws and an Allen wrench in the box.
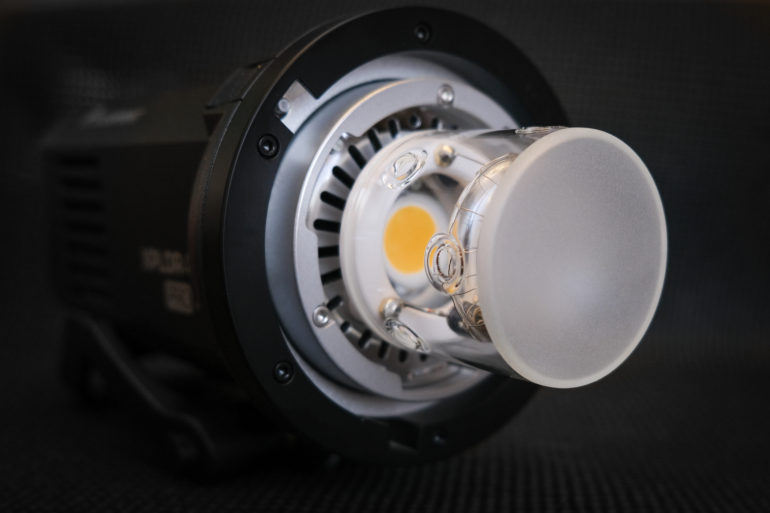
The front of the XPLOR 400 with the Bowen mount attached. Here you can see the 30-watt modeling lamp that sits under the flash tube. The flash tube is easy to connect and simply requires you to line up the prongs and a circular indicator. Once in place, you just push the prongs into the body. There is no audible click when it’s in place, but it feels incredibly snug and secure.
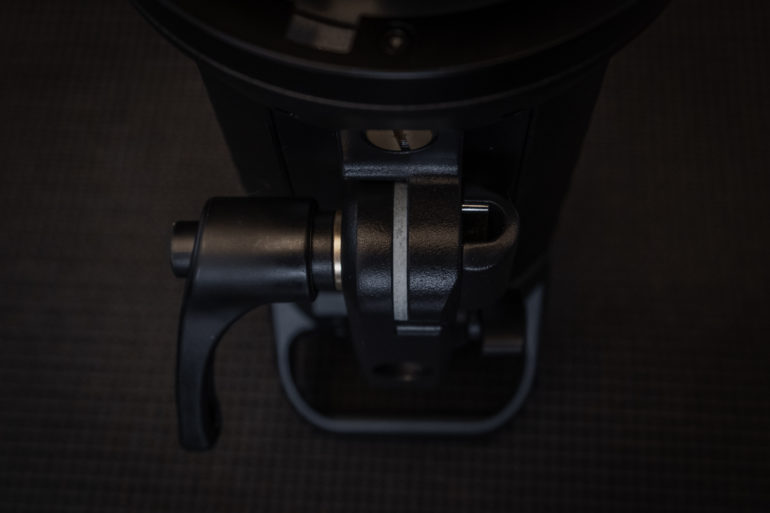
The light stand bracket is easy to operate, and it feels nice and secure when things have been tightened down. On one side of the mount, there is a built-in umbrella holder, which is a nice touch. One problem I have noticed, though, is when the Bowens modifier is installed on the XPLOR 400, the handle to tighten the clamp rubs against the housing of the light and can become quite tight against the body. I’m not sure if this will happen with other adapter rings or not, but it’s certainly the case with the Bowens adapter. It’s really nothing to worry about, I just thought that the extra width that different mount adapters add to the body would have been taken into consideration.
Build Quality

The Flashpoint XPLOR 400 Pro TTL is a very well built monolight, especially for the price you’ll be paying. Everything about this light has a premium feel about it. The controls on the side are firm and have an excellent solid click to them when pressed. The scroll wheel offers some resistance so that it cannot be turned accidentally, but it’s not so tight that it’s hard to make changes when you want to. The battery clicks into place and is held nice and tight against housing, and there is no play between it and the main body of the monolight.
The LCD screen is nice, bright, and easy to read. The light turns off after a few seconds but turns on instantly when a button is pressed. The screen itself is covered in a robust plastic, so the display underneath is nicely protected. You certainly won’t have to worry about the screen becoming damaged unless something hits it very hard.
While the main body of the monolight is made from plastic, it’s not a cheap-feeling plastic. There is also a nice amount of texture to it as well, though it can still be a little bit slippery when being held in your hands. The different light modifier adapters fit tightly on the body, too, and are held in place with four tiny screws. Once they’re installed correctly, they won’t go anywhere.
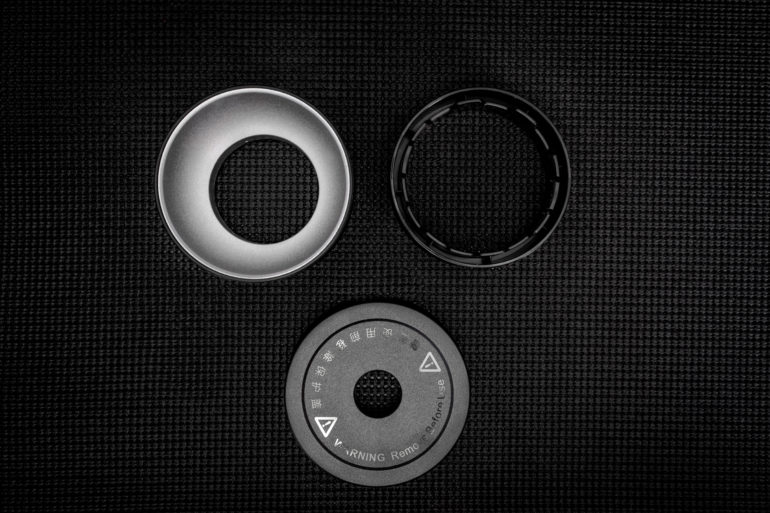
My only gripe with the build quality comes from these three pieces pictured above. The reflector, the Godox light modifier adapter, and the protective cap. Singularly they are all great, nothing to write home about; it’s getting them apart from each that’s the problem.
When you get the monolight out of the box the reflector and the Godox mount are connected together and form one unit. If you want to use the reflector with the Bowens adapter and want to be able to protect the flash tube (trust me, you do because replacements are $119.99), you have to remove the Godox mount. Sounds easy, right? Unfortunately, that’s not the case.
I sat and struggled for way more time than I want to admit. I thought I was, perhaps, going crazy. I checked the manual to see if they did, in fact, come apart; it said they did. It made me question many life choices I have made and whether or not they had affected my ability to separate two pieces of plastic. I looked to see if there was perhaps a release mechanism that would make the two pieces split apart, but nope. No button, switch, or magic lever is there. After a good while, I channeled my inner world’s strongest man and got the two pieces apart via brute force and ignorance. I thought for sure that I had probably broken one of the parts, but no, they were just sitting there, acting like nothing had ever happened. Why this was designed like this, I have no clue.
Overall the Flashpoint XPLOR 400 PRO TTL is a solidly built monolight that will undoubtedly stand up to everyday use. If you keep the flash tube protected when not in use and keep the monolight in the padded case between shoots, there is no doubt that this light will last you a long time.
Ease of Use

Overall the Flashpoint XPLOR 400 Pro TLL monolight is easy to use. For those of you out there that have used any Godox or Flashpoint branded light before, you’ll feel right at home. To turn on the light, you press the power key and are then instructed on the screen to turn the scroll wheel. This is a nice feature and will prevent the light from being turned on accidentally during transport.
To cut down on the number of physical buttons on the light and on the transmitter, some of the buttons are dual function. To access the first listed feature of each control, you simply hit the button and can then use the control wheel to scroll through the menu for that function. To switch between each mode or feature of the button, you simply need to depress it for a second or so, and the secondary role becomes active.
The menu system doesn’t have the greatest design in the world, to be honest, but it gets the job done. After you have used the XPLOR 400 Pro TTL for a short while, you’ll become much more comfortable with its operation. Pairing the monolight with the R2 trigger is also an easy process. Simply place the monolight into slave mode, put the monolight and the transmitter on the same group and channel, and you’re in business.
After the initial setup, it’s merely a case of dialing in your camera to the settings of your choice. If you’re using the TTL function, you’ll need to do no more as the light will automatically adjust the output to expose the scene based on your camera settings. If you’re using the light in manual mode (which I always do), you simply press the group button on the transmitter and then use the scroll wheel to adjust power. To use the modeling light, you simply hit the light bulb icon on either the transmitter or the light itself. There are five different levels of brightness for the modeling light, and they do a great job of illuminating your subject.
When in use, the Flashpoint XPLOR 400 Pro TTL is excellent in every way. Recycle times are almost instantaneous even after firing at 1/1, and the High-Speed Sync feature worked flawlessly. The fan to cool the unit down is not overly loud either, which is useful if you’re going to be using the light in an area that demands quiet.
Battery life is also very good. During a shoot with the 400 Pro TTL, I took 283 shots, and at the end of it, the battery had decreased just over 30%. For reference, I was shooting between 1/32 and 1/64 power for most of the shoot, with about 30 of those shots using 1/2 power to 1/8. Give yourself just a bit of time to figure out the controls, and how to navigate the menu system, and you will be amazed at what you can do with this light.
Image Quality
 The Flashpoint XPLOR 400 Pro TTL has honestly impressed me to no end. During my tests, I was able to get exactly what I wanted with ease. The light that the XPLOR 400 Pro TTL emits is consistent, which is great because you’ll know precisely what you’ll get every time you use it. I haven’t seen any significant swings in color temperature either. During this shoot, I set my white balance to 5600K and just went on with the shoot. Here are some more image samples. All images were captured with a Fujifilm X-T3, the Fujifilm 56mm f1.2, the XPLOR 400 Pro TTL, and a 30-inch octa box.


Conclusions
Likes
- Excellent overall build quality
- Fast recycle times, and extraordinary battery life
- Compatible with most major camera brands
- You know precisely what you’re going to get performance-wise every time you use it
Dislikes
- The workout it gave me trying to get the Godox adapter and the reflector apart
- Otherwise no other dislikes
I have been incredibly impressed with the overall performance of the Flashpoint XPLOR 400 Pro TTL. This light is honestly just about perfect for every photographer. Whether you’re a studio shooter, or if you do a lot of work outside, this monolight will not let you down. With enough power to shoot in full sun, this light will open up many doors for photographers who don’t want to drop four figures on lighting equipment. The build quality is excellent overall, the battery life is fantastic, and it’s consistent performance means you can just shoot and don’t have to worry about what you’re going to get from it.
With a price of $649, the XPLOR 400 Pro TTL is one of the most affordable, professional-grade monolights you can buy. If you want to be able to take studio-quality lighting with you anywhere where you go, and want to be able to shoot in any lighting situation with ease, the Flashpoint XPLOR 400 Pro TTL is tough to ignore. What makes it even better is that if you choose to change camera systems, you can simply buy a new transmitter and can continue to use it with your new gear. This monolight is a stunner. You can pick one up from Adorama.
Get rid of the ads!
Did you enjoy reading this article as much as we enjoyed writing it? There's a way to support us and our reporting, getting ad-free navigation and more as a bonus. Subscribe to us for less than a coffee per month —just $3.99— or take advantage of our yearly subscription with a hefty discount for only $25.- An ad-free experience
- A free mystery box for Lightroom or Capture One
- All the books in our store
- 20% discount on Capture One
- 30% discount on Imalume Photo Theft Protection
- 20% off Herbs and Kettle Tea Company.
- 20% off your order from MPIX printing services.
- 5% off Viltrox Products via their eCommerce store.
- 10% off all film developing, printing and scanning services from Blue Moon Camera and Machine
- 15% off 7Artisans products: The lens and accessory maker is offering a sweet discount for Phoblographer's readers.