
This is a syndicated blog post from Digital Photo Pro, part of the Madavor network
The art of portrait lighting is the art of bringing out the essence of an individual—identifying the person’s personality and facial features, and coming up with a lighting scheme that will synchronize with them. Many photographers fall into the habit of using a stock setup for all of their work without consideration of the person they’re photographing. Some can pull this off quite well, creating a body of work that takes some variability out of a series of images.
For most, however, this becomes a “Hey! Look at me and what I can do!” kind of thing. The photographer trying to impress by imposing inappropriate lighting on the subject is flirting with disaster. That’s because many photographers fail to embrace and practice the basics of lighting technique.
Truly, grasping good lighting is a lot like understanding the relationship between aperture and shutter speed—it’s confusing up until the moment it clicks, and then every photograph becomes a variation on that idea.
These photographic lighting basics are the go-to techniques, the foundation on which all other lighting is built. With an understanding of these photographic lighting basics, you can easily light any scene.
Portrait Lighting Essentials
Of course, like any rule, this one can be broken, and there are examples where such shots are quite successful. Arnold Newman’s famous photograph of Alfried Krupp immediately comes to mind. Newman himself said of the photo that it was one of two photographs he made where he deliberately tried to make someone look bad (the other was Richard Nixon). These examples are extreme, and Newman clearly had a personal agenda. Most photographers won’t have a chance to photograph a German industrialist who directly profited from slave labor, but if you ever do have that chance, feel free to light the shot as your conscience dictates.
There are a few key portrait-lighting setups every photographer should have in their repertoire: Rembrandt, Split, Glamour and Loop lighting. These setups are like the mother sauces of French cuisine. From these four basic recipes, you can create an unlimited number of unique looks to match your subject. We’re looking at each setup in its most basic form with as few lights as possible.
Essential Portrait Photography Term – Catchlight
A catch light is one of the most important elements in any portrait. Amateur photographers with an eye for a subject and composition almost always fail to have an appropriate catch light, and as a result, the photo has an amateur look. The catch light adds a hint of sparkle and life to the person being photographed. When you’re working with dramatic lighting patterns, having a catch light in the shadowed eye can be particularly important. A good catchlight can be found in each of these essential portrait lighting techniques.
To pull it off, choose a light source that will have the shape you’d like—an umbrella for a round catch light, a softbox for a rectangular catch light, a simple reflector for a pin-point catch light, etc.—and set it up at low power. If you turn up the power too much, you’ll end up lighting the person, and all you want is a little sparkle.
You can even get a nice catchlight in the eyes during the day, without strobes, by using a reflector or other light shaping tool to bounce some light at your subject.
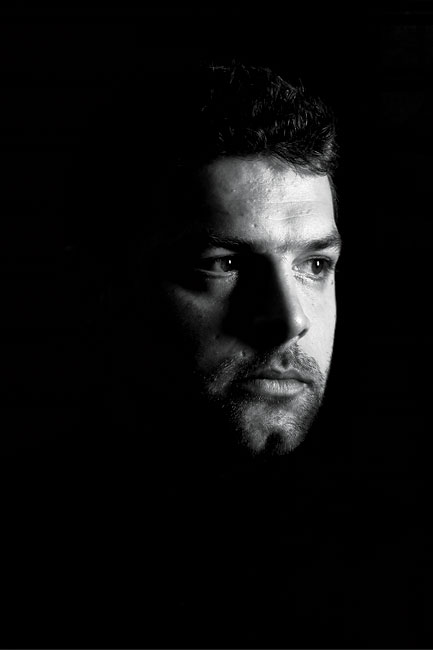
Rembrandt Lighting
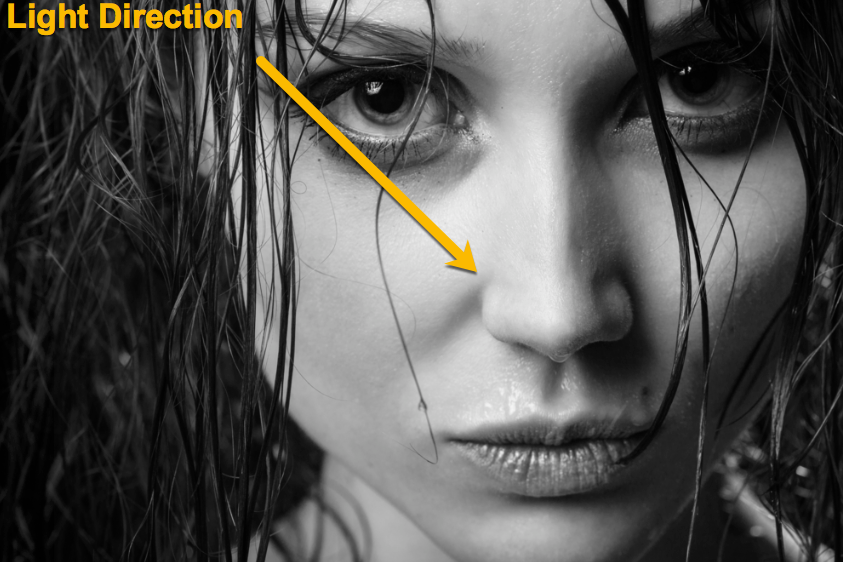
One of the most talked about and least understood lighting styles is Rembrandt lighting. Most people mistakenly refer to “Rembrandt lighting” to describe any sort of chiaroscuro effect with dramatic highlights and shadows. While Rembrandt lighting is certainly dramatic, in reality, the defining characteristic of the technique is the triangle of light on the shadowed side of the face that’s visible between the bottom of the eye socket, the cheekbone and the nose.
To create Rembrandt lighting, you want to position your main light to the side and above the subject’s face—about 45 degrees to the side and 45 degrees above the face. The Dutch masters used skylights in their studios to light the subject, so think along those lines. The shadow from the nose should merge with the shadow beneath the cheekbone to create the characteristic triangle. Rembrandt lighting isn’t a good choice for every face. The eye, nose and cheek need a certain prominence for the look to work. Don’t force it if your subject isn’t a match.

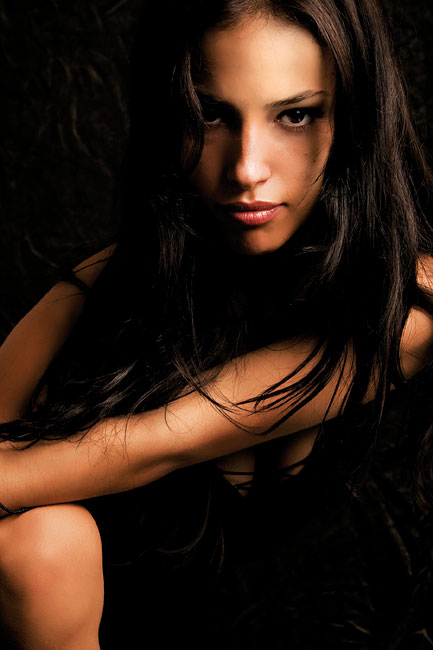
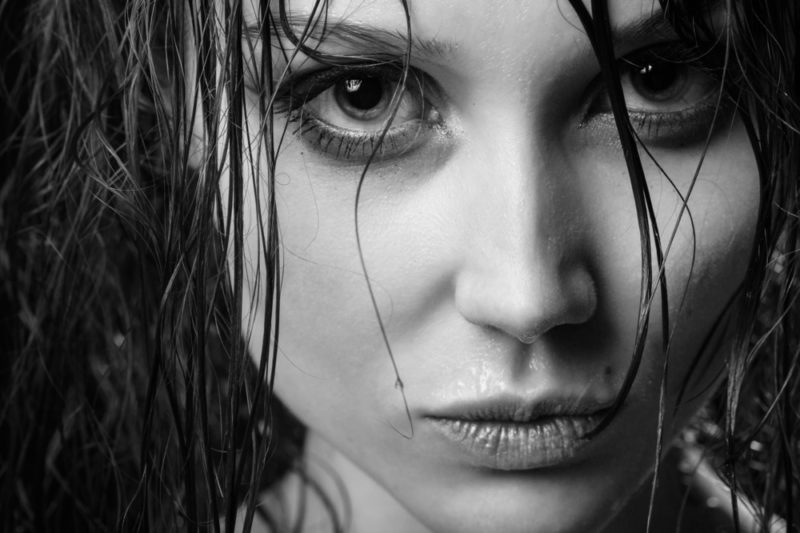
Split Lighting
As the name implies, split lighting splits the face like the sides of the moon. Half the face is lit and half is in shadow. The effect can be harsh for a dramatic look, or it can be kept softer. Creating a hard split is simple to do with a hard light source. You’re going for a big ratio of light to dark, but beware of blowing out the brighter highlights on your subject’s face. If you’re shooting with a point source, experiment with the subject-to-light-source distance to control the highlights. To soften the effect, you can use a little fill on the shadow side. A softbox also works well, as it will create pleasing soft light on the illuminated side of the face, and the line between light and shadow will be more gradual than it would if you used a hard source. Usually, an umbrella or a beauty dish wouldn’t be ideal choices for split lighting because these modifiers tend to wrap the light around the subject, which isn’t the effect split lighting is going for.Split lighting is usually employed to create the actual split longitudinally along the center of the face—from forehead to chin right along the center of the nose. Like any rule, this one is made to be broken, but be careful about going too far. You can create an interesting look with a slight angle, but too much can look bad. Keeping one eye lit and one completely in shadow is a good idea.
To achieve a split-lighting look, simply set up your source at your subject’s head height at about 90 degrees to the side. Fine-tune the light position to get the line between shadow and highlight where you want it. As with any lighting setup, the look will completely change if either the light or the subject move in relation to one another, so if the person you’re photographing is apt to move around, a softer source is a good idea to avoid a misplaced hard line between light and shadow.
Many photographers will use flags or reflectors to help shape the light here, so that excess light from the strobe doesn’t fall to the other side of the face.

With the Split Lighting technique, the centerline of the face (or a region near the centerline of the face) is used to create dramatically different lighting intensities.

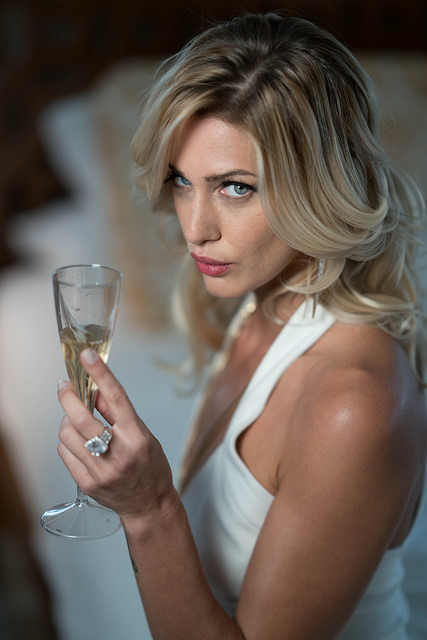
Glamour Lighting
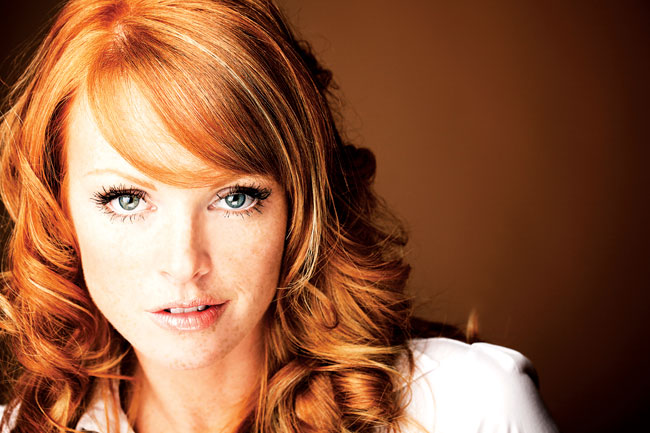
This style goes by several names, mostly associated with Hollywood. It’s also referred to as butterfly lighting for the shape of the shadow the pattern creates under the nose. Glamour lighting was made popular in the 1930s, and it has remained a mainstay of portrait work ever since. The goal here is to emphasize the cheekbones and the shape of a classically beautiful oval-shaped face. It’s not a great match for rounder faces or for people with deeper eye sockets.
To create glamour lighting, position the light source parallel to the subject’s face and above at an angle of about 30 degrees. This will give the cheekbones even illumination, and it will create shadowing, and therefore contouring, beneath the cheekbones. For glamour lighting, a fill light placed directly beneath the main light is often used to soften the shadows.
Thanks to wireless speedlights, this is a popular, quick, and attractive way to light a subject. Simply hold the strobe off camera in your left hand to the side of the subject. Depending on the distance from your subject, you may need to have an assistant hold the light to get the exact angle you’d like. If you’re move forward toward the subject, you’re going to create the similar Loop Lighting…

Loop Lighting
Named for the shadow it creates below and to the side of the nose, loop lighting is the go-to pattern for many pros. It’s simple and usually quite flattering, and you can make it work with anything from a small flash to a big studio light. Loop lighting shows the contours of the face without emphasizing unflattering elements like wrinkles blemishes or scars. You’ll often see wedding photographers making a lot of use of loop lighting for this reason. If you use a softer source like a lightbank or a softbox, you can de-emphasize these unflattering elements even more. An umbrella or a beauty dish can do a good job with a loop lighting setup because the wraparound look will soften the subject without negating the general look.
To create a loop lighting setup, position the light to the side of the subject at about a 30- to 40-degree angle and a little higher than head height. Don’t go too much higher, or you’ll create an elongated nose shadow that can look pretty bad. Also, if you position the light too high, you’ll get a bad shadow in the eye on the opposite side of the face from the light source. These objectionable shadows can be somewhat mitigated with fill light, but they’ll still be there.
Fill and Hair Lighting
In this article, we’ve identified some core portrait lighting setups, but we’ve talked about them stripped down to their bare essentials. We haven’t addressed background lights or hair lights, and we’ve mentioned fill lights sparingly. The main light sets the tone for the image, beyond that, you should always feel free to add accents like a hair light as you see fit. Most pros add hair lights as a matter of course because they’re flattering, they help frame the face and they add dimension, but you won’t go to lighting jail if you don’t use one.
The portrait in the Glamour Lighting section shows what good hair and fill light looks like, but each of these styles has different amount of hair and fill lights. By varying the light falling on hair, clothes and backdrop, a photographer can create different looks with ease.
Required Reading
To find out what professional photographers Conan Thai, Martin Wonnacott, Ethan Pines, Joanna Kustra and Seth Olenick consider their Essential Lighting tools, read more in our technique interviews with them.
To delve into the world of “continuous” LED lighting, our LED Lighting Solutions guides breaks down the basics and the gear needed to light with LED.
Get rid of the ads!
Did you enjoy reading this article as much as we enjoyed writing it? There's a way to support us and our reporting, getting ad-free navigation and more as a bonus. Subscribe to us for less than a coffee per month —just $3.99— or take advantage of our yearly subscription with a hefty discount for only $25.- An ad-free experience
- A free mystery box for Lightroom or Capture One
- All the books in our store
- 20% discount on Capture One
- 30% discount on Imalume Photo Theft Protection
- 20% off Herbs and Kettle Tea Company.
- 20% off your order from MPIX printing services.
- 5% off Viltrox Products via their eCommerce store.
- 10% off all film developing, printing and scanning services from Blue Moon Camera and Machine
- 15% off 7Artisans products: The lens and accessory maker is offering a sweet discount for Phoblographer's readers.