Creating the Photograph is an original series where photographers teach you about how they concepted an image, shot it, and edited it. The series has a heavy emphasis on teaching readers how to light. Want to be featured? Email chrisgampat[at]thephoblographer[dot]com.
Photographer Debabrata Rey is very highly focused on portraiture. He does loads of personal projects and also works on a bunch of fashion projects. One project of his that really caught our eyes was of a photo called “The Red Girl.”
You see, Debabrata works on putting forward a true creative vision as we’ve seen from his tattoo project and his People of Copenhagen feature, His method is very specific and he’ll make sure that everything in the scene is perfect before he even picks up the camera. It’s part of what helps him deliver incredible photos.
The Concept
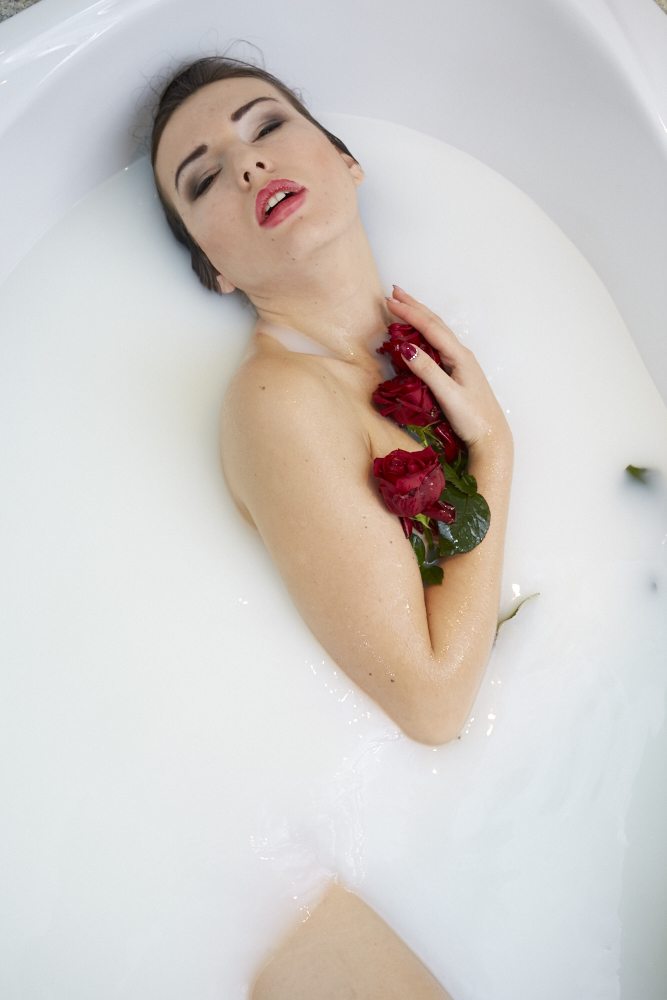
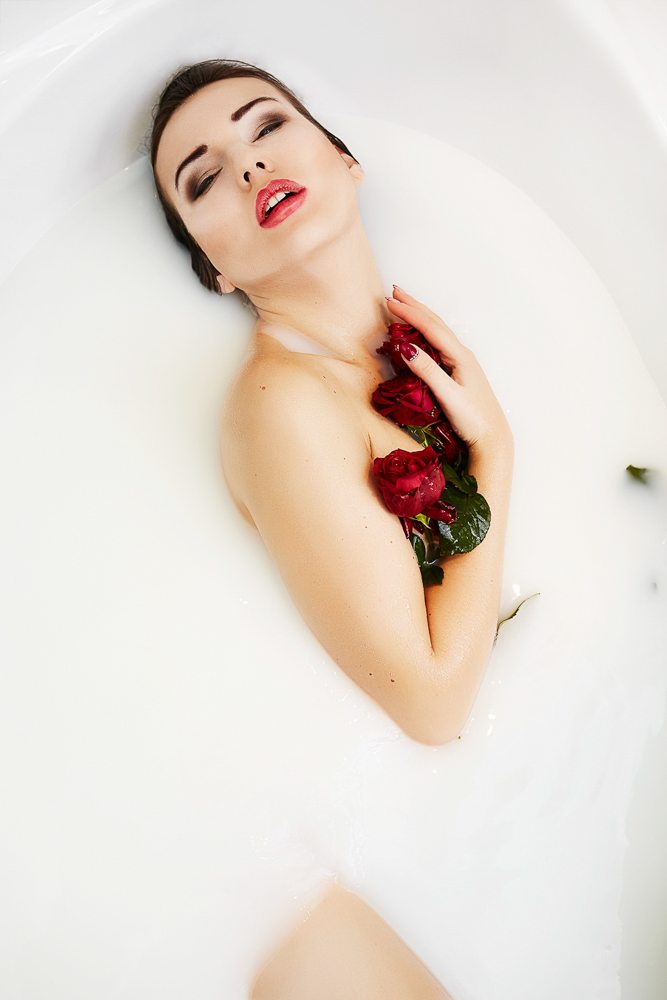
I have always wanted to do a bathtub shoot with milk in it. The lovely model Diviana actually came up with the idea first and we discussed about it. I realised this is something I always have been wanting to do but had never done before. The idea of challenging my skills, be in term of concept, lighting, or any other item related to photography that I haven’t done before really excites me. This picture was shot as part of an overall theme – The Red Girl. The idea was to emphasise on the colour red. We therefore used a bright red lip colour on her and used the red roses as a prop.
The Gear
Camera: Canon 5D MarkIII + Canon 24-70 f/2.8 L lens.
Lights: Godox AD 360, Godox AD 180
Modifiers: Large 5 foot octabox with both diffusion panels on – used with the Godox AD 360 and a standard reflector used with the Godox AD 180.
Triggers: Godox trigger set.
The Shoot
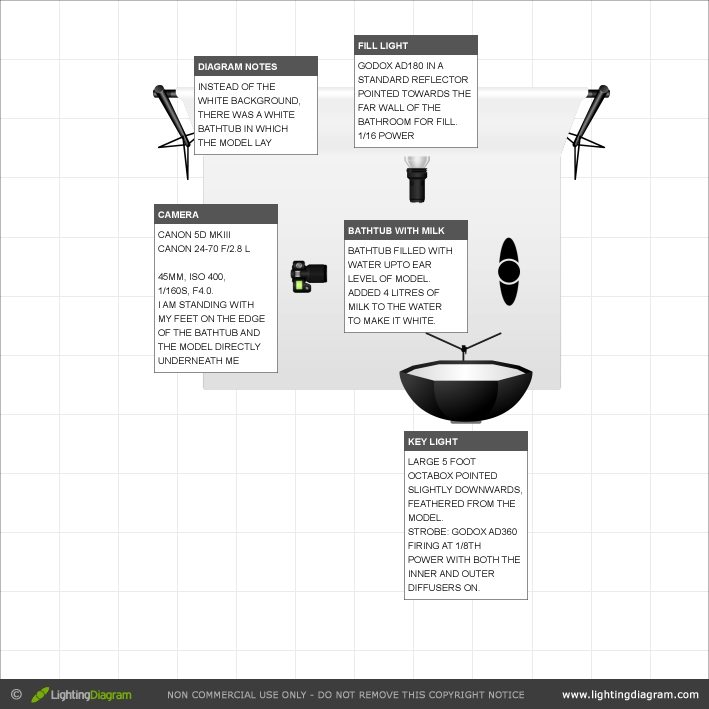
There was a lot of pre-planning involved in the shoot. We needed a bathtub, and that too a large one, as Diviana is quite tall. Second, we needed a bathtub which had some space for me to stand on top of, as I would be shooting directly down. Other option would’ve been to boom the camera up and shoot tethered to a laptop. 3rd we needed some space in the bathroom to work and setup the lights – so a bathroom with a bathtub at the end wouldn’t have worked this well. 4th, we needed fresh roses on the morning of the shoot and finally we needed Milk for the scene.
Diviana’s friend Lief had a friend who had a house which had a bathroom that fit our needs and specifications and he was very kind to let us use the bathroom for our shoot. Leif did go to the bathroom and did survey of the bathroom a couple of days prior by taking pictures and sending me those for confirmation. I had made an arrangement with a local florist for fresh roses to be available on the morning of the shoot. The trickiest part was the milk. I read up on a few forums on how to do this kind of a shoot.
Filling the bathtub with milk was going to be a very costly proposition. A few photographers suggested using Milk Powder, or Baby food powder. I tried those in a small can in my bathroom and found that Milk Powder a) takes a longer time to dissolve and b) there’s coagulation, so I would’ve seen spots instead of pure white milk, which would’ve been a nightmare to remove in post processing. The best combination I found was that of Milk (the full cream / full fat version rather than the skimmed version. I used the one with 3.5% fat content.) and Water roughly in the ratio of 1:4 – 1 litre of Milk to 4 litres of Water. For the shoot I used 4 litres of Milk.
“The best combination I found was that of Milk (the full cream / full fat version rather than the skimmed version.”
With all the pre production items in place, we agreed on the date of the shoot. Looking at the pictures and knowing the description of the bathroom I knew I needed at a minimum 2 lights. But then I own only 2 lights and I had to make do within those constraints. When we started out, I put the higher powered AD360 into a softlighter as key light and the lower powered AD180 with a standard reflector, bounced off the far wall of the bathroom as a fill.
The issue with the softlighter was that It didn’t have enough punch for the shot I was looking for. It gives out a beautiful soft wrapping light, but I needed something with more contrast. So I moved from the softlighter as the key to the 5 foot deep octa. The deep octa has an amazing quality of light and creates a nice contrasty light. I initially chose the softlight also because I thought due to the soft light, it wouldn’t produce any harsh reflections on the milk+water. However now with the increased efficiency, I had to make sure I didn’t get reflections of the strobes in the milk.
The way I adjusted the key light was to stand in my shooting position looking straight down at the milk+water combination. I then asked Lief to moved my light into position and feathered it in such a way that it created a nice soft yet edgy light in the position where the model would lay, but didn’t produce any reflections in the water. With the lighting and exposure now set, I was ready to have Diviana get into the bathtub. Once she was in the tub, I waited till the water and milk combination got absolutely still. Waves in the bathtub would’ve reflected back some of the light and would’ve created some harsh and distracting hotspots. Once Diviana was in position, I asked her to try a few poses and I took a series of shots. I used a higher ISO, as I wanted to capture every amount of light available and yet be efficient without having to fire my strobes at full power. This is also important to expose appropriately for the milk. I generally don’t like to do a lot of post production and want to get the shot right in camera.
The way I work is that even before taking the shot, I would pre-visualise the scene, get all the props, models into the scene in the way I had thought it out and then let the model just play with their expressions.
“With the lighting and exposure now set, I was ready to have Diviana get into the bathtub. Once she was in the tub, I waited till the water and milk combination got absolutely still. Waves in the bathtub would’ve reflected back some of the light and would’ve created some harsh and distracting hotspots.”
Post Production
My post production theme is pretty simple.
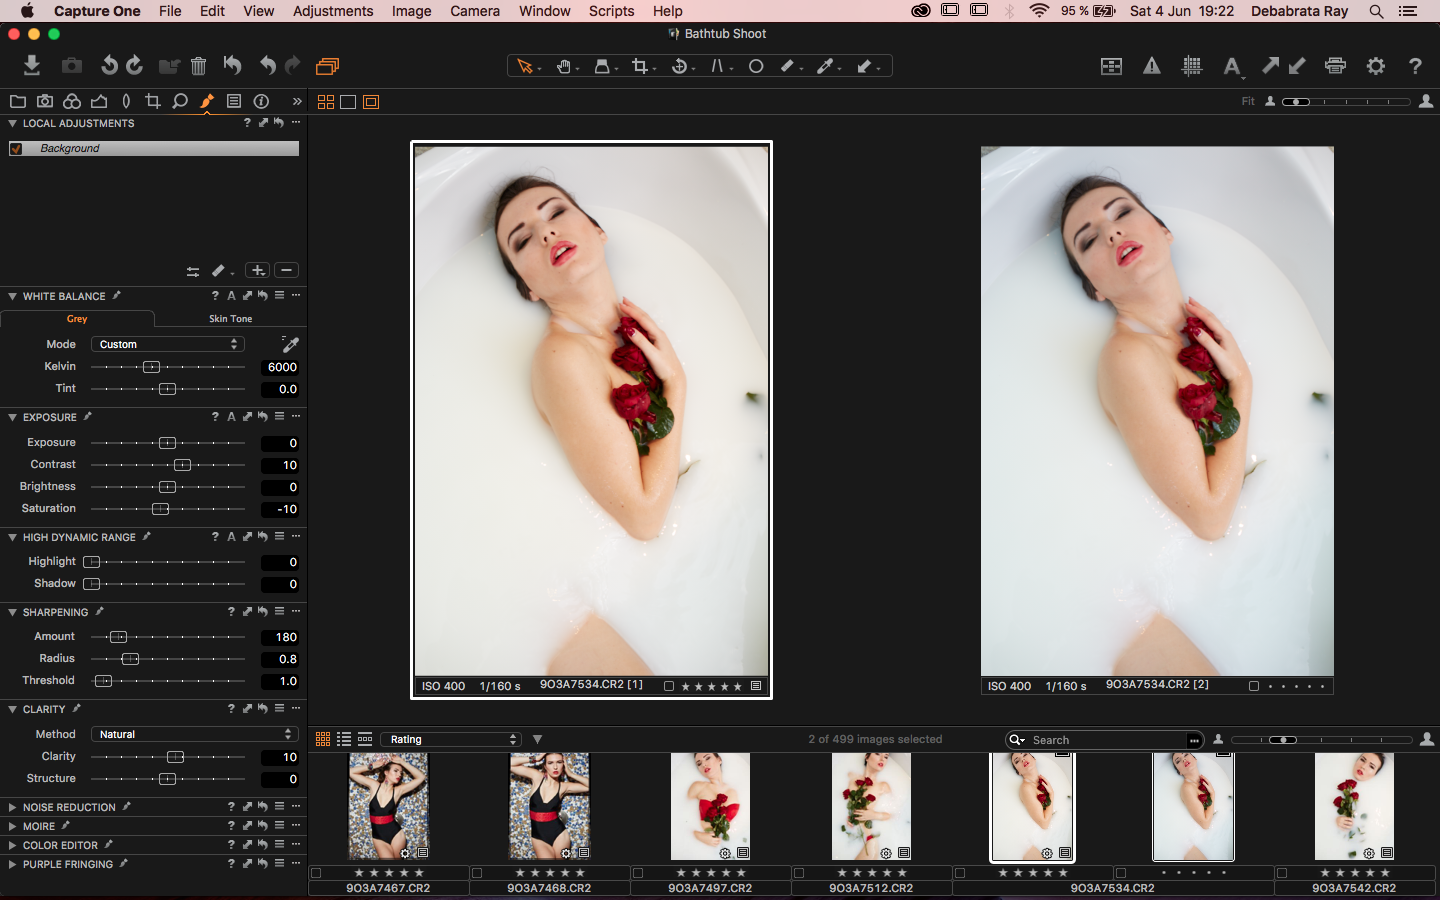
I start out by opening the raw files in Capture One. Since the last few years Capture One has become my mainstay for editing raw images. The way Capture One handles images, is far superior to Lightroom; and now with all adjustments that I can get in Lightroom. In Capture One, my focus is on getting the colour temperature right, a bit of brightness, contrast and clarity adjustments for export into Photoshop.
In Photoshop I export a 16 bit TIFF file and further work on the skin, dodging and burning and any cloning that I need to do. As you can see in the image below, there isn’t much of a difference in the original shot and processed shot that I get as an output from Capture One.
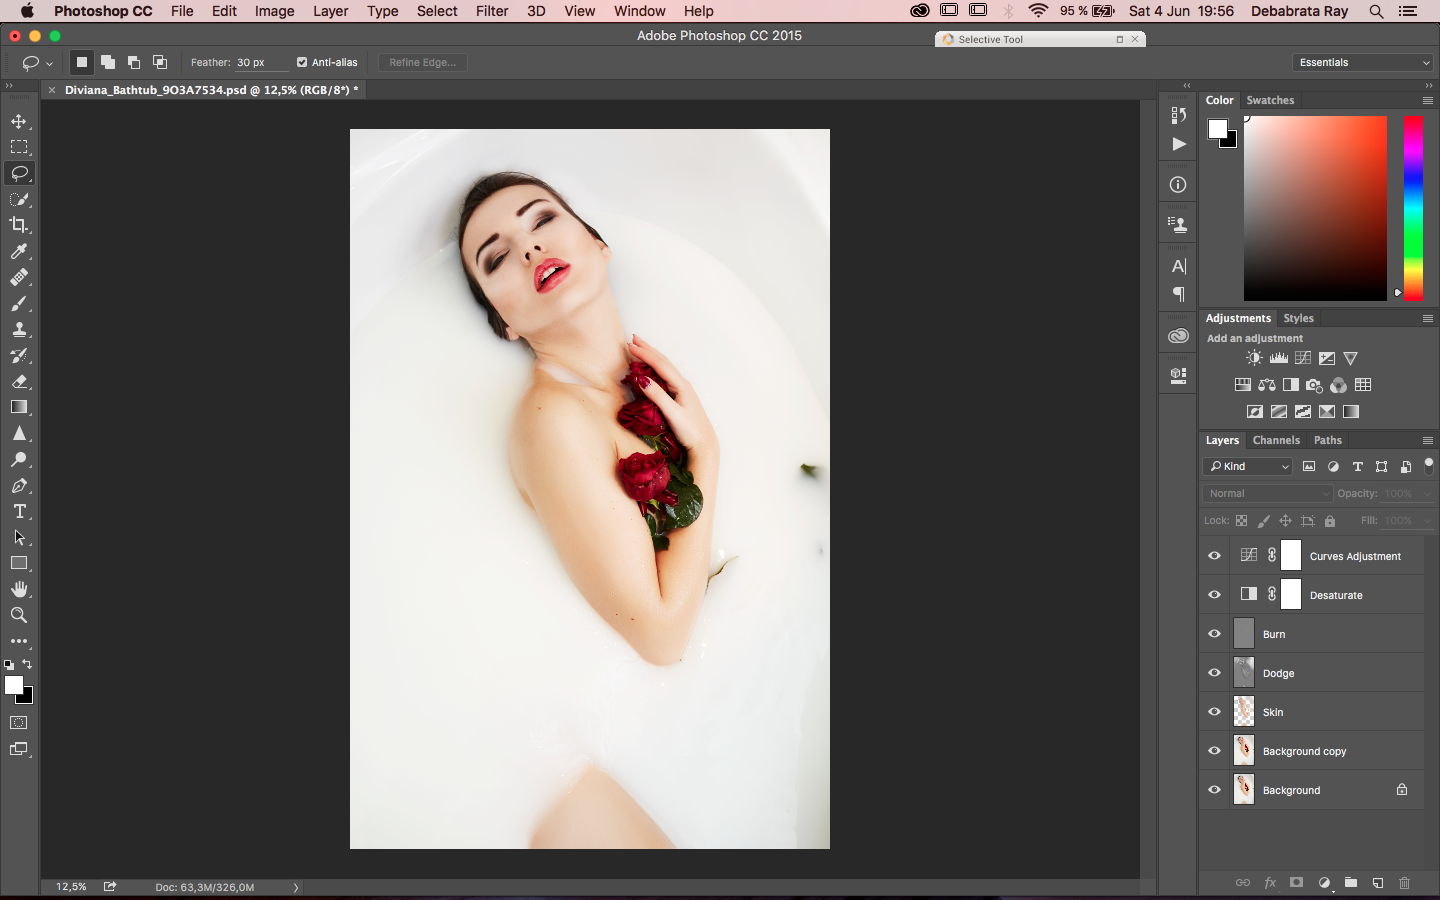
In Photoshop, I generally focus on getting the skin right. Unless I am shooting beauty or something with Skin being in focus, I use the Portraiture plugin for photoshop. I have a custom setup for the plugin which ensures that skin texture is preserved while making the skin smooth. In case I am shooting Beauty or Skin, I apply the frequency separation technique for editing skin. I then move to dodging and burning for providing depth and thats pretty much it.
Before/After
Get rid of the ads!
Did you enjoy reading this article as much as we enjoyed writing it? There's a way to support us and our reporting, getting ad-free navigation and more as a bonus. Subscribe to us for less than a coffee per month —just $3.99— or take advantage of our yearly subscription with a hefty discount for only $25.- An ad-free experience
- A free mystery box for Lightroom or Capture One
- All the books in our store
- 20% discount on Capture One
- 30% discount on Imalume Photo Theft Protection
- 20% off Herbs and Kettle Tea Company.
- 20% off your order from MPIX printing services.
- 5% off Viltrox Products via their eCommerce store.
- 10% off all film developing, printing and scanning services from Blue Moon Camera and Machine
- 15% off 7Artisans products: The lens and accessory maker is offering a sweet discount for Phoblographer's readers.