Creating the Photograph is an original series where we interview photographers about a photo that they shot and how it was achieved. The results are some knowledge passed on to you. Want to be featured? Email chrisgampat[at]thephoblographer[dot]com.
When photographer Bill Wisser creates food photography that will not only make you hungry, but also make your jaw drop. What many don’t realize is that even though food photography is everywhere, very good food photography is a heck of a lot of work.
Bill Wisser is an advertising and editorial photographer based in Miami Beach, who in recent years has specialized in photographing food, chefs, restaurants and resorts. His work has gained him the recognition of Daniel Boulud’s db Bistro Moderne, General Foods, Bon Appetit, Miami New Times, the Fisher Island resort and the Greater Miami Convention and Visitors Bureau. In the last five years, he’s photographed more than 270 restaurants.
But his award-winning days started many years ago as a photojournalist up here in New York. He did investigative reporting and freelance photographing in Pakistan and India. Bill has kept up with the times and showcases lots of his work on Instagram and Twitter.
As we looked through his portfolio, he told us about the image called Cheese Course Breakfast and just how complicated the lighting was behind the photo.
Here’s Bill’s story.
The Concept
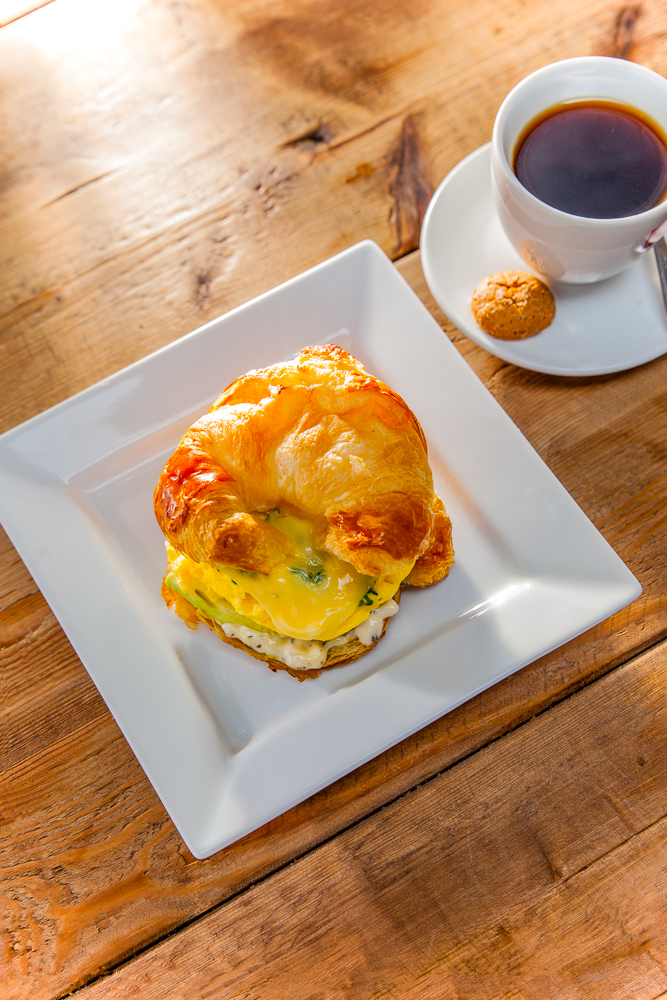
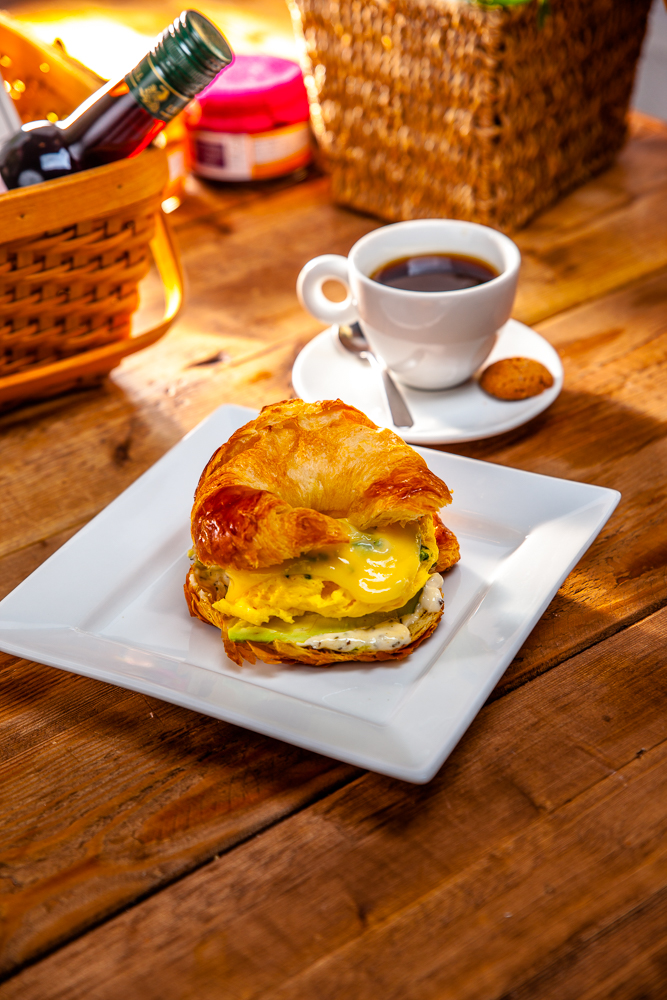
Warm, early morning light pours like molten gold through the window and onto your breakfast table and a crisp croissant . . . an illusion created with just three speedlights, a gel, a couple of reflectors, and bit of post-production.
I made this image for The Cheese Course, a chain of gourmet cheese shops that also have little, on-premises cafés serving drinks and light breakfast and lunch fare such as sandwiches, salads, soups, and pastries.
I did several all-day shoots for them — this one, at a lovely Cheese Course shop at an upscale mall in Boca Raton, Florida, was dedicated just to items on their breakfast menu.
So my basic strategy was to use lighting to create the illusion of early morning sunlight streaming in from a low angle.
We had to photograph some 18 dishes that day, and I tried to shoot each one in a somewhat different yet also somewhat similar way, so they would each seem unique — not cookie-cutter identical — but yet would share a sort of family resemblance, each visibly different, yet visibly related.
Food stylist Rebecca Martin and I were greatly aided in this by the rich collection of props that were part of the café’s decor: a beautiful, about 12 feet-long, rustic wooden table; a bunch of woven baskets; deeply colored jars of exotic jams; bottles of wine and vinegar; flowers; and so forth.
The marketing director had asked us to bring “French country flowers,” and while they don’t appear in this particular shot, that was the sort of the mood we were going for: a French country inn.
The Gear
Canon 5D Mk. II
Tamron 24-70 VC lens @ 70mm
One Bastard Amber (reddish-orange) gel
Three Yongnuo 565EX speedlights
Two Yougnuo YN-622C transceivers to trigger the flashes
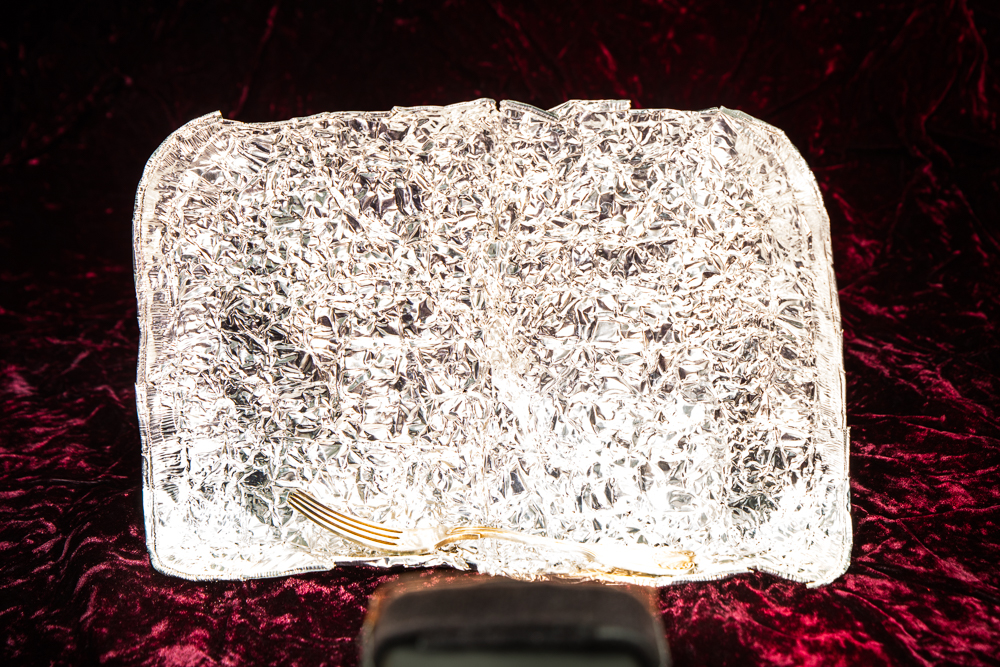
One lightweight, aluminum, supermarket broiler pan flattened into a flexible, textured surface, silver reflector, here pictured in my studio:
The fork is a ballast to keep the reflector from tipping over . . . and here it is illuminated by a speedlight with a bastard amber gel:
One adjustable, silvered cardboard reflector from photographer Gary Bartholomew’s Lightright Reflector set.
One home-made, white, U-flat reflector made by taping together three pieces of 20 x 30 inch foam core with white gaffer tape
One 46-inch, shoot-through umbrella
One 43-inch, collapsible, Westcott shoot-through umbrella
Two Quantum Turbo 2 x 2 high-voltage battery packs and one Cheetah 4500 high-voltage lithium battery pack
Little Manfrotto clamps and ball bungee cords to secure the battery packs to the light-stands
Lightweight, 7- and 8- foot aluminum light-stands
Five-pound ankle weights to stabilize the light-stands
The Shoot
We were at the location from about 10 a.m. to 6:30 p.m. Since the store and the café were open most of that time with customers walking by our set, I tried to keep my equipment footprint as small as possible.
Shooting strobist style with little, but powerful speedlights helps keep everything relatively compact and light.
But I also wrapped 5-pound ankle weights — the kind athletes use — around the bottom of my light-weight light-stands to prevent them from being too top-heavy and tippy. I don’t want them to fall over if some café customer accidentally trips over one.
OK — I first lit the table with two umbrellas, one to the left of the table, and one to the right
The idea is that these lights create a base exposure, a sort of canvas of light on which I can “paint” by adding other accent lights on top of the base, as seen here in an earlier version of this shot — using a speedlight in a 7 ½ by 8 ½ inch, Lumiquest softbox to cast the “sunlight” coming into the frame.
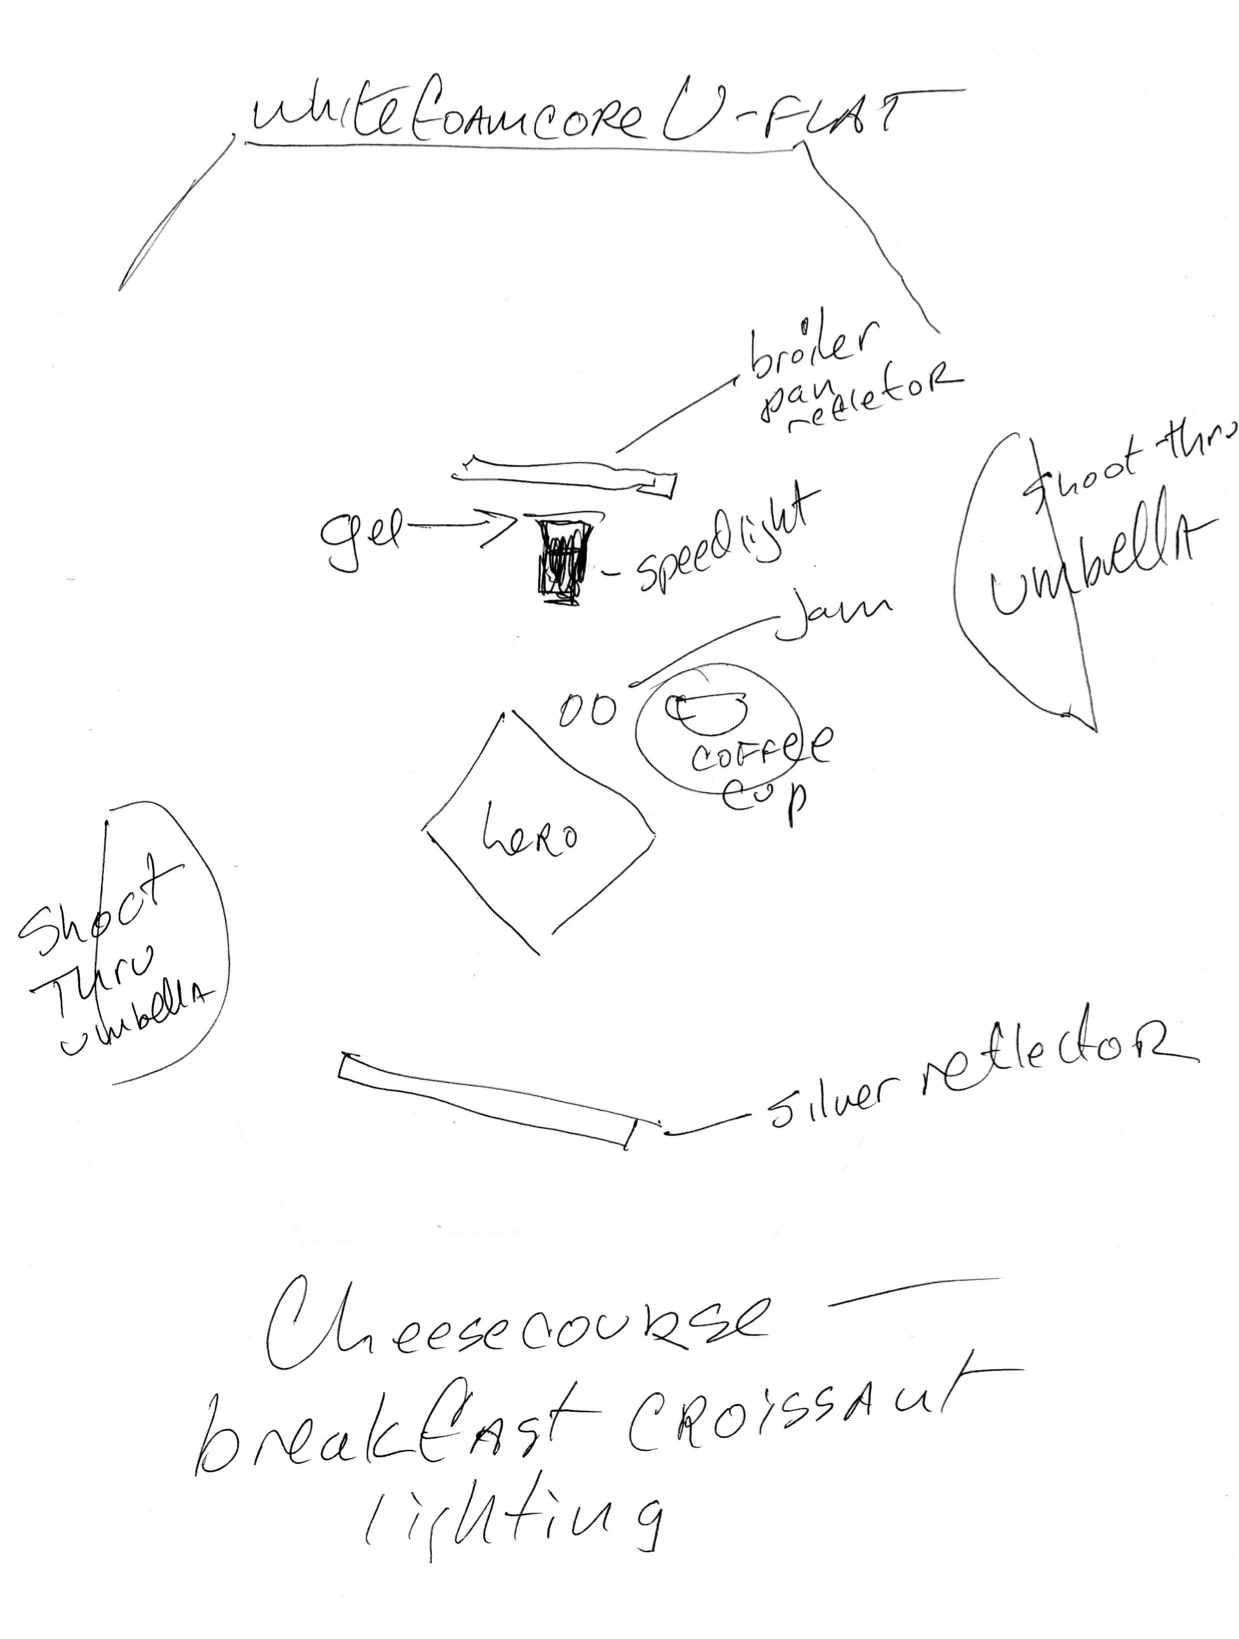
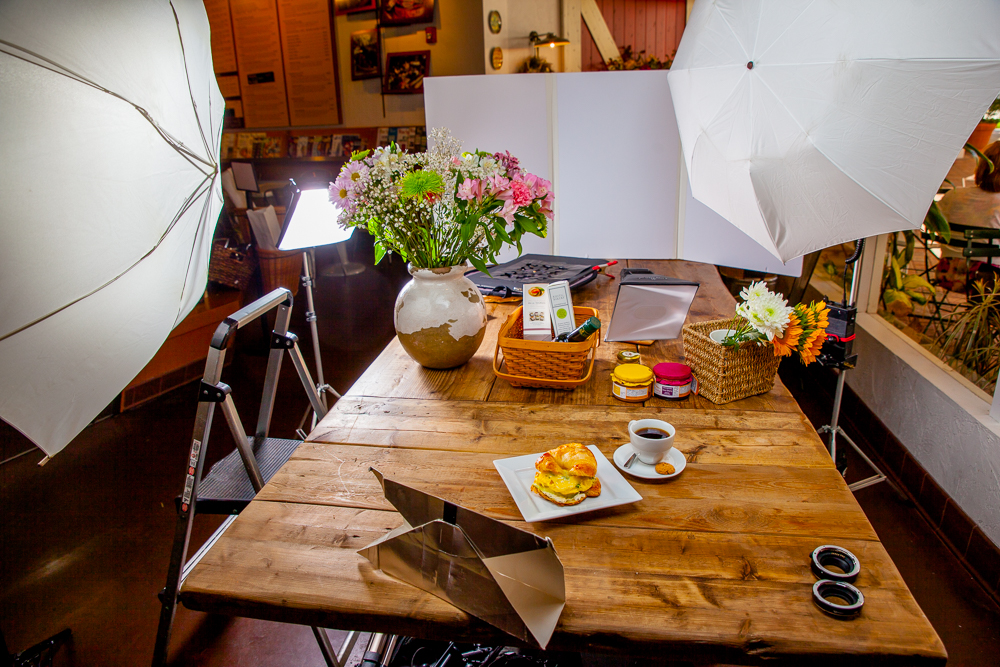
Here’s a behind-the-scenes image showing the general layout of the set:
I tried several variations, using different amounts of light in the umbrellas and various different arrangements of little LumiQuest soft boxes as backlights, but I wanted to get more dramatic . . .
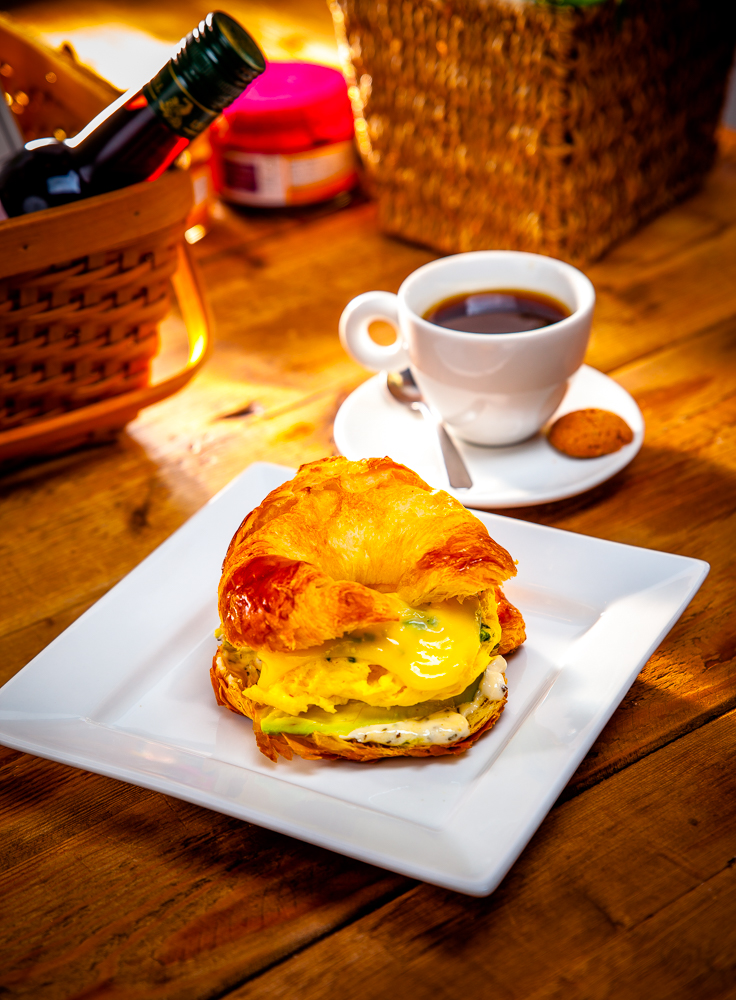
So I took a bare speedlight and taped onto it a reddish-orange “Bastard Amber” gel . . . and then blasted that colored light, not directly into the frame, but into a flexible, silver-colored reflector I made from a lightweight aluminum broiler pan from the supermarket . . . and that reflected the “sunlight” back down into the frame in a more jagged, interesting and uneven way.
Plus we had the jam jars and baskets to block some of the incoming light, to cast little shadows, enhancing the three-dimensionality of the image.
From the general layout shot above, you can see I also have a folding, silver-colored, cardboard, LightRight reflector in the foreground to bounce some of that warm light back into the croissant for fill.
And way in the background you can also see the white, folding, U-flat reflector that I made from three, 20 x 30 inch sheets of foam core. Many studio photographers are familiar with V-flats, made from two sheets of foam core or other material fastened together. They are called V-flats because when seen from directly above they are in the shape of the letter “V”.
V-flats are useful in tabletop set-ups like this, but I found that adding a third sheet to turn the V shape into a U-shape is even better — more stable and more flexible to form different shapes.
Also, if using a V-flat as a white background in some shots, you have to do extra Photoshop work to clone away the central, gaffer tape seam, while with a U-flat, the middle panel makes for a seamless backdrop — a useful trick if you don’t want to lug around a roll of heavy seamless paper, plus the two, extra background stands and a crossbar needed to suspend the paper.
In this case, I moved my U-flat closer to the front of the set where it served to also bounce a little more light into the frame.
The exposure was f4.5 at 1/200th, ISO 200.
Post-production
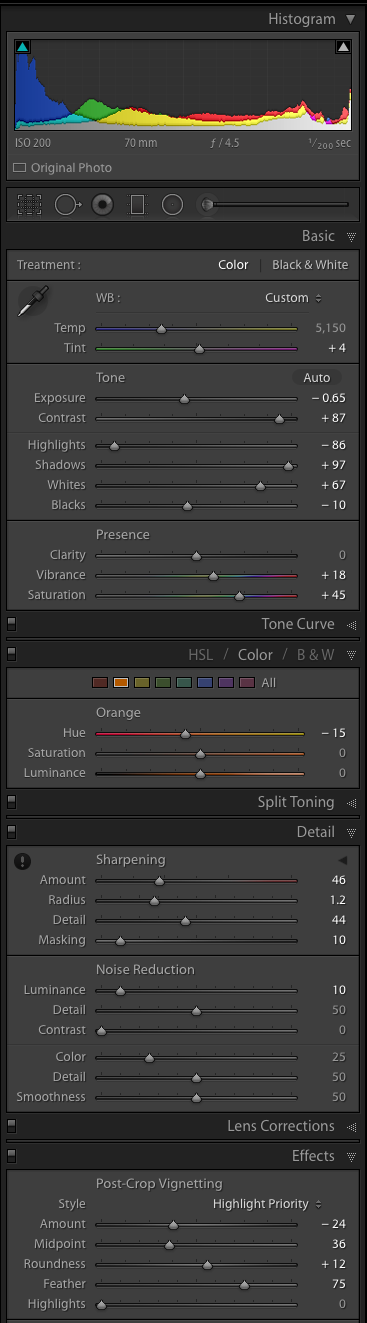
The shot was a little over-exposed, especially the blast of sunlight part, so I had to bring down the overall brightness in Lightroom. Then I further brought down the highlights, applied a light vignette and a graduated darkening at the top, then opened some shadows, bumped up the saturation, vibrance, clarity and contrast, and moved the orange color a bit more toward the red.
I also cropped a bit off the bottom. That and a little sharpening completed the job.
Here’s a screenshot of the Lightroom settings:
Get rid of the ads!
Did you enjoy reading this article as much as we enjoyed writing it? There's a way to support us and our reporting, getting ad-free navigation and more as a bonus. Subscribe to us for less than a coffee per month —just $3.99— or take advantage of our yearly subscription with a hefty discount for only $25.- An ad-free experience
- A free mystery box for Lightroom or Capture One
- All the books in our store
- 20% discount on Capture One
- 30% discount on Imalume Photo Theft Protection
- 20% off Herbs and Kettle Tea Company.
- 20% off your order from MPIX printing services.
- 5% off Viltrox Products via their eCommerce store.
- 10% off all film developing, printing and scanning services from Blue Moon Camera and Machine
- 15% off 7Artisans products: The lens and accessory maker is offering a sweet discount for Phoblographer's readers.