Last Updated on 11/30/2014 by Chris Gampat
All images by Chuck Baker. Used with permission.
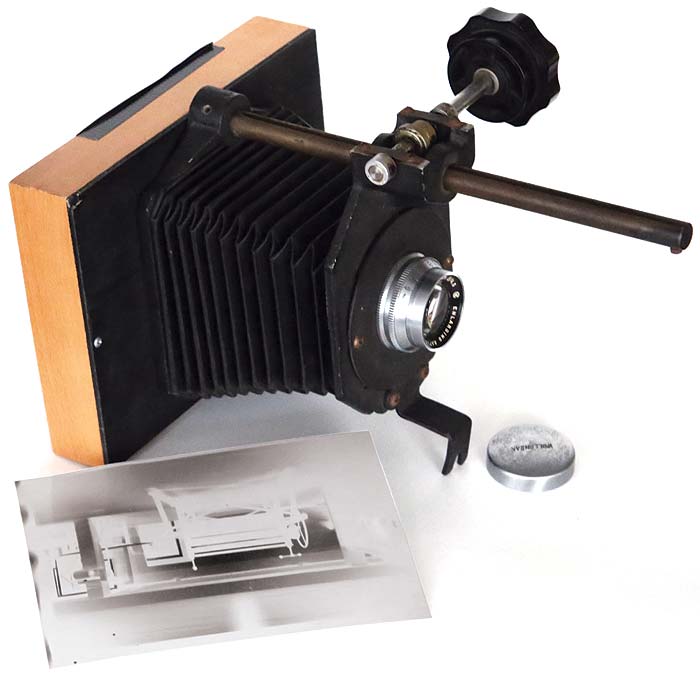
Making your own cameras usually results in the creation of pinhole cameras, but photographer Chuck Baker recently created a large format 5×7″ camera after being inspired by a 20×24″ camera. He tells us that he wanted to create a smaller version and that the stuff that he collects from garage sales helped him to build a camera using an old film enlarger.
For the uninformed, 35mm film needed to use enlargers in order to print them at a larger size. These enlargers had lenses, bellows, etc. And in many cases they are indeed turned into cameras. But the story about this one from Mr. Baker really amazed us. His ingenuity inspired us–and his knack for tinkering helped him to create his own large format camera.
Phoblographer: What inspired you to build the camera?
Chuck: I like building cameras, especially from materials destined for the trash, that will help execute a type of final image I might have in mind. Over the past 40 years I’ve made, or slapped together, quite a few cameras for specific uses. This past year I was introduced to the widow of the prolific Dutch artist, Kees Roosenboom. This exceptional artist worked in many of the mediums I’m currently working in, such as carbon printing and heliography. She gave me his outstanding homemade 20″ x 24″ camera so that it would be used and not just die while stored away forever. The camera, because of it’s breathtaking handmade bellows, gave me the idea to make this camera on a Saturday afternoon with a free hour or so. I initially intended to use ortho film in it but started using paper negatives when I discovered that it produced the desired results.

Phoblographer: Tell us specifically about the camera and how it was made.
Chuck: I go to second hand stores and flea markets nearly every week looking for materials, cameras, frames, films, etc. Many times someone will be selling something I want, but a full box of stuff comes with it which is how I have ended up with quite a few cheap enlargers that I will never use. After a day out of shooting with the 20″ x 24″ camera and processing finished, I was staring at one of these enlargers, an old Czechoslovakian-made Meopta made for 35mm film use only, and saw what could be made into a mini version of the large camera. This particular enlarger was a good one to use because the rack and pinion focusing mechanism was one piece with the bellow assembly. Because this was a spur-of-the-moment build and that I have the ability to easily load and unload film in the field, constructing it for use with a film holder was not necessary and not an option in my mind.
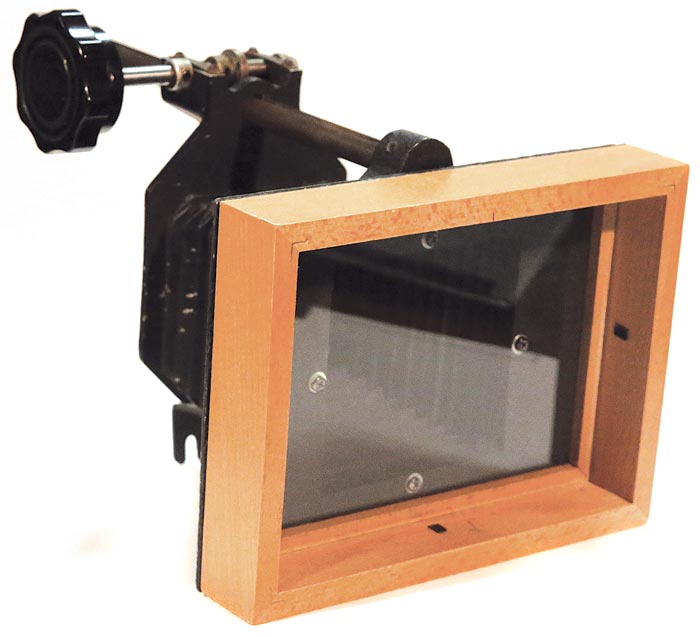
The four screws holding the whole bellows mechanism were removed and I had the workings of a camera in hand. I then took a 5″x7″ hardwood frame, cut a piece of very thin wood to size, cut a hole the same size as the enlarger hole for the bellows, painted it with flat-black paint, and attached it to frame with glue and small screws. The bellows assembly was attached to the board. The inside of the glass, as it would be in the normal frame, became the film plane. The glass has translucent tape over it for focusing. A piece of foam was cut to hold the paper/film in place against clear glass. The card that came with the frame is then taped in place as it compresses the foam against the paper/film.
To use the camera it is put in place, focused with the translucent tape glass and the position of the camera is noted. The glass is then replaced with clear glass, the paper, the foam, and the card backing. Meter read the light, adjust the f-stop and remove the lens cover for the required time. Because paper is processed in red light, processing can be varied for this development.
Phoblographer: You’re using 5×7 photo sensitive paper with an ISO of 6. What type of stuff are you shooting with it?
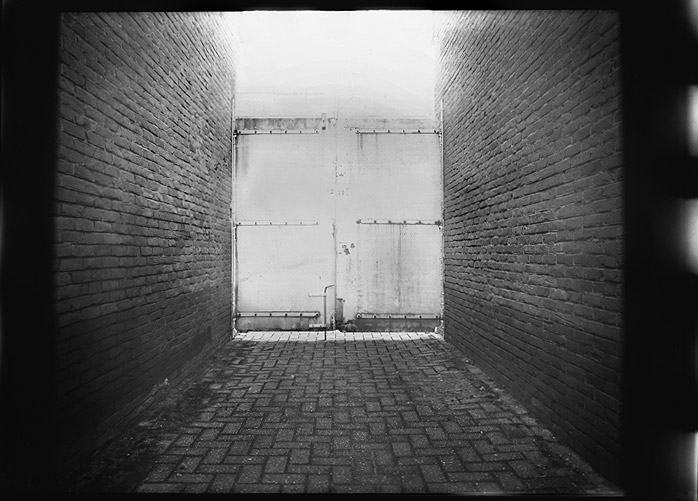
Chuck: Subjects tend to be still because of the length of exposure, though I have shot a couple of portraits with it.
Phoblographer: Why did you choose that specific ISO rating?
Chuck: The camera was actually intended for use with an ortho film that I use that I’ve rated at ISO 6. When shooting the first paper negative, which is technically rated ISO 25, I “mistakenly” metered for ISO 6 and got a good result. I have found that when using this camera in difficult light situations that bracketing, starting at ISO 6 up to ISO 25 in full stops, yields good results. I tend to lean towards the slower ISO in addition to using a 1.5 multigrade filter while shooting to maintain detail in the final shadow areas without highlights being completely blown out. This way I can burn in the highlight detail while keeping the shadow detail when printing the final.
Phoblographer: When creating something like this, do thoughts about how to take an image and photography in general tend to rush into your head?
Chuck: I have to say that thinking of images, almost as a language, is constantly on my mind and not only when making a camera. Cameras are fun, and I like them as objects, but they are tools or like words, if you like. Just like a paint brush or a hammer or the right word to finish the poem, the right tool is always best to use for a particular job. Sometimes a Canon 5D is right and sometimes a plastic lens 110 camera is better.
Phoblographer: How has the camera project inspired you?

Chuck: I think that other factors inspired me to make the camera. Making a tool that works for an intended purpose is a satisfying exercise, though I haven’t found the right image for this camera yet. I think that this project has inspired me to use more discarded materials in my art.
Get rid of the ads!
Did you enjoy reading this article as much as we enjoyed writing it? There's a way to support us and our reporting, getting ad-free navigation and more as a bonus. Subscribe to us for less than a coffee per month —just $3.99— or take advantage of our yearly subscription with a hefty discount for only $25.- An ad-free experience
- A free mystery box for Lightroom or Capture One
- All the books in our store
- 20% discount on Capture One
- 30% discount on Imalume Photo Theft Protection
- 20% off Herbs and Kettle Tea Company.
- 20% off your order from MPIX printing services.
- 5% off Viltrox Products via their eCommerce store.
- 10% off all film developing, printing and scanning services from Blue Moon Camera and Machine
- 15% off 7Artisans products: The lens and accessory maker is offering a sweet discount for Phoblographer's readers.