Creating the Photograph is a series that we try to do weekly where we feature photos that took quite a bit of work and a creative eye to mold. Want to be featured? Email chrisgampat[at]thephoblographer[dot]com.
Chris Martin is a wedding, commercial and creative portraiture photographer hailing from Florida. Upon browsing his portfolio around a year ago, I immediately thought that it was quite killer and very inspirational. Then, Chris released film presets for Lightroom and Photoshop and recently updated them for Lightroom 5.
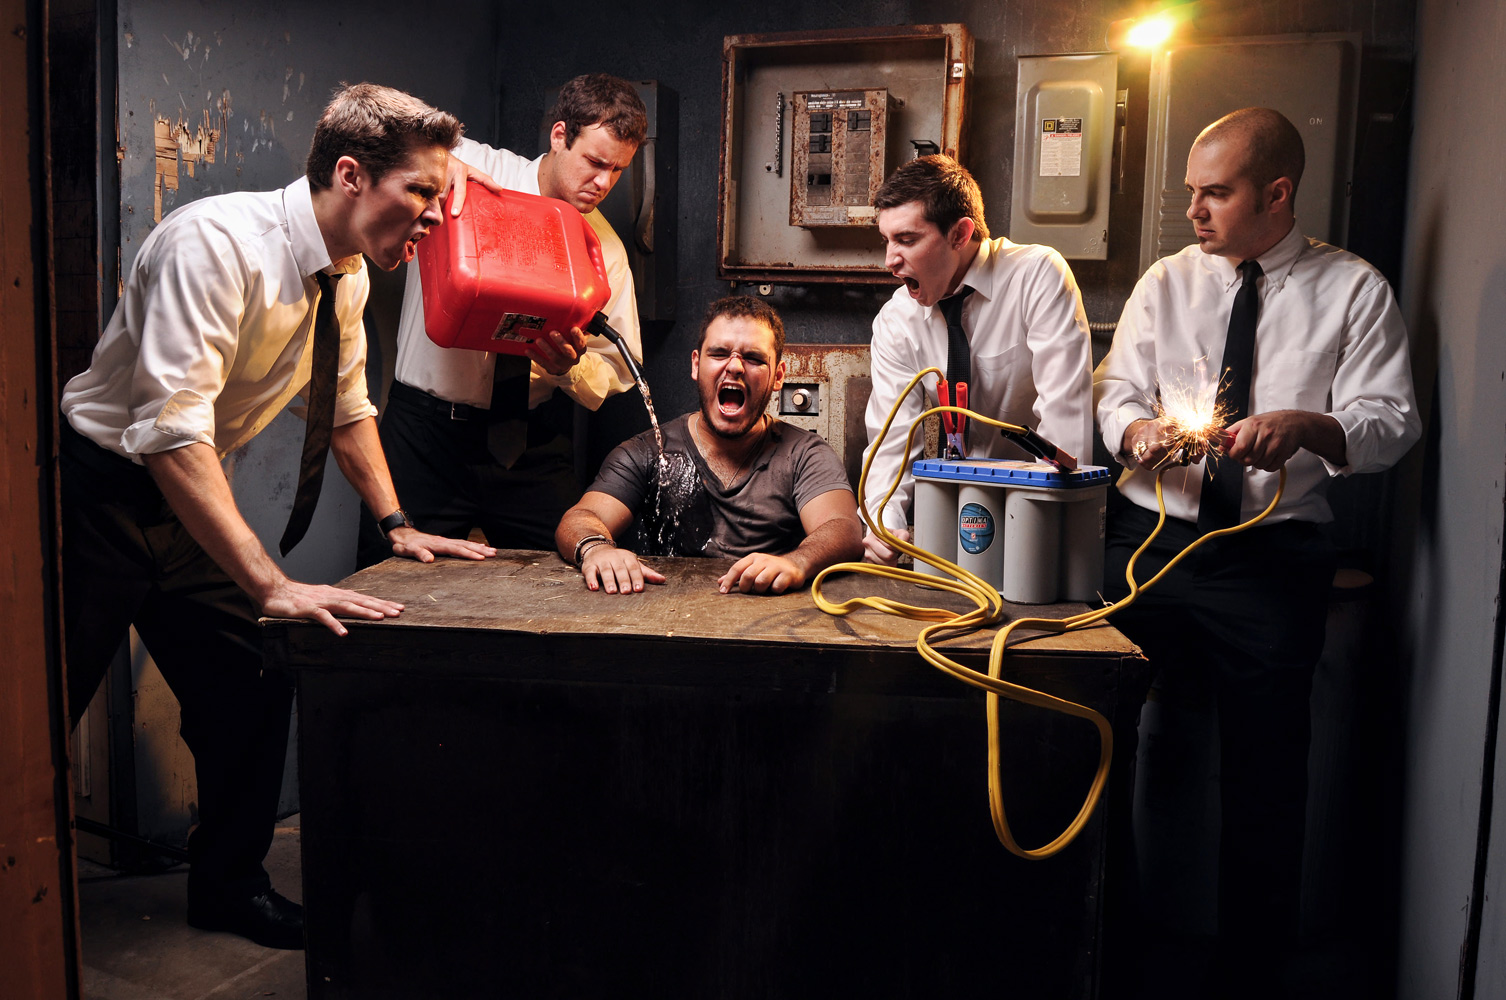
But besides Chris’s knowledge of lighting, one of the tools that makes him so noteworthy of a photographer is his creative vision and his concepts. The photo above was shot for the band, “Grenade Face.” Even crazier is that it was done with a kit lens.
And there’s quite the story behind it.
The Concept
The band “Grenade Face” had approached me about doing a few images for a new release they had coming out, as well as to promote their band for some tour dates that they had coming up. The shoot was taking place around Halloween, so we were trying to put together a few different ideas for shots. One of which was a photo with a number of zombies attacking them where we styled it to have the feel of the video game “Left For Dead” which you can see on my website. For this particular shot they wanted something that emulated the movie “Reservoir Dogs” and I think we did a pretty good job of capturing that vibe!
Gear
I am a big supporter of using minimal gear, and getting quality shots from what you have so some of this list may surprise you!
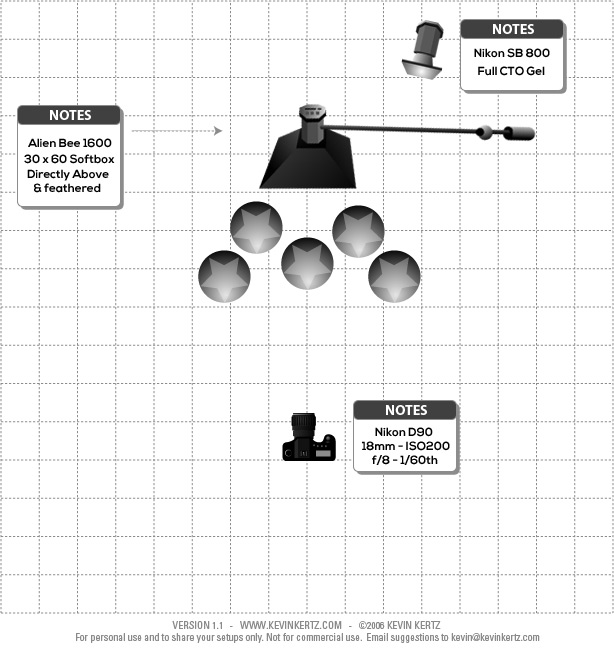
Nikon D90
Nikkor 18-55mm 3.5-5.6 (yes a kit lens!)
Paul C Buff Cybersync Triggers and Recievers
1 Paul C Buff – Alien Bee 1600
1 Nikon SB 800
1 Full CTO Gel
1 Vagabond Battery Pack
13ft Heavy Duty Light Stand with Boom Arm
Gaff Tape
Lightroom
Photoshop
The Shoot
So as every shoot normally goes, figuring out the proper location was the first thing on my list. I knew I wanted to have a more dreary, sort of abandoned vibe for the shot, but it is pretty difficult to find those types of locations in the beautiful Palm Beach, FL. I spoke with a friend of mine who had a connection with the South Florida Fair. It just so happened that Fright Nights was taking place during the time we were planning on shooting. This is an event during Halloween where they build out an extremely large warehouse into 3 separate haunted houses and thousands of people go to get their “fright” on every weekend leading up to Halloween for a month. We got permission to shoot inside of the haunted houses as long as it was during the day on weekdays, so I did a walk through of all the different rooms and then found the perfect one for this shoot.
I knew I wanted the key light to feel more like ambient ceiling lighting, but still wanted to get some lighting hitting the subjects faces so I chose my AB 1600 with the Giant 30×60 soft box, boomed it over head and tilted it a bit to feather the light so that the shadows on the subjects faces were not too harsh. I also wanted to add some separation from the background but wanted it to be a bit warmer than the key, so I taped my SB 800 to a power box behind the subjects, gelled it with a full CTO and put it on full power to provide some additional rim light.
We were going for a darker vibe of an interrogation so we added in the gasoline tank (full of sweet tea to look like gasoline) and an live battery to be able to create some actual sparks to give a little more mood to the image. During the shoot the sparks were a little harder to get in camera then I anticipated, so we ended up making some additional sparks from the battery at the end so that I could add them in post after the fact. Also, there was another gas can near us that was actually full of real gasoline to power the generators inside the haunted houses. One of the guys had accidentally picked up the real gas can at first, but we (luckily) caught it in time before any was spilled out (thanks to the horrendous smell). It could have been a disaster, so word of advice, ALWAYS check your props before you shoot (especially when working with anything that be dangerous!)
After working that all out, we shot in this location for around 15 – 20 minutes, changing up expressions and emotions throughout that time. When we got this shot, I knew we had the winner, so we wrapped this location and then moved on to the next.
Post
I always begin my post workflow by importing all of the images from a shoot into a new catalogue in Lightroom. Making new catalogues frees up a lot of memory because it does not have to load all of your images from every shoot you have ever taken, and the program ends up working a lot faster. I cull through my images, and then when I choose my finals I do some color correction and if needed I will play with levels a bit to get the exact exposure I want (If i did not nail it 100% in camera).
Then I bring the image into Photoshop, do whatever retouching is necessary for skin and faces and then I move on to any additional bells and whistles that may be needed. For this image, I did some dodge and burn techniques to emphasize the highlights and shadows. I also removed the visible receiver and sync cord from my SB 800, added the battery sparks in the screen blending mode, and did some final sharpening to finish off the image.
Before

After Lightroom
After Dodge and Burn
Final Image
For more you can follow Chris Martin on Facebook, Twitter or Tumblr.
Please Support The Phoblographer
We love to bring you guys the latest and greatest news and gear related stuff. However, we can’t keep doing that unless we have your continued support. If you would like to purchase any of the items mentioned, please do so by clicking our links first and then purchasing the items as we then get a small portion of the sale to help run the website.
Also, please follow us on Facebook, Flickr and Twitter.
Get rid of the ads!
Did you enjoy reading this article as much as we enjoyed writing it? There's a way to support us and our reporting, getting ad-free navigation and more as a bonus. Subscribe to us for less than a coffee per month —just $3.99— or take advantage of our yearly subscription with a hefty discount for only $25.- An ad-free experience
- A free mystery box for Lightroom or Capture One
- All the books in our store
- 20% discount on Capture One
- 30% discount on Imalume Photo Theft Protection
- 20% off Herbs and Kettle Tea Company.
- 20% off your order from MPIX printing services.
- 5% off Viltrox Products via their eCommerce store.
- 10% off all film developing, printing and scanning services from Blue Moon Camera and Machine
- 15% off 7Artisans products: The lens and accessory maker is offering a sweet discount for Phoblographer's readers.