Last Updated on 04/10/2013 by Chris Gampat

Editor’s Note: Creating the Photograph is a new series that we’re starting where we interview photographers all about the photo that they shot and talk to them about how it was achieved. The results are some knowledge passed onto you. Want to be featured? Email chrisgampat[at]thephoblographer[dot]com
Bill Wadman is an NYC based photographer that has specialized in portraiture and editorial work for many years. His previous projects, 365 Portraits, won him much praise from many media outlets a couple of years back. He has also been a contributor to TIME, BusinessWeek, Improper Bostonian, POZ, Popular Photography, The New York Times, La Monde, Eloquence, Der Spiegel, Wharton Magazine, Times of London, USA Today, The University of Chicago Magazine, Fast Company, WIRED.com, and Corriere della Sera. Advertising clients include Gillette, The NY Lottery, UBS Bank, Practical Law Company, and (RED). But most recently, he’s also been one of the hosts of On Taking Pictures–one of the best photography podcasts we’ve seen as of late. We asked Bill to talk to us about this photo called, “Diner Scene.”
And here’s how he created it for our latest edition of Creating the Photograph.

The Concept
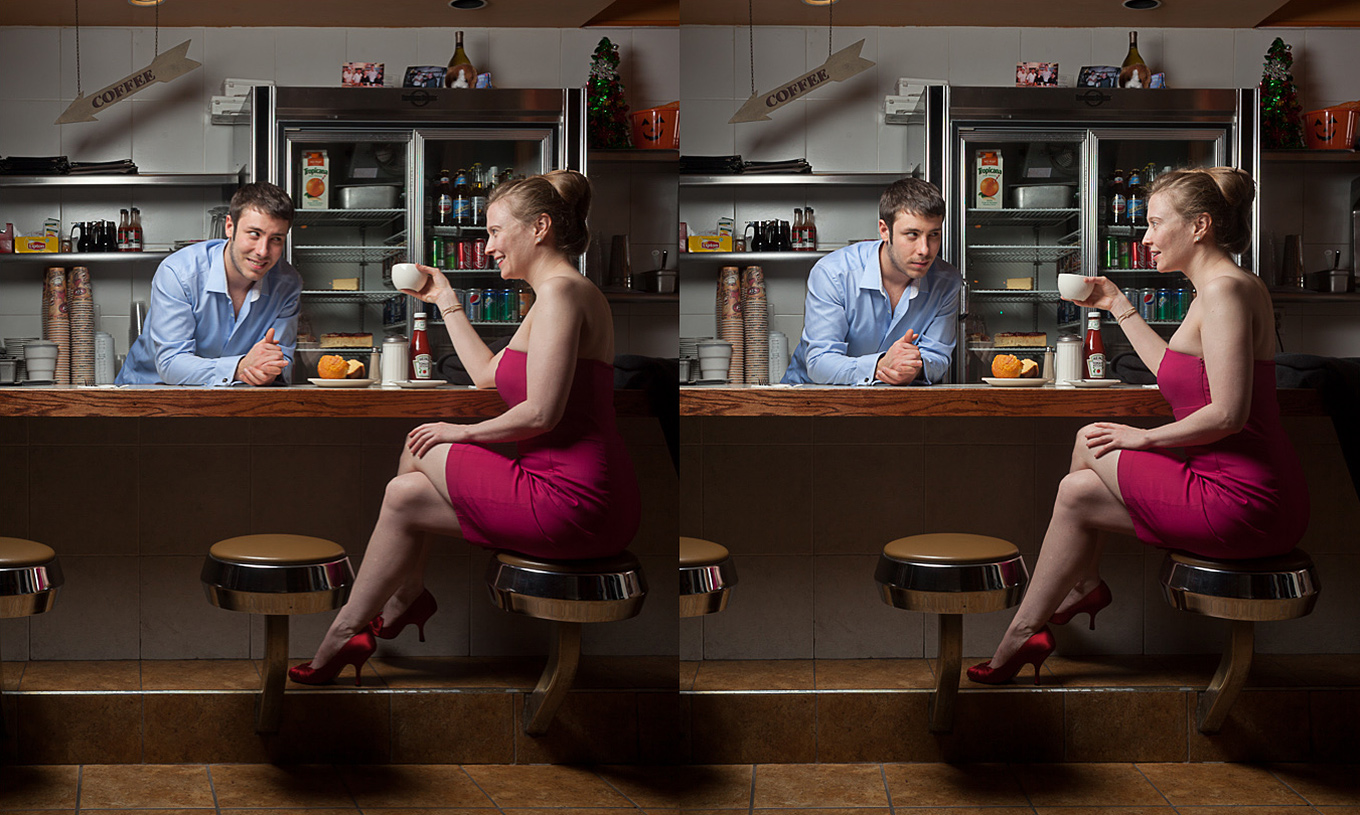
I’ll admit it. I’m in love with the characters and light in Norman Rockwell paintings. They’re not real–they’re better than real. In fact, they’re perfect in that imperfect way: America in a bottle. There’s that classic Rockwell shot of a kid and policeman sitting at a diner counter. It had a great feel but I needed it to be a little more gritty, a little more modern, and a little more Hopper-esque. I wanted to see if I could absorb that feeling and make something of my own with it. First I had to find the location, but as it turns out I’m good friends with the guy who runs the diner in my neighborhood, so I asked if we couldn’t use it as a location one night after closing. The concept was to have a dolled up woman sitting at the counter very late at night. Perhaps she just got off a bad date or was stood up, either way, the late night manager at the diner is going to take the opportunity to hit on her. That’s about all I had going in.
Gear
Alien Bees B400 Monolight
Paul Buff Medium Softbox with Grid
The Shoot
Step one was to find my cast of characters. The actual diner manager Nick was perfect for his normal role and I had a friend lined up to play the femme fatale. However on the night of the shoot was a bit of a snow storm and she cancelled at the last minute. So I turned to my ever accommodating partner Heather to take her place. My friend Claude came along to give me an assist with the lighting and in the end I used him at the last minute as the begrudging patron at the other end of the counter looking on with scorn.
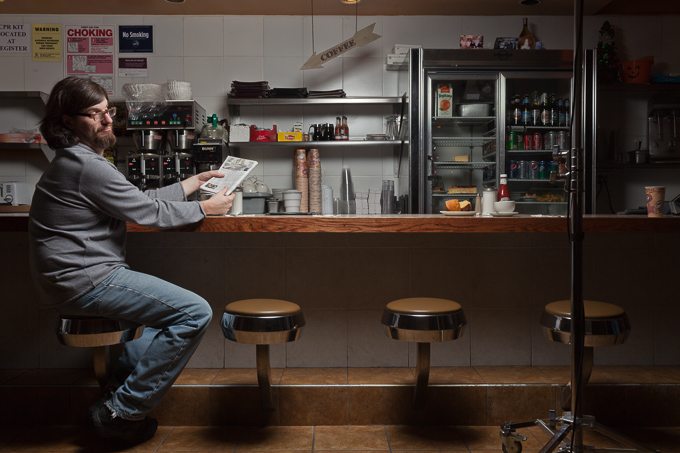
The actual lights in the diner were not going to give me what I was after. They were too modern and mixed in color temperature to give me what I was looking for. They definitely didn’t look like painting I had in my head. On top of that, I needed far more light to get the depth of field I was looking for and I wanted the lighting to be softer and from above without having any nasty eye shadows so I ended up using a single monolight coming in over the top on a boom. The gridded softbox was tilted toward each side depending on the shot. So it was turned to the right to shoot Nick and Heather and then to the left to shoot Claude. If you had more time and rigging you could certainly do it with a couple of lights simultaneously, but again, I had the luxury of working one side at a time.
There wasn’t too much room between the counter and the booths along the opposite wall, so after we moved all of the tables out of the way it looked like I was going to have to use a 35mm wide-angle lens to fit the 4 seats of the counter into the shot. I put the camera on a tripod and locked in a manual exposure with the strobe of f/11 at 1/125th of a second.
I didn’t expect to get the whole picture in one shot. These people weren’t actors and I knew that I’d have to do a lot of post production anyway, so I went in planning on piecing the final photograph together later. It was all about getting just the right expressions on each of their faces in at least one frame a piece. I needed the couple flirting and the other guy grumpy. When I was happy with the ingredients I had to work with, I also removed the grid and shot a nice clean ‘plate’ of the counter with no one around. This is always a good idea in composite work. You never know when you’re going to need something that’s behind one of your subjects. All in all about a 1 hour shoot from top to tail.
Post Production

Step one of post production was choosing the element images. I do this in Lightroom by giving pictures that might work 1 star, then going through the 1 star images and choosing the standouts to get two stars and so on. In the end I had one of each of the characters that I was happy with. I opened them up as layers in Photoshop along with the ‘plate’ to serve as the background layer and started the someone tedious job of masking them in. There are numerous ways to mask people in Photoshop, but I tend to do most of my work old-school style with a layer mask and a paint brush at 100%. I’ve tried other methods but invariably have to clean them up this way, so why not just start here in the first place.
Once things start looking like a cohesive whole and I’ve done any minor skin retouching and the like, I go back in with numerous curves adjustment layers, masking in local contrast and color correction to try to make the whole thing feel a bit more painterly. Darkening much of the background to make the people pop a bit more. In this kind of photograph, the shadows are your friend, they add mood and mystery. It’s all about how you play the lines between the light and the dark. Go and study Caravaggio for more on this. Oh, and I turned her dress from pink to red as I thought it added a bit more pop to the composition.
In the end I felt that I needed to warm the whole picture up a little bit and add a very subtle lens flare across the middle to give the light that is just out of frame more of a role in the production. Finally a little vignetting and a subtle bit of high-pass sharpening to blend everything together and give it a little more dimensionality and I was done.
You can go take a look at more of my work at my website, I’m on twitter as @billwadman, and don’t miss the weekly podcast I do with @jefferysaddoris of Faded and Blurred about the art, science, and philosophy of photography called On Taking Pictures on the 5by5 network of shows.
Before and After

Want to be featured? Email chrisgampat[at]thephoblographer[dot]com
Please Support The Phoblographer
We love to bring you guys the latest and greatest news and gear related stuff. However, we can’t keep doing that unless we have your continued support. If you would like to purchase any of the items mentioned, please do so by clicking our links first and then purchasing the items as we then get a small portion of the sale to help run the website.
Get rid of the ads!
Did you enjoy reading this article as much as we enjoyed writing it? There's a way to support us and our reporting, getting ad-free navigation and more as a bonus. Subscribe to us for less than a coffee per month —just $3.99— or take advantage of our yearly subscription with a hefty discount for only $25.- An ad-free experience
- A free mystery box for Lightroom or Capture One
- All the books in our store
- 20% discount on Capture One
- 30% discount on Imalume Photo Theft Protection
- 20% off Herbs and Kettle Tea Company.
- 20% off your order from MPIX printing services.
- 5% off Viltrox Products via their eCommerce store.
- 10% off all film developing, printing and scanning services from Blue Moon Camera and Machine
- 15% off 7Artisans products: The lens and accessory maker is offering a sweet discount for Phoblographer's readers.