Last Updated on 11/11/2014 by Chris Gampat
I would call timelapses a fad, but these tend to go away after some time. People have been pushing the envelope for quite some time now with some amazing short films. Some of which has created big stars like Tom Lowe and his forum. Getting started with a timelapse is a daunting task that can include just a still camera or many moving parts.
I’m here to talk about my experience with TriggerTrap which gives most cameras the ability to do a timelapse. TriggerTrap is essentially a team up between a great mobile app and a cable which connects your camera to your phone. Lets see what Triggertrap can do for you.
Update 11/11/2014: We’ve updated the review ot include some of the new features. All updates were done by Chris Gampat
Pros and Cons
Pros:
- Portable and small
- Gives many new abilities to your cameras
- Makes setting up complicated procedures easy
Cons:
- Requires a portable device
- App has to stay open which drains battery
- Requires something to mount phone to camera
Tech Specs
Triggertrap app consists of 17 features:
- Timelapse Mode
- TimeWarp™ Mode
- Sound sensor Mode
- Shock & Vibration sensor Mode
- Metal & magnetism sensor Mode
- Facial recognition Mode
- LE HDR Mode
- LE HDR Timelapse Mode
- DistanceLapse™ Mode
- Motion detection Mode
- Cable Release Mode
- Star trail Mode
- Bulb Ramping Timelapse
- Wi-Fi Slave Mode
- Wi-Fi Master Mode (trigger other devices running Triggertrap Mobile
- Sunset & Sunrise Calculator
- Lag-o-Meter
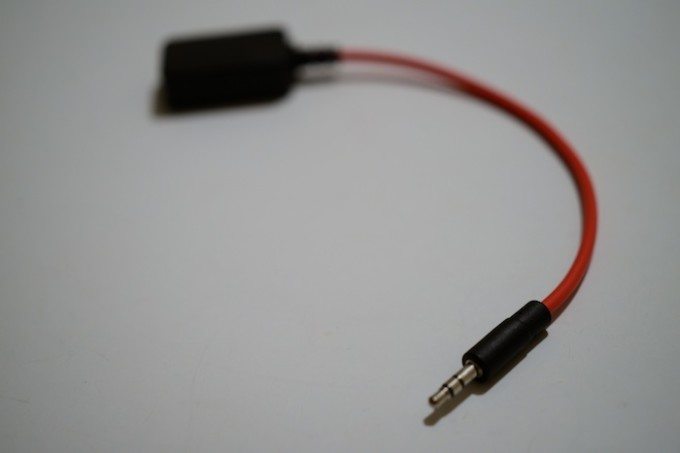
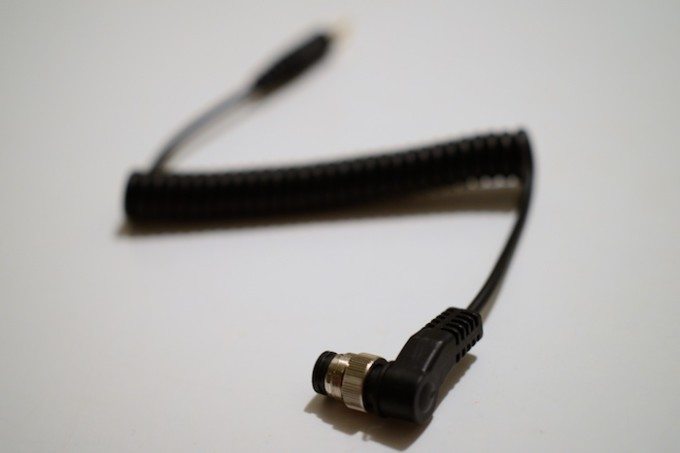
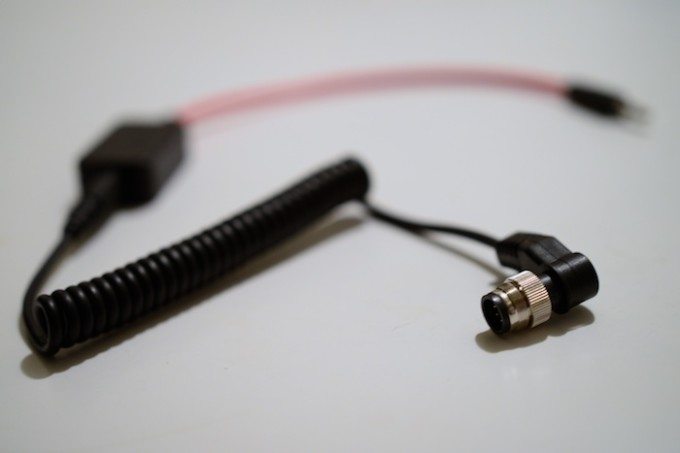
The cable portion of it consists of two different pieces, the TriggerTrap dongle and the connection cable.
Ergonomics and Build Quality
I remember muttering a “thats it?” when I first opened the TriggerTrap box. I’m not sure why I expected more but I just did. The cables aren’t anything special and each is about eight inches long.
The build quality is quite standard, not on the beefy side but also not too frail. They are pretty close to the thickness of an Apple usb cable. The length of the cable was only a problem before I got a hot shoe adapter for my iPhone. I suggest buying this along with the TriggerTrap so you don’t have to hang your phone from your camera.
Portability
As I mentioned earlier, the Triggertrap (TT) consists of just two cables so I have been bringing them with me everywhere. If the opportunity had arrived I would always have access to the right tools for an epic timelapse. I never felt burdened by the weight because it is the lightest of all the extra items I carry with me.

The other key to creating a timelapse is the mobile app which will already be pre installed on your phone before a big trip. I will get to this later, but if you are planning on doing a lot of shooting with the TriggerTrap, I would suggest bringing along either an iPod Touch, an iPad, or a compatible Android device.
Ease of Use
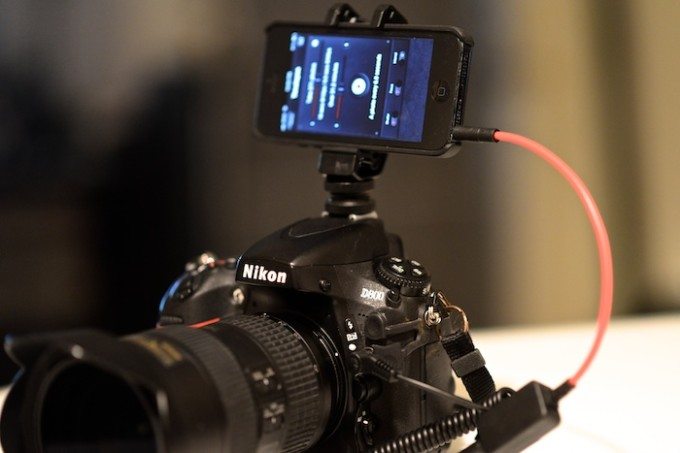
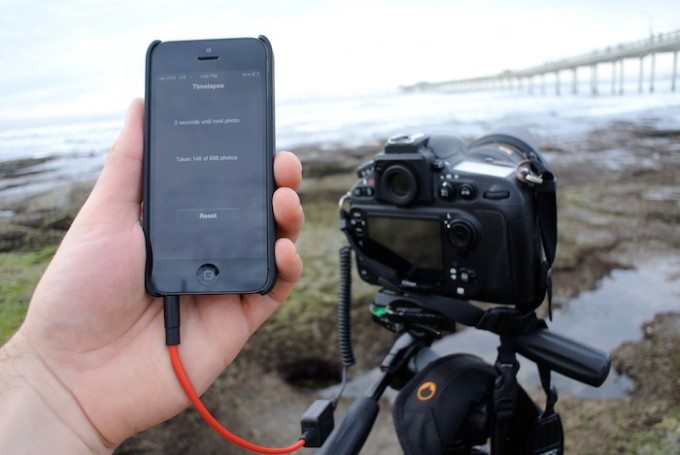
For the review I am using my trusty Nikon D800, so the first step is to attach the camera connector cable to the accessory port. When purchasing the Triggertrap you will follow a series of drop down menus to choose which adapter is right for your camera. In my case it is the CL-DC0 connector.
Once the camera is secured to the camera connector all you have to do is attach the dongle. The dongle will plug into your devices headphone jack and will join the connector on the other end with a 2.5mm looking plug.
Once theses are attached all you have to do is launch the mobile app. When you launch the app the display will show an extensive mode list. These range from a simple cable release to the ability to capture images when a face is detected. I will get into these features in a bit, but first I would like to discuss some weaknesses of the system.
First off, when shooting, the app cannot be disturbed on your mobile device. Your sequence will simply stop if the app is closed, it does not have the ability to run in the background on iOS. Also I had disturbances when receiving normal notifications as well as a low battery warning. When I cleared the alert surprisingly the app didn’t continue on its merry way taking pictures. From time to time I could just restart the process, but there was a time when I had to force quit the app all the way to continue. These are most likely not problems with TriggerTrap itself, but issues with the limitations of iOS. Companies have to work around the tight restrictions of the allowed APIs. TT should be applauded for finding so many ways to incorporate the features of my iPhone. I think of these as growing pains with the system and things that I have to remember going forward if I want to create fluid timelapes.
This is a 4k timelapse that was compiled from thousands of images. I used Sequence to create movies from the stills and styled them in FCPX using Magic Bullet. To view the 4k version make sure you select “Original” under the settings gear.
Update

For the Android version, Triggertrap has received a makeover that is much more in line with the company’s branding and overall looks. It even gives you a small tutorial on how to use the app. Whether you choose to go through this tutorial is your choice, but it substitutes well enough in the place of a user manual.
By tapping the area in the upper left of the app, the user can unlock all of the abilities that Triggertrap can do.
From there the user can select many of the app’s features just by scrolling. Each feature even comes with its own small description. That works out pretty well for people that are new to the app.
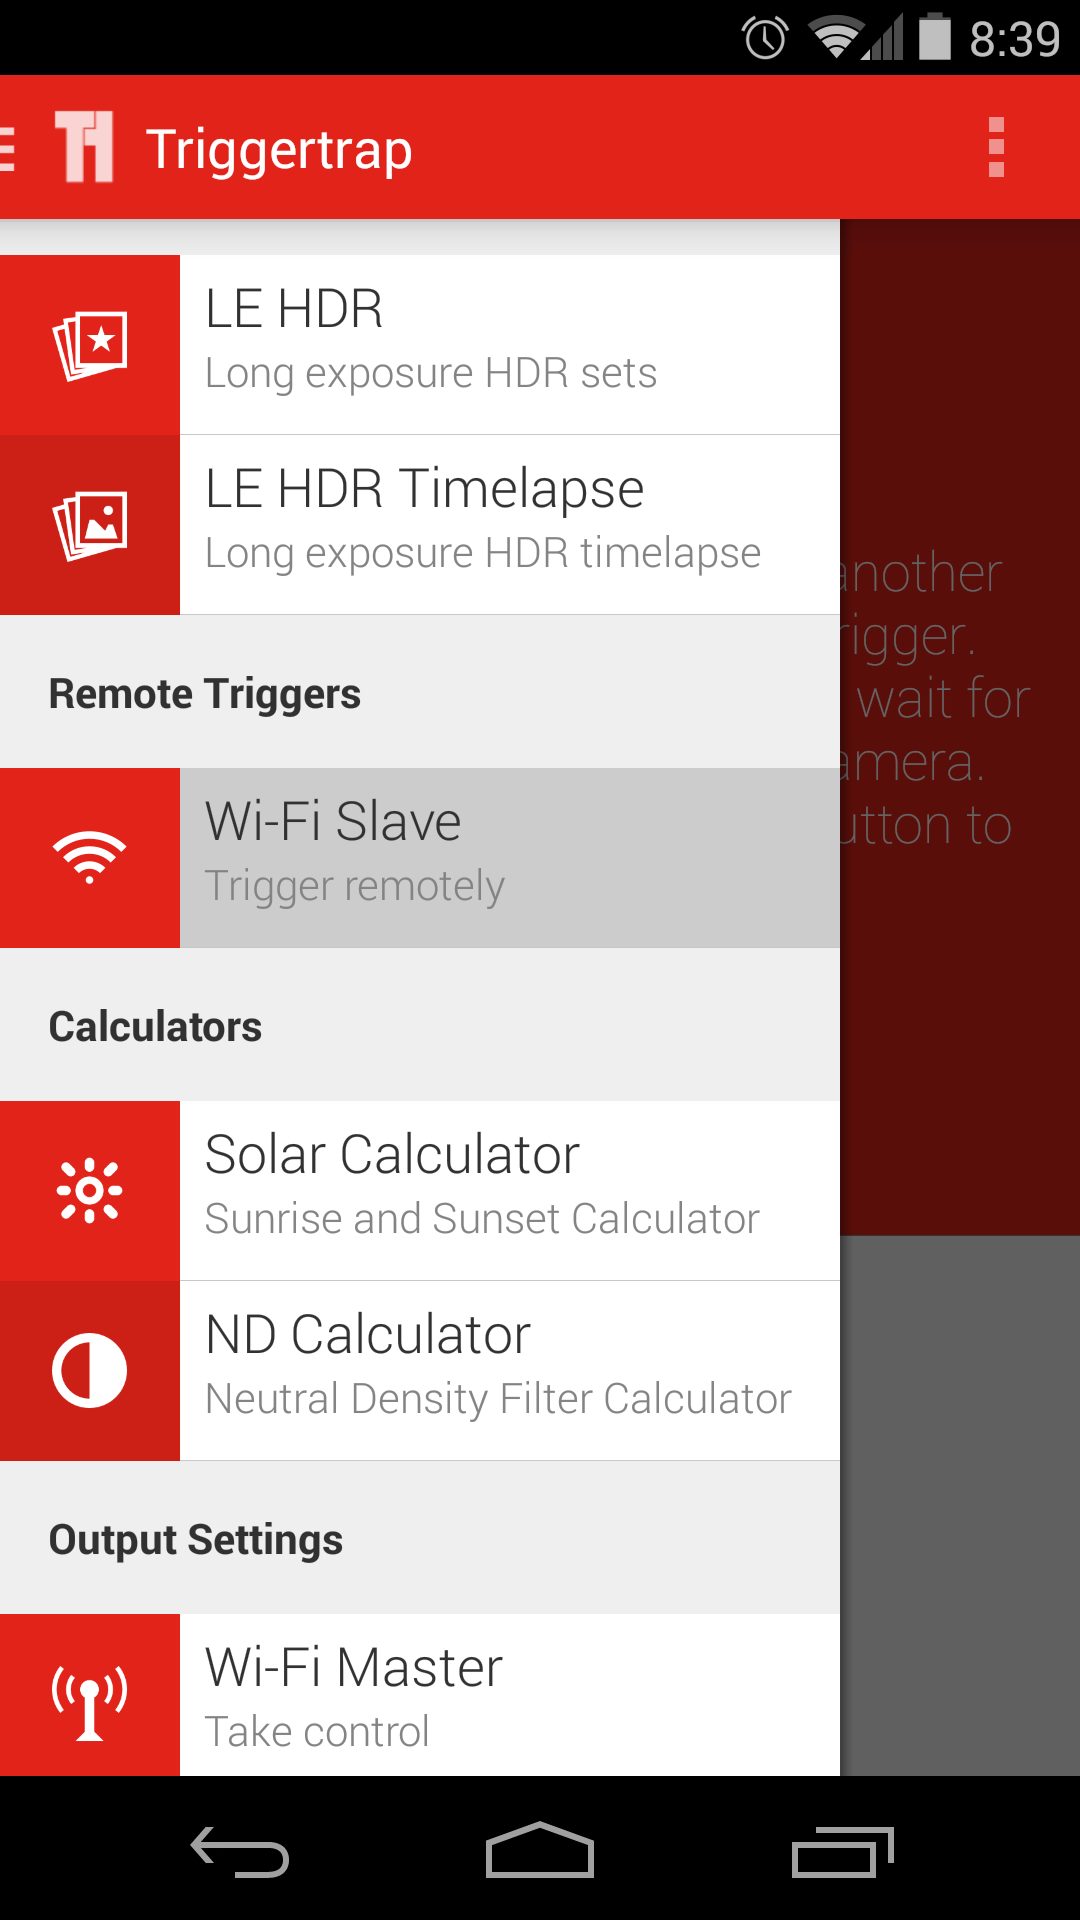
Triggertrap Mobile App Features
There are quite a few different options and I will go over a few of them in detail. When you enter the app all of the modes are listed on the first screen which makes choosing one easy. Once you choose a mode inside of each is a little “i” icon which explains the your selected mode and details most options.
Cable Release
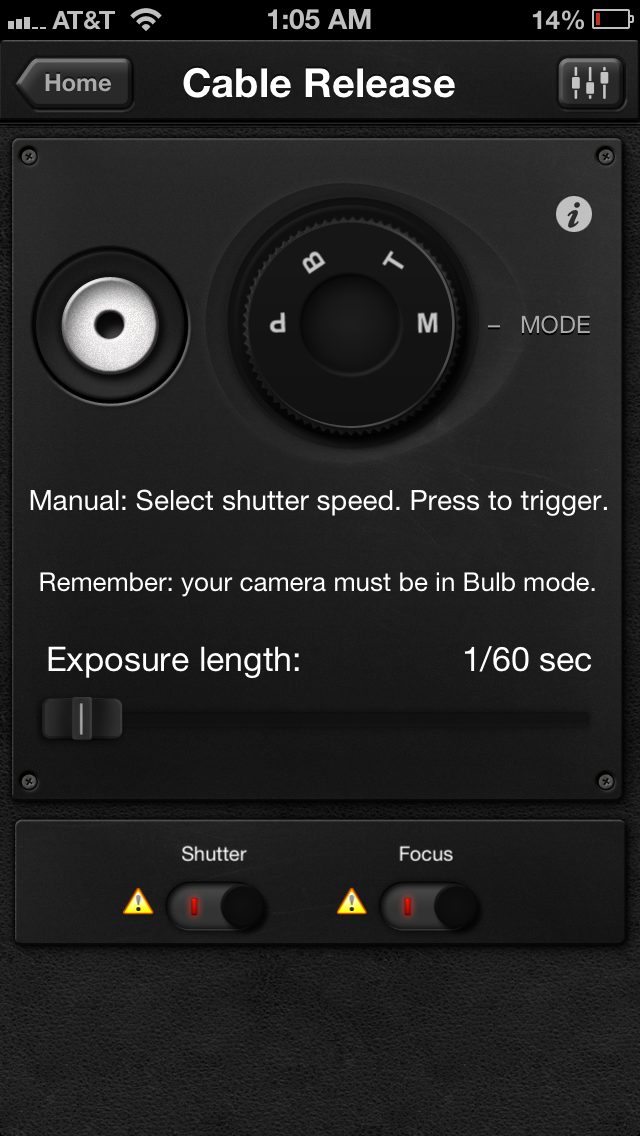
This feature can be used as a replacement for a release left at home. I have a cheap knockoff one for my Nikon, so if it ever fails, this will do nicely. Cable Release offers the ability to do Program, Bulb, Timed Bulb and Manual. For the bulb modes keep in mind that your camera must still be placed in the proper bulb setting. Manual mode lets you set the cameras exposure from 1/60th to 60 minutes. Think of the possibilities!
Bang
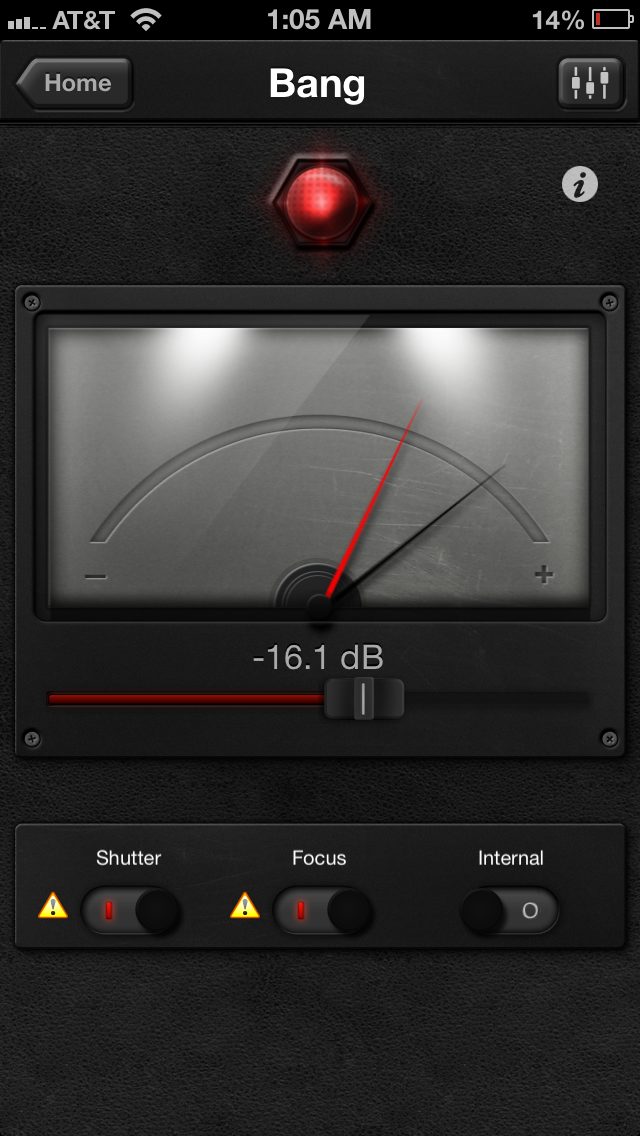
This is a mode where the camera will use your mobile device as its own ears. I actually love this mode although I struggle to find a use for it. Bang give you the ability to set a decibel where, if reached, it will trigger the camera to take a photo. A problem I have with this is that I own a D800 and at TT’s loudest setting, my camera is louder. This causes the app to continue taking photos because each shot activates the next. Possibly in a wider less closed off area the sound of my shutter will be able to escape. This was tested with my phone on top of my camera. The creative possibilities are endless from catching a predator or yelling at the camera from a distance to capture a selfie!
Timelapse
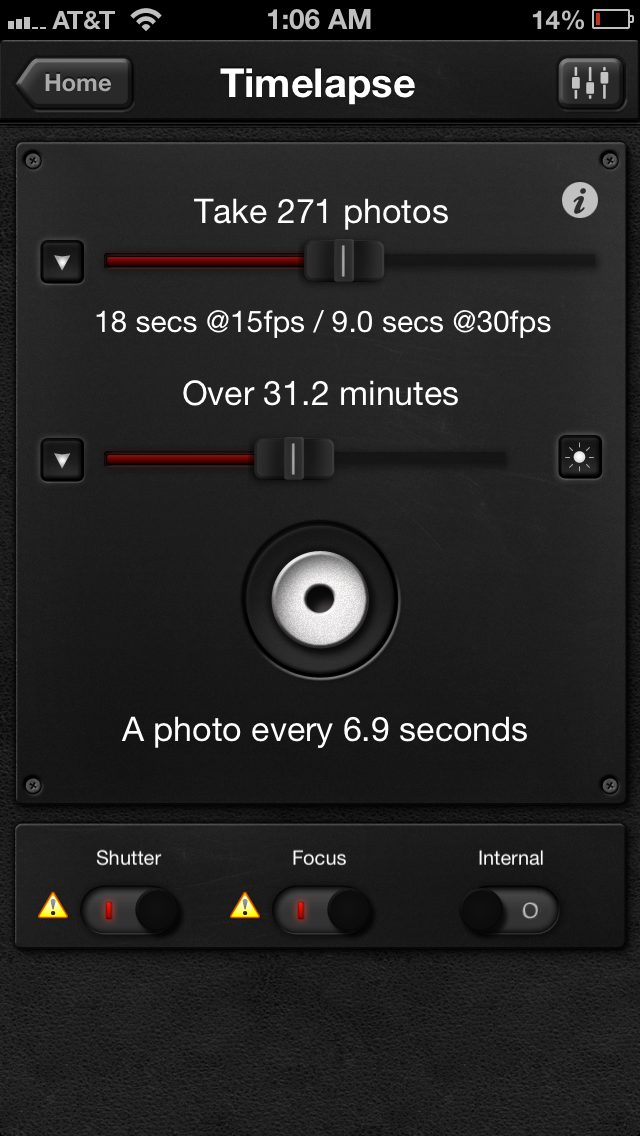
We know what timelapses are so I won’t go into detail on what it does. I am instead going to focus on the specific drawbacks of using it. My biggest complaint is the fact that it displays the total time at either 15 or 30 FPS. As people should know, the cinema standard frame rate is 24 FPS at the moment. This oversight required me to get an additional app on my phone to simply calculate 24p. This feature allows you to set the amount of photos taken from 9 to 10,000. Time can also be set for how long you would like to capture for from 13 seconds to 7 days. A nice tiny addition is the little sun icon on the right side of the time slider which allows you to see current sunrise / sunset times.
TimeWarp
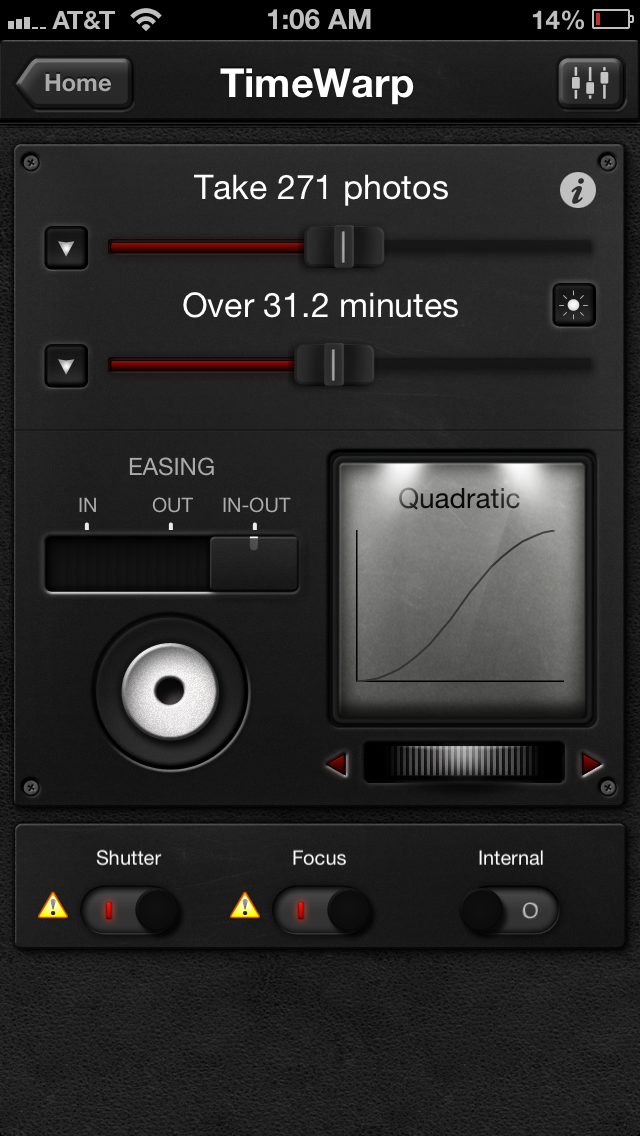
Very similar to timelapse this mode will add the ability to ease in and out of your lapses instead of it abruptly starting/ending. TimeWarp will allow you to just ease in, ease out or both with the option if different rates. I complained about the timelapse feature not having a 24 FPS mode but this one doesn’t even offer the unconventional 15 or 30 FPS. With TimeWarp, you are on your own to set your intervals.
DistanceLapse
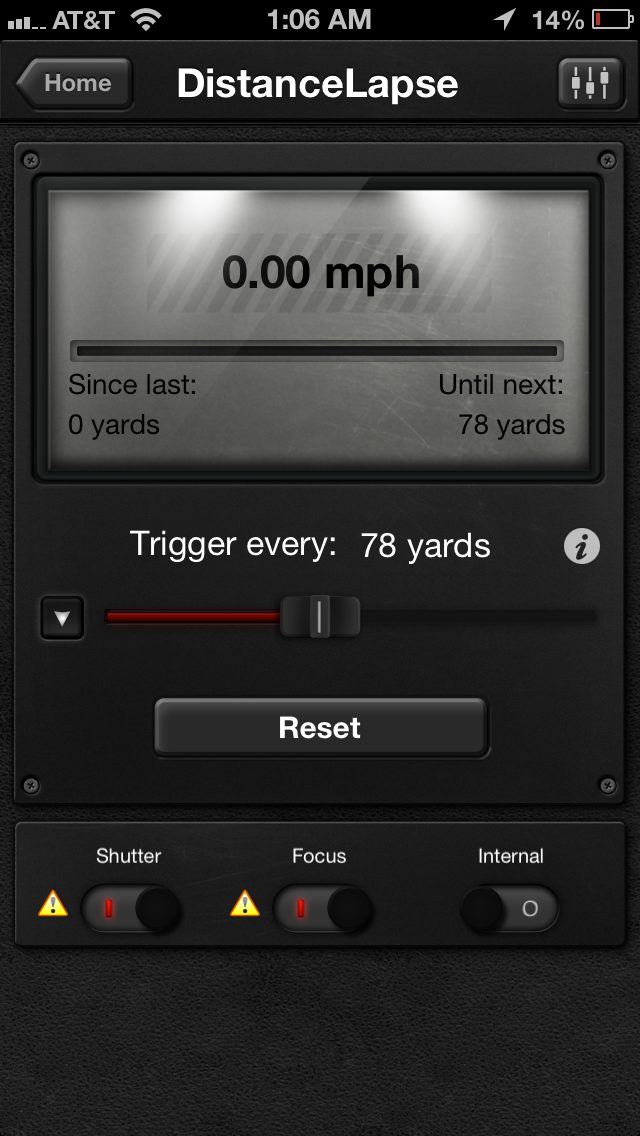
Are you planning a roadtrip and want to document every mile from your perspective? This is the feature that you want and need. Well that is if you need if measure distance in yards… I assume yards was chosen for a reason because the range for the distance slider is 8 to 1,640. Since there are 1,760 yards in a mile, it seems like that will be the closest you will have to a relevant measurement. So for people like me and for quick reference when the bar is set in the middle, the camera will take a photo every half mile and so on. I always have an idea of what a yard is but measuring a long road trip in yards is tough, you might as well ask me to measure in feet. Complaining aside, this feature will be priceless for capturing epic journeys.
Seismic
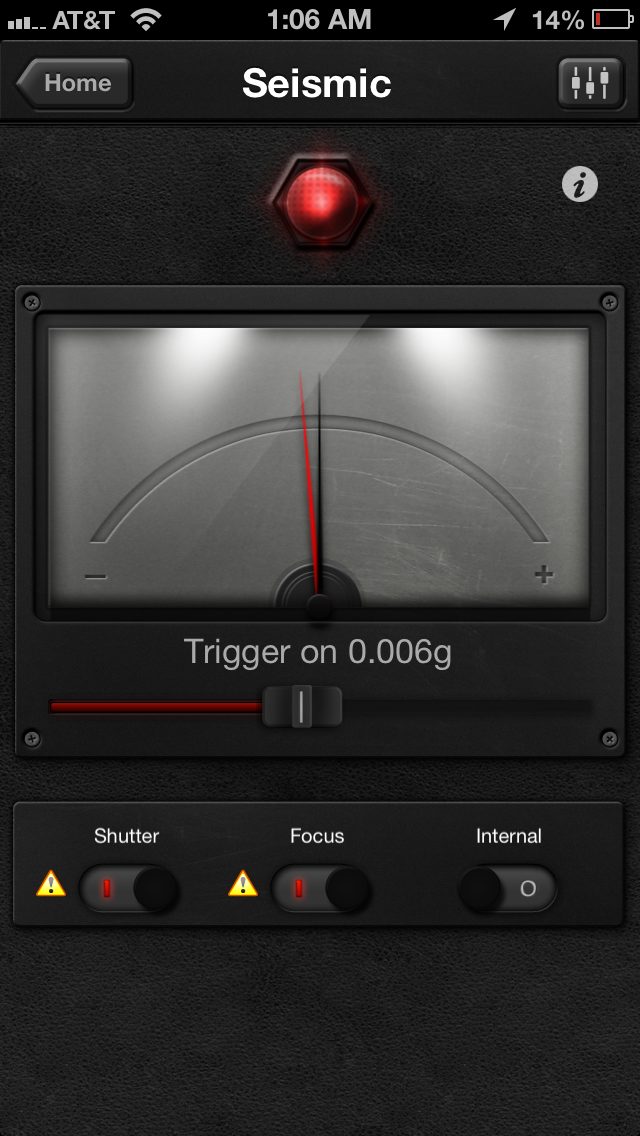
As it would appear this mode allows the camera to capture a photo if it reaches a user-set vibration level.
Peekaboo
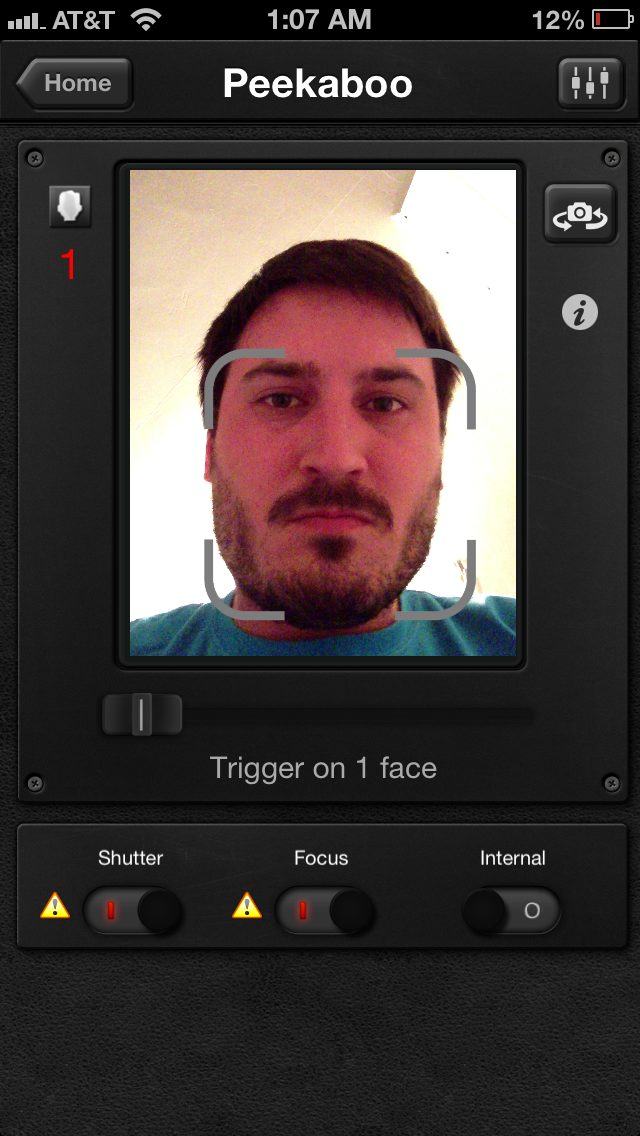
Photobooth Anyone? I really hope someone out there is raking in the cash after turning this cheap adapter into a profitable business. Like other features, Peekaboo uses the iPhone’s unique ability to recognize up to five faces. Every time a face is detected it is framed with a bracket and the counter goes up by one. Simple and easy once the amount of faces set are seen the camera fires off a round.
Star Trail
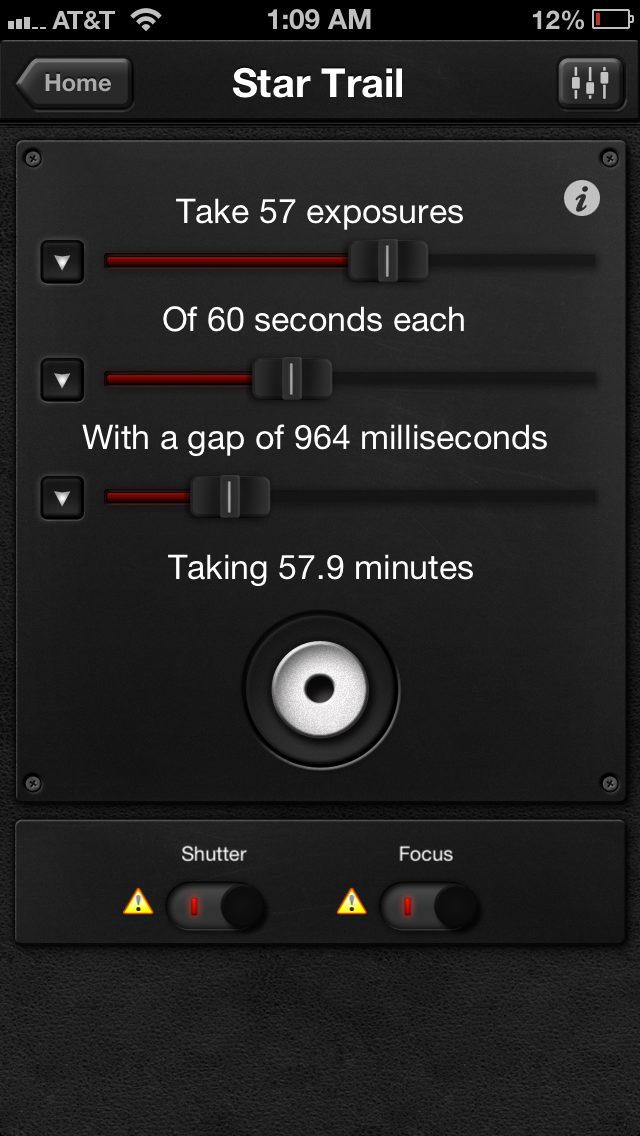
Like timelapses, we all know what star trails are and they are equally amazing. This features just eliminates the pain, leaving you with all gain and cozy in a car. There are just three settings and they are amount of exposures, how many seconds each and gap between shots. You can take 1 to 1,000 exposures, from 1 to 24 hours exposure time for each shot and 100 milliseconds to 60 minutes between each shot. You really have quite a lot to choose from here and there are zero complaints from me. I’ll be warm in my car while my camera works throughout the night.
Le HDR

On my Nikon, I have the ability to do 9 frame bracketed images, but I rarely ever need to go that far. Usually, this mode on my camera is more for CYA purposes but the Le HDR feature allows you to go beyond that. This feature is like catnip for your HDR button allowing you to go from 3 to 19 exposures. The main slider is the first one and it allows you to set the time of your middle exposure which is your 0EV properly exposed image. This middle exposure can be set from 1/15th of a second all the way up to 10 minutes. Changing this up and down gives you more or less available brackets. The second slider changes the amount of exposures that you want based on what settings are set. You also have the option to set the EV steps between each shot from 1/3rd to 2, these also affect the total of shots you can take. I didn’t have a need for this but if I wanted to do more than three brackets on my D600 I would need a Triggertrap (or do it manually blah). A great feature for those Canon people looking to get more than five brackets on their professional cameras.
Le HDR Timelapse
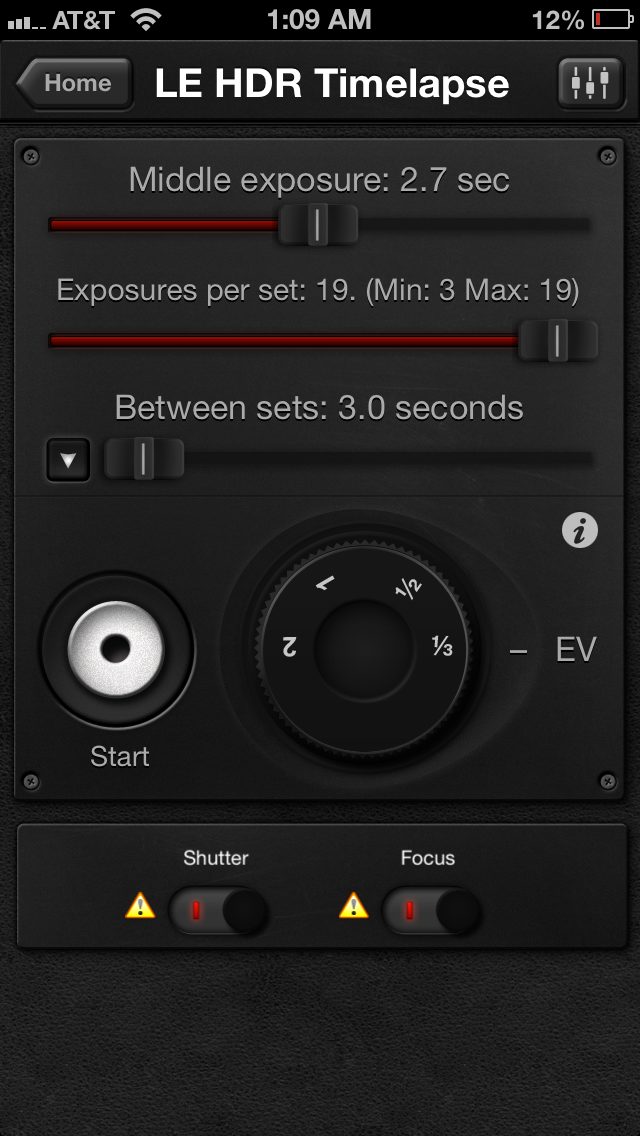
A combination of the timelapse option and the above Le HDR function. Think of this as your gateway to making your first HDR timelapse. I hope those who choose this are ready for the workflow of creating the final movie.
Tesla
This is a mode that I left unused due to the fact that I have no idea why I would use it. Tesla can activate your camera if a set amount of magnetism is sensed by your mobile device.
Motion
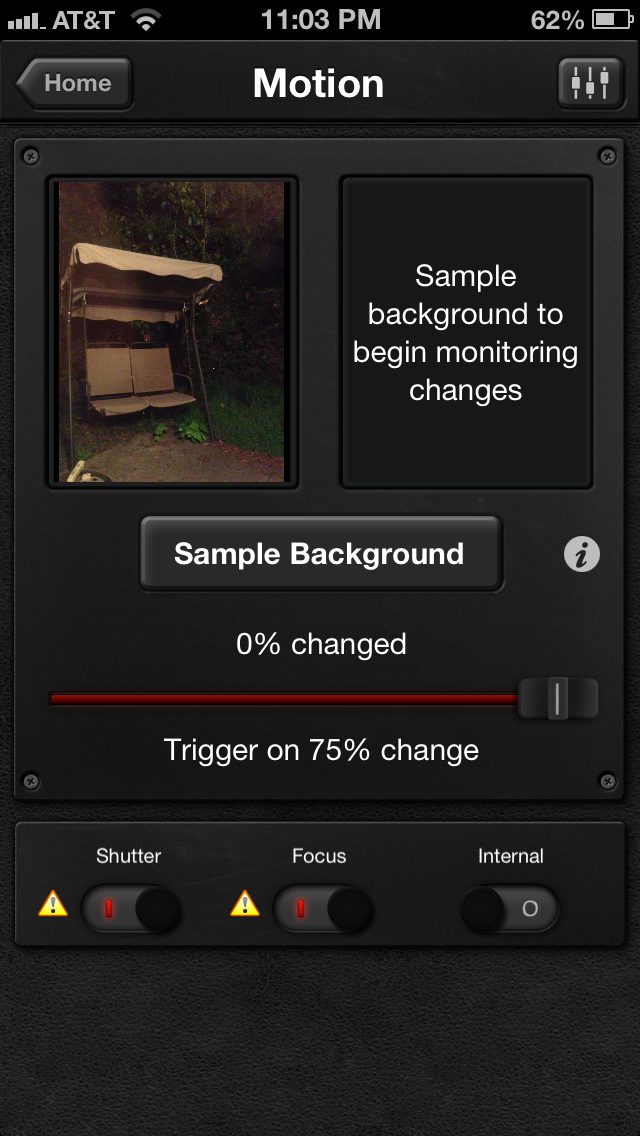
Want to take a photo of your sneaky cat? Motion will allow you to take a sample background photo and take a picture based on how much of that sample changes. The amount of change will have to be between the sliders range of 5-75%.
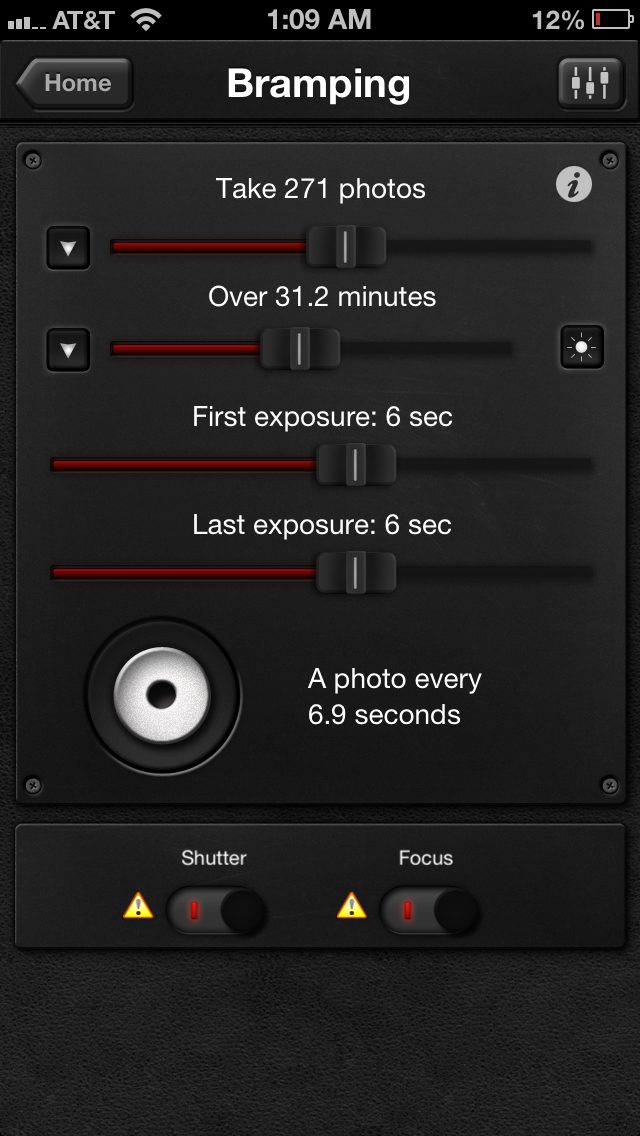
Bulb Ramping

This feature’s goal is to make the timelapse appear smooth without flickers. Normally people leave their cameras in Aperture priority but due to inconsistencies with light meters, flashes of light will appear in a normal timelapse. The “i” button inside of Bramping explains the feature well enough for newcomers in the field wanting to do bulb ramping while timelapsing.
Wi-Fi Slave
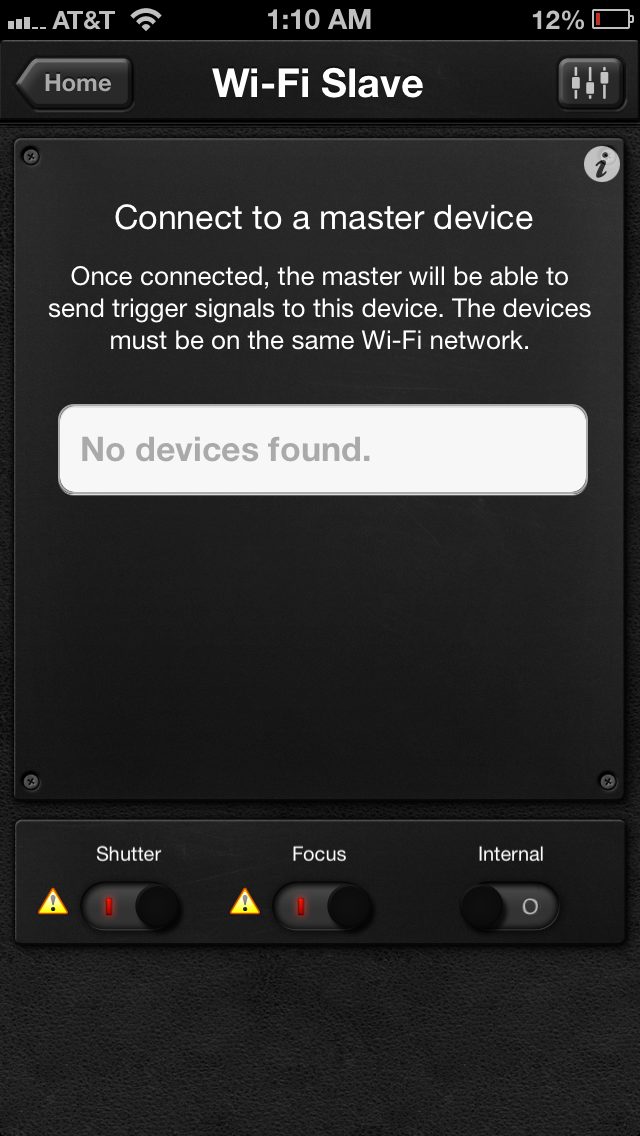
If you have two devices and you want to trigger the camera manually you can do so with this feature. One device will be plugged into the camera as normal and will be connected to a “master device” in the settings. Once this is done you can safely trigger your camera from a distance the range of a Wi-Fi network. Normally this would be done with an IR trigger but sometimes those can be out of sight and cables won’t reach you. I see this as a great option for people who set dedicated “danger cameras”.
Star Trail
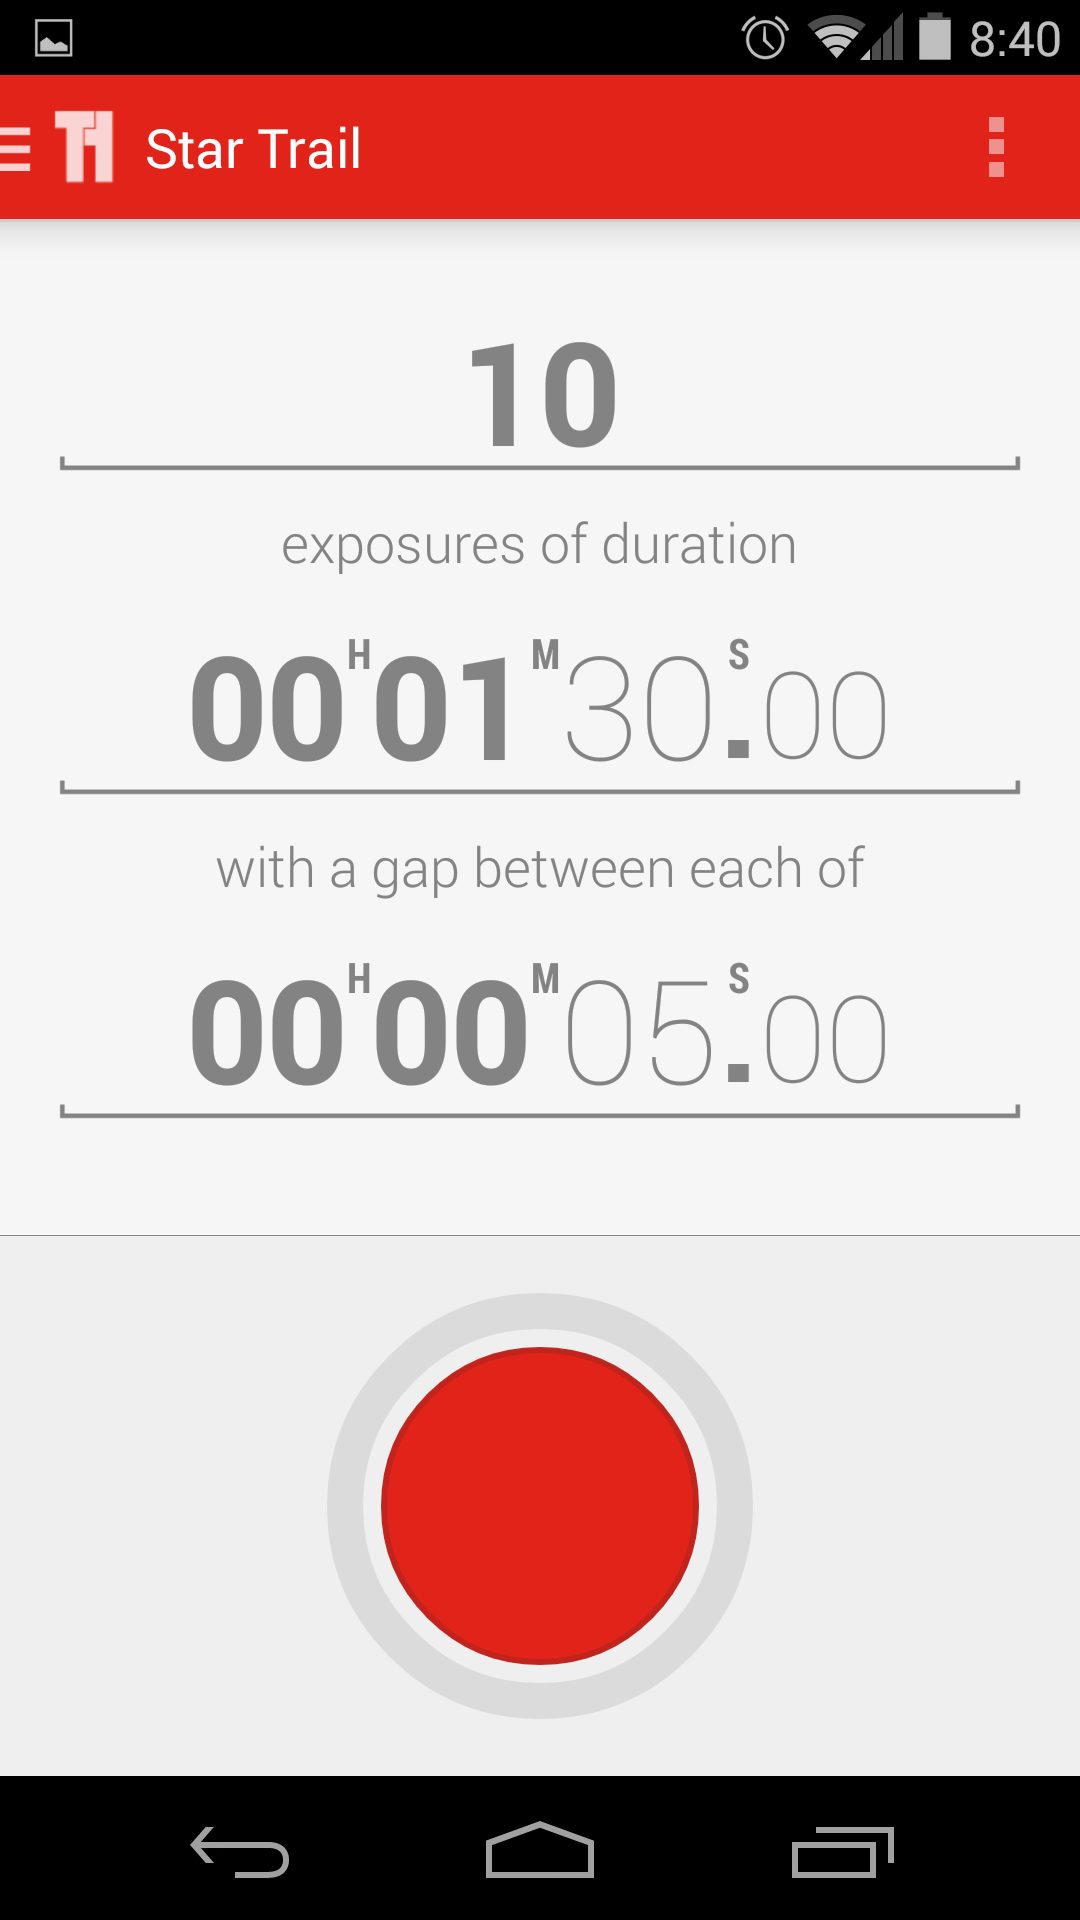
One of the more recent features that Triggertrap has brought to their app is the ability to shoot star trail photos that can then be put into a timelapse of some sort. Many photographers have done it since. What the app will do is tell the camera to shoot at an exposure, pause for a bit for the camera to process the image, then shoot the next image. But it will only do this for as many photos as you tell it to.
This is best done with very long exposure times of maybe 30 seconds or so.
ND Calculator
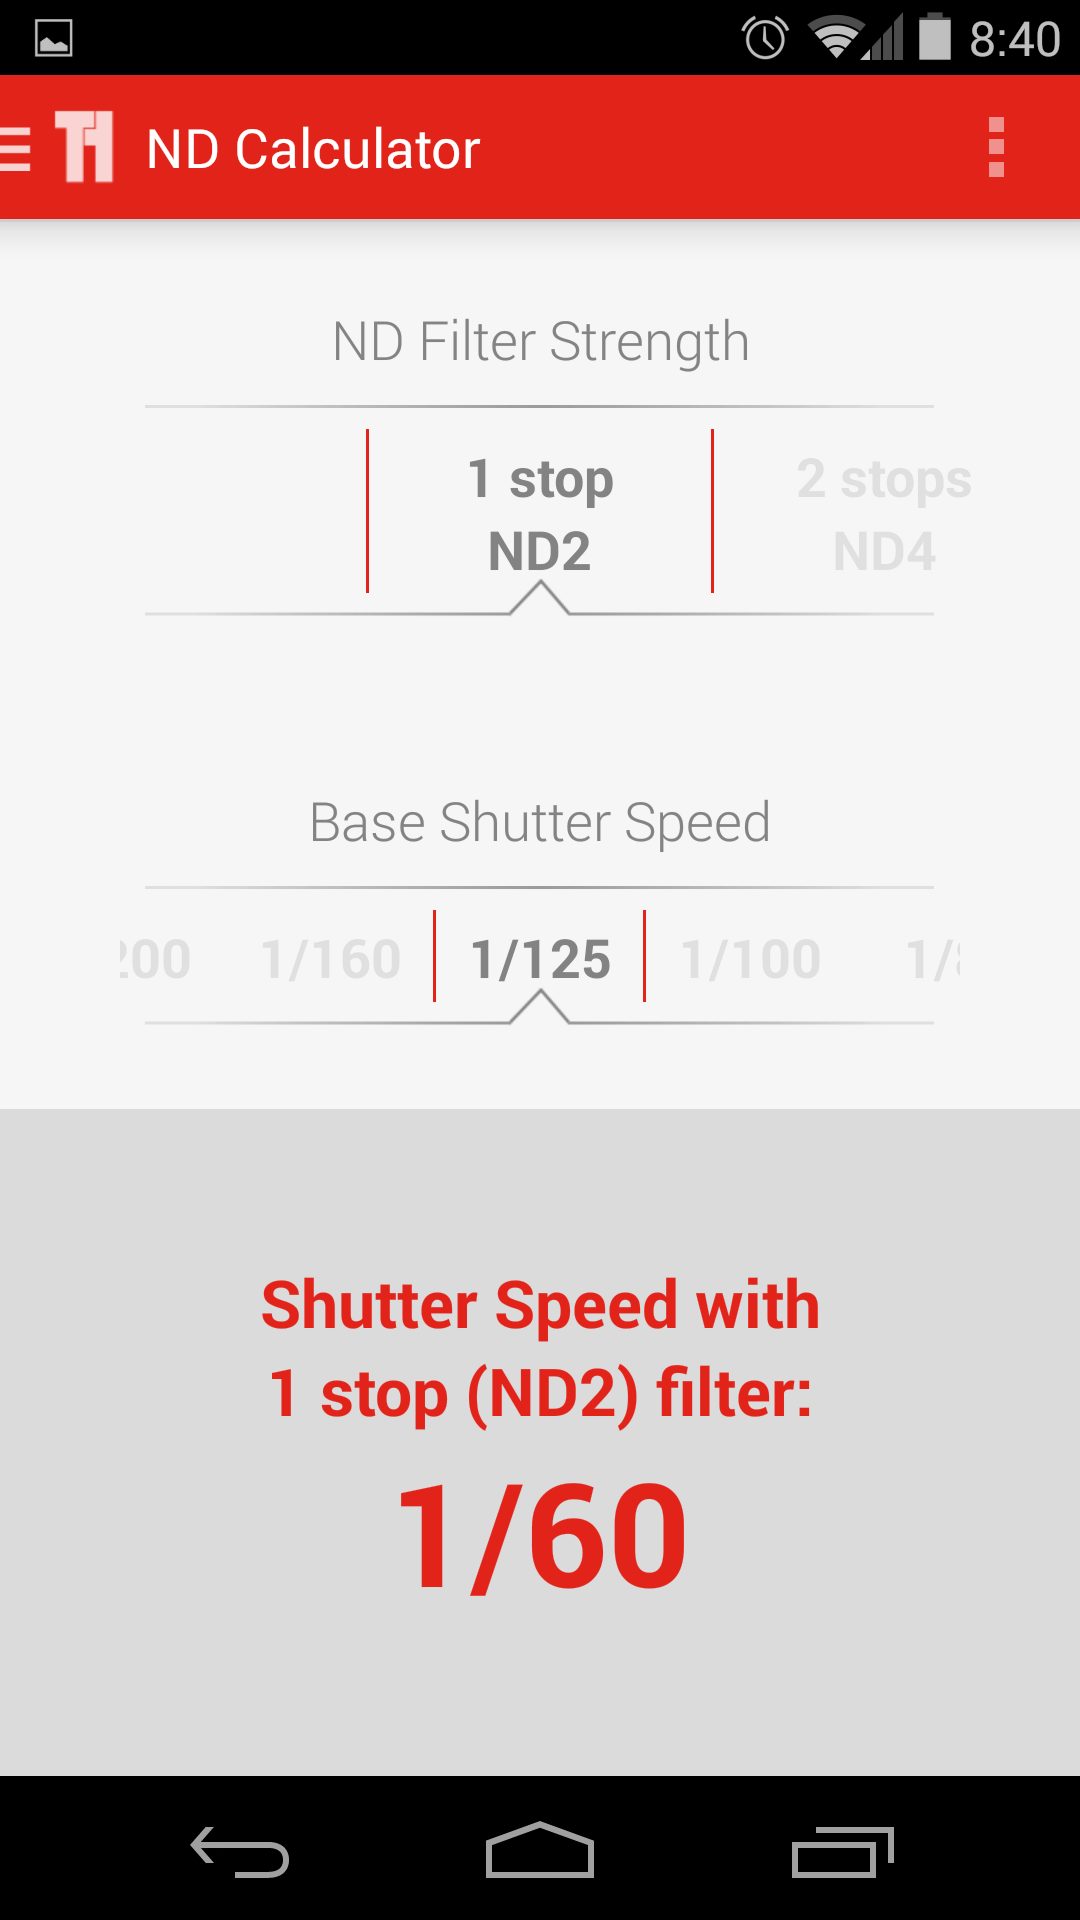
Triggertrap also comes with its own separate ND filter calculator–which honestly couldn’t totally figure out on our own. Though the site has its own tutorial on this, it doesn’t make sense to my practically as a photographer because you’re not telling Triggertrap what your aperture and ISO are. Additionally, while many photographers will use an ND filter for landscapes, I typically use them for portrait shoots where I need to kill ambient light.

Different strokes I guess!
Solar Calculator
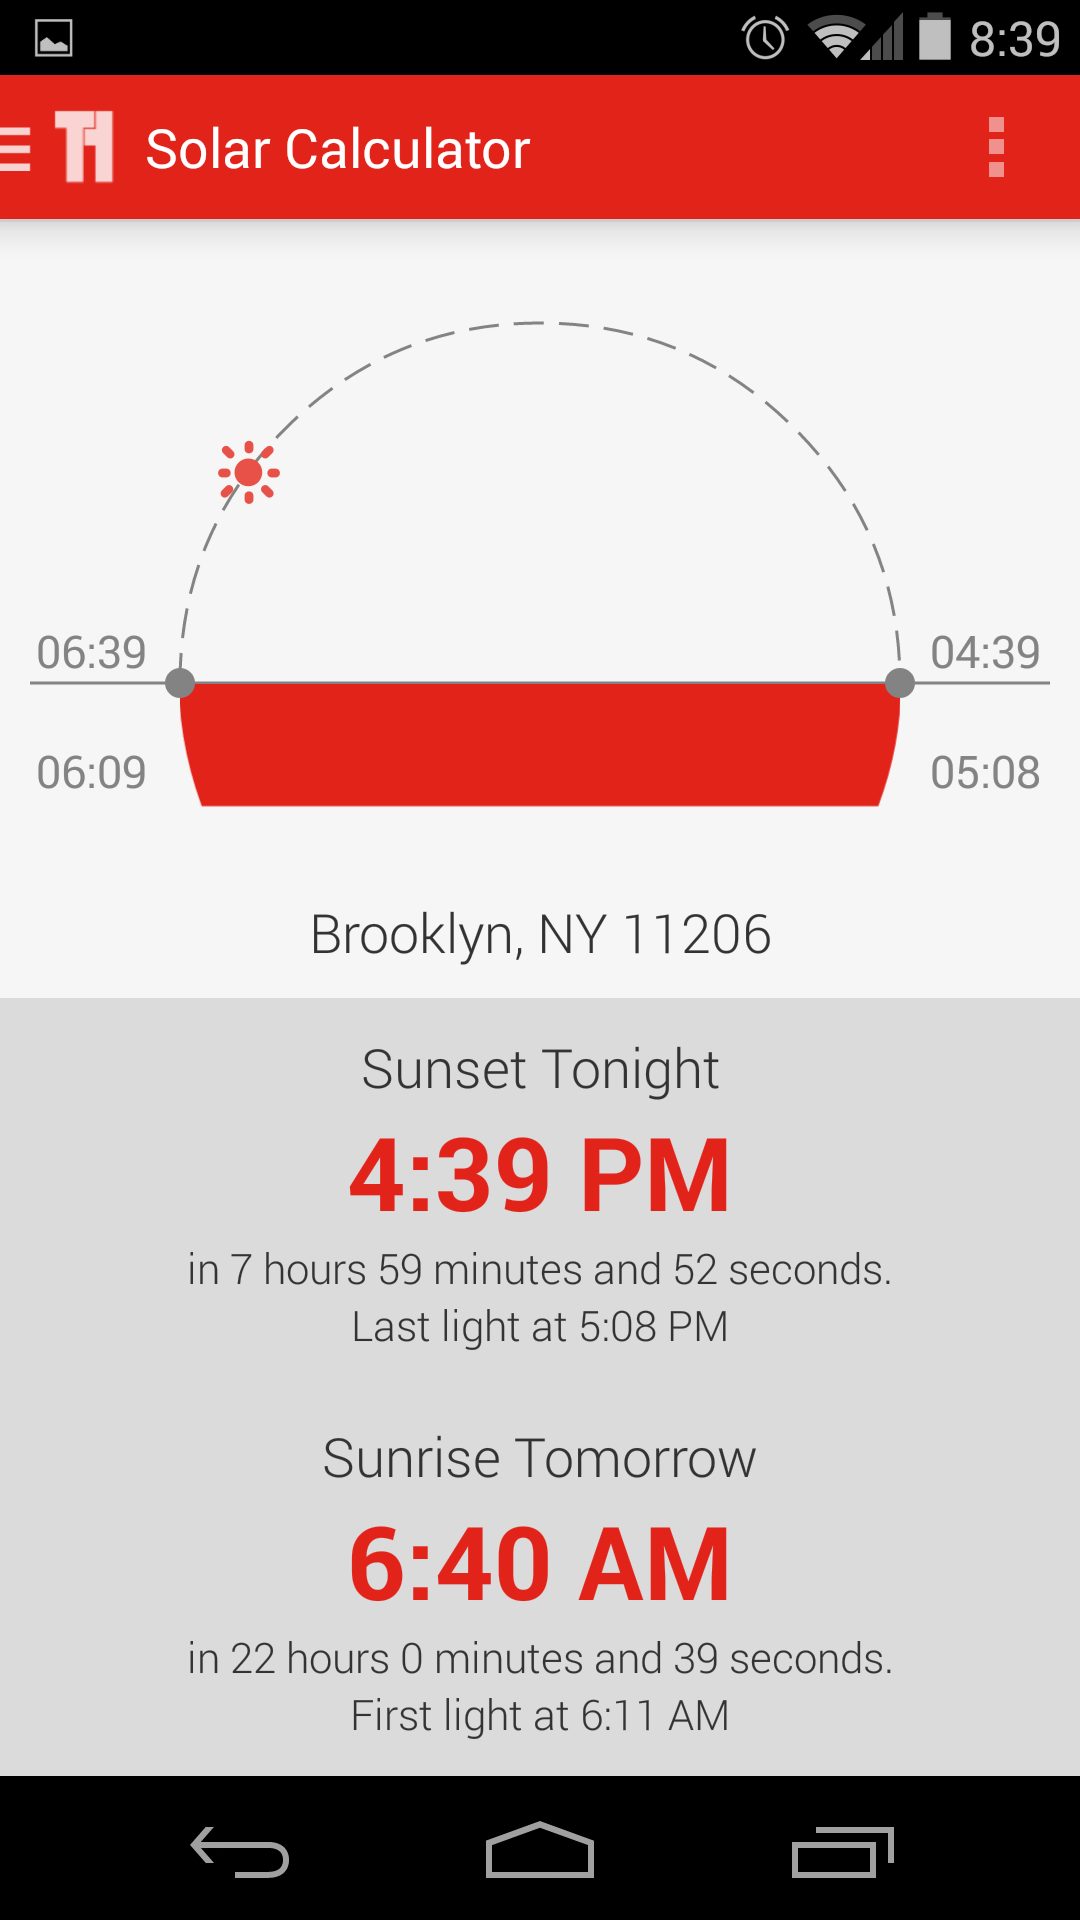
Instead of going to the Weather Channel, Triggertrap has its own built in solar calculator to tell you when you need be out there to capture either the sunrise or sunset. It’s a nice feature if you’re into shooting during the golden hour. But in that case, I would have renamed this section “the Golden Hour.”
Recommendations
Well,you finally read through the many features and I just want to go over a few suggestions for using TriggerTrap. If you are using your phone as a capture device, turn on airplane mode to eliminate possible interruptions. I would also suggest buying a used iPod touch if you are planning to do a timelapse or use features like Peekaboo that do not require iPhone functionality. This will allow you to chat with friends and socialize to help the time pass.
Another gem of advice would be to buy a USB battery pack to keep your device charged while shooting over long periods. I bought my pack for around $25 and it’s a lifesaver.
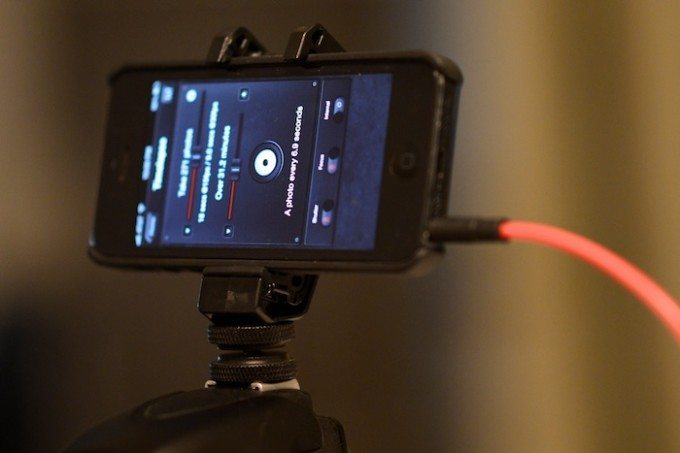
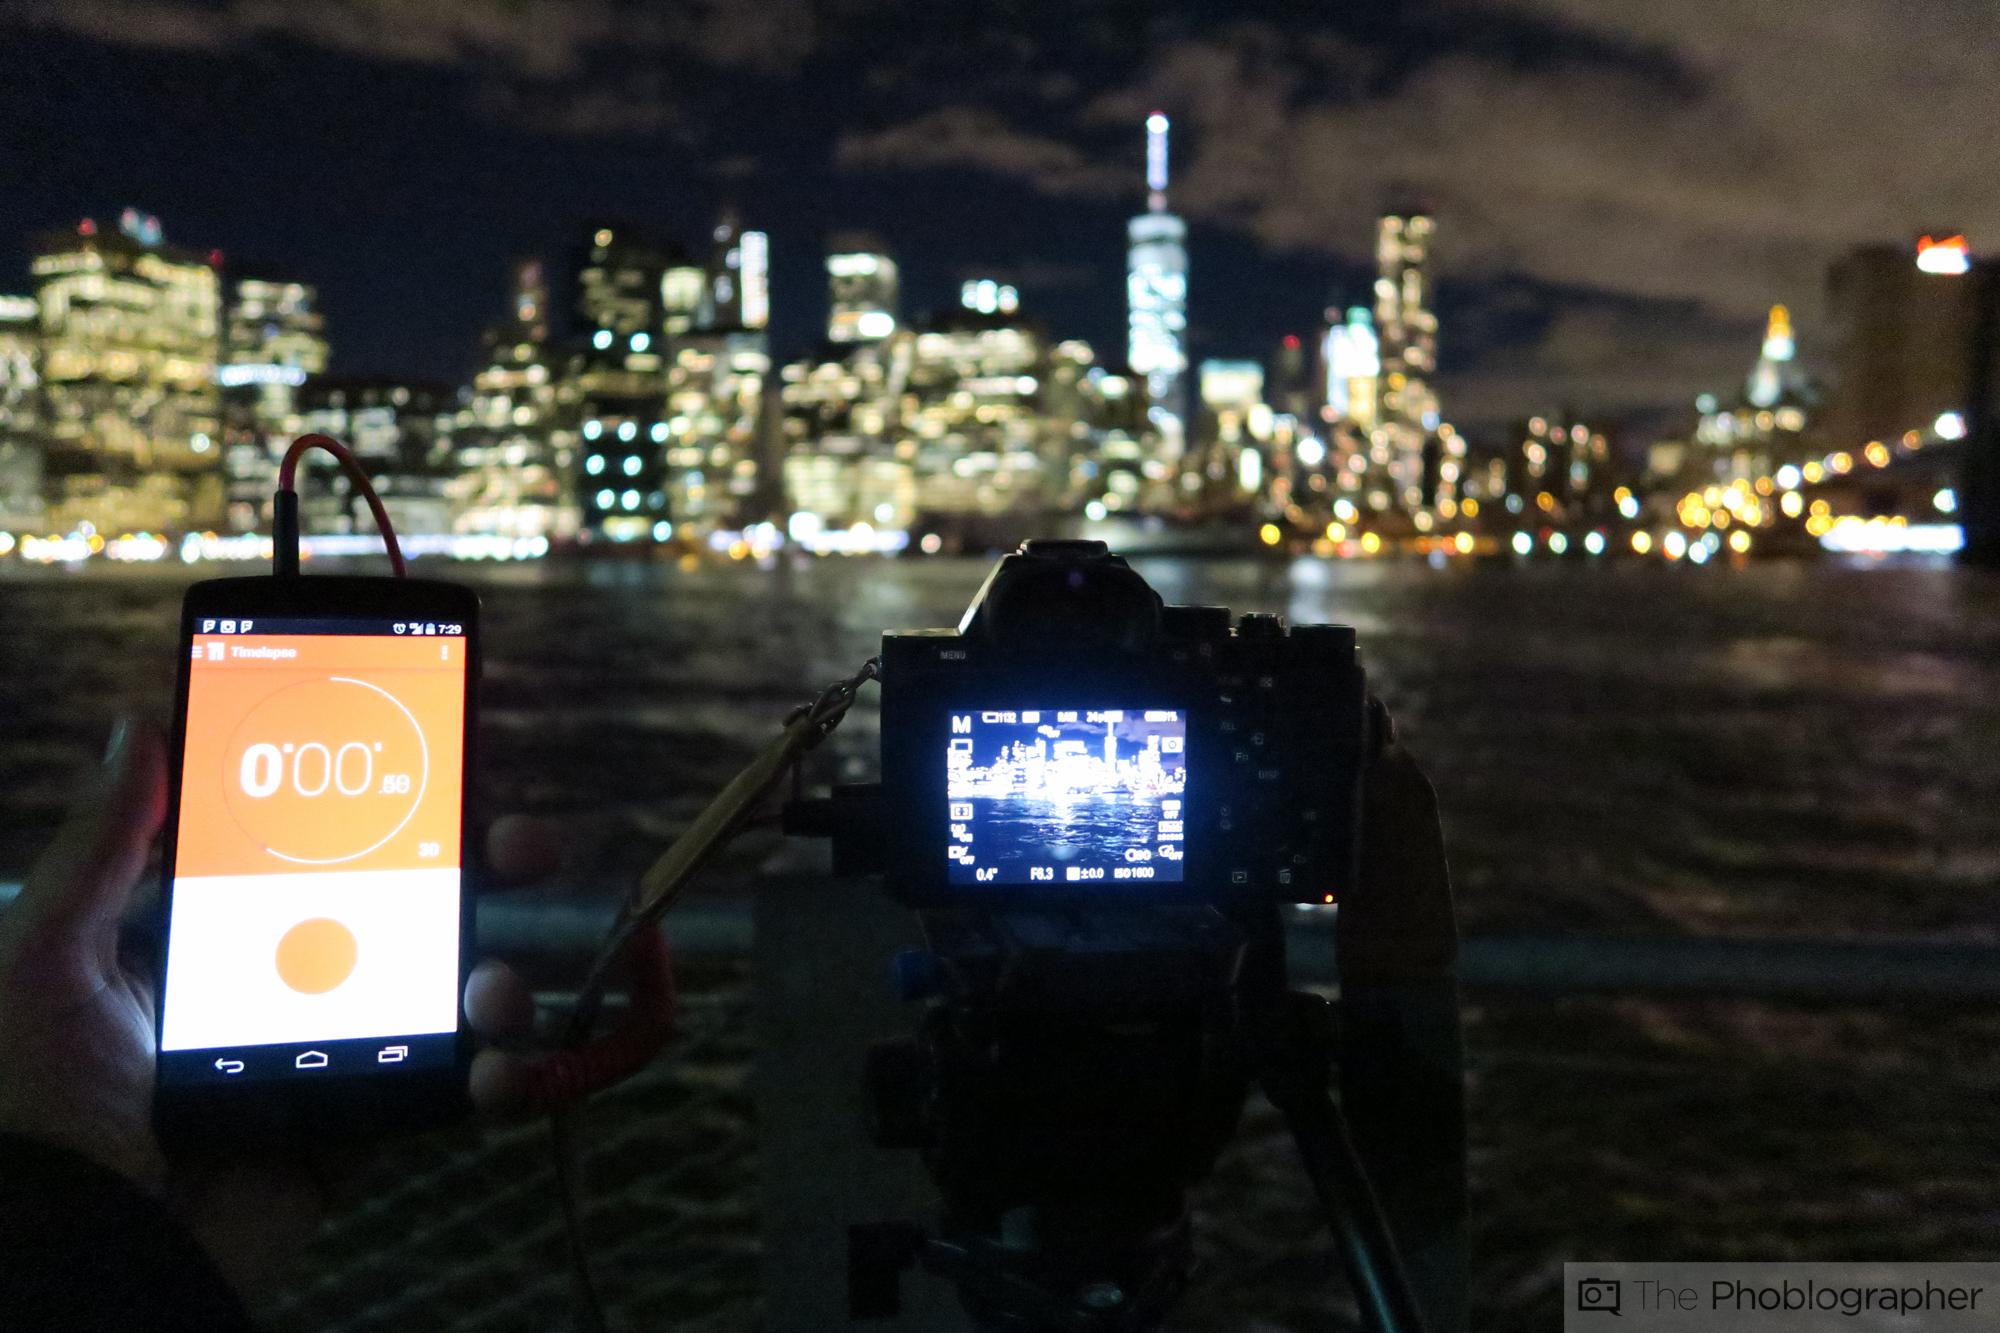
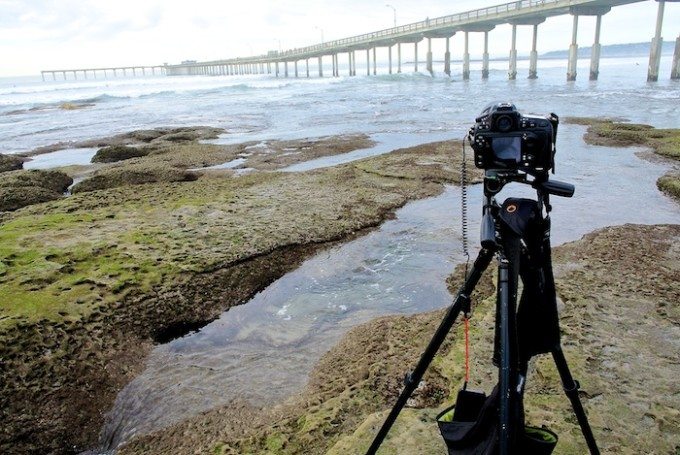
You should plan ahead and purchase a hotshoe tripod adapter to mount your phone as seen in the above picture. This will keep the strain off the cable and make features like Peekaboo possible. Otherwise your device will be dangling from the camera or in a bag hanging from your tripod (seen below). The arm holding my iPhone 5 is the MilliMount that I just received from Kickstarter.
A recommendation for TriggerTrap would be to add 24 FPS as a preview option so I don’t need multiple apps. I am sure that this was just a simple oversight and I expect to see it in the app soon.
Conclusions
Well what do I think? Coming from a professional Nikon user, my decision is a tough one. See, we Nikonians have had intervalometers built into our cameras for a long time now. This addition into my camera makes every other brand user jealous because it is such a simple software addition. Besides timelapse, there are plenty of TriggerTrap features that make me go “OOH and AAH” so the device is still worth it for me. I would love to set up my second camera at a wedding and let people have a blast. Also automating star trails makes it worth the $30 that my kit costs alone. If I were to only shoot plain Jane timelapses on the other hand it would be a tough choice for me.
So hypothetically as a Canon or Sony user without the built-in feature to do a timelapse, is TriggerTrap worth it? Well to do so on a Canon, it would at the very minimum cost you around $32 or more for just the basic timelapse feature without bramping or other features that TT offers. I can’t speak for those people but I would assume it would be a resounding yes for TriggerTrap. It may leave your phone stranded in a bag for several hours but it is worth it if you can stand the radio silence. Maybe take this time to interact with your surroundings or company. If you can’t stand the silence set up an iPad or buy a used iPod touch to do the trick.
For those of you who are unsure about the apps functionality feel free to download the app for free for iOS and Android. If you are into any of the above features I encourage you to pick up a TriggerTrap for your camera for around $30. Prices change depending on the make and model of your camera. Check out TriggerTrap and make a purchase on their website or on Amazon.
Get rid of the ads!
Did you enjoy reading this article as much as we enjoyed writing it? There's a way to support us and our reporting, getting ad-free navigation and more as a bonus. Subscribe to us for less than a coffee per month —just $3.99— or take advantage of our yearly subscription with a hefty discount for only $25.- An ad-free experience
- A free mystery box for Lightroom or Capture One
- All the books in our store
- 20% discount on Capture One
- 30% discount on Imalume Photo Theft Protection
- 20% off Herbs and Kettle Tea Company.
- 20% off your order from MPIX printing services.
- 5% off Viltrox Products via their eCommerce store.
- 10% off all film developing, printing and scanning services from Blue Moon Camera and Machine
- 15% off 7Artisans products: The lens and accessory maker is offering a sweet discount for Phoblographer's readers.