Last Updated on 08/17/2012 by Travis Lawton
Now that everyone and their mother has a digital camera capable of taking hundreds and even thousands of pictures in one sitting, the next logical step is a way to store and organize those images. And because of this, photo management software was born. If you asked most photographers, “What are the different photo management software packages out there?”, I bet 97% of them would only be able to tell you one answer; Adobe Lightroom.
While Lightroom does have a pretty large stake in this arena, there are a few companies out there trying to eat some of Adobe’s piece of the pie. One such company is DxO Image Science with their product, DxO Optics Pro which is currently at version 7.5. So how does it compete with the big boy on the block? Read on to see what we think.
Editor’s Note: This is a guest blog posting by Travis Lawton. You can find more of his work on his website at Travis Lawton Photography as well as his blog at The Lawtographer.
Before I begin, let me say that personally I’m an avid Lightroom user of several years now. I use Lightroom for all my management and honestly most of my post processing. When our Editor-In-Chief asked if I would like to review DxO Optics Pro, I thought it would be nice to try out something else and maybe find a hidden gem that photographers don’t necessarily know about but should. With all that said, I went into the review with as open a mind to change.
Now, let’s get into this thing already.
DxO Optics Pro (hereby written as OP) is broken into three different sections; Organize, Customize, and Process. Below you’ll find an overview of each section.
Organize
This is where OP lets you view your photos currently on your computer and perform basic management. You can choose how to view your photos a few different ways. The first and probably most frequently used is just viewing them in a standard file system/folder method. Secondly, you can create individual projects within OP and organize sets of photos into those projects. And finally, if you already have Lightroom installed, you can view your photos by opening the corresponding Lightroom catalog.
One very nice thing about OP is the Camera/Lens modules. Depending on what lens you use and on what camera the image was shot with, some distortion, vignetting, and color fringing occurs. For most lens/camera combinations, OP will automatically recognize this and ask if you’d like to download, what they call a module, for that combination. This is basically a preset that will be applied to all images where that particular combination of equipment was used and automatically adjust for many of the adverse effects it maybe have caused the image.
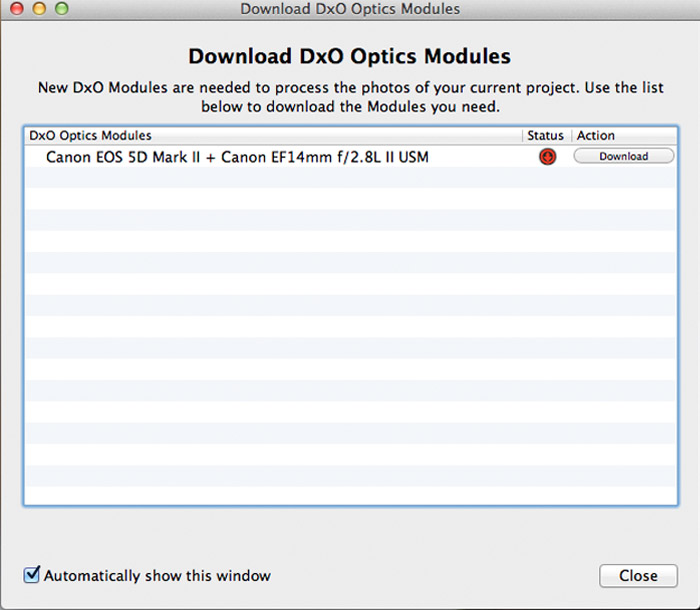
These modules are also updated very frequently. For example, modules for the brand new Canon 5DmkIII and Nikon D800 are already available.
The Organize section features a star system for rating your photos 1-5 while you browse through them. Lightroom users will recognize this feature as it’s almost identical in the two systems.
Unfortunately, the Organize section does have several short-comings that I encountered. First and foremost, there is no import feature. You must use some other method of getting the photos from your camera or memory card onto the computer, then opening them in OP.
Second, there was no way to add keywords to your images and thus making searching for older images quite difficult. OP does offer ways to filter down images but the filtering options are more generic things like image rating, ready for processing, only RAW or JPEG, etc.
And third, and by far the issue that drove me the most crazy, was the speed at which you are shown the full size image when quickly culling images. When I opened a folder of 1400+ images from a recent wedding, and went through for a thoroughly laborious initial culling.
When advancing through your images, I found the faster you go, the slower the images load. You get a lower resolution full screen image anywhere between .5 to 2 seconds and then the higher resolution image takes another 2-3 seconds. Doesn’t sound like too much but when flying through 1000 images, that time adds up. I don’t care as much about the higher resolution image loading but not being able to even see ANY preview of the image for up to 2 seconds kills my productivity.
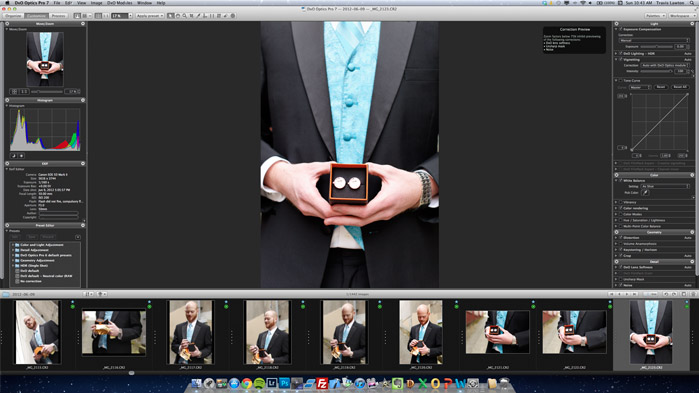
Customize
Here is where you can edit your images and RAW files and tweak them to your liking. OP at its core is built off of using presets to edit your images, although you have the ability to adjust different things manually and/or save new presets.

For example, by default, OP applies what they call their “DxO Default” preset to every single image. I know many of you might be saying that there is no way you would want the same default preset applied to all your images but here’s the beauty of it, the default preset isn’t the same for every image that it applies itself on. The DxO Default adjusts itself based on the module that is applied for the image. Modules are what OP calls the file the houses the information about the camera/lens combo used for that picture.
So you can begin to see where the magic is here. OP automatically applies a module to your image, and then the default preset applies adjustments based on that module. The good news is that it’s actually quite effective.

If you don’t want to rely on OP to adjust images for you, you can manually adjust whatever settings you would like. OP features two different layouts for the Customize section; “First Steps” or “Advanced User”. First Steps being geared towards the novice user while Advanced User is self-explanatory.
First Steps includes the basic adjustments you would expect, white balance, exposure compensation, contrast, saturation, noise reduction, distortion correction, Vignetting, Chromatic Aberration, Lens Softness correction, as well as some HDR options. Advanced User adds in such things as Tone Curve, Hue/Saturation/Lightness, Unsharp Mask, Dust Correction and more.
I found that the First Steps layout and controls to be sufficient for most images. Only needed the more advanced features when I wanted to add some more “flare” to an image.
My biggest complaint about the Customize section is that most changes aren’t presented to you live. Plus the image must be reloaded after almost every tweak you make. Slide the exposure slider up and you won’t see the result until you let go of the slider. At that point you will see a low resolution preview of your change followed by a 0-100% loader to reload the higher resolution preview of the image with your change applied. This load doesn’t take too long (about one second), but much like the Organize section, it just slows the workflow down just that little bit.
Process
The Process section is where you go to export your changed images into usable file types such as JPEG’s, TIFF’s, or DNG’s. You can select where the exported files are to be placed, add a suffix to the file names, choose the DPI, resize the image, and apply a certain ICC profile. That’s about it but I actually like how the section works.
Simply put, you choose all these options, then drag and drop which images you like these setting applied into the Processing window and it automatically starts exporting and applying your settings to those images. OP is a non-destructive editing program, meaning all your Customization changes made to an image are applied when you export that image and never on the original file. This way you don’t have to worry about messing up your originals in the event you want to alter them sometime later.
By default your export options are JPEG, TIFF, TIFF (8 bit), DNG and then there are some very useful, more specific ones that many people use regularly. These are Web 600 Pixels, Web 800 Pixels, Print 4×6 inches, and Print 8×12 inches. Beyond these you can create your own export presets of any combination of the above mentioned options.
I was a little disappointed in the Export Speed. Exporting a 22MB RAW file into a 100% quality JPEG took about 19 seconds, which is a tad high and again can slow down workflow.
Conclusion
DxO Image Science’s software package DxO Optics Pro is a photo management program complete with image editing and RAW file conversion. They are trying to draw some business away from Adobe’s monsterously popular Lightroom software. This is evident by the fact that you can open a Lightroom catalog directly through DxO Optics Pro.
In my tests with the product, Optics Pro does an excellent job of applying automatic changes to your images. Generally I hate any automatic adjustments that programs apply, but DxO Image Science did it right with this software. Their secret is the massive amount of specific camera/lens modules they have been studied and preprogrammed to maximize any image captured with that combination.
But all isn’t perfect in using this software. Even though you can view and rate your photos, I found the overall photo management portion is quite lacking. With no import abilities and no way to add keywords for metadata and searching, it seriously hinders the management section.
Speed of performing options seems to take longer than it should with Optics Pro. Specifically load times of full screen previews of the RAW files both in the Organizer and when making manual adjustments to images.
And the final kicker is the price. While it is “officially” listed at $299 for the Elite Edition and $169 for the Standard Edition (the difference being the amount of camera/lens modules included. For example, for my 5DmkII camera, I would need the Elite Edition), you can pick up the two difference editions for $185 and $87 respectively from Amazon right now. The current photo management and RAW converter king, Adobe’s Lightroom software runs $150. Unless you are using Optics Pro with a camera that you can get away with the Standard Edition, I can’t really see a reason to purchase this over Lightroom.
Get rid of the ads!
Did you enjoy reading this article as much as we enjoyed writing it? There's a way to support us and our reporting, getting ad-free navigation and more as a bonus. Subscribe to us for less than a coffee per month —just $3.99— or take advantage of our yearly subscription with a hefty discount for only $25.- An ad-free experience
- A free mystery box for Lightroom or Capture One
- All the books in our store
- 20% discount on Capture One
- 30% discount on Imalume Photo Theft Protection
- 20% off Herbs and Kettle Tea Company.
- 20% off your order from MPIX printing services.
- 5% off Viltrox Products via their eCommerce store.
- 10% off all film developing, printing and scanning services from Blue Moon Camera and Machine
- 15% off 7Artisans products: The lens and accessory maker is offering a sweet discount for Phoblographer's readers.