
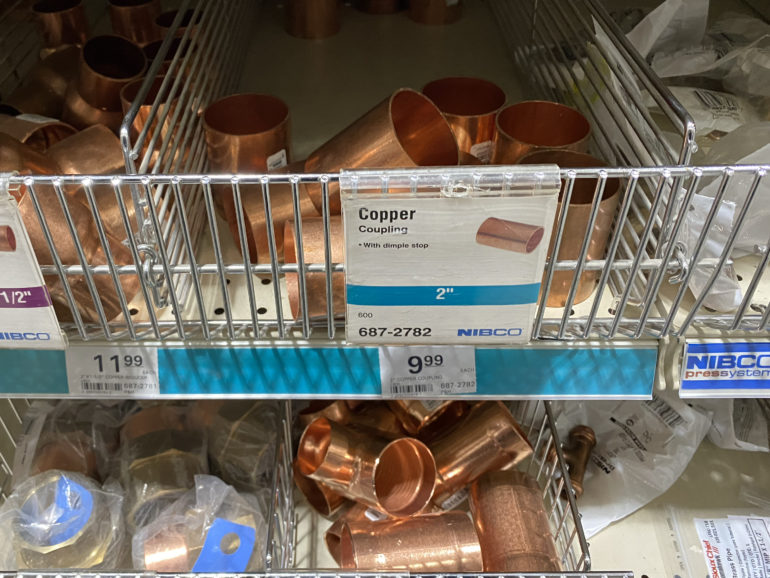
Modern lenses are becoming increasingly sharper — designed to capture clear, high resolution details. But, a side effect of the increase in clarity is the demise of artistic lens flare. Sure, you can typically get at least a soft bloom of light when pointing a modern lens into the sun. But circular lens flare is quickly achieving unicorn levels of scarcity. Thankfully, it’s possible to create epic, circular lens flare with modern lenses using copper pipe coupling that costs around $8 to $10.
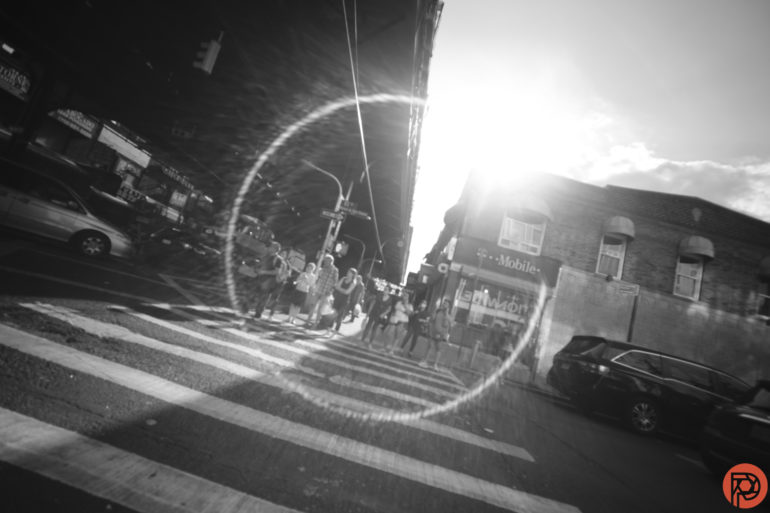
Lens flare is created when light bounces around and reflects inside the camera lens instead of going straight to the camera sensor. Most modern lens manufacturers are adding coatings upon coatings to reduce that flare; while flare can be artistic, it often wreaks havoc on contrast and clarity. Occasionally though, photographers can still find great lens flare, like this one from the Laowa 10mm f4:
But, since flare is created from light bouncing around in the camera lens, it’s possible to add flare to a lens you already own. Shooting through a copper pipe bounces the light to create circular lens flare, and is a longstanding photography trick. Here’s how.
What you’ll need
This lens flare can be created with either natural light or a flash. You’ll need:
- A 50mm or longer lens with a wide aperture
- A camera
- A strong directional light source such as:
- A low sun
- Or an off-camera flash on a light stand
- Optional: Colored gels for your flash
- A 2-inch piece of copper pipe coupling from your local hardware store or Amazon.
I created the images in this tutorial using the Fujifilm XH2, the Fujifilm 50mm f1 R WR and the Flashpoint Zoom Li-On III with a transmitter and light stand.
1. Find or create a strong backlight
Like with natural lens flare, to create this flare you’ll need to be shooting directly into a strong light source. You can do this one of two ways, one of which is to you shoot into the sunset (or sunrise) on a clear day.
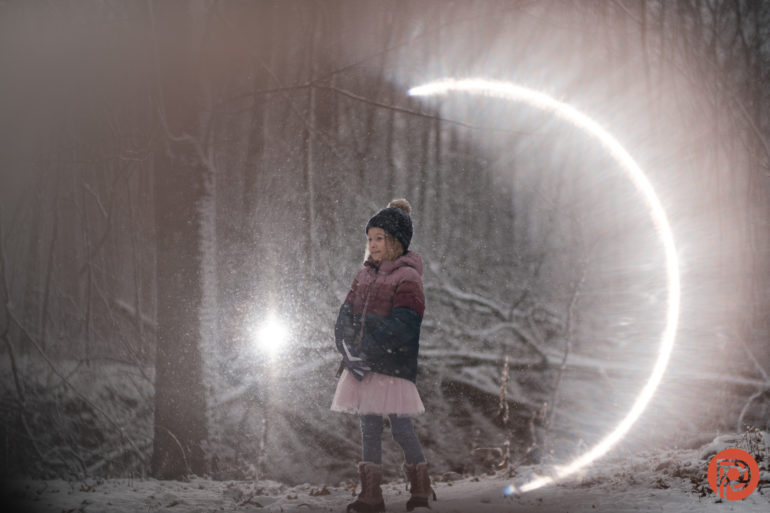
But, if you want to shoot at any time of day, from any location, or in the middle of a snowstorm, you’ll need to create the light source with off-camera flash. For the most control and versatility, set up an off-camera flash for backlighting.
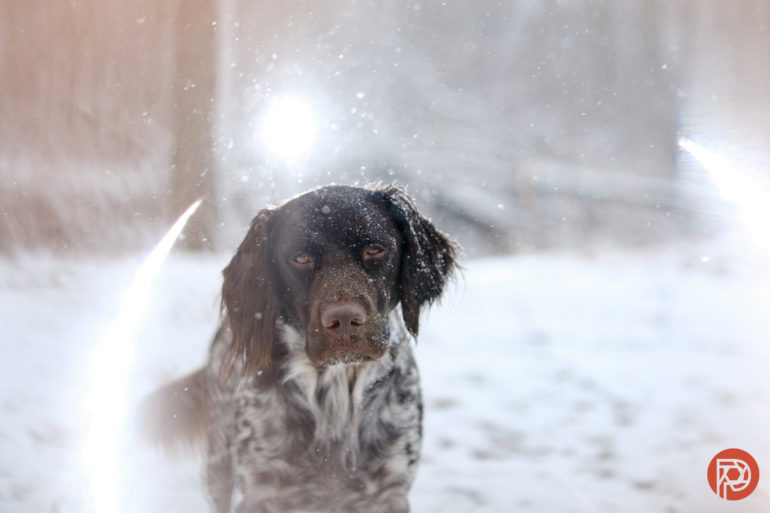
Place the light behind the subject, but don’t completely cover the flash with the subject. While I often place a flash directly behind the subject to avoid having to Photoshop the light stand out, that won’t work here. You can hide the flash with hills, buildings, and trees but the full flash head should still be visible to the camera. If the light is completely behind the subject, you’ll get pretty backlighting with a copper-colored vignette rather than flare:

The stronger the flash setting, the thicker and brighter the flare will be. Distance plays a role as well — you’ll need to increase the power of your flash to shoot further away from the subject.
For example, this photo was created with the flash on a low setting:
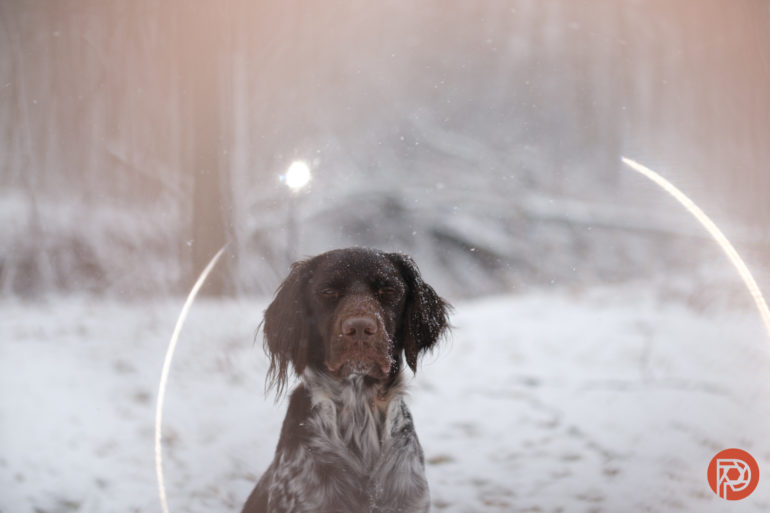
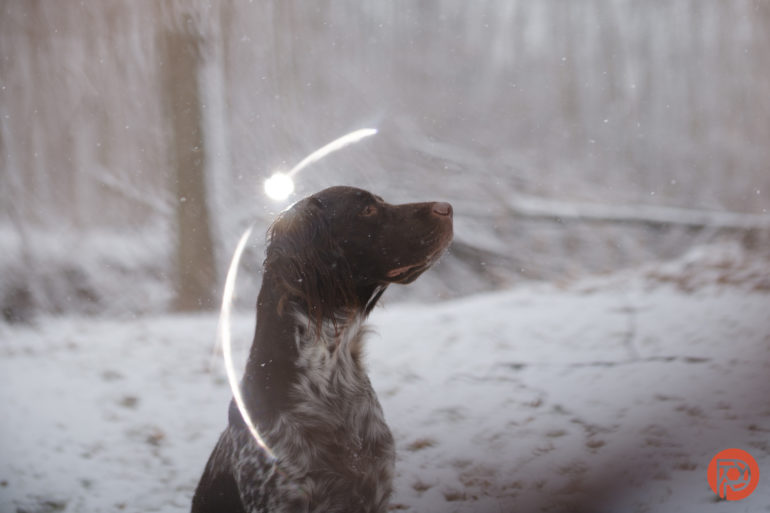
This photo was created with the flash at half power:

To play with the color of the flare, use flash gels. The photos here were created with a bare flash. If you want more golden flare, use an orange flash gel.
2. Shoot through a copper pipe coupling in front of the lens

With the light in place, hold the copper pipe up so that you are shooting through the hole in the pipe, towards the light.
Now, unless you’re also a welder and attached a handle to your pipe, your fingers are going to be in front of the lens as well. This is why you’ll want a mid-length lens and the 2-inch coupling rather than a smaller size. The pipe should be large enough to see a majority of the image, yet small enough that you can see a bit of the pipe on the edges. Use a wide aperture to blur out most of the pipe itself.
With a wide lens or a narrow aperture, you’re going to see your fingers in the photo. Shoot with a longer lens wide open or almost wide open to blur out any fingers holding up the pipe. The images here were shot with the Fujifilm 50mm f1 lens, which is equivalent to an 75mm lens on full frame.
3. Experiment with different angles.


When creating flare in-camera, the results tend to be a bit unpredictable. The slightest change in angle can make a dramatic difference. Try holding the pipe at slightly different angles. Experiment with holding the copper closer or further away from the front of the camera lens. Take some time and have fun playing with flare.
4. Edit.

Flare can mess with the colors and contrast of the final image — that’s why lens manufacturers work so hard to try to prevent flare. When working with copper pipe flare photos, try the dehaze and clarity sliders. White balance, HSL, and exposure adjustments also commonly come into play when creating these images.
Get rid of the ads!
Did you enjoy reading this article as much as we enjoyed writing it? There's a way to support us and our reporting, getting ad-free navigation and more as a bonus. Subscribe to us for less than a coffee per month —just $3.99— or take advantage of our yearly subscription with a hefty discount for only $25.- An ad-free experience
- A free mystery box for Lightroom or Capture One
- All the books in our store
- 20% discount on Capture One
- 30% discount on Imalume Photo Theft Protection
- 20% off Herbs and Kettle Tea Company.
- 20% off your order from MPIX printing services.
- 5% off Viltrox Products via their eCommerce store.
- 10% off all film developing, printing and scanning services from Blue Moon Camera and Machine
- 15% off 7Artisans products: The lens and accessory maker is offering a sweet discount for Phoblographer's readers.