
Whether you’re an aspiring food photographer or simply want to take better photos of your culinary masterpieces, this photography cheat sheet will get you started.
The ultimate goal of food photography is easy to point out; the way to making that happen may be a bit challenging to figure out for beginners. A lot of factors go into it like styling, lighting, backdrops, and of course, camera settings. Your Instagram-worthy snaps may seem good enough to many, but if you really want to go beyond that, you’ll have to make some magic with an actual camera. This is why we’re always on the lookout for learning resources and tips to help make it happen. For today, let’s tackle the basic camera settings that you can use to get started.
The cheat sheet below is part of the ideal camera settings tutorial put together by Pixobo. Of course, you can do food photography even at home or a cozy cafe. However, a good portion of it are done in the studio. If you plan to do it professionally, you will also have to learn how to put together a studio set up. But the suggested camera settings below should work, whether you’re working in a studio or otherwise.
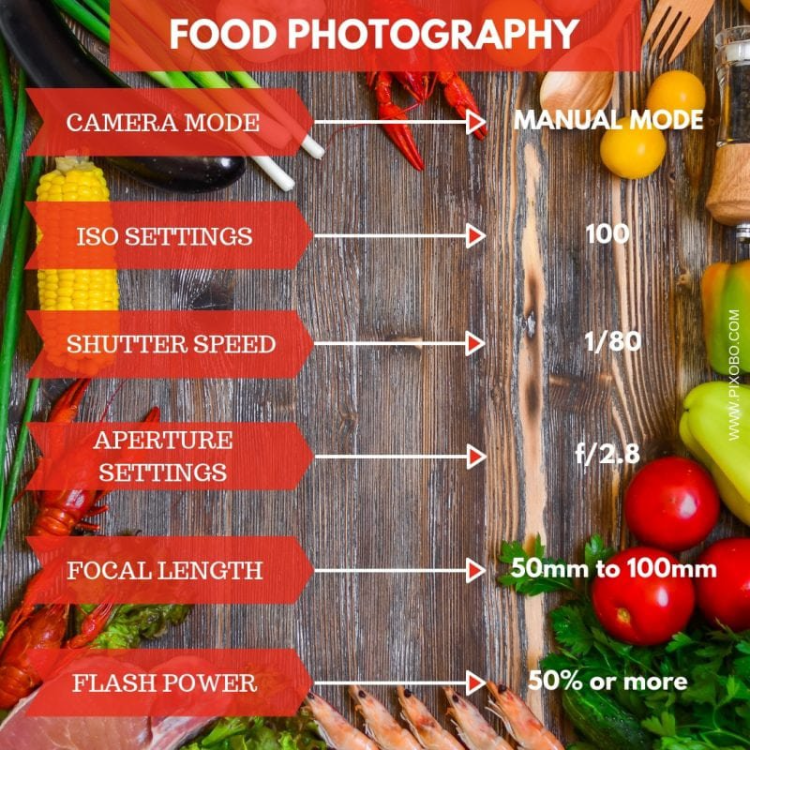
Set your camera to manual mode, ISO 100, 1/80 sec shutter speed, and f2.8 for the aperture. Equip your camera with a 50mm to 100mm lens. If you’re shooting with flash, set it at 50% power or more. Consider these your basic camera settings and adjust as necessary.
The Exposure
Now, let’s break that down. ISO 100 is the best setting for food photography since you’ll need your photo to be as sharp and clear as possible. That means you need to work with adequate lighting, whether with natural light or using flash. A fast shutter speed isn’t your top priority here since your subject isn’t moving, and a slower shutter speed compensates for the low ISO setting and ensures you get well-exposed photos. However, make sure you prop your camera on a tripod to avoid shaky shots.
A Wide Aperture
Meanwhile, it’s best to use a wide aperture or lower f-stop number to nicely blur out most of the unfocused elements, which comes in handy if you’re shooting with a scene in the background. But if you’re photographing from a distance and want the ideal focal length, 50mm is best since you’ll most likely be photographing from close range a lot. If you have a tight working space or you want to get even closer and create portrait-style shots, you’ll do great with a 100mm macro lens as well.
With these recommended camera settings, you’ll be on your way to getting started with beautiful food photography. But of course, that’s only one part of the equation. You’ll also need to work on your composition, styling, angles, creative techniques, and story-telling approach to make those snaps as mouth-watering as possible. For that, we also suggest checking out this food photography essentials cheat sheet, as well as some impressive and unique approaches to the craft that will surely inspire and give you ideas.
Don’t forget to check out our photography cheat sheet collection to find more tips that will come in handy for your next shoot and projects!
Get rid of the ads!
Did you enjoy reading this article as much as we enjoyed writing it? There's a way to support us and our reporting, getting ad-free navigation and more as a bonus. Subscribe to us for less than a coffee per month —just $3.99— or take advantage of our yearly subscription with a hefty discount for only $25.- An ad-free experience
- A free mystery box for Lightroom or Capture One
- All the books in our store
- 20% discount on Capture One
- 30% discount on Imalume Photo Theft Protection
- 20% off Herbs and Kettle Tea Company.