
If you’ve ever run into difficulty posing your subject’s head or hands while creating portraits, this guide is a lifesaver.
Figuring out how to pose your subject’s head and hands are essential skills that every portrait photographer should have. This is especially important if you primarily photograph laypeople with little to no modeling experience. If portrait photography is new to you, or you’ve ever found yourself to be at a loss with how to pose your subject’s head and hands during a shoot, this this handy portrait posing guide is for you. Created by the folks at Digital Camera World, this guide features practical head and hand posing options that can be lifesavers during a shoot if you’re drawing a blank. They are especially useful for close-ups. Let’s check it out.
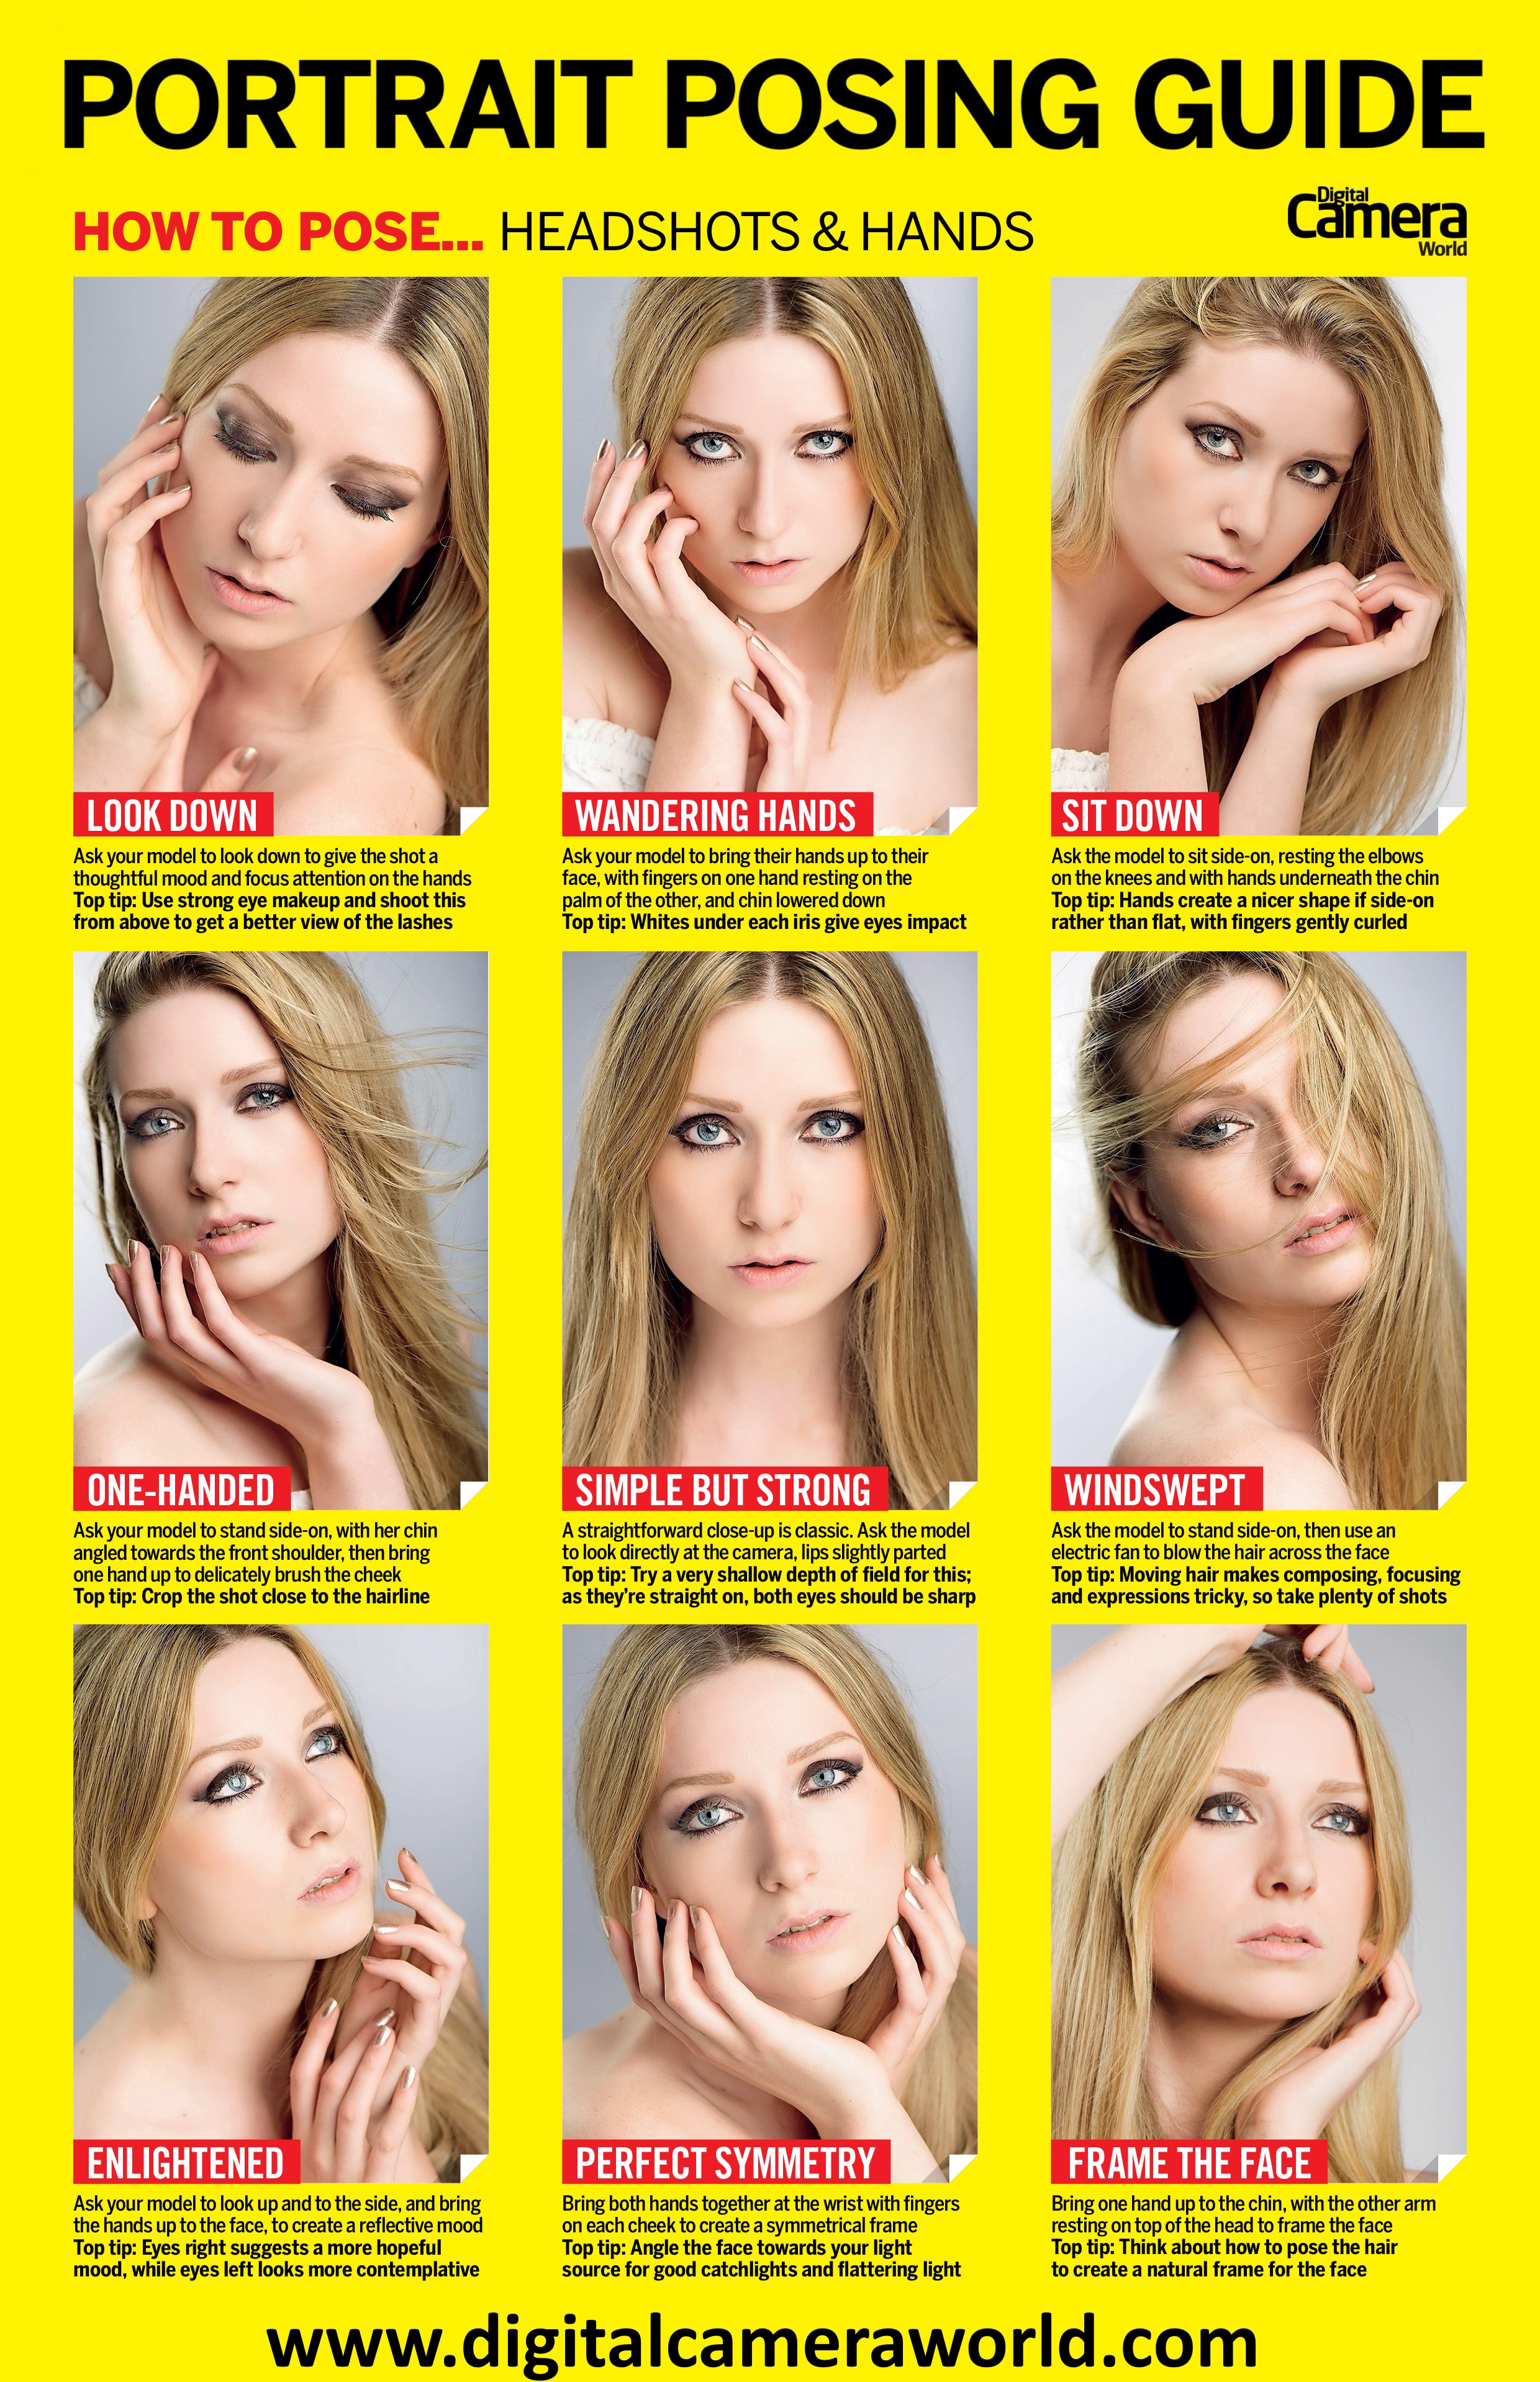
Look Down
You don’t always have to have your subjects look directly at the camera when creating portraits. In fact, consider having your subject look down and slightly away from the camera. This will help lend a sense of pensiveness to the image. Note that doing so will divert the attention towards your subject’s hands if they happen to be in the frame. Be sure to pay close attention to their placement and posing.
Wandering Hands
Start by having your subject look into your lens while lowering their chin. Alternatively, you can raise your shooting position and shoot slightly down towards your subject. Have your subject bring one of their hands up to their face, gently resting the fingers on their cheek. Then have your subject rest their fingers of their other hand onto the palm of hand caressing their face. This is a popular pose for beauty photography.
Sit Down
Let your subject take a break and have them take a seat. Instead of facing you directly, turn your subject to either the left or right side of the camera. While seated, have your subject rest their elbows onto their knees. Finally, bring their hands up so that they’re resting beneath their chin.
One-Handed
Position your subject so that they’re standing in front of you while facing either left or right of your camera. Now have them turn their head and face the camera, bringing their chin towards the shoulder closest to the camera in the process. To complete this look, ask your subject to bring one of their hands up and gently caress their cheek. Heads are shaped differently, so don’t be afraid to experiment with both sides of the face.
Simple But Strong
You can never go wrong with a straight-on close-up. It’s a timeless classic, and deservedly so. Have your subject look intently into your lens while parting their lips ever so slightly. The resulting portrait will be sure to grab a viewer’s attention. If you’re a fan of the shallow depth of field look, this is a great option. Since your subject is facing the camera head-on, both eyes will be on the same focal plane. You can shoot wide open and not have to worry about one of the eyes being out of focus.
Windswept
Just like with the One-Handed pose, ask your subject to stand in front of the camera while facing either the left or right of your lens. Now have them turn their head towards the lens and bring their chin towards the front shoulder. Once your subject is in position, use a fan to blow their hair across their face to create an intentionally messy look. Be prepared to take a lot of images as the moving hair can be unpredictable.
Enlightened
This is another pose that will require you to position your subject so that they’re facing to the side. Once they’re facing either the left or right of the camera, have them look up (generally towards the key light). To complete this pose, have the subject bring their hands to their face, similar to the way the hands were posed in Wandering Hands. This pose will give your subject the appearance of being contemplative.
Perfect Symmetry
This is a variation of the classic straight-on look. This pose uses your subject’s hands to create a symmetrical frame around their face. To achieve this, have your subject bring their hands together at the wrist and then up to their face. Position their fingers so that they gently caress each cheek. Consider tilting your subject’s face so that it’s facing your light source. Lighting the face this way tends to be the most flattering and the resulting catchlights will give the image added visual interest.
Frame the Face
Have your subject gently place one of their arms on top of their head while bringing their other hand up to their chin. Doing so will create an organic frame around your subject’s face. You’ll also want to pay attention to your subject’s hair when using this pose. Your subject’s hair can also be another organic way to frame their face. Try combining both for creative effect.
Get rid of the ads!
Did you enjoy reading this article as much as we enjoyed writing it? There's a way to support us and our reporting, getting ad-free navigation and more as a bonus. Subscribe to us for less than a coffee per month —just $3.99— or take advantage of our yearly subscription with a hefty discount for only $25.- An ad-free experience
- A free mystery box for Lightroom or Capture One
- All the books in our store
- 20% discount on Capture One
- 30% discount on Imalume Photo Theft Protection
- 20% off Herbs and Kettle Tea Company.
- 20% off your order from MPIX printing services.
- 5% off Viltrox Products via their eCommerce store.
- 10% off all film developing, printing and scanning services from Blue Moon Camera and Machine
- 15% off 7Artisans products: The lens and accessory maker is offering a sweet discount for Phoblographer's readers.