
If you’re unsure which aperture setting to use for photos you want to shoot, let today’s photography cheat sheet serve as your quick reference.
We’ve been sharing a lot of tips about camera settings as of late, especially aperture. As one of the components of the Exposure Triangle, the aperture is responsible for letting light into the camera. The lower the f-stop (also known as f-number), the larger the opening of lens, and the more light hits the camera sensor or film. However, that is just one of the things your aperture setting will do for your photos. Today’s featured photography cheat sheet provides yet another way for beginners to look at aperture: which one should you use to get the creative effects you need for your shot?
Not quite sure which aperture you need for the kind of photography or creative effect you want? The cheat sheet below, by travel and lifestyle photographer Peter Rickloff of Passports to Life, makes a quick guide for your next practice. Using a wider aperture will give you a brighter photo and a shallow depth of field, while a smaller aperture will give you a darker photo and a deeper depth of field. But, keeping those technical details in mind is just one part of working with aperture settings.
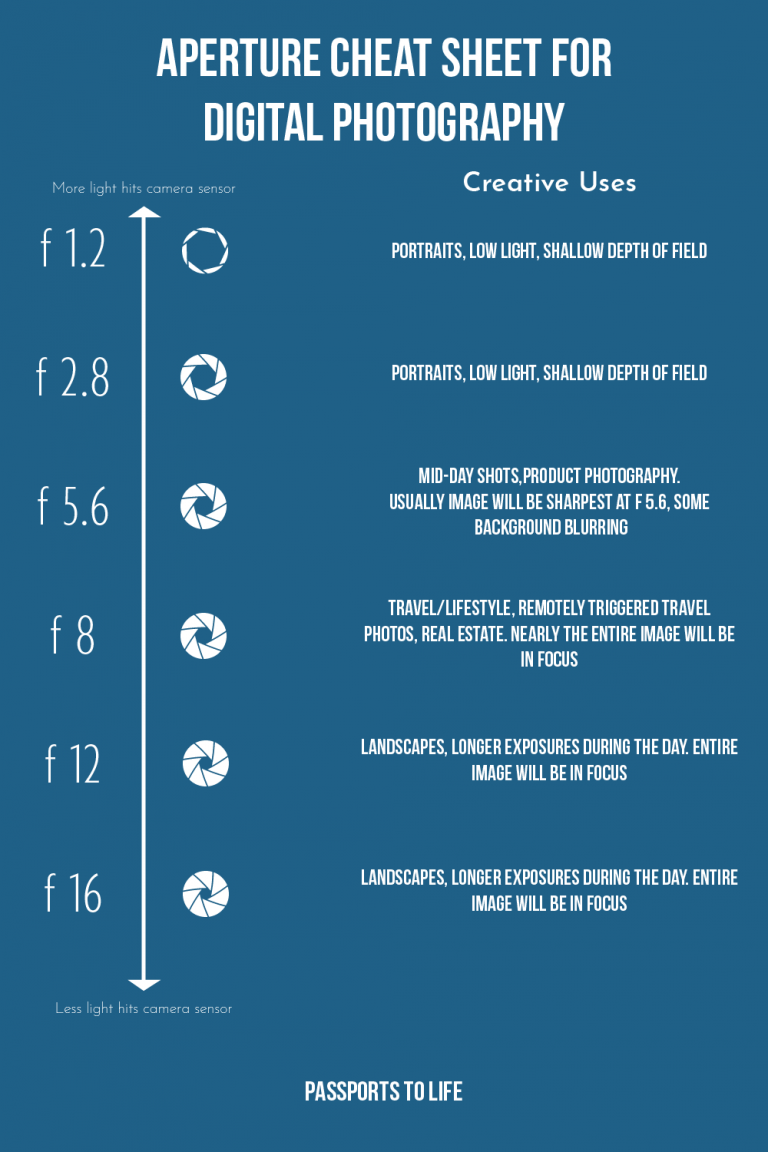
In the cheat sheet above, we are given a quick rundown of the commonly used aperture settings, what they do, and the creative uses for each. Consider it an application of the concepts you learned about how aperture works. For example, if you want to shoot portraits or you’re in low light, you’ll need the widest aperture your lens allows. Aside from letting more light in, you’ll also achieve gorgeous blurring or bokeh due to the shallow depth of field. For portraits, the best aperture settings are f1.2 to f2.8.
What if you want to shoot during a bright day but not out in the sun? What about still life photography or product photography? You can safely use f5.6 for these shots, since you’ll be able to achieve sharpness in a good portion of your frame but still retain some pleasant blurring in the background. It’s also one way to avoid overexposure when shooting in open shade which is especially useful for outdoor portraits.
Next, we go to the smaller aperture settings. Beginning at f8, everything in your scene will be in sharp focus due to the increased depth of field. This makes it a good setting to start with if you’re shooting travel or lifestyle images, real estate, and street photography: all these genres require or benefit from a deep depth of field. Many photographers throughout history consider this as the all-around aperture that never fails. Iconic photojournalist Arthur Fellig, best known through his pseudonym Weegee, coined the popular expression “f8 and be there” to stress the importance of seizing the opportunity to take a photo instead of dwelling on the technologies employed.
Lastly, what about really small apertures like f11 and f16? Since they provide extensive depth of field, they are your best bet for shooting landscapes, which require optimum sharpness throughout the frame. However, since these settings increase the exposure time (the Exposure Triangle states that you need a slow shutter speed to compensate for the small lens opening), you’ll need to prop your camera on a tripod to avoid camera shake.
If you liked today’s handy guide, we invite you to check out our growing collection of photography cheat sheets for more useful tips and tricks!
Get rid of the ads!
Did you enjoy reading this article as much as we enjoyed writing it? There's a way to support us and our reporting, getting ad-free navigation and more as a bonus. Subscribe to us for less than a coffee per month —just $3.99— or take advantage of our yearly subscription with a hefty discount for only $25.- An ad-free experience
- A free mystery box for Lightroom or Capture One
- All the books in our store
- 20% discount on Capture One
- 30% discount on Imalume Photo Theft Protection
- 20% off Herbs and Kettle Tea Company.
- 20% off your order from MPIX printing services.
- 5% off Viltrox Products via their eCommerce store.
- 10% off all film developing, printing and scanning services from Blue Moon Camera and Machine
- 15% off 7Artisans products: The lens and accessory maker is offering a sweet discount for Phoblographer's readers.