
Today’s featured photography cheat sheet is a different take on understanding the exposure elements and how you can use them to make your photos darker or brighter.
Still getting a grip on how to set your camera’s aperture, shutter speed, and ISO? Getting acquainted with the Exposure Triangle is one of the best and fundamental ways to understand how it all works and comes together to create proper exposures. Changing the value of one element often means you have to compensate the other two to maintain proper exposure. However, there’s another way to look at what these settings can do: using them to make your photos darker or brighter, especially when you’re mastering shooting in manual mode. Today’s photography cheat sheet is a quick reference you can use for your next practice.
The Idea of the Exposure Triangle
In case you’re not yet familiar with the Exposure Triangle, we suggest checking out this photography cheat sheet first. Essentially, it refers to the relationship between the aperture (the opening of your lens), shutter speed (how long the shutter remains open), and ISO (how dark or bright your image looks). The first course of action if you want to darken or brighten your shot would obviously be to decrease or increase the ISO. However, there will be instances when that won’t be the best course of action. Here’s where today’s featured photography cheat sheet by The Tripod Diaries comes in handy.
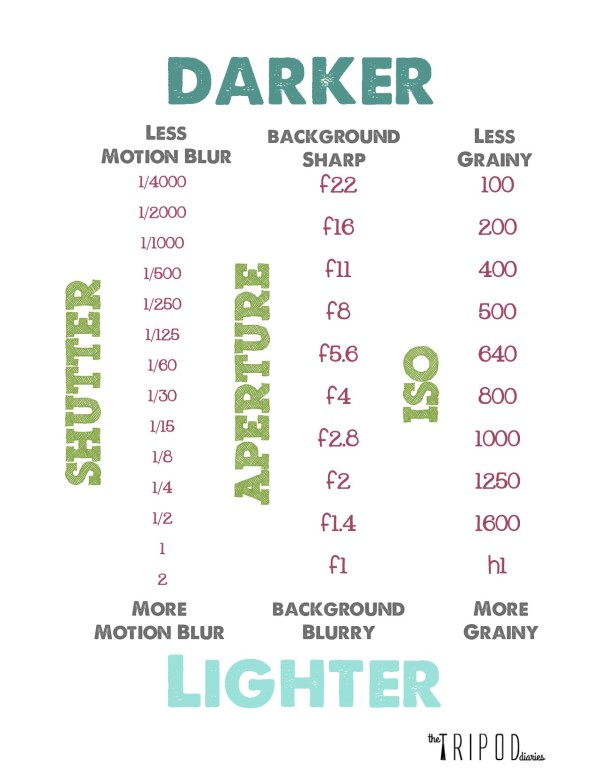
The guide above is arranged in such a way that setting a faster shutter speed, selecting a higher f-number (or smaller aperture), or decreasing the ISO will produce darker images. Conversely, going the other way will make the images brighter. However, we also see what else happens when we change the values of each element. Setting a faster shutter speed, for example, will let in less light but also freeze movement and minimize motion blur. Using a larger aperture/smaller f-number will make your image brighter, but will also make your background blurry. Choosing a higher ISO setting will also make your image brighter, but will also make it more grainy or noisy.
The Facts
What do all these facts tell you? There are three ways to make brighter or darker photos, but you also have to account for the other effects they make. You can also use these other effects to your advantage and get more creative results. For example, if you’re shooting landscape photos, you want to end up with a shot that is sharply focused from the foreground to the background. An aperture of f11 or f16 is usually great for this. Now, since you also want your photo to be as clear as possible, you have to set the ISO at 100. To compensate for all these settings, the only thing left is to use a slow shutter speed (like 1 or 2 seconds), which requires propping your camera on a tripod. You can make it brighter (overexpose) by increasing the shutter speed, or darker (underexpose) by decreasing the shutter speed. Since using a slower shutter speed blurs out movement, these camera settings will also capture bodies of water in your shot with a soft, misty effect.
These are just the basics of what you can do with the tips provided here. So feel free to experiment with different settings to get the effects and look you want, whatever the kind of photography you’re doing.
Don’t forget to check out our photography cheat sheet collection to find more that will come in handy for your next shoot and projects!
Get rid of the ads!
Did you enjoy reading this article as much as we enjoyed writing it? There's a way to support us and our reporting, getting ad-free navigation and more as a bonus. Subscribe to us for less than a coffee per month —just $3.99— or take advantage of our yearly subscription with a hefty discount for only $25.- An ad-free experience
- A free mystery box for Lightroom or Capture One
- All the books in our store
- 20% discount on Capture One
- 30% discount on Imalume Photo Theft Protection
- 20% off Herbs and Kettle Tea Company.
- 20% off your order from MPIX printing services.
- 5% off Viltrox Products via their eCommerce store.
- 10% off all film developing, printing and scanning services from Blue Moon Camera and Machine
- 15% off 7Artisans products: The lens and accessory maker is offering a sweet discount for Phoblographer's readers.