
Nikolai Nielsen’s passion for building his own cameras, including large format cameras, was something he discovered by accident.
Most photographers who build their own cameras, especially large format cameras, started out driven by an interest in traditional photographic processes. For South Africa-based Nikolai Nielsen, however, discovering camera building was a fortunate accident. Anyone who knew of his passions — mainly chemistry, pyrotechnics, and rocketry — would be surprised that he took up making cameras for what he calls “from scratch” photography. However, motivated by his DIY spirit and a chance event that introduced him to traditional photography, it was only a matter of time before he was building his own cameras.
Soon after we discovered his latest venture — a DIY large format camera — we couldn’t resist getting in touch with him to tell us more about the project, the challenges he encountered, and what he envisions for the next camera he will build. Oh, and he makes his own old school flash powder!
Phoblographer: Can you tell us what got you building a 4×5 large format camera from scratch?
Nikolai Nielsen: The single event that got me down this rabbit hole was my science teacher (and friend) giving me a little container with silver nitrate (a crucial photographic chemical) in exchange for some pyrotechnic mixtures I made for him so he could demonstrate the different flame colors of different chemicals to his class should he wish to. I knew what silver nitrate could be used for but wasn’t that interested in it right away so I sat on it for a few months.
I then started picking up interest in wet plate photography and started doing some intense research on the topic. In doing so, I found out about the silver gelatin process which saved on the very expensive silver nitrate and was much more efficient on materials. It also worked with modern black and white processing chemicals, and such, it was a much cheaper option for me. I then started intensely researching this process instead and got in contact with the Historic Processes Specialist at the Eastman Kodak Museum, and he has been very helpful in answering any questions I’ve had. I chat with him on a regular basis.
This was a few months before I was due to go to Denmark for five months for the purpose of getting permanent citizenship because my mother is Danish. I decided that I would hold off from buying anything until after the five months and see how much I still wanted to pursue this venture. In the meantime, I decided to try taking photos with a camera using the salted paper method which involves wiping salt solution onto paper, drying it in a darkened room, then wiping silver nitrate solution over it. This forms silver chloride on the paper which is sensitive to light and turns dark brown when exposed to light but rather slowly. I’d cut out pieces that would fit in the camera. On a bright sunny day, I could get a proper exposure in 6 hours. This is very similar to the first photographs ever taken using a process that was invented by Henry Fox Talbot in the 1800s.
Phoblographer: You mentioned in a Reddit thread that it’s the second camera you made and owned. How different is this to the first one you built?
Nielsen: The 4×5 camera is actually the second camera I made. The first one was what I used in the salted paper method. It was just an attachment for a cheap lens my dad remembered he had in the attic from 20 years ago. I made a mount for it by (with great effort) flattening a piece of PVC pipe and carefully cutting out the mount shape that corresponds to the lens’ mount. I then glued that to a cardboard tube that I had and cut to length, then made a slightly larger tube to slide over the first and held the viewing glass which was a sanded piece of glass cut into a circle.
While still at home before my trip to Denmark, I discovered that there was a camera shop in Copenhagen that had all sorts of lenses and equipment. At the time I was looking at Harman direct positive paper and this shop was listed as a shop that had it. Seeing as my birthday would happen while I was in Denmark, I decided to ask for a 4×5 lens as an early birthday present from my parents. I was to stay at a folk high school for five months and my mother and I got to Denmark a week before starting the semester, so in that time, we went to the shop and got the lens. For a while, I still used the camera mentioned above, then decided to build the 4×5 at the school because they had some woodworking power tools for their sustainable construction course.
The camera wasn’t really based on any camera in particular, it just needed to have a bellows, a place to hold the film, a film holder which I made myself, and a way to attach the lens in such a way it would be easy to remove again. Plus, a whole bunch of other small technical details.
Phoblographer: How long did it take to put everything together? What were the particular challenges or difficulties you had to work with?
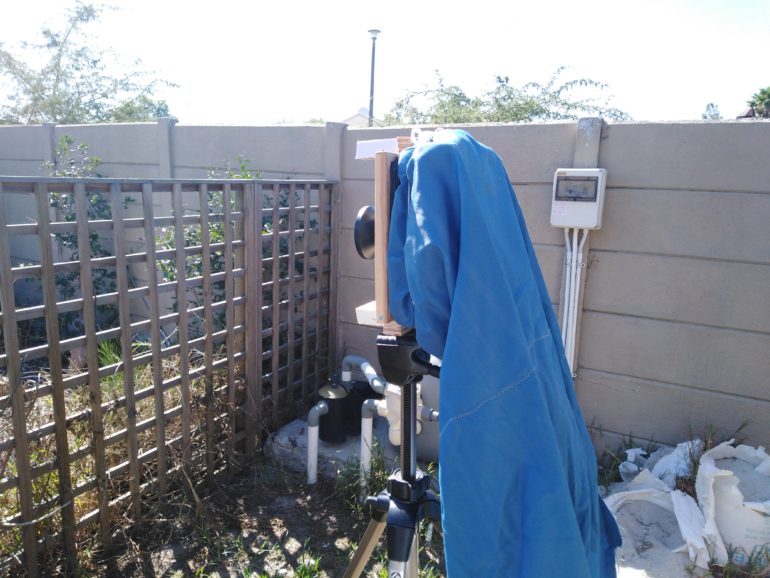
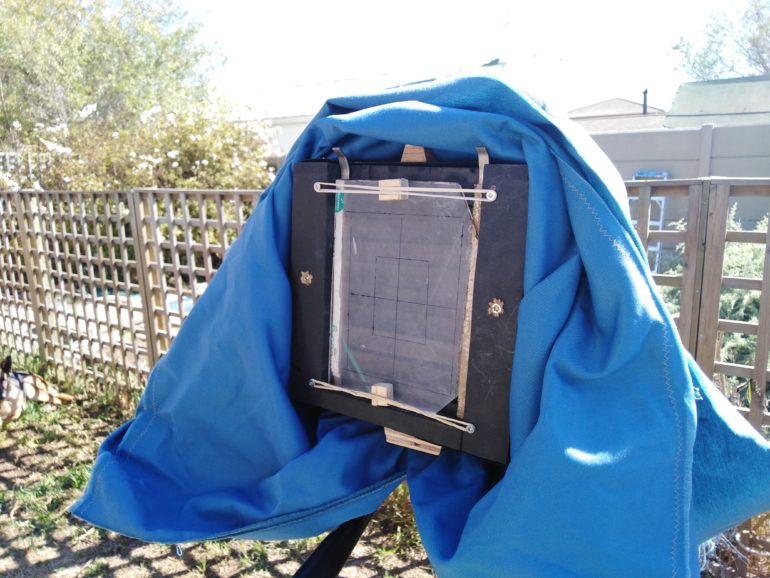
Nielsen: It took me about a week or so to build the 4×5 camera. To be honest, I really didn’t enjoy the process of building the camera because I ran into many issues and had a lot of troubleshooting to do before I could finish it. To start with, I was using a power tool called a router but its usually used while mounted to a table. This machine had didn’t have a table so it wasn’t very stable to use and I was in constant fear of losing fingers to this machine. I then had to do a lot of sanding of parts to make sure everything was flat. This made sure there won’t be gaps where light could get in and the focal plane was always in the same place. I then had to struggle with light proofing the camera, filling in any little gap with black paint.
Then, there was the viewing glass. Man, I broke a lot of glass trying to get to the size I needed. I also had to sand it to frost it which is a lot harder than one might think; glass is very hard. Not long after I made it, the glue let go of the glass in the frame. It fell on the ground, breaking it in half. I nearly cried. I just stopped what I was doing and went to sulk and watch TV for the rest of the day. I then gave up on the glass and stole a piece of clear acrylic from the art room and used that instead.
Phoblographer: Please tell us about the lens you equipped on this camera. Why did you choose this lens in particular? Do you have any other lenses in mind to try?
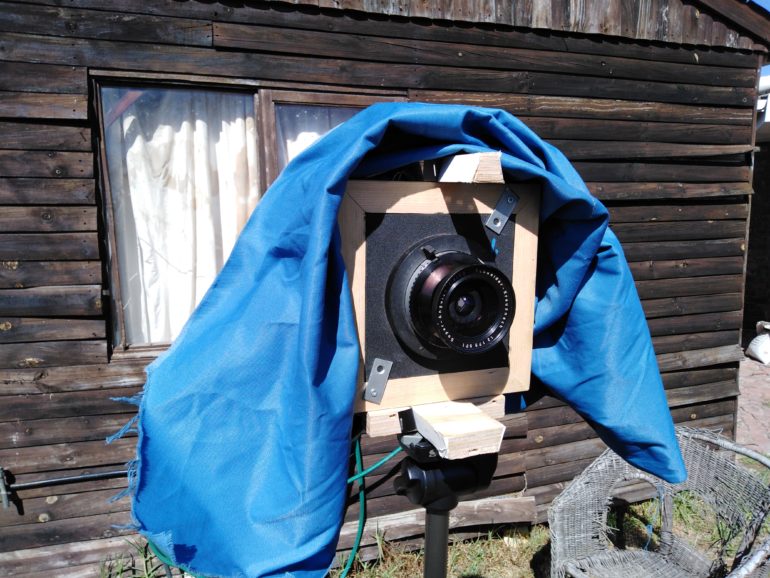
Nielsen: Honestly the only reason I chose that lens was because it fit my budget of 1,000 Danish Krone ($146) and it looked cool. At the time I didn’t know much about lenses. I learned the process of photography through this camera. I would really love to try any lens with a wider aperture and a shutter, but can’t because I don’t have pockets deep enough for one. I’ve been trying to use a homemade guillotine shutter but it’s hard to use it reliably because it has to be perfectly straight up and have no wind otherwise it can be slowed down and throw the shutter speed out. I started work on a spring-powered shutter but the lockdown is really hindering progress because I can’t get the parts I need.
Phoblographer: Are you thinking of any improvements to make to this camera? Is there anything you wish you’d have done differently?
Nielsen: Improvements? Hmm. There isn’t really anything I can think of to improve this camera. If anything I’d probably be better off building a new one, just with better materials and using the knowledge from the first to not make the same mistakes.
Phoblographer: Since you’d rather build a new camera instead of making minor improvements to the second camera you built, what kind of camera will you likely be building next? What features and materials would you include?
Nielsen: I would want to build one more similar to the camera above, which allows you to tilt the lens in multiple directions. This is only slightly doable in my camera in the up and down direction. The reason I’d rather build a new one is because of the way I built the camera. If I were to need to take it apart to add something, that would require partially destroying the part being worked, on which would be too much hassle. Making a completely new and improved one would be easier than botching and dealing with old problems in the first one. If I could, I would build the camera using laser-cut wood and plastic to be sure I have precision, which was hard to do when I built the camera by hand.
Phoblographer: Why do you continue to build your own 4×5 camera and choose to shoot with it despite all the advanced digital cameras today? What do you consider to be the charm of this traditional tool?
Nielsen: Honestly, it’s because digital is too easy with very little involvement; just click and bam, there is your perfectly exposed HD photo. With what I do it’s extremely involved and calculated. I source the chemicals, labor away at making the emulsion, I cut the plastic film, coat with emulsion in a darkroom, dry it, load it into the film holder, position the subject, focus the camera, set the exposure time, load the film holder, expose, develop it, dry it, print it, (if it’s worth printing) then post it on Instagram or something.


The charm for me is the pride in my work. I know I made it and nobody else had a hand in the result. I am a very DIY person so it’s just in my nature to want to do everything myself and not rely on commercial products as much as possible. It also saves money, which isn’t saying much because I’ve spent about 10,000 ZAR (South African Rand) towards this venture already.
Phoblographer: Lastly, do you have any tips for those interested in building their own 4×5 large format cameras from scratch?
Nielsen: I guess just do your homework. Know what you want and what your goals are. Try to work around what tools you have, or if you have the money for it, buy the tools you need.
Don’t forget to check out Nikolai Nielsen’s YouTube channel and Instagram to learn more about his DIY large format camera and other projects.
Get rid of the ads!
Did you enjoy reading this article as much as we enjoyed writing it? There's a way to support us and our reporting, getting ad-free navigation and more as a bonus. Subscribe to us for less than a coffee per month —just $3.99— or take advantage of our yearly subscription with a hefty discount for only $25.- An ad-free experience
- A free mystery box for Lightroom or Capture One
- All the books in our store
- 20% discount on Capture One
- 30% discount on Imalume Photo Theft Protection
- 20% off Herbs and Kettle Tea Company.
- 20% off your order from MPIX printing services.
- 5% off Viltrox Products via their eCommerce store.
- 10% off all film developing, printing and scanning services from Blue Moon Camera and Machine
- 15% off 7Artisans products: The lens and accessory maker is offering a sweet discount for Phoblographer's readers.