
There’s more to getting great architectural snaps than pointing a camera at a building, as today’s photography cheat sheet tells us!
If architectural photography is becoming your passion, we have another photography cheat sheet to help you master the craft. Previously, we shared some useful tips for eye-catching compositions. Once you’ve figured out how to use composition to either showcase the beauty of the buildings in their entirety or emphasize the impressive details, next is to make sure your exposures are spot on.
Exposing for the exteriors is precisely what the flowchart below by Digital Camera World takes care of. As with any photography genre, the histogram will be the guide for evaluating and fine-tuning your exposures for architectural exteriors.
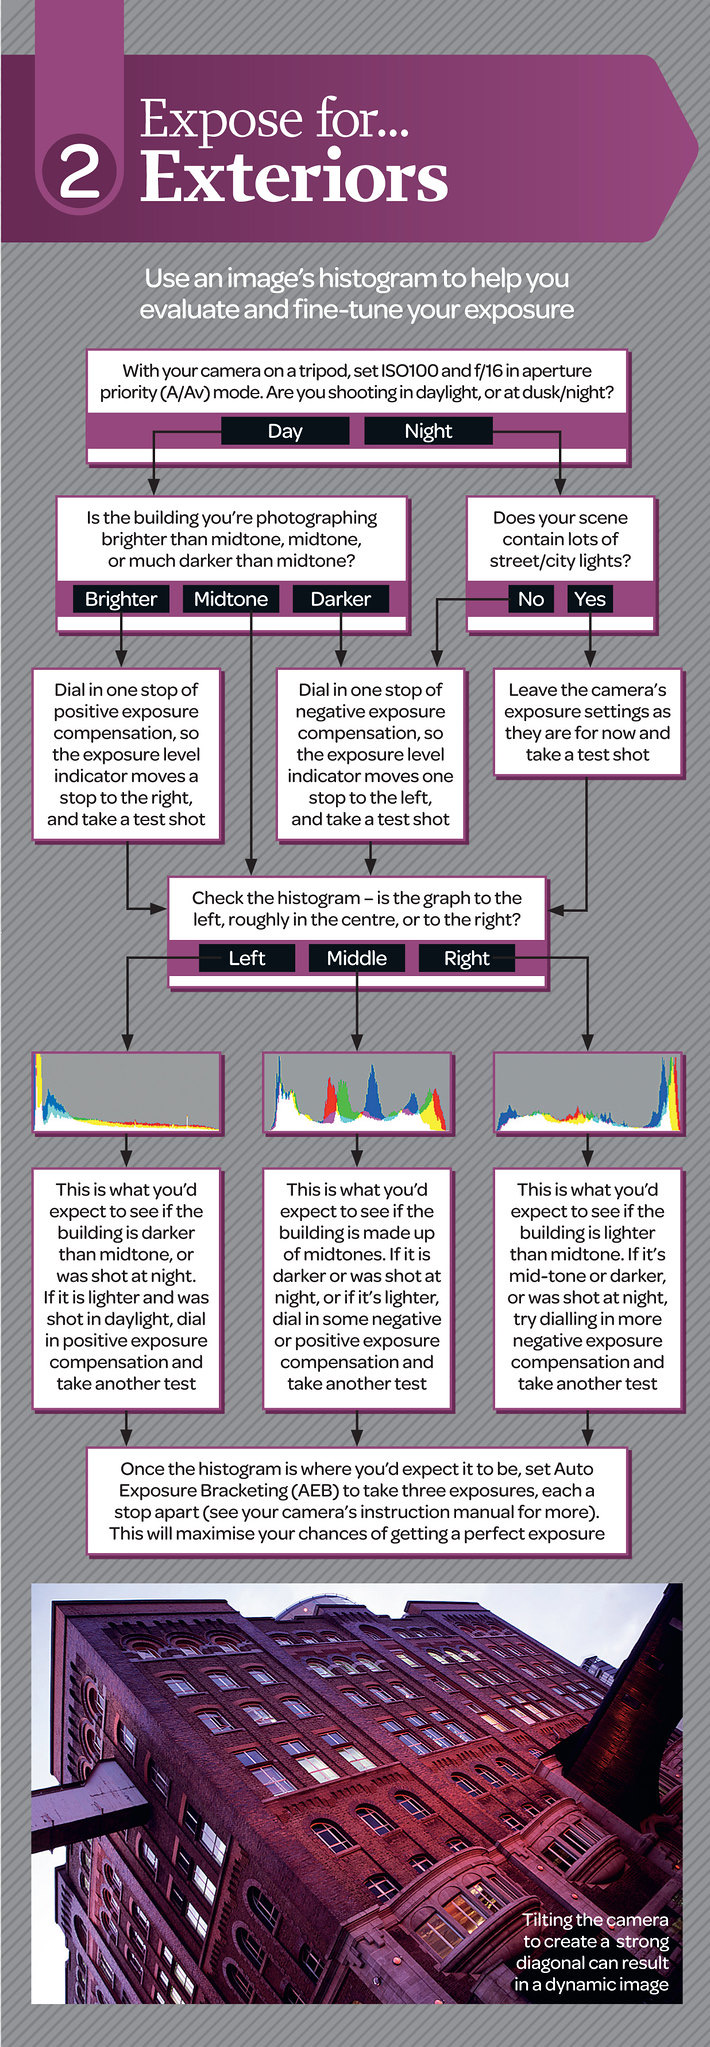
First, put your camera on a tripod and set it to Aperture Priority mode, with the aperture at f16 and the ISO at 100. If you’re shooting during the day, evaluate the scene and identify if the building is brighter, the same, or darker than the midtone. Following the flow chart, adjust to one stop of positive compensation if the building is brighter, or one stop of negative compensation if the building is darker. Take a test shot and check if the histogram graph is to the left, around the middle, or to the right, and adjust the exposure compensation as necessary.
If you’re shooting at night with many city lights, leave the settings as is and proceed to taking a test shot. Check the histogram as you would if you were taking a daytime shot, and adjust the exposure compensation as necessary as well.
Once the histogram is where it’s supposed to be, shoot with Auto Exposure Bracketing (AEB) to take three exposures, each a stop apart. This should increase your chances of getting a perfectly exposed shot.
Want more photography tips and tricks like this for your next shoot? We have loads more to check out from our photography cheat sheet collection!
Get rid of the ads!
Did you enjoy reading this article as much as we enjoyed writing it? There's a way to support us and our reporting, getting ad-free navigation and more as a bonus. Subscribe to us for less than a coffee per month —just $3.99— or take advantage of our yearly subscription with a hefty discount for only $25.- An ad-free experience
- A free mystery box for Lightroom or Capture One
- All the books in our store
- 20% discount on Capture One
- 30% discount on Imalume Photo Theft Protection
- 20% off Herbs and Kettle Tea Company.
- 20% off your order from MPIX printing services.
- 5% off Viltrox Products via their eCommerce store.
- 10% off all film developing, printing and scanning services from Blue Moon Camera and Machine
- 15% off 7Artisans products: The lens and accessory maker is offering a sweet discount for Phoblographer's readers.