
Last Updated on 01/11/2020 by Mark Beckenbach
Light up your macro photography like a pro with some tips from today’s featured photography cheat sheet!
As with all kinds of photography, lighting is a crucial part of a beautiful, well-exposed macro photo. Not only will it ensure your shots are sharp, but will also give them extra punch. With a handful of quick tips from today’s photography cheat sheet, you’ll be able to use effective lighting for macro photography in time for your next shoot!
The flowchart below is actually part of a series of cheat sheets that Digital Camera World put together for improving our macro photography. If you’ve already worked out the composition and gotten the hang of evaluating the exposure, it’s time for you to learn how to light your macro shots better by using a reflector or fill-flash.
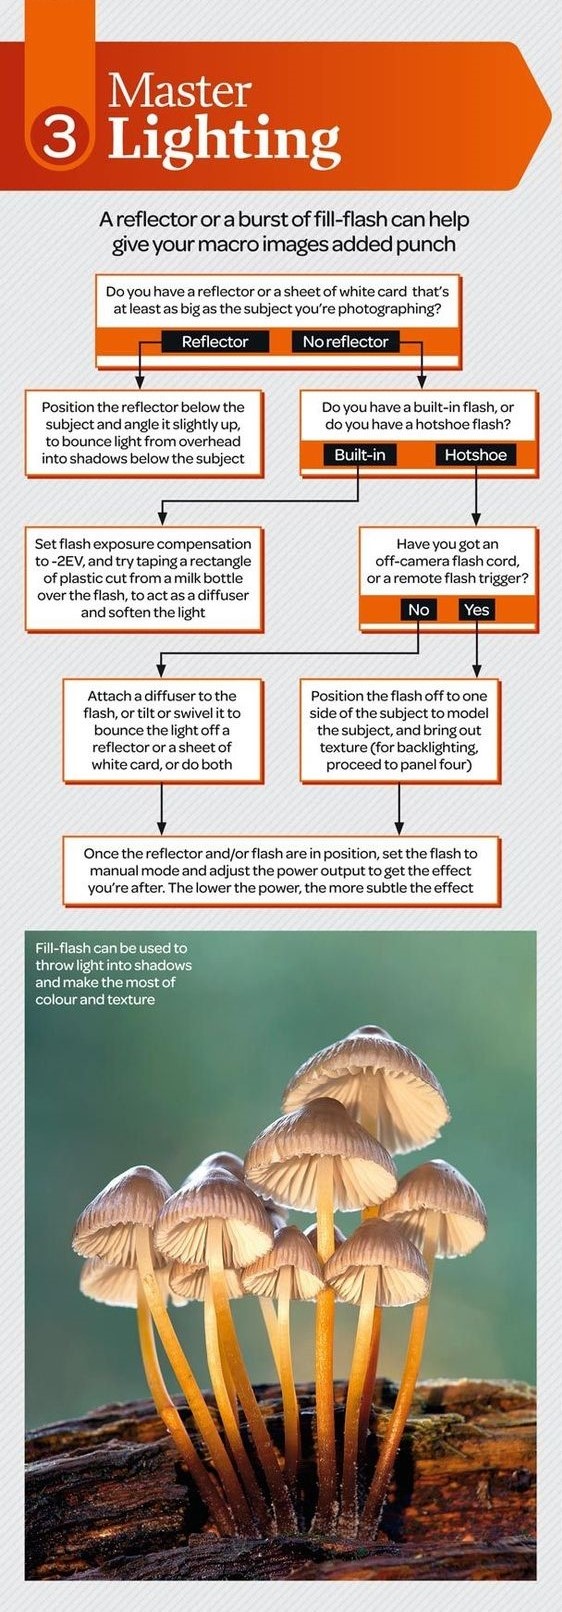
Let’s begin with the reflector route. If you have a reflector or a sheet of white card at least as big as your macro subject, position it below the subject and angle it slightly up. This will bounce the overhead light to the shadows below the subject, illuminating more of it and bringing out more of its textures.
If you don’t have a reflector or white card, you can go the fill-flash route using your camera’s built-in flash or a hotshoe flash. For the former, set the exposure compensation to -2 EV and, if you can, tape a piece of plastic from a white milk bottle over the flash to serve as a diffuser. For the latter, you’ll need a flash cord or a remote trigger so you can place the flash to one side of the subject to bring out the texture. If you want to experiment with some backlighting, check out this cheat sheet as well. If you don’t have any of these, attach a diffuser to the flash, or tilt it towards a reflector or white card to bounce light towards the subject. Once your setup is ready, set your flash to manual mode and adjust the power output as you see fit.
Looking for more photography tips and tricks to try for your next projects? Go ahead and check out our growing collection of photography cheat sheets!
Get rid of the ads!
Did you enjoy reading this article as much as we enjoyed writing it? There's a way to support us and our reporting, getting ad-free navigation and more as a bonus. Subscribe to us for less than a coffee per month —just $3.99— or take advantage of our yearly subscription with a hefty discount for only $25.- An ad-free experience
- A free mystery box for Lightroom or Capture One
- All the books in our store
- 20% discount on Capture One
- 30% discount on Imalume Photo Theft Protection
- 20% off Herbs and Kettle Tea Company.
- 20% off your order from MPIX printing services.
- 5% off Viltrox Products via their eCommerce store.
- 10% off all film developing, printing and scanning services from Blue Moon Camera and Machine
- 15% off 7Artisans products: The lens and accessory maker is offering a sweet discount for Phoblographer's readers.