
Struggling to get your exposure right when shooting macro? Today’s photography cheat sheet shows how to master exposure through the histogram.
As with any kind of photography, macro photography can benefit considerably from histogram readings. This tool will let you evaluate your exposure more accurately than you would from checking your camera screen. If you’ve yet to master using the histogram for macro shots, we have just the photography cheat sheet to get you started.
In the flowchart below, Digital Camera World outlines some histogram basics when composing your macro shots. As stressed by the cheat sheet, knowing how to read the histogram is crucial to getting spot-on exposures, and minimizes the corrections you have to do later in post. You may want to get more in-depth with this histogram cheat sheet later, but for now, let’s look at it from the perspective of macro photography.
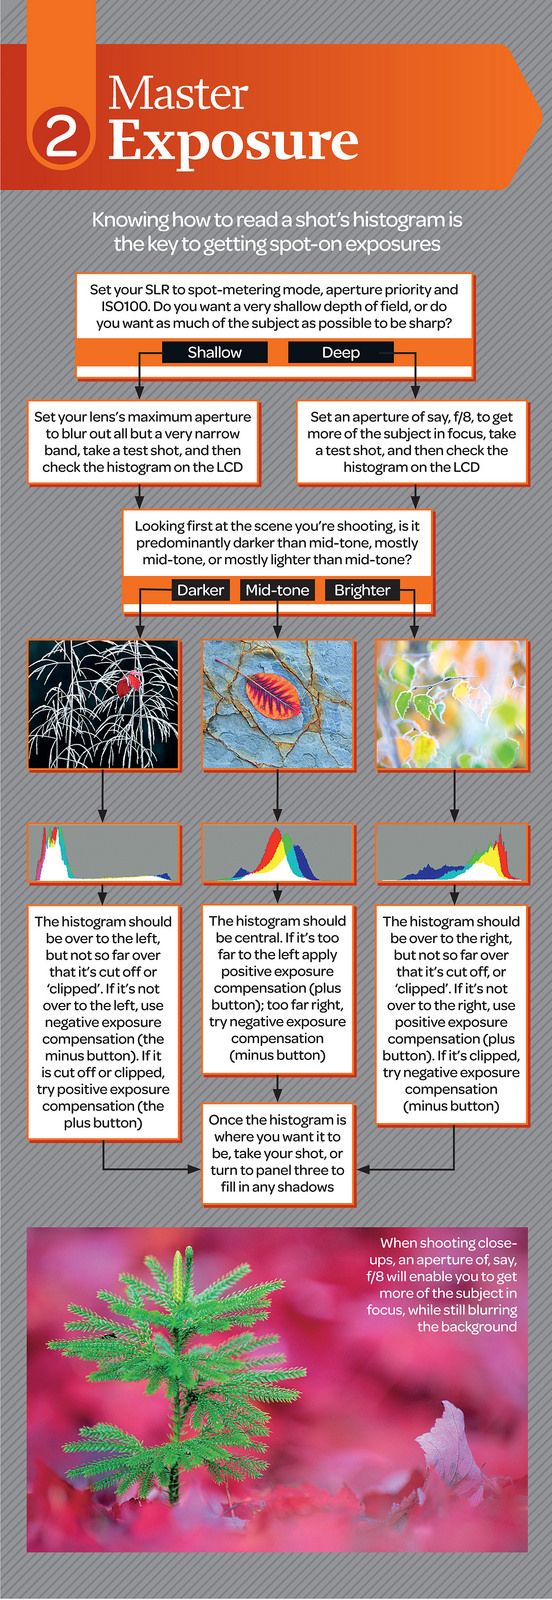
Since you’re shooting macro, set your camera to spot metering mode, aperture priority, and ISO 100. Decide on how much depth of field you want for the shot. Do you want to isolate the subject from the background with a very shallow depth of field, or do you want to keep as much of the subject as sharp as possible? For the former, set your lens to the widest aperture; for the latter, set your aperture to f8. Take a test shot and check the histogram. Compare it to the scene you’re shooting.
Use the visual guide provided in the cheat sheet as your reference on where the histogram should be (or how it should look like) based on the scene. If it is off to the left or right, or even clipped/cut off, use your camera’s exposure compensation to adjust it. Use negative compensation to darken (or move it to the left), and positive compensation to lighten (or move it to the right). Take your shot once the histogram is all set.
Need more tips and tricks for your next photography practice? We have more photography cheat sheets to check out!
Get rid of the ads!
Did you enjoy reading this article as much as we enjoyed writing it? There's a way to support us and our reporting, getting ad-free navigation and more as a bonus. Subscribe to us for less than a coffee per month —just $3.99— or take advantage of our yearly subscription with a hefty discount for only $25.- An ad-free experience
- A free mystery box for Lightroom or Capture One
- All the books in our store
- 20% discount on Capture One
- 30% discount on Imalume Photo Theft Protection
- 20% off Herbs and Kettle Tea Company.
- 20% off your order from MPIX printing services.
- 5% off Viltrox Products via their eCommerce store.
- 10% off all film developing, printing and scanning services from Blue Moon Camera and Machine
- 15% off 7Artisans products: The lens and accessory maker is offering a sweet discount for Phoblographer's readers.