
Still getting a grip on shutter speed and how it applies to different shooting situations? Today’s photography cheat sheet will serve as your handy visual guide.
One of the first important lessons you have to learn to take better photos is how shutter speed works and what its role is in creating a good exposure. If you’re still figuring it out and need a less technical resource to use as a reference, a visual guide might work better for you. And we bring exactly that for today’s photography cheat sheet.
The visual guide below is part of a shutter speed guide put together by Boost Your Photography. It’s one thing to tell beginners when they should use faster or slower shutter speed, and another to demonstrate what results they can get out of each stop. This is where a visual reference comes in handy.
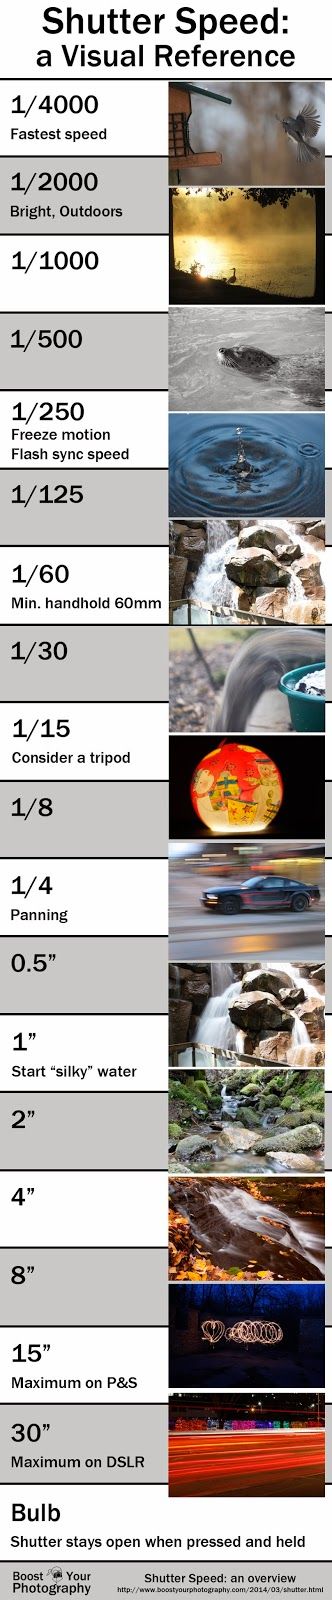
The photography cheat sheet lists some of the most commonly used shutter speeds, from 1/4000 of a second being the fastest to 30 seconds being the slowest. Each shutter speed value is halved to a unit called a stop, with each stop corresponding to the halving or doubling of light that reaches your camera sensor. Then, there’s also the Bulb setting, which allows you to keep the shutter open for as long as your shot requires (thus used for long exposures).
As we can also see in the chart, each shutter speed (or stop) corresponds to an ideal shooting situation. You’ve probably already learned that fast shutter speeds can freeze movement, and is the way to go when photographing fast-moving subjects, as the bird in flight shot demonstrates. You don’t always have to go as fast as 1/4000 sec: 1/250 sec or 1/500 sec is usually enough to freeze motion, depending on how fast your subject is moving.
If you’re shooting using flash, it’s also worth remembering that 1/250th is the flash sync speed for many cameras, meaning it’s the fastest speed that you can shoot with flash. Any faster and you’ll get a black bar across the top or bottom of your photo; this is actually your camera’s shutter captured in the shot as it opens to make the exposure.
Fast shutter speeds are also useful for other situations. A good example is shooting in a very bright outdoor setting where you need to cut down the light to avoid overexposure, as with a back-lit, silhouetted subject. The same goes for when you want to use a wide aperture to keep the depth of field shallow for nice bokeh shots.
At 1/60 sec, you have the minimum shutter speed that you can set for handheld shooting. Any slower and you’ll likely need to use a tripod if you want to keep your camera steady and avoid blurry or shaky photos. Slower shutter speeds also mean longer exposure times, which are actually handy for different creative shots that take advantage of motion blur. These include milky or silky shots of moving water, and light trails when shooting moving vehicles plowing busy streets at night.
Need more shutter speed cheat sheets? Here’s one about the right shutter speed for every situation and another for photographing moving subjects. Otherwise, go ahead and check out the rest of our photography cheat sheets so far!
Get rid of the ads!
Did you enjoy reading this article as much as we enjoyed writing it? There's a way to support us and our reporting, getting ad-free navigation and more as a bonus. Subscribe to us for less than a coffee per month —just $3.99— or take advantage of our yearly subscription with a hefty discount for only $25.- An ad-free experience
- A free mystery box for Lightroom or Capture One
- All the books in our store
- 20% discount on Capture One
- 30% discount on Imalume Photo Theft Protection
- 20% off Herbs and Kettle Tea Company.
- 20% off your order from MPIX printing services.
- 5% off Viltrox Products via their eCommerce store.
- 10% off all film developing, printing and scanning services from Blue Moon Camera and Machine
- 15% off 7Artisans products: The lens and accessory maker is offering a sweet discount for Phoblographer's readers.